2.3. Page Generation
The most basic type of HTTP servlet generates a full HTML page. Such a servlet has access to the same information usually sent to a CGI script, plus a bit more. A servlet that generates an HTML page can be used for all the tasks where CGI is used currently, such as for processing HTML forms, producing reports from a database, taking orders, checking identities, and so forth.
2.3.1. Writing Hello World
Example 2-1 shows an HTTP servlet that generates a complete HTML page. To keep things as simple as possible, this servlet just says "Hello World" every time it is accessed via a web browser.[1]
[1]Fun trivia: the first instance of a documented "Hello World" program appeared in A Tutorial Introduction to the Language B, written by Brian Kernighan in 1973. For those too young to remember, B was a pre-cursor to C. You can find more information on the B programming language and a link to the tutorial at http://cm.bell-labs.com/who/dmr/bintro.html.
Example 2-1. A servlet that prints "Hello World"
import java.io.*;
import javax.servlet.*;
import javax.servlet.http.*;

public class HelloWorld extends HttpServlet {

  public void doGet(HttpServletRequest req, HttpServletResponse res)
                               throws ServletException, IOException {

    res.setContentType("text/html");
    PrintWriter out = res.getWriter();

    out.println("<HTML>");
    out.println("<HEAD><TITLE>Hello World</TITLE></HEAD>");
    out.println("<BODY>");
    out.println("<BIG>Hello World</BIG>");
    out.println("</BODY></HTML>");
  }
}
This servlet extends the HttpServlet class and overrides the doGet() method inherited from it. Each time the web server receives a GET request for this servlet, the server invokes this doGet() method, passing it an HttpServletRequest object and an HttpServletResponse object.
The HttpServletRequest represents the client's request. This object gives a servlet access to information about the client, the parameters for this request, the HTTP headers passed along with the request, and so forth. Chapter 4, "Retrieving Information" explains the full capabilities of the request object. For this example, we can completely ignore it. After all, this servlet is going to say "Hello World" no matter what the request!
The HttpServletResponse represents the servlet's response. A servlet can use this object to return data to the client. This data can be of any content type, though the type should be specified as part of the response. A servlet can also use this object to set HTTP response headers. Chapter 5, "Sending HTML Information" and Chapter 6, "Sending Multimedia Content", explain everything a servlet can do as part of its response.
Our servlet first uses the setContentType() method of the response object to set the content type of its response to "text/html", the standard MIME content type for HTML pages. Then, it uses the getWriter() method to retrieve a PrintWriter , the international-friendly counterpart to a PrintStream. PrintWriter converts Java's Unicode characters to a locale-specific encoding. For an English locale, it behaves same as a PrintStream. Finally, the servlet uses this PrintWriter to send its "Hello World" HTML to the client.
That's it! That's all the code needed to say hello to everyone who "surfs" to our servlet.
2.3.2. Running Hello World
When developing servlets you need two things: the Servlet API class files, which are used for compiling, and a servlet engine such as a web server, which is used for deployment. To obtain the Servlet API class files, you have several options:
-
Install the Java Servlet Development Kit (JSDK), available for free at http://java.sun.com/products/servlet/. JSDK Version 2.0 contains the class files for the Servlet API 2.0, along with their source code and a simple web server that acts as a servlet engine for HTTP servlets. It works with JDK 1.1 and later. (Note that the JSDK is the Servlet API reference implementation, and as such its version number determines the Servlet API version number.)
-
Install one of the many full-featured servlet engines, each of which typically bundles the Servlet API class files.
There are dozens of servlet engines available for servlet deployment, several of which are listed in Chapter 1, "Introduction". Why not use the servlet engine included in JSDK 2.0? Because that servlet engine is bare-bones simple. It implements the Servlet API 2.0 and nothing more. Features like robust session tracking, server-side includes, servlet chaining, and JavaServer Pages have been left out because they are technically not part of the Servlet API. For these features, you need to use a full-fledged servlet engine like the Java Web Server or one of its competitors.
So, what do we do with our code to make it run in a web server? Well, it depends on your web server. The examples in this book use Sun's Java Web Server 1.1.1, unofficially considered the reference implementation for how a web server should support servlets. It's free for educational use and has a 30-day trial period for all other use. You can download a copy from http://java.sun.com/products. The Java Web Server includes plenty of documentation explaining the use of the server, so while we discuss the general concepts involved with managing the server, we're leaving the details to Sun's documentation. If you choose to use another web server, these examples should work for you, but we cannot make any guarantees.
If you are using the Java Web Server, you should put the source code for the servlet in the server_root/servlets directory (where server_root is the directory where you installed your server). This is the standard location for servlet class files. Once you have the "Hello World" source code in the right location, you need to compile it. The standard javac compiler (or your favorite graphical Java development environment) can do the job. Just be sure you have the javax.servlet and javax.servlet.http packages in your classpath. With the Java Web Server, all you have to do is include server_root/lib/jws.jar (or a future equivalent) somewhere in your classpath.
Now that you have your first servlet compiled, there is nothing more to do but start your server and access the servlet! Starting the server is easy. Look for the httpd script (or httpd.exe program under Windows) in the server_root/bin directory. This should start your server if you're running under Solaris or Windows. On other operating systems, or if you want to use your own Java Runtime Environment (JRE), you'll need to use httpd.nojre. In the default configuration, the server listens on port 8080.
There are several ways to access a servlet. For this example, we'll do it by explicitly accessing a URL with /servlet/ prepended to the servlet's class name.[2] You can enter this URL in your favorite browser: http://server:8080/servlet/HelloWorld. Replace server with the name of your server machine or with localhost if the server is on your local machine. You should see a page similar to the one shown in Figure 2-3.
[2] Beware, servlets are placed in a servlets (plural) directory but are invoked with a servlet(singular) tag. If you think about it, this makes a certain amount of sense, as servlets go in the servlets directory while a single servlet is referenced with the servlet tag.

Figure 2-3. The Hello World servlet
If the servlet were part of a package, it would need to be placed in server_root/servlets/package/name and referred to with the URL http://server:8080/servlet/package.name.HelloWorld.
An alternate way to refer to a servlet is by its registered name. This does not have to be the same as its class name, although it can be. With the Java Web Server, you register servlets via the JavaServer Administration Tool, an administration applet that manages the server, usually available at http://server:9090/. Choose to manage the Web Service, go to the Servlets section, and then Add a new servlet. Here you can specify the name of the new servlet and the class associated with that name (on some servers the class can be an HTTP URL from which the servlet class file will be automatically loaded). If we choose the name "hi" for our HelloWorld servlet, we can then access it at the URL http://server:8080/servlet/hi. You may wonder why anyone would bother adding a servlet to her server. The short answer appropriate for Chapter 2, "HTTP Servlet Basics" is that it allows the server to remember things about the servlet and give it special treatment.
A third way to access a servlet is through a servlet alias. The URL of a servlet alias looks like any other URL. The only difference is that the server has been told that the URL should be handled by a particular servlet. For example, we can choose to have http://server:8080/hello.html invoke the HelloWorld servlet. Using aliases in this way can help hide a site's use of servlets; it lets a servlet seamlessly replace an existing page at any given URL. To create a servlet alias, choose to manage the Web Service, go to the Setup section, choose Servlet Aliases, and then Add the alias.
2.3.3. Handling Form Data
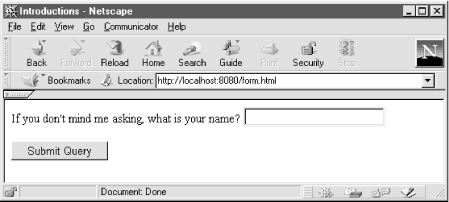
The "Hello World" servlet is not very exciting, so let's try something slightly more ambitious. This time we'll create a servlet that greets the user by name. It's not hard. First, we need an HTML form that asks the user for his or her name. The following page should suffice:
<HTML>
<HEAD>
<TITLE>Introductions</TITLE>
</HEAD>
<BODY>
<FORM METHOD=GET ACTION="/servlet/Hello">
If you don't mind me asking, what is your name?
<INPUT TYPE=TEXT NAME="name"><P>
<INPUT TYPE=SUBMIT>
</FORM>
</BODY>
</HTML>
Figure 2-4 shows how this page appears to the user.

Figure 2-4. An HTML form
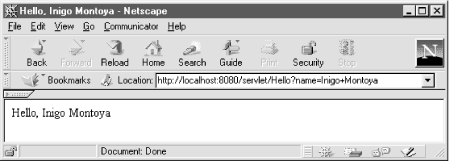
When the user submits this form, his name is sent to the Hello servlet because we've set the ACTION attribute to point to the servlet. The form is using the GET method, so any data is appended to the request URL as a query string. For example, if the user enters the name "Inigo Montoya," the request URL is http://server:8080/servlet/Hello?name=Inigo+Montoya. The space in the name is specially encoded as a plus sign by the browser because URLs cannot contain spaces.
A servlet's HttpServletRequest object gives it access to the form data in its query string. Example 2-2 shows a modified version of our Hello servlet that uses its request object to read the "name" parameter.
Example 2-2. A servlet that knows to whom it's saying hello
import java.io.*;
import javax.servlet.*;
import javax.servlet.http.*;

public class Hello extends HttpServlet {

  public void doGet(HttpServletRequest req, HttpServletResponse res)
                               throws ServletException, IOException {

    res.setContentType("text/html");
    PrintWriter out = res.getWriter();

    String name = req.getParameter("name");
    out.println("<HTML>");
    out.println("<HEAD><TITLE>Hello, " + name + "</TITLE></HEAD>");
    out.println("<BODY>");
    out.println("Hello, " + name);
    out.println("</BODY></HTML>");
  }

  public String getServletInfo() {
    return "A servlet that knows the name of the person to whom it's" +
           "saying hello";
  }
}
This servlet is nearly identical to the HelloWorld servlet. The most important change is that it now calls req.getParameter("name") to find out the name of the user and that it then prints this name instead of the harshly impersonal (not to mention overly broad) "World". The getParameter() method gives a servlet access to the parameters in its query string. It returns the parameter's decoded value or null if the parameter was not specified. If the parameter was sent but without a value, as in the case of an empty form field, getParameter() returns the empty string.
This servlet also adds a getServletInfo() method. A servlet can override this method to return descriptive information about itself, such as its purpose, author, version, and/or copyright. It's akin to an applet's getAppletInfo() . The method is used primarily for putting explanatory information into a web server administration tool. You'll notice we won't bother to include it in future examples because it is clutter for learning.
The servlet's output looks something like what is shown in Figure 2-5.

Figure 2-5. The Hello servlet using form data
2.3.4. Handling POST Requests
You've now seen two servlets that implement the doGet() method. Now let's change our Hello servlet so that it can handle POST requests as well. Because we want the same behavior with POST as we had for GET, we can simply dispatch all POST requests to the doGet() method with the following code:
public void doPost(HttpServletRequest req, HttpServletResponse res)
                              throws ServletException, IOException {
  doGet(req, res);
}
Now the Hello servlet can handle form submissions that use the POST method:
<FORM METHOD=POST ACTION="/servlet/Hello">
In general, it is best if a servlet implements either doGet() or doPost(). Deciding which to implement depends on what sort of requests the servlet needs to be able to handle, as discussed earlier. The code you write to implement the methods is almost identical. The major difference is that doPost() has the added ability to accept large amounts of input.
You may be wondering what would have happened had the Hello servlet been accessed with a POST request before we implemented doPost(). The default behavior inherited from HttpServlet for both doGet() and doPost() is to return an error to the client saying the requested URL does not support that method.
2.3.5. Handling HEAD Requests
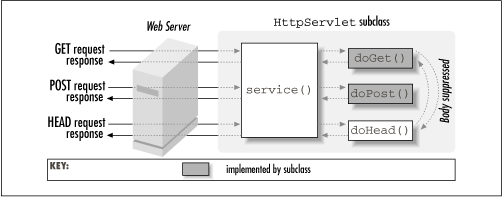
A bit of under-the-covers magic makes it trivial to handle HEAD requests (sent by a client when it wants to see only the headers of the response). There is no doHead() method to write. Any servlet that subclasses HttpServlet and implements the doGet() method automatically supports HEAD requests.
Here's how it works. The service() method of the HttpServlet identifies HEAD requests and treats them specially. It constructs a modified HttpServletResponse object and passes it, along with an unchanged request, to the doGet() method. The doGet() method proceeds as normal, but only the headers it sets are returned to the client. The special response object effectively suppresses all body output.[3]Figure 2-6 shows how an HTTP servlet handles HEAD requests.
[3] Jason is proud to report that Sun added this feature in response to comments he made during beta testing.

Figure 2-6. An HTTP servlet handling a HEAD request
Although this strategy is convenient, you can sometimes improve performance by detecting HEAD requests in the doGet() method, so that it can return early, before wasting cycles writing output that no one will see. Example 2-3 uses the request's getMethod() method to implement this strategy (more properly called a hack) in our Hello servlet.
Example 2-3. The Hello servlet modified to return quickly in response to HEAD requests
import java.io.*;
import javax.servlet.*;
import javax.servlet.http.*;

public class Hello extends HttpServlet {

  public void doGet(HttpServletRequest req, HttpServletResponse res)
                               throws ServletException, IOException {

    // Set the Content-Type header
    res.setContentType("text/html");

    // Return early if this is a HEAD
    if (req.getMethod().equals("HEAD")) return;

    // Proceed otherwise
    PrintWriter out = res.getWriter();
    String name = req.getParameter("name");
    out.println("<HTML>");
    out.println("<HEAD><TITLE>Hello, " + name + "</TITLE></HEAD>");
    out.println("<BODY>");
    out.println("Hello, " + name);
    out.println("</BODY></HTML>");
  }
}
Notice that we set the Content-Type header, even if we are dealing with a HEAD request. Headers such as these are returned to the client. Some header values, such as Content-Length, may not be available until the response has already been calculated. If you want to be accurate in returning these header values, the effectiveness of this shortcut is limited.
Make sure that you end the request handling with a return statement. Do not call System.exit(). If you do, you risk exiting the web server.

Copyright © 2001 O'Reilly & Associates. All rights reserved.


