| United States-English |
|
|
|
Ignite-UX Administration Guide: for HP-UX 11i > Chapter 3 Simple Network: Creating a Server for Registered ClientsConfiguring the Ignite-UX Server for PA-RISC Clients |
|
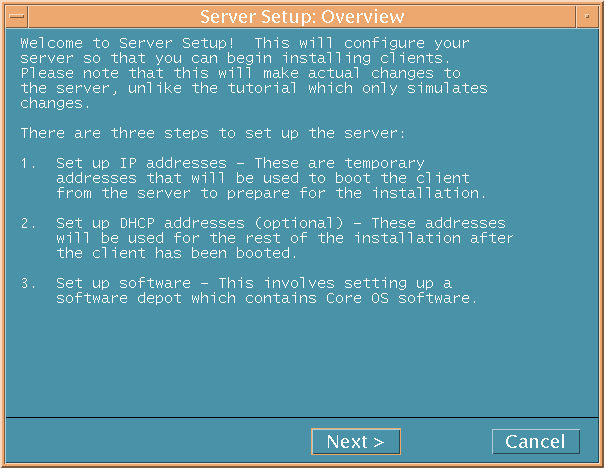
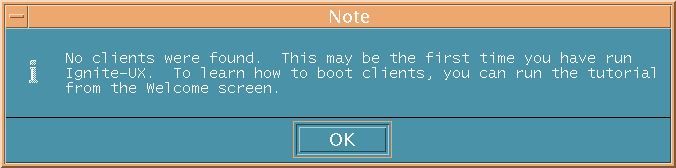
As superuser, start Ignite-UX by entering the following command: Because this is the first time Ignite-UX is launched, there are no clients and the message in Figure 3-1 appears. You must boot a client before it can be recognized and managed by Ignite-UX. Acknowledge the message by clicking OK. The Ignite-UX Welcome dialog box is displayed, as shown in Figure 3-2. To learn more about the Ignite-UX GUI now, click Tutorial and Demo... Once the Ignite server
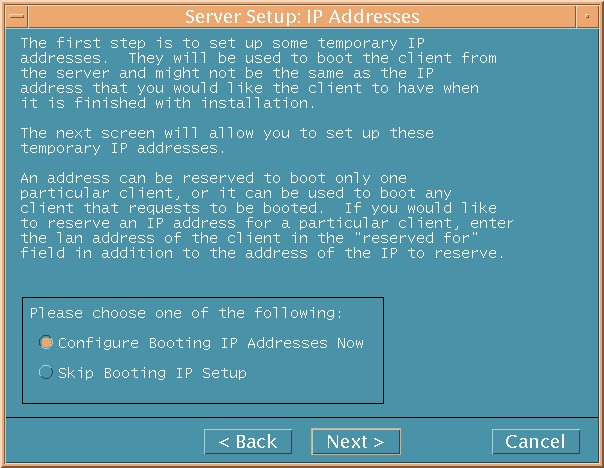
is configured, you can access the tutorial by selecting Actions To bypass this welcome the next time you start Ignite-UX, click the Do not show this screen again check box. To begin configuring your Ignite-UX server, click Server Setup... to launch the Server Setup Wizard, as shown in Figure 3-3. To set up an Ignite-UX server for PA-RISC clients, complete step 1 (Set up IP addresses), skip step 2 (Set up DHCP addresses), and complete step 3 (Set up software). Click Next to advance to the Server Setup: IP Addresses dialog box (Figure 3-4).
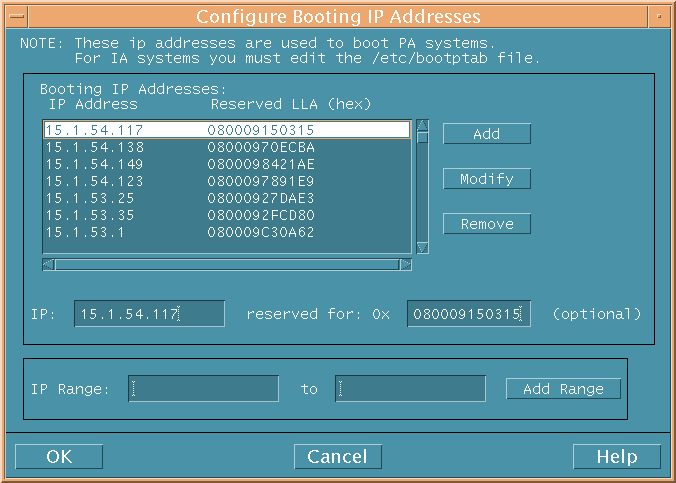
Select Configure Booting IP Addresses Now from the Server Setup: IP Addresses dialog box (Figure 3-4), then click Next to proceed to the Configure Booting IP Addresses dialog box shown in Figure 3-5. Use the Configure Booting IP Addresses dialog box to register client IP addresses with their physical MAC addresses. The IP addresses and corresponding reserved MAC addresses are read from the /etc/opt/ignite/instl_boottab file on the server to display in the Booting IP Addresses window. IP addresses with blank reserved MAC addresses are not currently reserved for any client. If you want to add a new IP address to reserve for a client, click in the IP text box and enter the IP address intended for your client. Then click in the reserved for: 0x text box and enter the client’s MAC address. Click Add to enter the IP address/MAC address pair into the Booting IP Addresses window. The MAC address given here must be the MAC address of the network interface to be used to boot the system over the network. If the IP address you want to reserve for a client is already listed in the Booting IP Addresses window, select that line. The IP address will appear in the IP text box, and the current MAC address it is reserved for, if there is one, will appear in the reserved for: 0x box. Enter the client MAC address in the reserved for: 0x box, then click Modify. The IP address will then appear in the Booting IP Addresses window with the client MAC you just entered. You can remove sets of IP addresses/MACs from the Booting IP Addresses window by selecting the line and then clicking Remove. Continue assigning IP addresses to clients’
MACs until all the clients to be booted from the Ignite-UX server
are registered. You can modify this information in the future by
editing the /etc/opt/ignite/instl_boottab file,
or via the Ignite-UX GUI under Options When you have completed registering clients, click OK to write the contents of the Booting IP Addresses window to the /etc/opt/ignite/instl_boottab file. Once you exit the Configure Booting IP Addresses dialog box, a registered client’s boot request is answered by instl_bootd, and the client will boot to the reserved IP address listed in the Booting IP Addresses window. After exiting the Configure Booting IP Addresses dialog box, the Server Setup: DHCP (optional) dialog box appears. Select Skip DHCP Setup, then click Next. A dialog box is displayed to tell you how to configure DHCP services later. Click OK. The Server Setup: Software Depot Setup dialog box is then displayed (Figure 3-6). Proceed to “Setting Up Software from OE Depots” to complete the Ignite-UX server setup. |
||||||||||||||||||||||||||||||||||||||||||||||||||||||||||||||||||||||
|
|||||||||||||||

 Run Tutorial/Server Setup