After determining that sufficient disk space exists and that
the target disk contains no data you want to keep, you are ready to
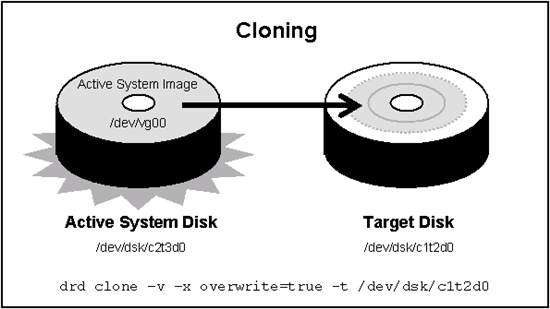
run the drd clone command. Figure 2-1 illustrates the content
of the active system disk and the clone target disk before cloning
happens.
Use the following command to clone the system image, substituting
your target disk identifier for the one shown in the command:
# /opt/drd/bin/drd clone -v -x overwrite=true -t /dev/dsk/c1t2d0 |
On HP-UX 11i v3 systems, you can also use the agile device file
to the target disk, substituting your target disk identifier for the
one shown in the following command:
# /opt/drd/bin/drd clone -v -x overwrite=true -t /dev/disk/disk10 |
The -x option lets you choose whether to overwrite
data on the target disk. The -x overwrite=true option
tells the command to overwrite any data on the disk. The -x
overwrite=false option tells the command not to write the
cloned image if the disk appears to contain LVM, VxVM, or boot records.
The default value is false.
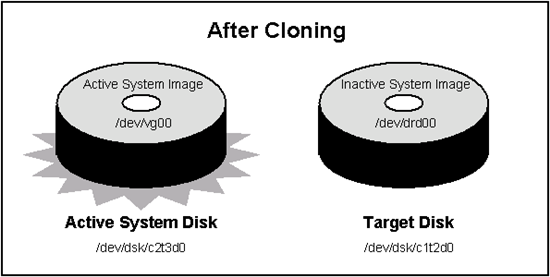
Cloning creates an inactive system image on the target disk
at /dev/dsk/c1t2d0. Figure 2-2 shows the active system image being cloned to the
target disk.
 |
| |
|
 | NOTE: The drd clone command does not write over
a disk that is part of the root volume. |
|
| |
|
The output you see as this command runs is similar to Example 2-7.
When you see the message, Copying
File Systems to New System Image, the active system image is being cloned. This operation can take
quite a while, and you see no more messages until the file systems
have been copied.
Example 2-7 The drd clone Command Output
=======  12/01/06 11:07:28 MST  BEGIN Clone System Image (user=root)
         (jobid=drdtest2)

       * Reading Current System Information
       * Selecting System Image To Clone
       * Selecting Target Disk
       * Selecting Volume Manager For New System Image
       * Analyzing For System Image Cloning
       * Creating New File Systems
       * Copying File Systems To New System Image
       * Making New System Image Bootable
       * Unmounting New System Image Clone
       * System image: "sysimage_001" on disk "/dev/dsk/c1t2d0"

=======  12/01/06 11:38:19 MST  END Clone System Image succeeded. (user=root)
         (jobid=drdtest2)
|
Figure 2-3 shows the
two disks after cloning. Both disks contain the system image. The
image on the target disk is the inactive system image.
The DRD clone operation will have some impact on the booted
system's I/O resources, particularly if the source disk is on the
same SCSI chain as the target disk. DRD's performance is similar to
system performance when using Ignite to create recovery images, which
many system administrators find acceptable.
After running drd clone, you have identical
system images on the system disk and the target disk. The image on
the system disk is the active system image. The image on the target
disk is the inactive system image.
The drd clone command returns the following
values:
0 Success
1 Error
2 Warning
For more details, you can examine messages written to the log
file at /var/opt/drd/drd.log.
Here is an example of creating a clone from a HP-UX 11i v3 system
to a storage area network (SAN) disk. First, Example 2-8 displays the
output of the following drd clone command:
# /opt/drd/bin/drd clone -t /dev/disk/disk14 -x overwrite=true |
Example 2-8 The drd clone Command Output for SAN Disk
=======  06/24/08 11:55:58 MDT  BEGIN Clone System Image (user=root)  (jobid=drdtest14)

       * Reading Current System Information
       * Selecting System Image To Clone
       * Selecting Target Disk
       * The disk "/dev/disk/disk14" contains data which will be overwritten.
       * Selecting Volume Manager For New System Image
       * Analyzing For System Image Cloning
       * Creating New File Systems
       * Copying File Systems To New System Image
       * Making New System Image Bootable
       * Unmounting New System Image Clone

======= 06/24/08 12:06:00 MDT END Clone System Image succeeded. (user=root) (jobid=drdtest14) |
Next, the drd status command is executed
to verify the clone disk and the original disk. Example 2-9 displays the
output of the following drd status command:
# /opt/drd/bin/drd status |
Example 2-9 The drd status Command Output for SAN Disk
=======  06/24/08 12:09:46 MDT  BEGIN Displaying DRD Clone Image Information (user=root)  (jobid=drdtest14)

       * Clone Disk:               /dev/disk/disk14
       * Clone EFI Partition:      AUTO file present, Boot loader present, SYSINFO.TXT not present
       * Clone Creation Date:      06/24/08 11:56:18 MDT
       * Clone Mirror Disk:        None
       * Mirror EFI Partition:     None
       * Original Disk:            /dev/disk/disk15
       * Original EFI Partition:   AUTO file present, Boot loader present, SYSINFO.TXT not present
       * Booted Disk:              Original Disk (/dev/disk/disk15)
       * Activated Disk:           Original Disk (/dev/disk/disk15)

======= 06/24/08 12:10:01 MDT END Displaying DRD Clone Image Information succeeded. (user=root) (jobid=drdtest14) |
|
| |
|
| NOTE: The elapsed time of the clone creation will vary, depending
on the size of the root disk, independent of whether it's going to
a SAN or an internal disk. |
|
| |
|