Jump to content United States-English
HP.com Home Products and Services Support and Drivers Solutions How to Buy
» Contact HP
More options
HP.com home
Software Distributor Administration Guide: HP-UX 11i v1, 11i v2, and 11i v3 > Chapter 3 Managing Installed Software

Removing Installed Software (swremove)

» 

Technical documentation

Complete book in PDF
» Feedback
Content starts here

 » Table of Contents

 » Glossary

 » Index

The swremove command removes software that has been installed on a host. Before its removal, the software is first unconfigured. swremove also removes software products that have been copied to a software depot.

swremove Features and Limitations

  • Removes files from the specified location. It removes symbolic links, but not the targets of symbolic links. It also lists busy files that were not removed.

  • Automatic use of dependencies to automatically select software on which to operate (in addition to any software you specify directly).

  • Ability to run control scripts as part of the removal:

    Unconfigure

    Undoes host configuration performed by configure scripts.

    Checkremove

    Analyzes each target to determine if removal and unconfiguration can take place. If this check fails, an object cannot be removed.

    Preremove

    Performs additional file operations, such as removing files created by a preinstall script.

    Postremove

    Performs additional remove operations (such as restoring "rollback" files) immediately after a fileset or product has been removed.

    For more information, see Chapter 11: “Using Control Scripts ”.

  • swremove does not perform automatic unconfiguration when you remove software from alternate roots.

Using the swremove GUI

This section provides an overview of the swremove GUI.

The swremove command behaves slightly differently when removing from primary root file systems, alternate root file systems, and depots. Interface changes for depot remove operations are summarized in “Removing Software from Depots”.

There are four steps in the removal process:

Table 3-8  GUI Removal Steps
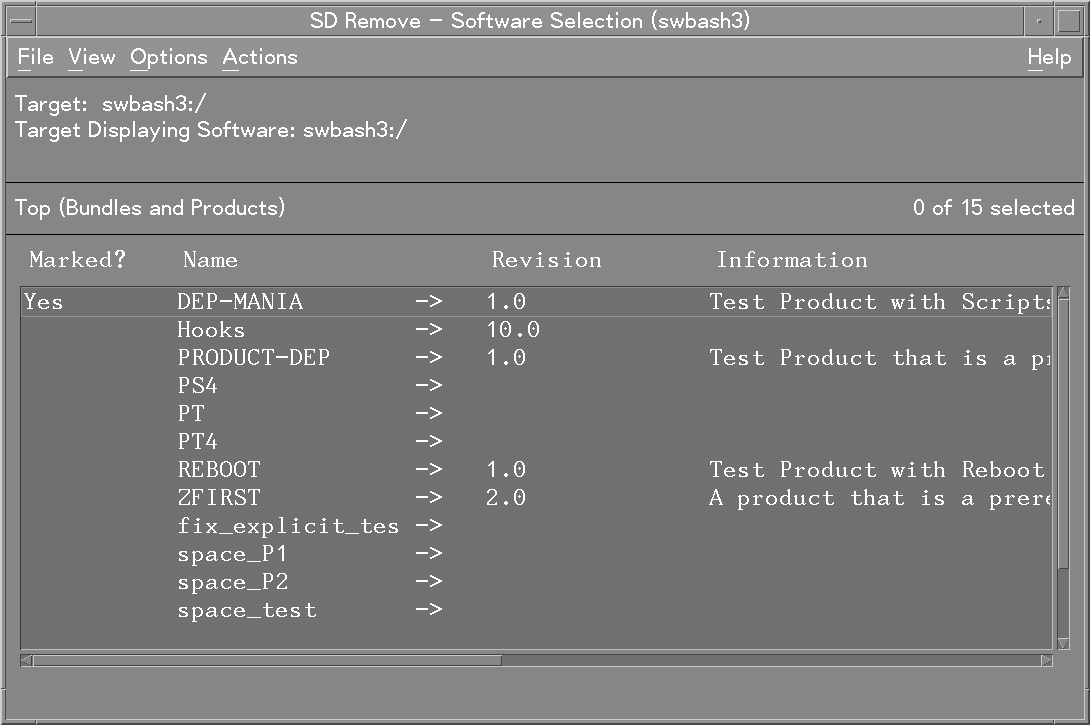
I. Start-Up

Start the swremove GUI.

II. Select Software

Choose the software to remove.

III. Analysis (Preview)

Analyze (preview) the removal to determine if the selected software can be successfully removed.

IV. Removal

Perform the actual removal.


Step I: Start-Up

To start the GUI or TUI for an removal session, type:

/usr/sbin/swremove

The GUI is automatically invoked unless you also specify software on the command line. To invoke the GUI and specify software, include the -i option. For example, to use the GUI for a preview (analysis only) session with BUNDLE1, type:

swremove -i -p /MyDepot/BUNDLE1

The Software Selection window appears.

Step II: Selecting Software

In this step, you use the Software Selection window to select the software you want to remove.
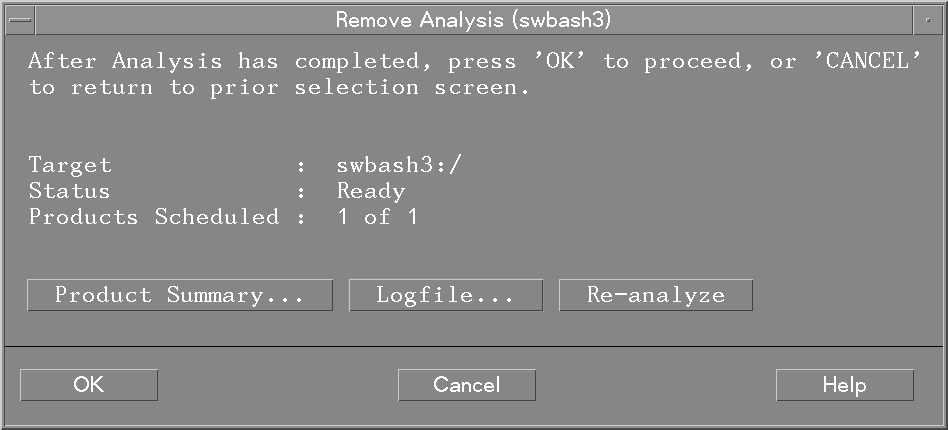
Figure 3-2 swremove Software Selection Window

swremove Software Selection Window
  1. Select software from the object list:

    1. Highlight an item

    2. Select Actions→Mark For Remove

      or

      Right-click to display the pop-up, then select Mark For Remove

    The Marked? flag in the object list changes to Yes to match your selection. (The flag Partial may appear if you select only some component of a software object.)

  2. (Optional) Use choices from the Actions menu to make additional software selections:

    • Change Target lets you select an alternate root from which to remove software.

    • Add Software Group lets you recall and re-use a group of previously saved software selections.

    • Save Software Group saves the current list of marked software as a group. SD stores the group definition in $HOME/.sw/software/ or a directory you specify.

    • Show Description of Software (available only for a single item highlighted in the object list) displays more information on the selected software.

  3. Select Actions→Install to start the analysis (preview) step. The Analysis dialog appears.

Step III: Analysis (Preview)

In this step, SD-UX analyzes the software you have selected.

The Remove Analysis dialog displays status information about the analysis process. When the analysis is complete and the host status shows Ready, click OK to start the actual installation (see “Step IV: Removal”). The Analysis dialog is then replaced by the Remove Window.

(If you started a preview session, the removal stops after the analysis. Clicking OK returns you to the Software Selection window.)

Figure 3-3 Remove Analysis dialog

Remove Analysis dialog

After analysis, if any of the selected software can be removed, the status indicates Ready or Ready with Warnings. If none of the selected software can be removed, the status indicates Excluded from task.

The Products Scheduled column shows the number of products ready for removal out of all products selected. The total products ready includes those products that are:

  • Marked because of dependencies

  • Marked inside of bundles

  • Partially and wholly marked

A product may be automatically excluded from the removal if an error occurs with that product. Removal cannot proceed if the host target is excluded from the removal. If the host fails the analysis, a warning dialog appears.

The following actions are also available:
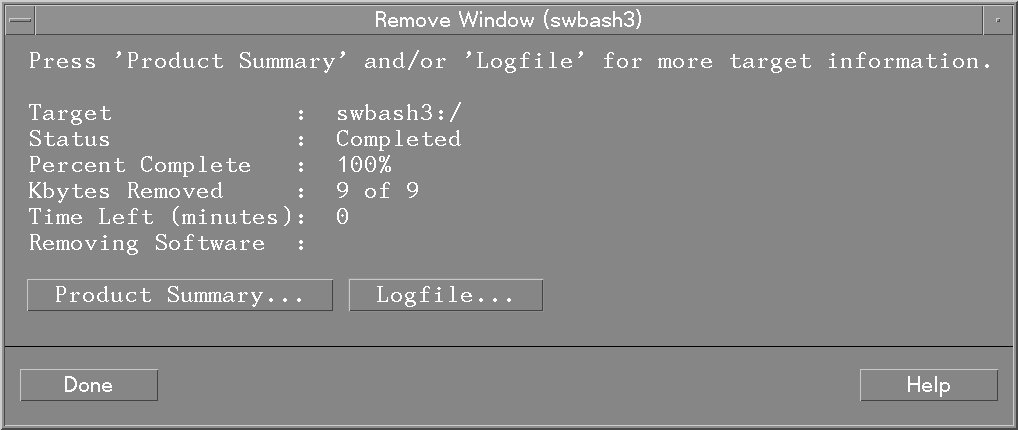
  • Product Summary gives additional information about the product or bundle and provides a Product Description button that displays information about additional information about dependencies, copyright, vendor, etc.

    The Projected Action column describes what type of removal is being done. The possible types are:

    Remove

    The product exists and will be removed.

    Filesets Not Found

    The system did not find the filesets as specified.

    Skipped

    The product will not be removed.

    Excluded

    The product will not be removed because of some analysis phase errors. See the logfile for details about the error.

    (The Product Summary List is not an object list. You cannot open the products, perform actions, or change the column view.)

  • Logfile presents a scrollable view of detailed removal information written to the logfile.

  • Re-analyze repeats the analysis process.

Step IV: Removal

In this step, SD-UX proceeds with the actual removal.

After you click OK in the Analysis window, SD-UX starts removal and displays the Remove Window (Figure 3-4: “Remove Window”,), which shows status information.

These action buttons are available:

  • Done returns you to the Software Selection Window. You can then begin another removal or exit the GUI (File→Exit).

  • Product Summary display removal and product information (name, revision, removal results, removal summary).

  • Logfile displays the logfile.

Figure 3-4 Remove Window

Remove Window

Removing with the Command Line

Syntax

swremove [XToolkit_Options] [-d|-r] [-i] [-p] [-v] [-C session_file] [-f software_file] [-Q date] [-s source] [-S session_file] [-t target_file] [-x option=value] [-X option_file] [software_selections] [@ target_selections]

Options and Operands

XToolkit_Options

X window options for the GUI. See “XToolkit Options and Changing Display Fonts ”.

-d

Operates on a depot rather than installed software. “Removing Software from Depots” for more information.

-i

Runs a GUI or TUI interactive session. Used to “pre-specify” software selections for use in the GUI/TUI.

-p

Preview a removal task by running it through the Analysis Phase and then exiting.

-r

Operate on an alternate root directory.

-v

Turn on verbose output to stdout and display all activity to the screen.

-C session_file

Run the command and save the current option and operand values to a session_file for re-use in another session. See “Session Files”.

-f software_file

Read a list of software selections from a separate file instead of (or in addition to) the command line. See “Software Files”.

-Q date

Schedules a job for the given date when remote operations are enabled. See “Scheduling Jobs from the Command Line” and Chapter 7: “Remote Operations Overview”

-S session_file

Run the command based on values saved from a previous removal session, as defined in session_file. See “Session Files”.

-t target_file

Read a list of target selections from a separate file instead of (or in addition to) the command line. See “Target Files”.

-x option=value

Sets a command option to value and overrides default values or a values in options files. See “Changing Command Options”.

-X option_file

Read session options and behaviors from option_file. See “Changing Command Options”.

software_selections

The software objects to be removed. See “Software Selections”.

target_selections

The target of the command. See “Target Selections”.

Changing Command Options

You can change the behavior of this command by specifying additional command-line options when you invoke the command (using the -xoption) or by reading predefined values from a file. The following table shows the defaults and options that apply to swremove.

Table 3-9 swremove Command Options and Default Values

  • admin_directory=/var/adm/sw

  • agent_auto_exit=true

  • agent_timeout_minutes=10000

  • auto_kernel_build=true

  • autoreboot=false

  • autoremove_job=false

  • autoselect_dependents=false

  • autoselect_reference_bundles= true

  • compress_index=false

  • controller_source=

  • distribution_target_directory= /var/spool/sw

  • enforce_dependencies=true

  • enforce_scripts=true

  • force_single_target=false

  • installed_software_catalog=products

  • job_title=

  • log_msgid=0

  • logdetail=false

  • logfile=/var/adm/sw/swremove.log

  • loglevel=1

  • mount_all_filesystems=true

  • polling_interval=2

  • preview=false

  • remove_empty_depot=true

  • remove_empty_depot_directory=false

  • reuse_short_job_numbers=true

  • rpc_binding_info=​ncacn_ip_tcp:[2121] ncadg_ip_udp:[2121]

  • rpc_timeout=5

  • run_as_superuser=true

  • run_scripts=true

  • select_local=true

  • software=

  • software_view=products

  • target_directory=

  • targets=

  • verbose=1

  • write_remote_files=false


For More Information

See Appendix A for complete descriptions of each default.

Remove Tasks and Examples

To remove a software product called MYSOFT from the default depot on the local host, type:

swremove -d MYSOFT

To preview the remove of the C and Pascal products installed at the local host:

swremove -p cc pascal

To remove a particular version of HP Omniback:

swremove Omniback,l=/opt/Omniback_v2.0

To remove the entire contents of a local depot:

swremove -d * @ /var/spool/sw

Removing Bundles

Removing a bundle does not always remove all filesets in that bundle. Because of SD-UX’s dependency management features, a fileset that is required by another bundle will not be removed. For example, if the bundles Pascal and FORTRAN both use the fileset Debugger.Run and you try to remove FORTRAN, the fileset Debugger.Run will not be removed because it is also used by the bundle Pascal. This prevents the removal of one bundle from inadvertently causing the removal of a fileset needed by another bundle.

Removing Patches

You cannot remove patch software unless:

  • Rollback files corresponding to the patch are available for re-installation.

or

  • The base software modified by the patch is removed at the same time. (Removing the base software also removes the patches associated with that software.)

For more information on removing patches, see Chapter 5: “HP-UX Patching and Patch Management”.

Removing Multiple Versions

The swremove GUI can help simplify removal of multiple versions of a product.

Each separate version of a product along with its location directory is listed in the object list. Selecting a multiple version implies a product:/location directory pair. By default, the location is not displayed in the Software Selection Window. It can be displayed using the GUI Columns Editor View→Columns... menu item and enabling the Product Directory menu item.

You can select more than one version of a product during the selection phase. During analysis, a warning is generated if the version of the product exists on the target but at a different location. If the product exists on the target, it will be removed. If it does not exist on the target, the product is simply skipped. The Product Summary... button in the Remove Analysis Window gives a product-by-product summary of what will be removed if the remove phase is started.

(Multiple versions of products are inherently possible in a depot. No special handling or checks are required when removing from depots.)

Removing Software from an Alternate Root

Software can be removed relative to the primary root directory (/) or relative to an alternate root directory. An alternate root is a non-root location that can function as the root of a stand-alone system; that is, a system that can be unmounted and function as a self-contained system. Any information files used in software removal are retrieved from the Installed Product Database (see “Installed Products Database ”) beneath this alternate root, not the IPD on the root volume.

Printable version
Privacy statement Using this site means you accept its terms Feedback to webmaster
© 1997, 2000-2003, 2006, 2007, 2008 Hewlett-Packard Development Company, L.P.