| United States-English |
|
|
|
HP-UX System Administrator's Guide: Overview: HP-UX 11i Version 3 > Chapter 3 Major Components of HP-UXStart-up and Shutdown |
|
Whenever you turn on (or reset) your computer, the hardware, firmware, and software must be initialized in a carefully orchestrated sequence of events known as the boot sequence. A similar sequence, known as the shutdown sequence, refers to the orderly sequence of steps needed to halt HP-UX. The shutdown sequence ensures all running processes are properly stopped and any data in memory that needs to be written to disk is not lost when the operating system is halted and power to the server is lost. When HP-UX (or any operating system) is up and running, it is said to be booted. When HP-UX is not running, it is said to be halted. HP-UX, like most Unix based operating systems, has several levels of the “booted” state known as run levels. As HP-UX starts up or shuts down, it transitions through the various run levels until it reaches its targeted run level. The various run levels determine what aspects of HP-UX are running. At boot time, a daemon known as init is started. Its primary role is to create processes from a script stored in the file/etc/inittab (see inittab(4)). The/etc/inittab file is one of the mechanisms used to configure what aspects of HP-UX are running at any given run level. The inittab file can also specify the initial run level that the system will boot to. The following list describes the general characteristics of each HP-UX run level:
In the past, much more of the system startup process was configured in the/etc/inittab file. Currently, most system services are started and stopped by the /sbin/rc daemon which is called by init each time you change the system run level. /sbin/rc (the “rc daemon”) performs the following actions:
Example 3-4 Run Level Transition Examples The following two examples show what happens during two typical situations:
The following commands can be used to set, change, and view HP-UX run levels:
HP-UX based systems go through the following sequential steps when you power them on or reset them:
For complete details on the HP-UX boot process and its possible variations, see HP-UX System Administrator’s Guide: Routine Management Tasks. “READY . . . SET . . . GO!” As with the famous phrase, there is a definite order that you should follow to shut down your system—or you may encounter problems. When shutting down an HP-UX system:
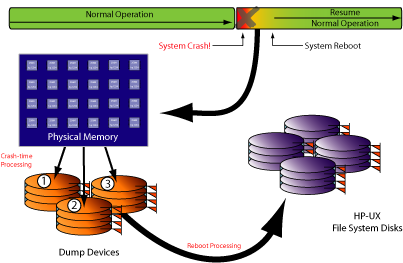
For details on the HP-UX shut down process, see HP-UX System Administrator’s Guide: Routine Management Tasks. When your system crashes, it is important to know why so that you can take actions to prevent it from happening again. Sometimes, it is easy to determine why: for example, if somebody trips over the cable connecting your computer to the disk containing your root file system (disconnecting the disk). At other times, the cause of the crash might not be so obvious. In extreme cases, you might want or need to analyze a snapshot of the computer’s memory at the time of the crash, or have HP do it for you, in order to determine the cause of the crash. When the system crashes, in order to preserve the evidence of what caused the crash, HP-UX tries to save the image of physical memory, or certain portions of it, to predefined locations called dump devices. When the system is subsequently rebooted, a special utility copies the memory image from the dump devices to the HP-UX file system area. When the memory image is in the HP-UX file system, you can analyze it with a debugger or save it to removable media for shipment to someone else for analysis. There are multiple ways that dump devices can be configured:
The dump process exists so that you have a way of capturing what your system was doing at the time of a crash. This is not for recovery purposes; processes cannot resume where they left off following a system crash. Rather, this is for analysis purposes in order to help you determine why the system crashed and hopefully prevent it from happening again. If you want to be able to capture the memory image of your system when a crash occurs (for later analysis), you need to define in advance the location(s) where HP-UX will put that image at the time of the crash. This location can be on local disk devices or logical volumes. Wherever you decide that HP-UX should put the dump, it is important to have enough space at the dump location (see “How Much Dump Space You Need”). If you do not have enough space, not every page selected to be dumped will be saved and you might not capture the part of memory that contains the instruction or data that caused the crash. If necessary, you can define more than one dump device so that if the first one fills up, the next one is used to continue the dumping process until the dump is complete or no more defined space is available. Beginning with HP-UX 11i version 3 you can even configure multiple dump devices to be written to in parallel (rather than one after the other), significantly cutting down dump times. To guarantee that you have enough dump space, define a dump area that is at least as big as your computer’s physical memory, plus one megabyte. If you are doing a selective dump (which is the default dump mode in most cases), much less dump space will actually be needed. Full dumps require dump space equal to the size of your computer’s memory plus a little extra for header information. In HP-UX Release 11i compressed dumps are enabled by default, however, dump compression will only occur if conditions in the crash environment are favorable. Do not plan your dump storage space based on potential compression; allow enough space for an uncompressed full or selective dump. For more information on compressed dumps, see “Compressed Dumps”. As computers continue to grow in speed and processing power, they also tend to grow in physical memory size. Where once a system with 256MB of memory was considered to be a huge system, today it is barely adequate for most tasks. Some of today’s HP-UX systems can have terabytes of memory. This is important to consider because the larger the size of your computer’s physical memory the longer it will take to dump its contents following a system crash (and the more disk space the dump will consume). Usually, when your system crashes it is important to get it back up and running as fast as possible. If your computer has a very large amount of memory, the time it takes to dump that memory to disk might be unacceptably long when you are trying to get the system back up quickly. And, if you happen to already know why the computer crashed (for example, if somebody accidently disconnected the wrong cable), there’s little or no need for a dump anyway. With HP-UX, a runtime dump subsystem gives you a lot more control over the dump process. With it you can override dump definitions configured into the kernel while the system is running. An operator at the system console can even override the runtime configuration as the system is crashing. You have control over the following crash dump features:
These capabilities give you a lot of flexibility, but you need to make some important decisions regarding how you will configure your system dumps. There are three main criteria to consider. Select which of these is most important to you and read the corresponding section. The criteria are: Use this section if your most important criterion is to get your system back up and running as soon as possible. The factors you have to consider here are: In addition to being able to choose “dump everything” or “dump nothing,” you have the ability to determine which classes of memory pages get dumped, allowing you to capture important memory structures without having to dump the whole contents of memory. You are reading this section because system recovery time is critical to you. Obviously, the fewer pages your system needs to dump to disk (and on reboot copy to the HP-UX file system area), the faster your system can be returned to service. Therefore, when system recovery time is critical avoid using the full dump option. When you define dump devices, whether in a kernel build or at run time, you can list which classes of memory must always get dumped and which classes of memory should not be dumped. If you leave both of these lists empty HP-UX will decide for you which parts of memory should be dumped based on what type of error occurred. In nearly all cases it is best to let HP-UX determine which pages to dump. Even if you have defined that you do not want a full dump to be performed, an operator at the system console at the time of a crash can override those definitions and request a full dump. Likewise, if at the time of a crash you know what caused it (and therefore do not need the system dump) but have previously defined a full or selective dump an operator at the system console at the time of a crash can override those definitions and request that no dump be performed. On servers with very large amounts of memory, the process of writing memory contents to disk can take a very long time. If you have multiple devices configured to receive the memory dump you can configure HP-UX to split the task of dumping memory and write to the multiple devices in parallel. This process is called dump concurrency and is configured using either the kernel tunable dump_concurrent_on (see dump_concurrent_on(5)), or the crash-processing configuration command crashconf (see crashconf(1M)). Following a system crash, the HP-UX operating system can use this feature to compress data from memory before it writes the data to the dump device. Compression decreases the volume of crash data, making the dump times faster. By reducing the time required to store the entire dump the recovery period is shorter and your system can be returned to service much sooner. Dump compression provides a greater time saving on systems that have large amounts of memory.
System dumps can be very large, so large that your ability to store them in your HP-UX file system area can be taxed. The boot time utility called savecrash can be configured (by editing the file /etc/rc.config.d/savecrash) to compress or not compress the data as it copies the memory image from the dump devices to the HP-UX file system area during the reboot process. This has system recovery time implications in that compressing the data can take longer if the saving occurs as foreground processing (for example, when HP-UX is trying to quickly evacuate a dump device that is also used for paging). So, if you have the disk space and require that your system be back up and running as quickly as possible, configure savecrash to not compress the data. It is possible to use a specific device for both paging (swap space) and as a dump device. However, if system recovery time is critical to you do not configure the primary paging device as a dump device. From the savecrash(1M) manpage:
Another advantage to keeping your paging and dump devices separate is that paging will not overwrite information stored on a dump device, no matter how long the system has been up or how much activity has taken place. Therefore, you can prevent savecrash processing at boot time (by editing the file /etc/rc.config.d/savecrash). This can save you a lot of time at boot time by allowing you to save the memory image after the server has been returned to service. After the server is up and running you can run savecrash manually to copy the memory image from the dump area to the HP-UX file system area. If a memory dump resides partially on dedicated dump devices and partially on devices that are also used for paging, you can choose to save (to the HP-UX file system) only those pages that are endangered by paging activity. Pages residing on the dedicated dump devices can remain there. If you know how to analyze memory dumps, it is even possible to analyze them directly from the dedicated dump devices using a debugger that supports this feature. Before sending your memory dump to someone else for analysis you must move the dumped pages from the dedicated dump devices to the HP-UX file system. You can then use a utility such as pax or tar to bundle them up for shipment. Use this section if your most important criterion is to make sure you capture the part of memory that contains the instruction or piece of data that caused crash. The factors you have to consider here are: You have chosen this section because it is critical to you to capture the specific instruction or piece of data that caused your system crash. The only way to guarantee that you have it is to capture everything. This means selecting to do a full dump of memory. Be aware, however, that this can be costly from both a time and a disk space perspective. From the time perspective, it can take quite a while to dump the entire contents of memory from an HP-UX instance using very large amounts of memory. It can take an additional large amount of time to copy that memory image to the HP-UX file system area during the reboot process. From the disk space perspective, if you have large amounts of memory (some HP-UX servers can have terabytes of memory), you will need an amount of dump area at least equal to the amount of memory in your system; and, depending on a number of factors, you will need additional disk space in your HP-UX file system area equaling the amount of physical memory in your system, in the worst case. You can configure HP-UX dump devices using one or more of the following methods:
Definitions at each of these places add to or replace any previous definitions from the other sources. However, consider the following situation: Example 3-5 Example of a Crash During the Very Early Stages of the Boot Process Consider a server that has ten gigabytes (10 GB) of physical memory. If you were to define system dump devices with a total of two gigabytes (2 GB) of space in the kernel file, and then define an additional nine gigabytes (9 GB) of disk space in the /etc/fstab file, you would have enough dump space to hold the entire memory image (a full dump) by the time the system was fully up and running. But, what if a crash occurs before /etc/fstab is processed? Only the amount of dump space already configured will be available at the time of the crash; in this example, two gigabytes of space. If it is critical to you to capture every byte of memory in all instances, including the early stages of the boot process, use crashconf with the -s option (which tells crashconf to retain dump device definitions across reboots) to define enough dump space in advance to account for this. crashconf is the preferred method for defining dump devices in HP-UX 11i version 3. It is possible to use a specific device for both paging purposes and as a dump device. But, if crash dump integrity is critical to you, this is not recommended. From the savecrash(1M) manpage:
So, if possible, avoid using a given device for both paging and dumping: particularly the primary paging device! HP-UX systems configured with small amounts of memory and using only the primary swap device as a dump device are in danger of not being able to preserve the dump (copy it to the HP-UX file system area) before paging activity destroys the data in the dump area. HP-UX systems configured with larger amounts of memory are less likely to need paging (swap) space during startup, and are therefore less likely to destroy a memory dump on the primary paging device before it can be copied. Use this section if you have very limited disk resources for the post-crash dump and/or the post-reboot save of the memory image to the HP-UX file system area. The factors you have to consider here are: You are reading this section because disk space is a limited resource on your server. Obviously, the fewer pages that you have to dump, the less space is required to hold them. Therefore, unless your server also has a small amount of physical memory, a full dump is not recommended. If disk space is very limited, you can always choose no dump at all. However, there is a happy medium, and it happens to be the default dump behavior, which is called a selective dump. HP-UX does a pretty good job of determining which pages of memory are the most critical for a given type of crash, and saves only those. By choosing this option, you can save a lot of disk space on your dump devices, and again later, in your HP-UX file system area. For instructions on how to do this, see HP-UX System Administrator’s Guide: Routine Management Tasks. Regardless of whether you choose to do a full or selective save, whatever is saved on the dump devices usually needs to be copied to your HP-UX file system area before you can use it. If the disk space shortage on your system is in the HP-UX file system area (not in the dump devices), you can choose to have savecrash (the boot time utility that does the copy) compress your data as it makes the copy. If you have plenty of dump device space but are limited on space in your HP-UX file system, you can use the -p option to the savecrash command. This command copies only those pages on dump devices that are endangered by paging activity (the pages residing on devices that are being used for both paging and dumping). Pages that are on dedicated dump devices are not copied.
The following resources have additional information on defining dump devices:
An HP-UX system crash (system panic) is an unusual event. When a panic occurs, it means that HP-UX encountered a condition that it did not know how to handle (or could not handle). Sometimes you know right away what caused the crash. Other times the cause is not readily apparent. It is for this reason that HP-UX is equipped with a dump procedure to capture the contents of memory at the time of the crash for later analysis.
Use the /sbin/crashconf command to configure these options. See the crashconf(1M) for details on how to configure the various options. When a HP-UX panics, the current dump control option settings are displayed at the system console during a crash. You then have 10 seconds to interact with the system console before the current settings are used to proceed with dump processing. If you choose to interact with the system during the 10-second override period, follow the on-screen prompts. You can choose to do the following:
After the operator is given a chance to override the current dump level, or the 10-second override period expires, HP-UX writes the physical memory contents to the dump devices until one of the following conditions is true:
Depending on the amount of memory being dumped, and a number of other factors, this process can take from a few seconds to hours. While the dump is in occurring, status messages on the system console indicate the dump’s progress. After the dumping of physical memory pages is complete, the system attempts to reboot (if the AUTOBOOT flag is set). For information on the AUTOBOOT flag, see HP-UX System Administrator’s Guide: Routine Management Tasks. You can define whether or not you want a process called savecrash to run as your system boots. This process copies (and optionally compresses) the memory image stored on the dump devices to the HP-UX file system area. Space permitting, you can store multiple crash dumps in the file system area in case there is more than one panic event. If you do not run savecrash during or shortly after boot, you risk only having the latest dump available, on the dump devices. By default, savecrash is enabled and performs its copy during the boot process. You can disable this operation by editing the /etc/rc.config.d/savecrash file, setting the SAVECRASH environment variable to a value of 0. This is generally safe to do if your dump devices are not also being used as paging devices. From the savecrash(1M) manpage:
The -r option to savecrash allows you to resave a crash that has already been marked as saved. If a save fails (or if only a partial save was made) due to lack of file system space, you have a chance, once the system is running again, to clean up the file system in order to gain the space you need for the savecrash operation; or you can run the savecrash command manually, specifying an alternate destination for the saved data.
After your system is rebooted, one of the first things you need to do is to be sure that the physical memory image that was dumped to the dump devices is copied to the HP-UX file system area so that you can either package it up and send it to an expert for analysis, or analyze it yourself using a debugger. Unless you specifically disable savecrash processing during reboot, the savecrash utility will copy the memory image for you during the reboot process. The default HP-UX directory that it will put the memory image in is /var/adm/crash. You can specify a different location by editing the file /etc/rc.config.d/savecrash and setting the environment variable called SAVECRASH_DIR to the name of the directory where you would like the dumps to be located. Just be sure the destination has enough disk space to hold the copied memory image. [7] Analyzing crash dumps is not a trivial task. It requires intimate knowledge of HP-UX internal structures and the use of debuggers. It is beyond the scope of this document to cover the actual analysis process. If you need help analyzing a crash dump, contact your HP representative. |
||||||||||||||||||||||||||||||||||||||||||||||||||||||||||||||||||||||||||||||||||||||||||||||||||||||||||||||||
|
|||||||||||||||