|
|

Product Numbers: BC-UAI-2SMFXLR, BC-UAI-4SMFXLR Doc Number: 54512-00
This document describes the following:
This document includes the following sections:
This section describes an overview of how to set up an IGX as a feeder node that uses an UXM feeder trunk. The feeder node can be connected to an IGX or a BPX/IMATM. In addition, the UXM interface type T1/E1, T3/E3, IMA T1/E1 and OC3 single-mode and multi-mode fiber can be used to connect an IGX feeder node to the IGX/BPX routing node. This document also describes how to set up HDM/LDM Control Lead Trap on HDM/LDM modules and basic information on the UAI 2 and 4 port OC-3c SMF XLR back card module.
An IMA lets you group physical T1 or E1 lines to form a logical trunk. System software lets you specify IMA so that one or more physical lines within the logical trunk can serve as backup if a line fails.
The switch software (SWSW) and firmware for the HDM/LDM Control Lead Trap feature provides capabilities to monitor all leads on high-speed HDM and low-speed LDM data modules for lead-state change. This feature also has the ability to trigger jobs such as up and down connections on different ports.
The following tables represent the legal minimum immunity requirements for ITE products to be sold into Europe after August 2001.
| Test | Applied to | Level | Immunity Criteria | Specification | Year | Comments |
|---|---|---|---|---|---|---|
Radiated Emissions | Enclosure | Class A/Class B | A | EN55022 | 1998 | Class A (other areas) Class B (Residential/Home) |
Conducted Emissions | AC Line | Class A/Class B | A | EN55022 | 1998 | Class A (other areas) Class B (Residential/Home) |
Conducted Emissions | Signal Line | Class A/Class B | A | EN55022 | 1998 | Class A (other areas) Class B (Residential/Home) |
Conducted Immunity (CW) | Mains Ports | 3V 1kHz 80% AM 0.15MHz-80MHz | A | EN61000-4-6 | 1996 | Spot frequency tests at 0.2, 1.2, 7.1, 13.56, 21, 27.12, and 68MHz |
Conducted Immunity (CW) | DC Ports | 3V 1kHz 80% AM 0.15MHz-80MHz | A | EN61000-4-6 | 1996 | Spot frequency tests at 0.2, 1.2, 7.1, 13.56, 21, 27.12, and 68MHz. Not applicable to equipment marketed with an external power convertor. Not applicable to DC lines within signal cables. |
Conducted Immunity (CW) | Signal Lines (all) | 3V 1kHz 80% AM 0.15MHz-80MHz | A | EN61000-4-6 | 1996 | Spot frequency tests at 0.2, 1.2, 7.1, 13.56, 21, 27.12, and 68MHz. Apply to lines supporting comms on cables >3m. |
Electrical Fast/Burst Transients | Mains Ports | 1000V (peak) 5 kHz Rep. freq. | B | EN61000-4-4 | 1995 |
|
Electrical Fast/Burst Transients | DC Ports | 500V (peak) 5 kHz Rep. freq. | B | EN61000-4-4 | 1995 | No applicale to equipment marketed with an external power converter. Not applicable to DC lines within signal cables. |
Electrical Fast/Burst Transients | Signal Lines (all) | 500V (peak) 5 kHz Rep. freq. | B | EN61000-4-4 | 1995 | Apply to lines supporting comms on cables >3m. |
Electro Static Discharge ESD | Enclosure | 4kV contact 8kV Air | B | EN61000-4-2 | 1995 | Based upon IEC801-2 (1991). Need to apply at least 200 discharges. |
Power Frequency Magnetic Field | Enclosure | 3A/m at 50Hz | A | EN61000-4-8 | 1994 | Must contain devices susceptibility to H-fields: VDUs, Microphones. VDU interference allowed above 1 A/m. |
Radiated Electric Field Immunity | Enclosure | 3V 1kHz 80% AM 80MHz-1000MHz | A | EN61000-4-3 | 1996 | Spot frequency tests at 80, 100, 120, 160, 230, 434, 460, 600, 863, 900 MHz. |
Surges Line to earth | Signal Lines excluding primary protection | 1500V 1.2/50 (8/20) | R | CCITT K series |
| Apply lines which will leave buildings: ISDN, telephone lines. Apply this level if the port does not include primary protection. |
Surges Line to earth | Signal Lines including primary protection | 4000V 1.2/50 (8/20) | R | CCITT K series |
| Apply lines which will leave buildings: ISDN, telephone lines. Apply this level if the port includes primary protection. |
Surges Line to earth | DC Ports | 500V 1.2/50 (8/20) | B | EN61000-4-5 | 1995 | Not applicable to equipment marketed with an external power convertor. Not applicable to DC lines within signal cables. |
Surges Line to earth | Mains Ports | 1000V 1.2/50 (8/20) | B | EN61000-4-5 | 1995 |
|
Voltage Interruptions/ Dips | Mains Ports | 30% reduction for 500ms | C | EN61000-4-11 | 1995 |
|
Voltage Interruptions/ Dips | Mains Ports | 95% reduction for 5000ms | C | EN61000-4-11 | 1995 |
|
Voltage Interruptions/ Dips | Mains Ports | 95% reduction for 10ms | B | EN61000-4-11 | 1995 |
|
Follow these guidelines to ensure general safety:
Safety warnings appear throughout this publication in procedures that, if performed incorrectly, might harm you. A warning symbol precedes each safety warning.
Waarschuwing Dit waarschuwingssymbool betekent gevaar. U verkeert in een situatie die lichamelijk letsel kan veroorzaken. Voordat u aan enige apparatuur gaat werken, dient u zich bewust te zijn van de bij elektrische schakelingen betrokken risico's en dient u op de hoogte te zijn van standaard maatregelen om ongelukken te voorkomen. Voor vertalingen van de waarschuwingen die in deze publicatie verschijnen, kunt u het document Regulatory Compliance and Safety Information (Informatie over naleving van veiligheids- en andere voorschriften) raadplegen dat bij dit toestel is ingesloten.
Varoitus Tämä varoitusmerkki merkitsee vaaraa. Olet tilanteessa, joka voi johtaa ruumiinvammaan. Ennen kuin työskentelet minkään laitteiston parissa, ota selvää sähkökytkentöihin liittyvistä vaaroista ja tavanomaisista onnettomuuksien ehkäisykeinoista. Tässä julkaisussa esiintyvien varoitusten käännökset löydät laitteen mukana olevasta Regulatory Compliance and Safety Information -kirjasesta (määräysten noudattaminen ja tietoa turvallisuudesta).
Attention Ce symbole d'avertissement indique un danger. Vous vous trouvez dans une situation pouvant causer des blessures ou des dommages corporels. Avant de travailler sur un équipement, soyez conscient des dangers posés par les circuits électriques et familiarisez-vous avec les procédures couramment utilisées pour éviter les accidents. Pour prendre connaissance des traductions d'avertissements figurant dans cette publication, consultez le document Regulatory Compliance and Safety Information (Conformité aux règlements et consignes de sécurité) qui accompagne cet appareil.
Warnung Dieses Warnsymbol bedeutet Gefahr. Sie befinden sich in einer Situation, die zu einer Körperverletzung führen könnte. Bevor Sie mit der Arbeit an irgendeinem Gerät beginnen, seien Sie sich der mit elektrischen Stromkreisen verbundenen Gefahren und der Standardpraktiken zur Vermeidung von Unfällen bewußt. Übersetzungen der in dieser Veröffentlichung enthaltenen Warnhinweise finden Sie im Dokument Regulatory Compliance and Safety Information (Informationen zu behördlichen Vorschriften und Sicherheit), das zusammen mit diesem Gerät geliefert wurde.
Avvertenza Questo simbolo di avvertenza indica un pericolo. La situazione potrebbe causare infortuni alle persone. Prima di lavorare su qualsiasi apparecchiatura, occorre conoscere i pericoli relativi ai circuiti elettrici ed essere al corrente delle pratiche standard per la prevenzione di incidenti. La traduzione delle avvertenze riportate in questa pubblicazione si trova nel documento Regulatory Compliance and Safety Information (Conformità alle norme e informazioni sulla sicurezza) che accompagna questo dispositivo.
Advarsel Dette varselsymbolet betyr fare. Du befinner deg i en situasjon som kan føre til personskade. Før du utfører arbeid på utstyr, må du vare oppmerksom på de faremomentene som elektriske kretser innebærer, samt gjøre deg kjent med vanlig praksis når det gjelder å unngå ulykker. Hvis du vil se oversettelser av de advarslene som finnes i denne publikasjonen, kan du se i dokumentet Regulatory Compliance and Safety Information (Overholdelse av forskrifter og sikkerhetsinformasjon) som ble levert med denne enheten.
Aviso Este símbolo de aviso indica perigo. Encontra-se numa situação que lhe poderá causar danos físicos. Antes de começar a trabalhar com qualquer equipamento, familiarize-se com os perigos relacionados com circuitos eléctricos, e com quaisquer práticas comuns que possam prevenir possíveis acidentes. Para ver as traduções dos avisos que constam desta publicação, consulte o documento Regulatory Compliance and Safety Information (Informação de Segurança e Disposições Reguladoras) que acompanha este dispositivo.
¡Advertencia! Este símbolo de aviso significa peligro. Existe riesgo para su integridad física. Antes de manipular cualquier equipo, considerar los riesgos que entraña la corriente eléctrica y familiarizarse con los procedimientos estándar de prevención de accidentes. Para ver una traducción de las advertencias que aparecen en esta publicación, consultar el documento titulado Regulatory Compliance and Safety Information (Información sobre seguridad y conformidad con las disposiciones reglamentarias) que se acompaña con este dispositivo.
Varning! Denna varningssymbol signalerar fara. Du befinner dig i en situation som kan leda till personskada. Innan du utför arbete på någon utrustning måste du vara medveten om farorna med elkretsar och känna till vanligt förfarande för att förebygga skador. Se förklaringar av de varningar som förkommer i denna publikation i dokumentet Regulatory Compliance and Safety Information (Efterrättelse av föreskrifter och säkerhetsinformation), vilket medföljer denna anordning.
 | Warning Before working on a chassis or working near power supplies, unplug the power cord on AC units; disconnect the power at the circuit breaker on DC units. |
| Warning Before working on a system that has an on/off switch, turn OFF the power and unplug the power cord. |
The following warning applies to routers with a DC power supply:
| Warning Before performing any of the following procedures, ensure that power is removed from the DC circuit. To ensure that all power is OFF, locate the circuit breaker on the panel board that services the DC circuit, switch the circuit breaker to the OFF position, and tape the switch handle of the circuit breaker in the OFF position. |
| Warning Ultimate disposal of this product should be handled according to all national laws and regulations. |
 | Caution To avoid damaging electrostatic discharge (ESD)-sensitive components, ensure that you have discharged all static electricity from your body before opening the chassis. |
| Warning The Ethernet 10BaseT, serial, console, and auxiliary ports contain safety extra-low voltage (SELV) circuits. BRI circuits are treated like telephone-network voltage (TNV) circuits. Avoid connecting SELV circuits to TNV circuits. |
| Warning Before working on equipment that is connected to power lines, remove jewelry (including rings, necklaces, and watches). Metal objects will heat up when connected to power and ground and can cause serious burns or weld the metal object to the terminals. |
Follow these guidelines when working on equipment powered by electricity:
Electrostatic discharge (ESD) can damage equipment and impair electrical circuitry. It occurs when electronic printed circuit cards are improperly handled and can result in complete or intermittent failures. Always follow ESD prevention procedures when removing and replacing cards. Ensure that the router chassis is electrically connected to earth ground. Wear an ESD-preventive wrist strap, ensuring that it makes good skin contact. Connect the clip to an unpainted surface of the chassis frame to safely channel unwanted ESD voltages to ground. To properly guard against ESD damage and shocks, the wrist strap and cord must be used correctly. If no wrist strap is available, ground yourself by touching the metal part of the chassis.
| Caution For safety, periodically check the resistance value of the antistatic strap, which should be between 1 and 10 megohms (Mohm). |
| Caution Before opening the chassis, be sure that you have discharged all static electricity from your body and the power is OFF. |
| Warning Before working on a chassis or working near power supplies, unplug the power cord on AC units; disconnect the power at the circuit breaker on DC units. |
This section describes how to configure an IGX as a feeder node that uses an UXM feeder trunk. The feeder node can be connected to an IGX or a BPX/IMATM. In addition, the UXM interface type T1/E1, T3/E3, IMA T1/E1 and OC3 single-mode and multi-mode fiber can be used to connect an IGX feeder node to the IGX/BPX routing node. For detailed information regarding the UXM, refer to the Cisco IGX 8400 Series Reference.
An IMA lets you group physical T1 or E1 lines to form a logical trunk. A logical trunk consisting of more than one T1 or E1 line supports connections with data rates that are much higher than the T1 or E1 rate. System software lets you specify IMA so that one or more physical lines within the logical trunk can serve as backup if a line fails. IMA characteristics are as follows:
To specify the range of ports for an IMA trunk, you can use either Cisco WAN Manager or the command-line interface (CLI). To define an IMA trunk on the CLI, use the uptrk command:
uptrk slot.start_port-end_port
For example, you could enter uptrk 8.1-4. Subsequently, you would refer to this logical trunk by using only the slot number and first port number—8.1 in this example—when you use other commands, such as addtrk, deltrk, cnftrk, and so on. Commands for viewing IMA information also include dspportstats, dspphyslns, dsptrkcnf, dspfdr, dspnode, and dspphyslnstathist.
The following card types are supported on the IGX feeder node feature:
The IMA feeder node feature provides redundancy in case one of the physical lines on an IMA trunk fails. This reduces the chance of a single point of failure when a single feeder trunk is out of service. In addition, this feature allows you to configure the services on a feeder node instead of a routing node.
Figure 1 shows an example of an IGX feeder topology.
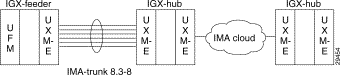
Currently supported on the IGX, a Service Expansion Shelf (SES) can function as a feeder node connected to an IGX routing node using a UXM OC-3 interface. The UXM feeder node feature adds the capability to support the UXM interface and the IGX as a feeder node. The routing node can be an IGX or a BPX/BXM-T3, BPX/BXM-E3, or BNI. The UXM interface type T1/E1, nxT1/E1, T3/E3, and OC-3, SMF/MMF Extra Long Reach can be used to connect an IGX feeder node to the IGX/BPX routing node.
To add the UXM feeder trunk, you can use either Cisco WAN Manager or the CLI. To define an IMA trunk on the CLI:
Step 1 Activate the trunk between the interface shelf and routing hub by specifying the primary link and the IMA group members of a UXM feeder trunk on an IGX routing node or an IGX feeder node. Enter:
uptrk slot.group-member(s)
Step 2 Use the cnftrk command to configure the activated UXM feeder trunk:
cnftrk slot.primary link
Step 3 Use the addshelf command to add the feeder trunk to an IGX routing node:
addshelf slot.primary link shelf type
For a summary of commands you use to bring up an IGX node, refer to the section "IGX Configuration Summary" in Cisco IGX 8400 Series Installation and Configuration.
When you configure an IMA trunk through Cisco WAN Manager or the cnftrk command, you enter the number of retained links. This represents the number of ports that must remain active for the IMA trunk itself to remain active. If a physical line goes out of service, but the number of active lines is at least as great as the retained links value, the IMA trunk remains active even though the node goes into major alarm. Also, the available load bandwidth is adjusted according to physical line status, so the switch does not reroute connections after a line failure unless the used bandwidth becomes greater than the available bandwidth.
In Figure 2, the number of retained links is set to 3. If line 1 fails for example, trunk 8.1-4 will continue functioning, however, the node will show major alarm due to the physical line failure.

The transmit and receive rate of an IMA trunk is the sum of all physical lines minus the IMA protocol overhead. The overhead for up to four lines is one DS0. Using the previous IMA trunk example, the maximum rates are as follows:
You could configure the line receive rate to be the maximum bandwidth allowed on this trunk:
You could configure the line transmit rate to be the maximum bandwidth allowed on this trunk:
However, if a physical line fails (and the number of retained links are still active), the switch adjusts the total bandwidth. Using the example IMA trunk consisting of four physical T1 lines:
Figure 3 shows an example of IMA protocol overhead. In the example, DS0 1 is reserved for an IMA group with 1 to 4 physical lines and DS0 2 is reserved for an IMA group with 5 to 8 physical lines.

To add links to an IMA group, you can use either Cisco WAN Manager or the CLI. To add a link to an IMA on the CLI:
Step 1 Find the nodes configured as trunks connected to the IMA feeder. Enter:
dsptrks
Step 2 Increase the IMA group members on both trunk and feeder nodes by manually entering the number of group members. Enter:
cnftrk slot.primary link
Step 3 Increase the receive rate using the DS0 calculation example in Figure 2 on both trunk and feeder nodes.
Step 4 Increase the number of retained links on both trunk and feeder nodes.
To remove links from an IMA group, you can use either Cisco WAN Manager or the CLI. To remove a link from an IMA group on the CLI:
Step 1 Find the nodes configured as trunks connected to the IMA feeder by using the dsptrks command.
Step 2 Reduce the number of retained links on the IMA feeder node.
Step 3 Reduce the receive rate using the DS-0 calculation example in Figure 2 on the IMA feeder node.
Step 4 Repeat steps 2 and 3 on the IMA trunk.
Step 5 Reduce the number of IMA group members on both trunk and feeder nodes by manually entering the number of group members. Enter:
cnftrk slot.primary link
Figure 4 shows an example of configuring a two-segment connection for IGX feeder node functionality.
Table 2 lists the corresponding routing and feeder endpoints with applicable gateway and load types and also connection types.
| Routing Endpoint A | Feeder Endpoint B | Connection Type | VCC or VPC | Gateway Type | Cell Routing | Load Type |
|---|---|---|---|---|---|---|
UXM | UXM | CBR | Both | GW_TYPE_NONE | True | CBR_LOAD |
BXM |
| RT-VBR |
| GW_TYPE_NONE | True | CBR_LOAD |
|
| NRT-VBR |
| GW_TYPE_NONE | True | VBR_LOAD |
|
| ABR.STD |
| GW_TYPE_NONE | True | ABR_LOAD |
|
| ABRFST |
| GW_TYPE_NONE | True | ABR_LOAD |
|
| UBR |
| GW_TYPE_NONE | True | UBR_LOAD |
UXM | UXM | ATFR | N/A | GW_TYPE_NWI | N/A | BDATA_LOAD |
BXM |
| ATFST |
| GW_TYPE_NWI | N/A | BDATB_LOAD |
UXM | UFM | ATFR | N/A | GW_TYPE_NWI | N/A | BDATA_LOAD |
| FRM | ATFST | N/A | GW_TYPE_NWI | N/A | BDATB_LOAD |
UFM | UFM | ATFR | N/A | GW_TYPE_NWI | N/A | BDATA_LOAD |
|
| ATFST | N/A | GW_TYPE_NWI | N/A | BDATB_LOAD |
|
| ATFX | N/A | GW_TYPE_SIWX | N/A | BDATA_LOAD |
|
| ATFXFST | N/A | GW_TYPE_SIWX | N/A | BDATB_LOAD |
|
| ATFT | N/A | GW_TYPE_SIWT | N/A | BDATA_LOAD |
|
| ATFTFST | N/A | GW_TYPE_SIWT | N/A | BDATB_LOAD |
FRM | FRM | ATFR | N/A | GW_TYPE_NWI | N/A | BDATA_LOAD |
Figure 5 shows an example of configuring a three-segment connection for IGX feeder node functionality.
Table 3 lists the corresponding feeder endpoints with applicable gateway and load types and connection types.
| Feeder Endpoint A | Feeder Endpoint B | Connection Type | VCC or VPC | Gateway Type | Cell Routing | Load Type |
|---|---|---|---|---|---|---|
UXM | UXM | CBR | Both | GW_TYPE_NONE | True | CBR_LOAD |
|
| RT-VBR |
| GW_TYPE_NONE | True | CBR_LOAD |
|
| NRT-VBR |
| GW_TYPE_NONE | True | VBR_LOAD |
|
| ABR.FST |
| GW_TYPE_NONE | True | ABR_LOAD |
|
| ABR.STD |
| GW_TYPE_NONE | True | ABR_LOAD |
|
| UBR |
| GW_TYPE_NONE | True | UBR_LOAD |
UXM | UXM | ATFR | Both | GW_TYPE_NWI | N/A | BDATA_LOAD |
UFM | UFM | ATFST |
| GW_TYPE_NWI | N/A | BDATB_LOAD |
|
| ATFX |
| GW_TYPE_SIWX | N/A | BDATA_LOAD |
|
| ATFXST |
| GW_TYPE_SIWX | N/A | BDATB_LOAD |
|
| ATFT |
| GW_TYPE_SIWT | N/A | BDATA_LOAD |
|
| ATFTST |
| GW_TYPE_SIWT | N/A | BDATB_LOAD |
UXM | UXM | ATFR | N/A | GW_TYPE_NWI | N/A | BDATA_LOAD |
FRM | FRM | ATFST | N/A | GW_TYPE_NWI | N/A | BDATB_LOAD |
UVM | UVM | CBR | N/A | GW_TYPE_NONE | N/A | CBR_LOAD |
CVM | CVM |
|
|
|
|
|
HDM | HDM |
|
|
|
|
|
LDM | LDM |
|
|
|
|
|
Table 4 lists the corresponding functions of gateway types.
| Gateway Type | Function | |
|---|---|---|
GW_TYPE_SGW |
| Simple gateway |
GW_TYPE_NWI |
| FR Frame <-> AAL-5 Frame Interworking |
GW_TYPE_CELL |
| Cell <--> FastPacket Interworking |
GW_TYPE_SIWX |
| Service Interworking (Translational) |
GW_TYPE_SIWT |
| Service Interworking (Transparent) |
GW_TYPE_CELL_VPC |
| Cell GW path connections |
GW_TYPE_NONE |
| Used for TRUE ATM to ATM connections |
This section describes elementary troubleshooting procedures and briefly describes the commands used when troubleshooting an IGX feeder node.The IGX operating system software does most of the IGX monitoring and maintenance. (Complete troubleshooting techniques for the Cisco IGX 8400 switches are described in detail in the Cisco IGX 8400 Series Installation and Configuration Guide.) This set of procedures is not exhaustive and does not take into account any of the diagnostic or network tools available to troubleshoot the IGX node.
The IGX node regularly runs self-tests to ensure proper function. When the node finds an error condition that affects operation, it deactivates the affected card or line then selects a standby card or redundant line if one is available.
| Procedure | Purpose | Conditions | |||
|---|---|---|---|---|---|
| Use the dspphyslns command. |
| View the status of all physical links configured for an IMA group. |
| Status cannot be in LOS.
|
| Use the lmtrace command. |
| Activates the lmi trace. |
| Be aware of the 7A (node status) message sent from the IGX/BPX to the feeder and expect a 7A message ACK. The 7A (node status) message is sent to the feeder to initiate the add feeder. |
| Use the nwtrace command. |
| Activates the nw trace to monitor blind messages and used to initiate the addshelf. |
| The network management message is 0xEC. |
| Procedure | Purpose | Conditions | |||
|---|---|---|---|---|---|
| Use the dsplmistats command. |
| Verify receive and transmit counts are approximately matching and incrementing in sync. |
| The network management message is 0xEC. |
| Use the dsptrkstats command. |
| Verify receive and transmit counts are approximately matching and incrementing in sync. |
| The network management message is 0xEC. |
| Use the nwstats command. |
| Shows if there are checksum errors. |
| Make sure transmit and receive count of the network message function code of 0xEC match. |
| Use the lmtrace command. |
| Activates the lmi trace. |
| The 7A (node status) message is sent to the feeder for keepalive messages. The IGX sends 7A messages to the feeder at 10-second intervals. |
| Use the dspalms command. |
| Displays state of the feeder node. |
| The feeder node should be in comm break with the SHELF. |
| Procedure | Purpose | Conditions | |||
|---|---|---|---|---|---|
| Use the nwtrace command. |
| Activates the nw trace. |
| Monitors the management message 0xE3 |
| Use the lmtrace command. |
| Activates the lmi trace. |
| Monitors type0 and reply 7B messages. |
This section provides descriptions of the HDM/LDM modules and how to configure a particular lead per node on a serial port of IGX HDM/LDM nodes, which can then be monitored for lead-state change and used as a failover mechanism.
The high-speed data module (HDM) front card in an IGX node is a programmable communications processor that can support four high-speed, synchronous data channels. It operates at speeds from 1.2 kbps up to 1344 kbps on all four ports while performing link error monitoring.
The HDM front data card:
An internal baud rate generator provides transmit and receive data clocks to the SDI card at the selected rate. The HDM can accept data from an external data device with a non-network synchronized clock (isochronous clock) up to 112 kbps. With isochronous clocking, the HDM sends a clock control signal to the other end of the circuit to synchronize the far end HDM receive clock to the isochronous clock received at the near end.
Unless specified, a packet of data for EIA control lead information is built only at a very low rate or when a change of state is detected on one or more of the control leads. The data rate is specified as either "fast" or "not fast" (the default) by the addcon command for data connections. A fast EIA lead transmission can be specified in the software to send EIA control lead information in every Fast Packet (interleaved EIA mode). This tightly couples the EIA lead states with the transmitted data but reduces the bandwidth efficiency.
The HDM card is installed in a front slot. An SDI back card plugs directly into the P2 connector of the front card. The SDI back card provides the proper data channel interface.
The faceplate of the HDM has message lights and buttons for loopback control and signal monitoring. The buttons relate to loopback testing or scrolling through the Fast Packet data ports for a snapshot of selected data port conditions (indicated by Port, Port Under Test, loopback, and communication line state lights).
The low-speed data module (LDM) front card supports up to eight synchronous or asynchronous data ports. Each port can be independently configured for DTE or DCE mode, baud rate, and so on. The LDM card is a low-speed data module for use on EIA/TIA-232C ports with data rates up to 19.2 kbps, where the higher speed capabilities of an HDM are unnecessary to use.
The LDM can process either synchronous or non-synchronous input data. With non-synchronous inputs, the data is over-sampled at a rate determined by how much jitter your equipment can tolerate. Using an external device is also possible for synchronizing the asynchronous data before the data enters the IGX node.
The LDM front data card:
Additional features, such as embedded (fast) EIA, sixth EIA lead support, and pleisochronous clocking, are also supported. The fast EIA control lead lets the user include the RTS/CTS EIA control leads in the same Fast Packet as customer data. The EIA control lead status is encoded as the eighth data bit in each data byte. This provides a quick EIA response without significantly affecting bandwidth requirements. It is limited to data rates of 19.2 kbps and below.
The LDM can reside in any empty front slot and requires an LDI back card. The LDI card plugs directly into the P2 connector of the LDM card.
The faceplate of the LDM has message lights and buttons for loopback control and signal monitoring. The buttons are for loopback testing and scrolling through the Fast Packet data ports to obtain a snapshot of selected port conditions (indicated by Port, Port Under Test, loopback, and communication line status lights).
IGX software currently supports the ability to monitor Request to Send (RTS) lead-state transitions for an HDM/LDM port, and trigger jobs, such as up and down connections on different ports. The switch software and firmware for this feature provides capabilities to monitor all leads on low-speed LDM or high-speed HDM.
Figure 6 shows a system-level block diagram of an NMS attached to an IGX using Simple Network Management Protocol (SNMP) to monitor port leads.

In Figure 6, you configure the type of lead to be monitored on a node through the IGX switch software using the CLI command cnfleadmon. The HDM/LDM card firmware reports lead-state changes (transition triggered events) monitored on the node to the SWSW at intervals of 5 to 55 seconds. The firmware reports lead-state changes at an interval based on the timer value specified in the cnfleadmon command. If the lead state has not changed, no event will be sent to the SWSW. This feature improves performance because the firmware on the HDM/LDM cards will report any lead changes instead of the SWSW polling for them.
The state of the lead(s) on any particular HDM/LDM lead port can be read by doing an SNMP get on the serialPortIfLeadState object defined MIB in the serialPort table. The HDM/LDM firmware will still respond to a lead-state request from the SWSW.
Table 8 lists the port leads that can be monitored on HDM/LDM.
| Card Type | Monitored Leads |
|---|---|
HDM | CTS, DSR, RI, SB, SCTS, DCD, TM, SRxD |
| QM, SQ, SI, SDCD, RTS, DTR, LL, SRTS |
| DM, CS, RR, SS, SF, TST, SI, IS, TR, RS, IC |
| NS, RL, STxD |
LDM | RTS, DSR, DCD, CTS, DTR |
Use the dspcd command to view a detailed display of the HDM/LDM cards. Following is an example display from the dspcd command:
p7c TN Cisco IGX 8420 9.2.30 Nov. 23 1999 15:40 PDT

Detailed Card Display for LDM in slot 9

Status: Active 	 (Front Card Supports Lead State Trap)
Revision: CK08
Serial Number: 586964
Fab Number: 20-7252-04
Backplane Installed
Backcard Installed
	 Type: 232-8
	 Revision: AL
	 Serial Number: 358942
	 Chan 1: DCE	 Chan 5: DCE
	 Chan 2: DCE	 Chan 6: DCE
	 Chan 3: DCE	 Chan 7: DCE
	 Chan 4: DCE	 Chan 8: DCE

Last Command: dspcd 9

Next Command:
In the example, Chan <n>, each port on back cards with EIA style interfaces (V.35 and RS-232) can be configured either as Data Terminal Equipment (DTE) or Data Communication Equipment (DCE). This is done by the insertion of a daughter board for each port on the back card for the Serial Data Interface (SDI) back cards.
Following is an example display from the dsplogcd command:
p7c TN Cisco IGX 8420 9.2.30 Nov. 23 1999 15:40 PDT

Logical Data Base for LDM card 9 at address 584KIT2V

Logical Data Base for LDM card 9 at address 313CAB4C

  Service             1
  Slot Number         9               Y Cable slot        8
  Need Card Flag      0               Y Cable status      Primary
  Need bkcd Flag      0               Chan  LUs     Status     Lead State Bmp
  Need Switch Flag    0               0     165     ACTIVE     00008000
  Cd LCCB Ptr         30D3451C        1     78      ACTIVE     00008000
  Ch Cnfg Ptr         30D8A51C        2     0       INACTIVE   00008000
  LC Card Type        LDM             3     0       INACTIVE   00008000
  Logep Tree Ptr      31993B0C        4     129     ACTIVE     00008000
                                      5     165     ACTIVE     00008000
                                      6     57      ACTIVE     00008000
                                      7     165     ACTIVE     00008000


This Command: dsplogcd 10 9
In the example, Lead State Bitmap, a hexidecimal that designates the port lead state configured on a node.
To configure the type of lead to be monitored on a node, use the cnfleadmon command. Following is an example display from the cnfleadmon command.
p2b            TN    Cisco       IGX 8420  9.2.3C    Oct. 6 1999  15:27 PDT

        |      LDM      |  HDM/SDI-RS232  |   HDM/SDI-RS449   |  HDM/SDI-V35  |
  index |  DCE  :  DTE  |  DCE   :  DTE   |   DCE   :   DTE   |  DCE  :  DTE  |
      1         :                :TST/25   IS/28    :SB/36            :
      2         :        LL/18   :RI/22    LL/10    :IC/15            :RI/J
===>  3  DTR/20 :DSR/6   DTR/20  :DSR/6    TR/12&30 :DM/11&29  DTR/H  :DSR/E
      4  RTS/4  :CTS/5   RTS/4   :CTS/5    RS/7&25  :CS/9&27   RTS/C  :CTS/D
      5         :        STxD/14 :SRxD/16           :                 :
      6         :        RL/21   :         RL/14    :TM/18            :TM/K
      7         :DCD/8           :DCD/8    NS/34    :RR/13&31         :DCD/F
      8         :        SRTS/19 :SCTS/13           :                 :
      9         :                :SDCD/12           :                 :
     10         :        SF/23   :SI/23    SF/16    :SI/2             :
     11         :                :                  :SQ/33            :
     12         :        ***/11  :QM/11    SS/32    :                 :
Sampling interval for HDM or LDM control lead shown above ......   5 seconds

This Command: cnfleadmon


Enter lead type index (1-12):
In the example index, designates the lead number of HDM/LDM cards. The configured interface is shown in the HDM/LDM cards column.
In the example Sampling interval for HDM or LDM control lead shown above, designates the configurable interval set to send reports of lead-state changes (transition triggered events) monitored on the node to the SWSW.
This section provides a general description of the UAI 2 and 4 port OC-3c SMF XLR back card module, illustrations of the architecture and back-card faceplate, and a table describing the connectors and status LEDs.
A hardware change to the OC-3 SMF Rev. A0 is the ATM-XCVR. This new transceiver supports a range greater than 100 Kilometers and has a minimum sensitivity of -32.5 dBm, allowing for increased link budgets.
Figure 7 displays the back-card block diagram for the UXM OC-3c XLR. The following circuits are necessary to implement backcard functions:
Configuration NOVRAM describes the backcard support functions. NOVRAM accesses are performed by the management interface. A serial NOVRAM (256 bits) contains all of the UAI-2/4 SMF XLR back card's configuration parameters, such as serial number, hardware revision, and type of back card installed. Production diagnostics are intended to program the NOVRAM.

The UAI 2/4 port OC-3c SMF XLR back-card module has SMF connection. As indicated by the "2" and "4" in the model number, these cards have two or four transmit and receive connectors. Each line has a tricolor LED whose color indicates its status. Each card also has a red FAIL LED and a green Active LED to indicate the status of the card.
Table 9 lists the connectors and LEDs.
| Connector/Indicator | Function |
|---|---|
Transmit and Receive | SC connector for SMF |
Red (on the tricolor LED) | On indicates line is active but a local alarm was detected. |
Yellow (on the tricolor LED | On indicates line is active but a remote alarm was detected. |
Green (on the tricolor LED) | On indicates line is active. |
Fail light (red) | An error was detected. Reset the card with resetcd f to clear it. If Fail comes on again, call the TAC through Cisco Customer Engineering. |
Active light (green) | The card is active and in service. |
The UXM features hot standby as a part of its Y-cable redundancy capability. With hot standby, the redundant card receives the configuration information as soon as you finish specifying redundancy. The standby card also receives updates to its configuration as the active card configuration changes. Hot standby lets the backup card go into operation as soon as necessary rather than waiting for the NPM to download the configuration. To view Y-cable redundancy illustration examples, refer to the Cisco IGX 8400 Series Installation and Configuration manual.
Y-cable redundancy requires that both cards are active and available before you set up redundancy. Use Cisco WAN Manager or the CLI commands uptrk, addtrk, then addyred. (See also descriptions of addyred, delyred, dspyred, and ptyred in the Cisco WAN Switching Command Reference publication).
If the card fails, a switchover occurs to a Y-cabled, redundant UXM card set if available. If the switchover occurs, the primary UXM acquires failed status, and the FAIL LED turns on.
Figure 8and Figure 9 show the faceplates of the UAI-2/4 OC-3c SMF XLR back-card modules.


This section consists of documentation changes that have occurred since IGX switch software 9.2.0.
Below is the correct procedure for replacing an System Clock Module (SCM).
Step 1 Visually inspect the replacement SCM to verify it is in good working order.
Step 2 Verify there are no alarms on the IGX LEDs by using the dspalms command. Clear all alarms on target node if possible.
Step 3 Reset the Standby NPM if the target IGX has CC redundancy. Allow the module to come back to standby mode.
Step 4 Use the switchcc command to verify that both NPMs can control IGX functionality.
Step 5 Wait for the standby NPM to come back in standby mode.
Step 6 Power the IGX node down.
Step 7 Disconnect all cables to the SCM. Identify and mark any cable locations before removing them.
Step 8 Loosen the captive mounting screws on the top and bottom of the IGX SCM faceplate.
Step 9 Operate the extractor levers and slide the SCM out of the cabinet.
Step 10 Inspect the backplane (upper portion of the IGX chassis) and the Utility Bus (lower portion of the IGX chassis) to verify there are no bent pins or other defects.
Step 11 Insert the replacement IGX SCM into the empty slot.
Step 12 Tighten captive mounting screws on the top and bottom of the IGX SCM faceplate.
Step 13 Operate the extractor levers and slide the SCM into the cabinet. Verify that extractor levers do not get wedged behind the SCM faceplate upon insertion.
Step 14 Reattach all cables to IGX SCM.
Step 15 Power the IGX on.
The note associated with the Maximum Port Speed Modes on the UFI Back Cards table in Table 4-36 in the Cisco IGX 8400 Series Reference stated the following:
The correct note should read:
The BC-UAI-3-T3 Connections and Indicators table in Table 3-33 in the Cisco IGX 8400 Series Reference incorrectly stated that the BC-UAI-3-T3 module had BNC transmit and receive jack connectors. Instead, the BC-UAI-3-T3 module has SMB transmit and receive jack connectors. Refer to Table 10 in this document for the correct information.
| Connector/Indicator | Function |
|---|---|
Transmit Jack | SMB connector for transmit data. |
Receive Jack | SMB connector for receive data. |
LOS light (red) | Loss of signal at the local end. |
Red alarm light (red) | Loss of local T3 or E3 frame alignment or loss of cell alignment. |
Yellow alarm light (yellow) | Loss of frame alignment at remote end or loss of cell alignment. |
AIS light (green) | All ones on the line. |
Fail light (red) | An error was detected. (Reset the card with resetcd f. If the LED comes on again, contact the TAC through Cisco Customer Engineering.) |
Active: light (green) | The card is in service and has active circuits. |
Cisco Connection Online (CCO) is Cisco Systems' primary, real-time support channel. Maintenance customers and partners can self-register on CCO to obtain additional information and services.
Available 24 hours a day, 7 days a week, CCO provides a wealth of standard and value-added services to Cisco's customers and business partners. CCO services include product information, product documentation, software updates, release notes, technical tips, the Bug Navigator, configuration notes, brochures, descriptions of service offerings, and download access to public and authorized files.
CCO serves a wide variety of users through two interfaces that are updated and enhanced simultaneously: a character-based version and a multimedia version that resides on the World Wide Web (WWW). The character-based CCO supports Zmodem, Kermit, Xmodem, FTP, and Internet e-mail, and it is excellent for quick access to information over lower bandwidths. The WWW version of CCO provides richly formatted documents with photographs, figures, graphics, and video, as well as hyperlinks to related information.
You can access CCO in the following ways:
For a copy of CCO's Frequently Asked Questions (FAQ), contact cco-help@cisco.com. For additional information, contact cco-team@cisco.com.
Cisco documentation and additional literature are available in a CD-ROM package, which ships with your product. The Documentation CD-ROM, a member of the Cisco Connection Family, is updated monthly. Therefore, it might be more current than printed documentation. To order additional copies of the Documentation CD-ROM, contact your local sales representative or call customer service. The CD-ROM package is available as a single package or as an annual subscription. You can also access Cisco documentation on the World Wide Web at http://www.cisco.com, http://www-china.cisco.com, or http://www-europe.cisco.com.
If you are reading Cisco product documentation on the World Wide Web, you can submit comments electronically. Click Feedback in the toolbar and select Documentation. After you complete the form, click Submit to send it to Cisco. We appreciate your comments.
![]()
![]()
![]()
![]()
![]()
![]()
![]()
![]()
Posted: Fri Sep 6 11:54:51 PDT 2002
All contents are Copyright © 1992--2002 Cisco Systems, Inc. All rights reserved.
Important Notices and Privacy Statement.
