|
|

Table Of Contents
Prerequisites for Presence Service
Restrictions for Presence Service
Information About Presence Service
How to Configure Presence Service
Enabling Presence for Internal Lines
Enabling a Directory Number to be Watched
Enabling a SCCP Phone to Monitor BLF Status for Speed-Dials and Call Lists
Enabling a SIP Phone to Monitor BLF Status for Speed-Dials and Call Lists
Configuring Presence to Watch External Lines
Verifying Presence Configuration
Configuration Examples for Presence
Presence in Cisco Unified CME: Example
Feature Information for Presence Service
Configuring Presence Service
Last Updated: March 26, 2007This module describes presence support in a Cisco Unified Communications Manager Express (Cisco Unified CME) system.
Finding Feature Information in This Module
Your Cisco Unified CME version may not support all of the features documented in this module. For a list of the versions in which each feature is supported, see the "Feature Information for Presence Service" section.
Contents
•
Prerequisites for Presence Service
•
•
•
•
•
Prerequisites for Presence Service
•
•
•
Restrictions for Presence Service
•
•
Information About Presence Service
To configure presence service in a Cisco Unified CME system, you should understand the following concept:
Presence Service
A presence service, as defined in RFC 2778 and RFC 2779, is a system for finding, retrieving, and distributing presence information from a source, called a presence entity (presentity), to an interested party called a watcher. When you configure presence in a Cisco Unified CME system with a SIP WAN connection, a phone user, or watcher, can monitor the real-time status of another user at a directory number, the presentity. Presence enables the calling party to know before dialing whether the called party is available. For example, a directory application may show that a user is busy, saving the caller the time and inconvenience of not being able to reach someone.
Presence uses SIP SUBSCRIBE and NOTIFY methods to allow users and applications to subscribe to changes in the line status of phones in a Cisco Unified CME system. Phones act as watchers and a presentity is identified by a directory number on a phone. Watchers initiate presence requests (SUBSCRIBE messages) to obtain the line status of a presentity. Cisco Unified CME responds with the presentity's status. Each time a status changes for a presentity, all watchers of this presentity are sent a notification message. SIP phones and trunks use SIP messages; SCCP phones use presence primitives in SCCP messages.
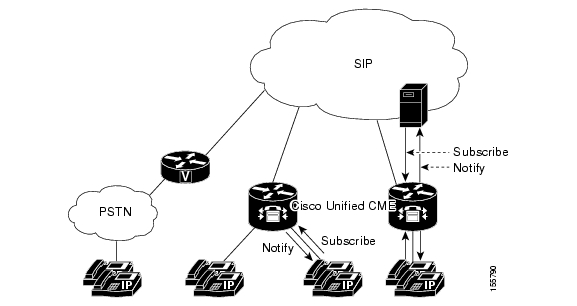
Presence supports Busy Lamp Field (BLF) notification features for speed-dial buttons and directory call lists for missed calls, placed calls, and received calls. SIP and SCCP phones that support the BLF speed-dial and BLF call-list features can subscribe to status change notification for internal and external directory numbers.
Figure 51 shows a Cisco Unified CME system supporting BLF notification for internal and external directory numbers. If the watcher and the presentity are not both internal to the Cisco Unified CME router, the subscribe message is handled by a presence proxy server.
Figure 51 BLF Notification Using Presence
The following line states display through BLF indicators on the phone:
•
•
•
Cisco Unified CME acts as a presence agent for internal lines (both SIP and SCCP) and as a presence server for external watchers connected through a SIP trunk, providing the following functionality:
•
•
•
Presence subscription requests from SIP trunks can be authenticated and authorized. Local subscription requests cannot be authenticated.
For configuration information, see the "How to Configure Presence Service" section.
How to Configure Presence Service
This section contains the following tasks:
•
•
•
•
•
•
Enabling Presence for Internal Lines
Perform the following steps to enable the router to accept incoming presence requests from internal watchers and SIP trunks.
Restrictions
•
•
•
SUMMARY STEPS
1.
2.
3.
4.
5.
6.
7.
8.
9.
DETAILED STEPS
Step 1
enable
Example:Router> enable
Enables privileged EXEC mode.
•
Step 2
configure terminal
Example:Router# configure terminal
Enters global configuration mode.
Step 3
sip-ua
Example:Router(config)# sip-ua
Enters SIP user-agent configuration mode to configure the user agent.
Step 4
presence enable
Example:Router(config-sip-ua)# presence enable
Allows the router to accept incoming presence requests.
Step 5
exit
Example:Router(config-sip-ua)# exit
Exits SIP user-agent configuration mode.
Step 6
presence
Example:Router(config)# presence
Enables presence service and enters presence configuration mode.
Step 7
presence call-list
Example:Router(config-presence)# presence call-list
Globally enables BLF monitoring for directory numbers in call lists and directories on all locally registered phones.
•
•
Step 8
max-subscription number
Example:Router(config-presence)# max-subscription 128
(Optional) Sets the maximum number of concurrent watch sessions that are allowed.
•
Step 9
end
Example:Router(config-presence)# end
Exits to privileged EXEC mode.
Enabling a Directory Number to be Watched
To enable a line associated with a directory number to be monitored by a phone registered to a Cisco Unified CME router, perform the following steps. The line is enabled as a presentity and phones can subscribe to its line status through the BLF call-list and BLF speed-dial features. There is no restriction on the type of phone that can have its lines monitored; any line on any IP phone or on an analog phone on supported voice gateways can be a presentity.
Restrictions
•
•
SUMMARY STEPS
1.
2.
3.
or
voice register dn dn-tag4.
5.
6.
DETAILED STEPS
Enabling a SCCP Phone to Monitor BLF Status for Speed-Dials and Call Lists
A watcher can monitor the status of lines associated with internal and external directory numbers (presentities) through the BLF speed-dial and BLF call-list presence features. To enable the BLF notification features on an IP phone using SCCP, perform the following steps.
Prerequisites
•
•
Restrictions
BLF Call-List
•
BLF Speed-Dial
•
Cisco Unified IP Phone 7931
•
SUMMARY STEPS
1.
2.
3.
4.
5.
6.
7.
8.
9.
10.
11.
DETAILED STEPS
Step 1
enable
Example:Router> enable
Enables privileged EXEC mode.
•
Step 2
configure terminal
Example:Router# configure terminal
Enters global configuration mode.
Step 3
ephone phone-tag
Example:Router(config)# ephone 1
Enters ephone configuration mode to set phone-specific parameters for a SIP phone.
•
Step 4
button button-number{separator}dn-tag [,dn-tag...] [button-number{x}overlay-button-number] [button-number...]
Example:Router(config-ephone)# button 1:10 2:11 3b12 4o13,14,15
Associates a button number and line characteristics with a directory number on the phone.
•
•
•
•
•
Step 5
blf-speed-dial tag number label string
Example:Router(config-ephone)# blf-speed-dial 3 3001 label sales
Enables BLF monitoring of a directory number associated with a speed-dial number on the phone.
•
•
•
Step 6
presence call-list
Example:Router(config-ephone)# presence call-list
Enables BLF monitoring of directory numbers that appear in call lists and directories on this phone.
•
•
Step 7
exit
Example:Router(config-ephone)# exit
Exits ephone configuration mode and enters privileged EXEC mode.
Step 8
telephony-service
Example:Router(config)# telephony-service
Enters telephony-service configuration mode.
Step 9
create cnf-files
Example:Router(config-telephony)# create cnf-files
Builds the XML configuration files that are required for Cisco Unified CME phones.
Step 10
restart {all [time-interval] | mac-address}
Example:Router(config-telephony)# restart all
Performs a fast reset of the specified phone or all phones associated with this Cisco Unified CME router. Does not contact the DHCP server.
•
•
•
Step 11
end
Example:Router(config-telephony)# end
Exits to privileged EXEC mode.
Enabling a SIP Phone to Monitor BLF Status for Speed-Dials and Call Lists
A watcher can monitor the status of lines associated with internal and external directory numbers (presentities) through the BLF speed-dial and BLF call-list presence features. To enable the BLF notification features on a SIP phone, perform the following steps.
Prerequisites
•
•
•
Restrictions
BLF Call-List
•
BLF Speed-Dial
•
SUMMARY STEPS
1.
2.
3.
4.
5.
6.
7.
8.
9.
10.
11.
12.
DETAILED STEPS
Step 1
enable
Example:Router> enable
Enables privileged EXEC mode.
•
Step 2
configure terminal
Example:Router# configure terminal
Enters global configuration mode.
Step 3
voice register pool pool-tag
Example:Router(config)# voice register pool 1
Enters voice register pool configuration mode to set phone-specific parameters for a SIP phone.
•
Step 4
number tag dn dn-tag
Example:Router(config-register-pool)# number 1 dn 2
Assigns a directory number to the SIP phone.
•
•
Step 5
blf-speed-dial tag number label string
Example:Router(config-register-pool)# blf-speed-dial 3 3001 label sales
Enables BLF monitoring of a directory number associated with a speed-dial number on the phone.
•
•
•
Step 6
presence call-list
Example:Router(config-register-pool)# presence call-list
Enables BLF monitoring of directory numbers that appear in call lists and directories on this phone.
•
•
Step 7
exit
Example:Router(config-register-pool)# exit
Exits voice register pool configuration mode and enters privileged EXEC mode.
Step 8
voice register global
Example:Router(config)# voice register global
Enters voice register global configuration mode to set global parameters for all supported SIP phones in a Cisco Unified CME environment.
Step 9
mode cme
Example:Router(config-register-global)# mode cme
Enables mode for provisioning SIP phones in Cisco Unified CME.
Step 10
create profile
Example:Router(config-register-global)# create profile
Generates configuration profile files required for SIP phones and writes the files to the location specified with the tftp-path command.
Step 11
restart
Example:Router(config-register-global)# restart
Performs a fast reset of all SIP phones associated with this Cisco Unified CME router. Phones contact the TFTP server for updated configuration information and reregister without contacting the DHCP server.
Step 12
end
Example:Router(config-register-global)# end
Exits to privileged EXEC mode.
Configuring Presence to Watch External Lines
To enable internal watchers to monitor external directory numbers on a remote Cisco Unified CME router, perform the following steps.
Prerequisites
Presence service must be enabled for internal lines. See the "Enabling Presence for Internal Lines" section.
SUMMARY STEPS
1.
2.
3.
4.
5.
6.
7.
8.
9.
10.
11.
12.
DETAILED STEPS
Verifying Presence Configuration
Step 1
Use this command to verify your configuration.
Router# show running-config
!
voice register global
mode cme
source-address 10.1.1.2 port 5060
load 7971 SIP70.8-0-1-11S
load 7970 SIP70.8-0-1-11S
load 7961GE SIP41.8-0-1-0DEV
load 7961 SIP41.8-0-1-0DEV
authenticate presence
authenticate credential 1 tftp://172.18.207.15/labtest/cred1.csv
create profile sync 0004550081249644
.
.
.
presence
server 10.1.1.4
sccp blf-speed-dial retry-interval 70 limit 20
presence call-list
max-subscription 128
watcher all
allow subscribe
!
sip-ua
presence enable
Step 2
Use this command to display presence configuration settings.
Router# show presence global
Presence Global Configuration Information:
=============================================
Presence feature enable : TRUE
Presence allow external watchers : FALSE
Presence max subscription allowed : 100
Presence number of subscriptions : 0
Presence allow external subscribe : FALSE
Presence call list enable : TRUE
Presence server IP address : 0.0.0.0
Presence sccp blfsd retry interval : 60
Presence sccp blfsd retry limit : 10
Presence router mode : CME mode
Step 3
Use this command to display information about active presence subscriptions.
Router# show presence subscription summary
Presence Active Subscription Records Summary: 15 subscription
Watcher Presentity SubID Expires SibID Status
======================== ======================== ====== ======= ====== ======
6002@10.4.171.60 6005@10.4.171.34 1 3600 0 idle
6005@10.4.171.81 6002@10.4.171.34 6 3600 0 idle
6005@10.4.171.81 6003@10.4.171.34 8 3600 0 idle
6005@10.4.171.81 6002@10.4.171.34 9 3600 0 idle
6005@10.4.171.81 6003@10.4.171.34 10 3600 0 idle
6005@10.4.171.81 6001@10.4.171.34 12 3600 0 idle
6001@10.4.171.61 6003@10.4.171.34 15 3600 0 idle
6001@10.4.171.61 6002@10.4.171.34 17 3600 0 idle
6003@10.4.171.59 6003@10.4.171.34 19 3600 0 idle
6003@10.4.171.59 6002@10.4.171.34 21 3600 0 idle
6003@10.4.171.59 5001@10.4.171.34 23 3600 24 idle
6002@10.4.171.60 6003@10.4.171.34 121 3600 0 idle
6002@10.4.171.60 5002@10.4.171.34 128 3600 129 idle
6005@10.4.171.81 1001@10.4.171.34 130 3600 131 busy
6005@10.4.171.81 7005@10.4.171.34 132 3600 133 idle
Troubleshooting Presence
Step 1
This command displays debugging information about the presence service.
Router# debug presence errors
*Sep 4 07:16:02.715: //PRESENCE:[0]:/presence_sip_line_update: SIP nothing to update
*Sep 4 07:16:02.723: //PRESENCE:[17]:/presence_handle_notify_done: sip stack response code [29]
*Sep 4 07:16:02.723: //PRESENCE:[24]:/presence_handle_notify_done: sip stack response code [29]
*Sep 4 07:16:02.791: //PRESENCE:[240]:/presence_handle_notify_done: sip stack response code [17]
*Sep 4 07:16:02.791: //PRESENCE:[766]:/presence_handle_notify_done: sip stack response code [17]
*Sep 4 07:16:04.935: //PRESENCE:[0]:/presence_sip_line_update: SIP nothing to update
*Sep 4 07:16:04.943: //PRESENCE:[17]:/presence_handle_notify_done: sip stack response code [29]
*Sep 4 07:16:04.943: //PRESENCE:[24]:/presence_handle_notify_done: sip stack response code [29]
*Sep 4 07:16:04.995: //PRESENCE:[240]:/presence_handle_notify_done: sip stack response code [17]
*Sep 4 07:16:04.999: //PRESENCE:[766]:/presence_handle_notify_done: sip stack response code [17]
Step 2
This command displays debugging information for BLF presence features.
Router# debug ephone blf
*Sep 4 07:18:26.307: skinny_asnl_callback: subID 16 type 4
*Sep 4 07:18:26.307: ASNL_RESP_NOTIFY_INDICATION
*Sep 4 07:18:26.307: ephone-1[1]:ASNL notify indication message, feature index 4, subID [16]
*Sep 4 07:18:26.307: ephone-1[1]:line status 6, subID [16]
*Sep 4 07:18:26.307: ephone-1[1]:StationFeatureStatV2Message sent, status 2
*Sep 4 07:18:26.307: skinny_asnl_callback: subID 23 type 4
*Sep 4 07:18:26.307: ASNL_RESP_NOTIFY_INDICATION
*Sep 4 07:18:26.307: ephone-2[2]:ASNL notify indication message, feature index 2, subID [23]
*Sep 4 07:18:26.311: ephone-2[2]:line status 6, subID [23]
*Sep 4 07:18:26.311: ephone-2[2]:StationFeatureStatV2Message sent, status 2
*Sep 4 07:18:28.951: skinny_asnl_callback: subID 16 type 4
*Sep 4 07:18:28.951: ASNL_RESP_NOTIFY_INDICATION
*Sep 4 07:18:28.951: ephone-1[1]:ASNL notify indication message, feature index 4, subID [16]
*Sep 4 07:18:28.951: ephone-1[1]:line status 1, subID [16]
*Sep 4 07:18:28.951: ephone-1[1]:StationFeatureStatV2Message sent, status 1
*Sep 4 07:18:28.951: skinny_asnl_callback: subID 23 type 4
*Sep 4 07:18:28.951: ASNL_RESP_NOTIFY_INDICATION
*Sep 4 07:18:28.951: ephone-2[2]:ASNL notify indication message, feature index 2, subID [23]
*Sep 4 07:18:28.951: ephone-2[2]:line status 1, subID [23]
*Sep 4 07:18:28.951: ephone-2[2]:StationFeatureStatV2Message sent, status 1
Configuration Examples for Presence
This section contains the following example:
•
Presence in Cisco Unified CME: Example
Router# show running-config
Building configuration...
Current configuration : 5465 bytes
!
version 12.4
service timestamps debug datetime msec
service timestamps log datetime msec
no service password-encryption
!
hostname CME-3825
!
boot-start-marker
boot-end-marker
!
logging buffered 2000000 debugging
enable password lab
!
no aaa new-model
!
resource policy
!
no network-clock-participate slot 1
no network-clock-participate slot 2
ip cef
!
!
no ip domain lookup
!
voice-card 1
no dspfarm
!
voice-card 2
no dspfarm
!
!
voice service voip
allow-connections sip to sip
h323
sip
registrar server expires max 240 min 60
!
voice register global
mode cme
source-address 11.1.1.2 port 5060
load 7971 SIP70.8-0-1-11S
load 7970 SIP70.8-0-1-11S
load 7961GE SIP41.8-0-1-0DEV
load 7961 SIP41.8-0-1-0DEV
authenticate presence
authenticate credential 1 tftp://172.18.207.15/labtest/cred1.csv
create profile sync 0004550081249644
!
voice register dn 1
number 2101
allow watch
!
voice register dn 2
number 2102
allow watch
!
voice register pool 1
id mac 0015.6247.EF90
type 7971
number 1 dn 1
blf-speed-dial 1 1001 label "1001"
!
voice register pool 2
id mac 0012.0007.8D82
type 7912
number 1 dn 2
!
interface GigabitEthernet0/0
description $ETH-LAN$$ETH-SW-LAUNCH$$INTF-INFO-GE 0/0$
ip address 11.1.1.2 255.255.255.0
duplex full
speed 100
media-type rj45
no negotiation auto
!
interface GigabitEthernet0/1
no ip address
shutdown
duplex auto
speed auto
media-type rj45
negotiation auto
!
ip route 0.0.0.0 0.0.0.0 11.1.1.1
!
ip http server
!
!
!
tftp-server flash:Jar41sccp.8-0-0-103dev.sbn
tftp-server flash:cvm41sccp.8-0-0-102dev.sbn
tftp-server flash:SCCP41.8-0-1-0DEV.loads
tftp-server flash:P00303010102.bin
tftp-server flash:P00308000100.bin
tftp-server flash:P00308000100.loads
tftp-server flash:P00308000100.sb2
tftp-server flash:P00308000100.sbn
tftp-server flash:SIP41.8-0-1-0DEV.loads
tftp-server flash:apps41.1-1-0-82dev.sbn
tftp-server flash:cnu41.3-0-1-82dev.sbn
tftp-server flash:cvm41sip.8-0-0-103dev.sbn
tftp-server flash:dsp41.1-1-0-82dev.sbn
tftp-server flash:jar41sip.8-0-0-103dev.sbn
tftp-server flash:P003-08-1-00.bin
tftp-server flash:P003-08-1-00.sbn
tftp-server flash:P0S3-08-1-00.loads
tftp-server flash:P0S3-08-1-00.sb2
tftp-server flash:CP7912080000SIP060111A.sbin
tftp-server flash:CP7912080001SCCP051117A.sbin
tftp-server flash:SCCP70.8-0-1-11S.loads
tftp-server flash:cvm70sccp.8-0-1-13.sbn
tftp-server flash:jar70sccp.8-0-1-13.sbn
tftp-server flash:SIP70.8-0-1-11S.loads
tftp-server flash:apps70.1-1-1-11.sbn
tftp-server flash:cnu70.3-1-1-11.sbn
tftp-server flash:cvm70sip.8-0-1-13.sbn
tftp-server flash:dsp70.1-1-1-11.sbn
tftp-server flash:jar70sip.8-0-1-13.sbn
!
control-plane
!
dial-peer voice 2001 voip
preference 2
destination-pattern 1...
session protocol sipv2
session target ipv4:11.1.1.4
dtmf-relay sip-notify
!
presence
server 11.1.1.4
sccp blf-speed-dial retry-interval 70 limit 20
presence call-list
max-subscription 128
watcher all
allow subscribe
!
sip-ua
authentication username jack password 021201481F
presence enable
!
!
telephony-service
load 7960-7940 P00308000100
load 7941GE SCCP41.8-0-1-0DEV
load 7941 SCCP41.8-0-1-0DEV
load 7961GE SCCP41.8-0-1-0DEV
load 7961 SCCP41.8-0-1-0DEV
load 7971 SCCP70.8-0-1-11S
load 7970 SCCP70.8-0-1-11S
load 7912 CP7912080000SIP060111A.sbin
max-ephones 100
max-dn 300
ip source-address 11.1.1.2 port 2000
url directories http://11.1.1.2/localdirectory
max-conferences 6 gain -6
call-forward pattern .T
transfer-system full-consult
transfer-pattern .T
create cnf-files version-stamp Jan 01 2002 00:00:00
!
!
ephone-dn 1 dual-line
number 2001
allow watch
!
!
ephone-dn 2 dual-line
number 2009
allow watch
application default
!
!
ephone-dn 3
number 2005
allow watch
!
!
ephone-dn 4 dual-line
number 2002
!
!
ephone 1
mac-address 0012.7F57.62A5
fastdial 1 1002
blf-speed-dial 1 2101 label "2101"
blf-speed-dial 2 1003 label "1003"
blf-speed-dial 3 2002 label "2002"
type 7960
button 1:1 2:2
!
!
!
ephone 3
mac-address 0015.6247.EF91
blf-speed-dial 2 1003 label "1003"
type 7971
button 1:3 2:4
!
!
!
line con 0
exec-timeout 0 0
password lab
stopbits 1
line aux 0
stopbits 1
line vty 0 4
password lab
login
!
scheduler allocate 20000 1000
!
end
Additional References
The following sections provide references related to Cisco Unified CME features.
Related Documents
Cisco Unified CME configuration
•
Cisco IOS commands
•
Cisco IOS configuration
•
Phone documentation for Cisco Unified CME
Technical Assistance
Feature Information for Presence Service
Table 54 lists the features in this module and enhancements to the features by version.
To determine the correct Cisco IOS release to support a specific Cisco Unified CME version, see the Cisco Unified CME and Cisco IOS Software Version Compatibility Matrix at http://www.cisco.com/en/US/products/sw/voicesw/ps4625/products_documentation_roadmap09186a0080189132.html.
Use Cisco Feature Navigator to find information about platform support and software image support. Cisco Feature Navigator enables you to determine which Cisco IOS software images support a specific software release, feature set, or platform. To access Cisco Feature Navigator, go to http://www.cisco.com/go/cfn. An account on Cisco.com is not required.
Note
Table 54 Feature Information for Presence Service
Presence Service
4.1
Presence with BLF was introduced.
![]()
![]()
![]()
![]()
![]()
![]()
![]()
![]()
Posted: Wed Aug 15 14:08:59 PDT 2007
All contents are Copyright © 1992--2007 Cisco Systems, Inc. All rights reserved.
Important Notices and Privacy Statement.