|
|

This chapter describes fault isolation techniques for the VCO/4K power subsystem. Refer to the Cisco VCO/4K Mechanical Assemblies for a description of the power subsystem components.
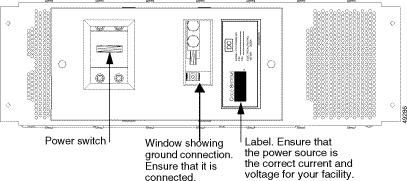
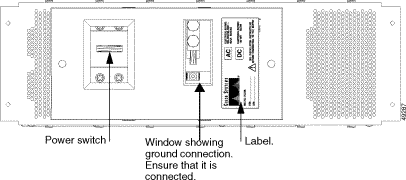
Step 1 Turn on the power switch to the right of the power connector on the power entry module. (The VCO/4K is on when the switch is in an upward position.) See Figure 5-1 or Figure 5-2.
Step 2 Check the power LED on the power supply module. Check both LEDs on both power supply modules in a redundant system. The LED is green under normal operating conditions.
When the power is off, the left indicator LED on the power supply module is not illuminated (see Figure 5-3). When the power switch is on and the power LED is not illuminated, either a fuse (see the "Spare Fuse Kit" section) or the power supply module needs to be replaced. Green indicates that the power is on and operation is normal. Red is a warning that there are voltages in the power supply module that are over or under the required voltages or that there is a problem with load sharing. The power supply module needs to be replaced. See the "Removal and Replacement Procedures" section.

To turn off a VCO/4K system, move the power switch on the power entry module to the off (down) position. The LED is no longer illuminated.
Two events occur simultaneously whenever voltage monitoring on the control board of the power supply module detects either an overvoltage or an undervoltage condition:
When these two events occur, you must remove and replace the power supply module. See the "Removal and Replacement Procedures" section.
One spare fuse kit used for AC or DC systems comes with the VCO/4K. The contents of the kit is described in Table 5-1.
| Number of Cartridge Fuses | Rating | Location |
|---|---|---|
Four | 30 amps | Power Entry Module |
Two | 25 amps | Power Supply Module |
The two replaceable fuses on the power entry module are the main fuses, shown in Figure 5-1. One replaceable 25-amp fuse is located on the back of the power supply module to the right of the power connector socket.
If you choose to go from 120 VAC to 240 VAC as a result of the input power that is available at your site, you do not need to change any fuses. The VCO/4K is an auto-ranging system.
 |
Caution When you are working inside the VCO/4K system enclosure, ensure that you are ESD protected. |
 |
Warning Voltages present on the power backplane and at other points can produce severe, perhaps fatal electrical shock. Observe all precautions normally associated with the testing of electrical equipment. Turn off power at the source before performing any service. |
To remove a nonredundant power supply, follow these steps:
Step 1 Turn the switch off on the power entry module if the system does not contain redundant power supply modules, or if both power supply modules are to be removed simultaneously. The power disconnect switch is located in the rear of the system on the power entry module.
Step 2 Remove the front door of the VCO/4K system to access the power supply module.
Step 3 Connect the wrist strap to the system (upper right corner).
Step 4 Remove the two mounting screws on the front panel of the power supply module.
When the upper left screw is removed, the power is cut off from the module (the power LED is off).
If the LED is faintly illuminated red, and the interlock switch screw is removed, it is safe to remove the power module.
Step 5 Grasp the black hand grip on the front of the module with one hand and pull the module out. Use your other hand to provide support underneath the module as you remove it from the system.
To remove a redundant power supply, follow these steps:
Step 1 Remove the front door of the VCO/4K system to access the power supply module.
Step 2 Connect the wrist strap to the system (upper right corner).
Step 3 Remove the two mounting screws on the front panel of the power supply module.
When the upper left screw is removed, the power is cut off from the module (the power LED is off).
If the LED is faintly illuminated red, and the interlock switch screw is removed, it is safe to remove the power module.
Step 4 Grasp the black hand grip on the front of the module with one hand and pull the module out. Use your other hand to provide support underneath the module as you remove it from the system.
|
Caution Follow ESD rules when replacing a system component. Use a wrist strap for grounding. |
To replace a power supply, follow these steps:
Step 1 If the power supply module is nonredundant, ensure that the power is off.
Step 2 Remove the front door of the VCO/4K system to access the power supply module.
Step 3 Connect the wrist strap to the system (upper right corner).
Step 4 Grasp the black hand grip on the front of the module with one hand and use your other hand to provide support underneath the module as you push it into its compartment.
Step 5 Fasten the two mounting screws on the front panel of the power supply module.
Step 6 Rotate the plate into position to align the left mounting screw before fastening the screw into place.
Step 7 If necessary, turn the VCO/4K system on.
Step 8 Remove the wrist strap.
Step 9 Check the power LED and ensure that the power supply module is operating. Refer to the "Starting Up the System" section for information on the LED.
Step 10 Replace the front door.
|
Caution The front door must remain on during system operation for NEBS EMI compliance. |
There are two tasks you might need to perform when troubleshooting the VCO/4K power subsystem:
When an alarm is sent to the Alarm Arbiter Card and the power LED on the power supply module turns red as a result of a voltage fault condition, you must replace the power supply module.
If the power switch is turned on but the power LED is not illuminated (not green), either the power supply module has failed or the power supply within the power supply module is still running (the fans are still operating) even though the power supply module itself is not functioning. See Figure 5-3. In either case, follow the process in listed in the Cisco VCO/4K Troubleshooting Guide to determine the cause of the problem, which can be any one of the following conditions:
When troubleshooting, you can either immediately replace a fuse or as an alternative, test it first by checking its resistance with a meter.
The Cisco VCO/4K Troubleshooting Guide presents the process to follow when troubleshooting a single power supply module. In a system with redundant power supply modules, both modules are load sharing; when one of them fails, the other one takes over.
For more information about troubleshooting the VCO/4K, refer to the Cisco VCO/4K Troubleshooting Guide.
![]()
![]()
![]()
![]()
![]()
![]()
![]()
![]()
Posted: Sat Sep 28 16:52:07 PDT 2002
All contents are Copyright © 1992--2002 Cisco Systems, Inc. All rights reserved.
Important Notices and Privacy Statement.