|
|

This chapter describes procedures for connecting peripheral equipment to a VCO/4K system.
If your VCO/4K has redundant control (two Storage/Control I/O Modules), you have three options for connecting peripheral equipment:
Figure 2-1 shows the three options.

System administrators use the master console screens to create and maintain the database, and perform diagnostic and maintenance procedures. This section describes how to connect the console to the system. The VCO/4K requires a video display terminal (VDT) with VT220/320 emulation as a master console. Cisco Systems supports the following terminals: VT220/320, WYSE Technology WY-185, and WYSE Technology WY-185ES.
The console connects directly to a dedicated serial port (Port 1 Console) on the Storage/Control I/O Module via an EIA/TIA-232 cable (see Figure 2-2).

Use the following steps to install the master console.
 |
Note If you already have a VDT, go to Step 5. |
Step 2 Position the VDT components on a suitable surface within cable length from the VCO/4K system.
Step 3 Follow the OEM instructions for connecting the keyboard to the VDT.
Step 4 Perform any additional installation steps indicated by the OEM instructions. These may include installing the legend strip on the keyboard or placing peel-and-stick keypad labels on the appropriate keys. Your keypad should match the keypad shown in Figure 2-3.

Step 5 Connect the AC line cord from the VDT to a general service AC receptacle.
Step 6 Connect a serial cable (EIA/TIA-232) to the serial communication port on the VDT. Figure 2-4 shows which pins in the cable connector carry the signals.

You can use a 25-conductor, straight-through cable to connect a system console to the Storage/Control I/O Module. However, only the conductors shown in Figure 2-4 are used.
If you are connecting the system console to redundant Storage/Control I/O Modules through a transfer switch, go to the "Installing a Manual Transfer Switch" section (for manual switch) or to the "Installing Automatic External A/B Transfer Switches Units (ASU)" section (for automatic switch).
Step 7 Connect the serial cable (EIA/TIA-232) connector to the port labeled Port 1 Console on the back panel of the Storage/Control I/O Module.
Step 8 To connect a duplicate console to a redundant Storage/Control I/O Module, repeat Step 1 to Step 7.
The system printer produces a hard copy of the database and system log file error and status messages. Administrators can print system reports with the system print utilities.
The VCO/4K system printer must be a parallel printer with a Centronics-type interface. Cisco recommends using a dot-matrix printer with a pin or tractor feed option that accepts continuous feed paper. The default report generation format is 8 1/2 inches by 11 inches (21.6 cm by 27.9 cm).
To install a system printer, follow these steps:
Step 2 Position the printer on a suitable surface within cable length from the VCO/4K system.
Step 3 Connect the AC line cord from the printer to a general service AC receptacle.
Step 4 Connect a parallel cable to the interface port on the printer.
A Centronics-to-Centronics cable is available from Cisco to connect the parallel printer interface on the Storage/Control I/O Module.
Step 5 Connect the parallel cable to the port labeled Printer on the back of the Storage/Control I/O Module. See Figure 2-2.
Step 6 To connect a duplicate system printer to a redundant Storage/Control I/O Module, repeat Step 1 to
Step 5.
You can use a serial modem for remote maintenance of a VCO/4K system. Cisco Systems Technical Support can also communicate with the system through a serial modem connection and perform diagnostic inquiries about system operation.
The modem is connected to the PSTN through a business line to the local central office (CO). The CO line is terminated on an RJ-11 modular jack located near the modem. Cisco does not recommend routing the modem through a PBX circuit.
To install a remote maintenance modem, follow these steps:
Step 2 Position the modem within cable length from the VCO/4K system and line cord distance from the RJ-11 or RJ-45 modular jack.
Step 3 Connect the power pack to a general service AC receptacle. Plug the DC power cord into the rear of the modem chassis.
Step 4 Set the modem to operate according to the parameters defined in the VCO/4K system database. Refer to the modem OEM manual for more information about setting the modem parameters.
Step 5 Connect a serial cable (EIA/TIA-232) to the serial communication port on the modem. Figure 2-5 shows which pins in the cable connector carry the signals.

Step 6 Connect the serial (EIA/TIA-232) cable connector to the port labeled Port 2 TTY01 on the back of the Storage/Control I/O Module (see Figure 2-2).
Step 7 To connect a duplicate remote maintenance modem to a redundant Storage/Control I/O Module, repeat Step 1 to Step 6.
A master console, system printer, and remote maintenance modem can be routed through manual or automatic transfer switches to primary and redundant Storage/Control I/O Modules.
A manual, two-way, serial port transfer switch enables you to switch one EIA/TIA-232 input to either of two outputs. In VCO/4K applications, an A/B transfer switch that is capable of switching all 25 EIA/TIA-232 pins is required between each master console, system printer, and remote maintenance modem and redundant Storage/Control I/O Modules (one A/B switch per peripheral).
The transfer switches can be purchased from several supply houses and are available for desktop and rack-mount installations. In addition to the transfer switches, you need six additional cables to connect the six outputs from the transfer switches directly to redundant Storage/Control I/O Modules. The distance from the transfer switches to the Combined Controller determines the length of the six cables.
To install manual transfer switches, follow these steps:

Step 2 Connect the cable from the master console to the input of Transfer Switch 1 (TS-1). Cables from the transfer switch to the master console should be labeled TS-1A and TS-1B.
Step 3 Connect the cable from the remote maintenance modem to the input of Transfer Switch 2. Cables from the transfer switch to the remote maintenance modem should be labeled TS-2A and TS-2B.
Step 4 Connect the cable from the system printer to the input of Transfer Switch 3. Cables from the transfer switch should be TS-3A and TS-3B.
|
Note You must use a Centronics-to-DB-25 cable between the transfer switch and system printer. Use a male DB-25-to-Centronics cable from the transfer switch to the VCO/4K system. |
Step 5 Route the cables from the Port A outputs of Transfer Switches 1, 2, and 3 (TS-1A, TS-2A, and TS-3A) to the connectors on the Storage/Control I/O Module. Connect the cables as shown in Table 2-1.
.
| Peripheral Device | Cable Label | Connector Name |
|---|---|---|
System Console | TS-1A | Port 1 Console |
Modem | TS-2A | Port 2 TTY01 |
System Printer | TS-3A | Printer |
Step 6 Route the cables from the Port B outputs of Transfer Switches 1, 2, and 3 (TS-1B, TS-2B, and TS-3B) to the connectors on the redundant Storage/Control I/O Module. Connect the cables as shown in
Table 2-1.
Step 7 Secure cable connectors to the receptacles on the transfer switches as required.
Step 8 Set all transfer switches to Port A to complete the installation process. For convenient reference, label the front panel of the transfer switches master console (TS-1), remote maintenance modem (TS-2), and system printer (TS-3).
|
Note The following installation procedures apply to the External EIA/TIA-232 A/B Switch and External A/B Switch Drive Cable, available from Cisco Systems. |
The ASU switches Pins 2 through 25 between Port A and Port B on a signal from the Alarm Arbiter Card (AAC). One ASU is required for each peripheral device that you need to switch. The peripheral devices (VDT, printer or remote maintenance modem) are cabled to the common port (COM port) of the switch unit.
Six additional cables are required to connect the six outputs from the switches to redundant Storage/Control I/O Modules. The distance from the switches to the Storage/Control I/O Modules determines the length of the six cables.
To install automatic transfer switch units, follow these steps:

Step 2 Connect the cable from the system console to the COMM Port of ASU-1. Cables from the transfer switch to the Storage/Control I/O Module (Port A and Port B) should be labeled ASU-1A and ASU-1B.
|
Note All port connections to the ASUs require male DB-25 connectors. |
Step 3 Connect the cable from the remote maintenance modem to the COMM of ASU2. Cables from the transfer switch to the Storage/Control I/O Module should be labeled ASU-2A and ASU-2B.
Step 4 Connect the cable from the system printer to the COMM of ASU-3. Cables from the transfer switch to the Storage/Control I/O Module should be labeled ASU-3A and ASU-3B.
|
Note You must use a Centronics-to-DB-25 cable between the transfer switch and system printer. Use a Centronics-to-DB-25 cable from the transfer switch to the VCO/4K system. |
Step 5 Route the cables from the Port A outputs of ASU-1A, ASU-2A, and ASU-3A to the connectors on the Storage/Control I/O Module. Connect the cables as shown in Table 2-2.
| Peripheral Device | Cable Label | Connector Name Storage/Control I/O Module Slots 3 and 4 |
|---|---|---|
System Console | ASU-1A | Port 1 Console |
Modem | ASU-2A | Port 2 TTY01 |
System Printer | ASU-3A | System Printer |
Step 6 Route the cables from the Port B outputs of ASU-1B, ASU-2B, and ASU-3B to the connectors on the redundant Storage/Control I/O Module. Connect the cables as shown in Table 2-3.
| Peripheral Device | Cable Label | Connector Name Storage/Control I/O Module Slots 5 and 6 |
|---|---|---|
System Console | ASU-1B | Port 1 Console |
Modem | ASU-2B | Port 2 TTY01 |
System Printer | ASU-3B | System Printer |
Step 7 Secure cables to the receptacles on the transfer switches as required.
Step 8 Connect the 9-pin, D-subminiature connectors (J2, J3, and J4) of the A/B Switch Drive Cable to the receptacles on the rear of each ASU.
Step 9 Route the cable from the ASUs to the DB-9 connector located at the lower left side on the back of the VCO/4K system.
Step 10 Plug the line cord from each ASU into a 110 VAC, 60-Hz outlet.
Step 11 Set the Select switch on the front panel of each ASU to the AUTO position.
The DB-15 external alarm connector is located in the rear of the VCO/4K, next to the power entry module; it is labeled Remote Alarms. The DB-9 remote A/B switch connector is located below the remote alarm connector; it is labeled Remote Switch A/B. See Figure 2-8.

Contacts are rated for 0.5 amp @ 24 VDC or 25 VAC (maximum).
 |
Caution Alarm contacts are not rated to handle excessive current. Do not directly connect high current devices (for example, sirens, 110 VAC lamps or bells) to the alarm contacts. |
Table 2-4 lists the pin signals for the remote alarm connector.
| Pin | Signal |
|---|---|
1 | major common |
2 | minor common |
3 | aux1 closed |
4 | aux2 closed |
5 | major open |
6 | minor open |
7 | aux2 common |
8 | not used |
9 | major common |
10 | minor common |
11 | aux1 open |
12 | major closed |
13 | minor closed |
14 | aux1 common |
15 | aux2 open |
Table 2-5 contains the pin signals for the remote A/B switch connector.
| Pin | Signal |
|---|---|
1 | ssel |
2-4 | not used |
5 | ground |
6-9 | not used |
Ethernet communications software provided with the VCO/4K supports TCP/IP communications between the VCO/4K and one or more host computers. Host-controlled applications use SNMP and/or the Cisco VCO/4K host API to communicate with the VCO/4K over the Ethernet connection. The VCO/4K Ethernet communications software supports a single physical link with multiple logical software connections (sockets). For more information concerning software aspects of VCO/4K Ethernet communications, refer to the following documents:
|
Note The VCO/4K system is limited to communication within a single Ethernet LAN. It cannot act as an Ethernet gateway, nor can it route messages through an Ethernet gateway. |
The hardware connection for Ethernet communications is facilitated by a DB-15 port on the VCO/4K Storage/Control I/O Module. (See Figure 2-2.) The DB-15 port provides a connection for a thickwire cable to an Ethernet transceiver.
Table 2-6 lists the DB-15 connector pinouts.
| Pin | Signal | Signal Name |
|---|---|---|
2 | C+ | Collision + (Input) |
3 | T+ | Transmit + (Output) |
5 | R+ | Receive + (Input) |
6 | GND | Ground |
9 | C- | Collision - (Input) |
10 | T- | Transmit - (Output) |
12 | R- | Receive - (Input) |
13 | +12VF | +12 VDC Power |
Cisco recommends that you use an attachment unit interface (AUI) cable between the DB-15 connector and the network transceiver. The transceiver converts the thickwire connection to thinwire or twisted pair which can then be routed to the network architecture used by your supporting host applications. Your Ethernet network determines the transceiver type. Cisco does not provide cables, transceivers, and other link components for the VCO/4K system.
The following describes wiring practices for serial EIA/TIA-232 connections to the Storage/Control I/O Module in each VCO/4K system controller:
Refer to the Cisco VCO/4K System Administrator's Guide for information about defining host links.
The pinouts of each serial EIA/TIA-232 DB-25 connector on the Storage/Control I/O Module are shown in Table 2-7. The signals supported by each connector are similar.
| Pin | Signal Name | Signal Description |
|---|---|---|
2 | TxD | Transmit Data |
3 | RxD | Receive Data |
4 | RTS1 | Request to Send |
5 | CTS1 | Clear To Send |
6 | DSR1 | Data Set Ready |
7 | GND | Signal Ground |
8 | DCD1 2 | Data Carrier Detect |
15 | TxC3 | Transmit Clock |
17 | RxC3 | Receive Clock |
20 | DTR1 | Data Terminal Ready |
24 | TxC3 | Transmit Clock |
| 1Modem support only 2Not used by serial Port 1 3Supported on serial Port 4 only |
Jumpers on Serial Ports 1 and 2 on the Storage/Control I/O Module allow these ports to be configured as modem (DCE) terminations for connection to a terminal or as terminal (DTE) terminations for connection to a modem.
The factory default settings for the Storage/Control I/O Module support the following cable configurations:
If other cable configurations or terminations are required, the jumper settings on the CPU card must be modified. Refer to the Cisco VCO/4K Card Technical Descriptions for more information about jumper settings.
Figure 2-9 shows straight-through cable wiring.
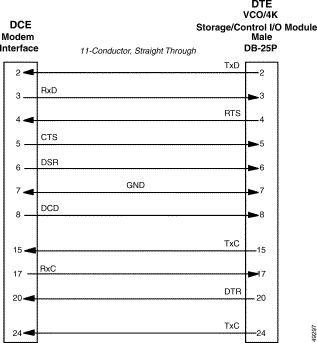
Figure 2-10 shows crossover, null modem cable wiring.
![]()
![]()
![]()
![]()
![]()
![]()
![]()
![]()
Posted: Fri Feb 2 11:38:31 PST 2001
All contents are Copyright © 1992--2001 Cisco Systems, Inc. All rights reserved.
Important Notices and Privacy Statement.
