|
|

AppleTalk is a local-area network system that was designed and developed by Apple Computer, Inc. It can run over Ethernet, Token Ring, and FDDI networks and over Apple's proprietary twisted-pair media access system (LocalTalk). AppleTalk specifies a protocol stack comprising several protocols that direct the flow of traffic over the network.
Apple Computer uses the name AppleTalk to refer to the Apple network protocol architecture. Apple Computer refers to the actual transmission media used in an AppleTalk network as LocalTalk (Apple's proprietary twisted-pair transmission medium for AppleTalk), TokenTalk (AppleTalk over Token Ring), EtherTalk (AppleTalk over Ethernet), and FDDITalk (AppleTalk over Fiber Distributed Data Interface).
This chapter describes how to configure AppleTalk and provides configuration examples. For a complete description of the commands mentioned in this chapter, refer to Chapter 12 of the Router Products Command Reference publication. For historical background and a technical overview of AppleTalk, see the Internetworking Technology Overview publication.
Cisco routers support AppleTalk Phase 1 and AppleTalk Phase 2. For AppleTalk Phase 2, Cisco routers support both extended and nonextended networks. Cisco's implementation of AppleTalk can route packets over Ethernet, Token Ring, and FDDI local-area networks, and over X.25, HDLC, Frame Relay, and SMDS wide-area networks.
The Cisco implementation of Appletalk supports the following standard AppleTalk protocols:
AARP, DDP, and RTMP provide end-to-end connectivity between internetworked nodes. AARP maps AppleTalk node addresses to the addresses of the underlying data link, thus making it possible for AppleTalk to run on several data links. DDP provides socket-to-socket delivery of packets. RTMP establishes and maintains routing tables.
NBP and ZIP maintain node name and zone information. NBP maps network names to AppleTalk addresses. ZIP tracks which networks are in which zones.
AEP is an echo, or ping-type, protocol. It generates packets that test the reachability of network nodes.
ATP is a reliable transport protocol that provides data acknowledgment and retransmission for transaction-based applications, such as file services provided by the AppleTalk Filing Protocol (AFP) and print services provided by the Printer Access Protocol (PAP).
For more information about the AppleTalk protocols, refer to the Internetworking Technology Overview publication.
The Cisco AppleTalk implementation includes the following enhancements to standard AppleTalk:
AppleTalk, like many network protocols, makes no provisions for network security. The design of the AppleTalk protocol architecture requires that security measures be implemented at higher application levels. We support AppleTalk distribution lists, allowing control of routing updates on a per-interface basis. This security feature is similar to those that we provide for other protocols.
There are two versions, or phases, of AppleTalk. AppleTalk Phase 1 and AppleTalk Phase 2 are implementations of the AppleTalk protocol stack, especially the routing portions of the stack.
AppleTalk Phase 1, the earlier version, supports a single physical network that can have one network number and be in one zone. This network can have up to 254 devices, which can consist of 127 end nodes and 127 servers. AppleTalk Phase 2, the more recent version, supports multiple logical networks on a single physical network. This means that one cable segment can have multiple network numbers. Each logical network in Phase 2 can support up to 253 devices, with no restrictions on the type of devices. Also, in AppleTalk Phase 2 a network can be in more than one zone.
AppleTalk Phase 2 introduced the concepts of extended and nonextended networks. These terms refer to the media-level encapsulation and cable addressing used on a network segment attached to a router interface. While the concepts of extended and nonextended networks do not exist in AppleTalk Phase 1, Phase 1 can be thought of as a nonextended network.
Table 12-1 compares the capabilities of AppleTalk Phase 1 and Phase 2.
| Capability | AppleTalk Phase 1 | AppleTalk Phase 2 |
|---|---|---|
| Networks, nodes, and zones | ||
| Number of logical networks (cable segments) | 1 | Unlimited |
| Maximum number of devices | 2541 | 2532 |
| Maximum number of end nodes | 127 | Does not apply3 |
| Maximum number of servers | 127 | Does not apply3 |
| Number of zones in which a network can be | 14 | 1 (nonextended) 255 (extended) |
| Media-level encapsulation | ||
| Nonextended network | Does not apply | Yes |
| Extended network | Does not apply | Yes |
| Cable addressing | Does not apply; uses network numbers | Single network number (nonextended)
Cable range of 1 or more (extended) |
Routers running Software Releases 8.2, 8.3, 9.0, 9.1, 9.21, and later support AppleTalk Phase 1 and Phase 2.
An AppleTalk address consists of a network number and a node number expressed in decimal in the format network.node.
The network number identifies a network, or cable segment. A network is a single logical cable. Although the logical cable is frequently a single physical cable, bridges can be used to interconnect several physical cables. The network number is a 16-bit decimal number that must be unique throughout the entire AppleTalk internetwork. In AppleTalk Phase 1, networks are identified by a single network number that corresponds to a physical network. In AppleTalk Phase 2, networks are identified by a cable range that corresponds to one or more logical networks. In Phase 2, a single cable can have multiple network numbers. A cable range is either one network number or a contiguous sequence of several network numbers in the format start-end. For example, the cable range 4096-4096 identifies a logical network that has a single network number, and the cable range 10-12 identifies a logical network that spans three network numbers. In both AppleTalk Phase 1 and Phase 2, the network number 0 is reserved.
The node number identifies the node, which is any device connected to the AppleTalk network. The node number is an 8-bit decimal number that must be unique on that network. In AppleTalk Phase 1, node numbers 1 through 127 are for user nodes, node numbers 128 through 254 are for servers, and node numbers 0 and 255 are reserved. In AppleTalk Phase 2, you can use node numbers 1 through 253 for any nodes attached to the network. Node numbers 0, 254, and 255 are reserved.
The following is an example of an AppleTalk network address:
3.45
Here, the network number is 3 and the node number is 45. You enter both numbers in decimal. Our software also displays them in decimal.
A zone is a logical group of networks. The networks in a zone can be contiguous or noncontiguous. A zone is identified by a zone name, which can be up to 32 characters long and can include standard characters as well as AppleTalk special characters. To include a special character, type a colon followed by two hexadecimal characters that represent the special character in the Macintosh character set. In AppleTalk Phase 2, an extended network can have up to 255 zones, and a nonextended network can have only one zone. An AppleTalk Phase 1 network can have only one zone.
AppleTalk Phase 1 and AppleTalk Phase 2 networks are incompatible and cannot run simultaneously on the same internetwork. As a result, all routers in an internetwork must support AppleTalk Phase 2 before the network can use Phase 2 routing. If your internetwork has a combination of AppleTalk Phase 1 and Phase 2 routers, you must observe the compatibility rules described in this section. Note, however, that you do not need to upgrade all end nodes in order to use the features provided by our AppleTalk enhancements.
Follow these guidelines when configuring an extended AppleTalk network on our router if any router in your AppleTalk internetwork supports only nonextended AppleTalk (that is, if any routers are Phase 1 routers). If you do not follow these guidelines, unpredictable behavior may result.
When using Cisco routers with other vendors' implementations of AppleTalk, follow these guidelines:
To configure AppleTalk routing, complete the following tasks. At a minimum, you must enable AppleTalk routing. The remaining tasks are optional.
This chapter describes how to perform these configuration tasks. Configuration examples are provided at the end of the chapter.
To enable AppleTalk routing, first enable it on the router, then configure each interface for AppleTalk. These are the only two tasks you must perform when configuring AppleTalk routing.
To enable AppleTalk on an interface, assign an AppleTalk address or cable range to the interface and then assign one or more zone names to the interface. You can perform these tasks either manually or dynamically.
You also can enable our routers to perform transition mode routing from nonextended to extended AppleTalk.
To enable AppleTalk routing on the router, perform the following task in global configuration mode:
| Task | Command |
|---|---|
| Enable AppleTalk routing. | appletalk routing |
For an example of how to enable AppleTalk routing, see the section "Configuring an Extended AppleTalk Network Example" later in this chapter.
You can manually configure an interface for nonextended or extended AppleTalk routing.
To manually configure an interface for nonextended AppleTalk routing, perform the following tasks in interface configuration mode:
| Task | Command |
|---|---|
| Step 1 Assign an AppleTalk address to the interface. | appletalk address address |
| Step 2 Assign a zone name to the interface. | appletalk zone zone-name |
For an example of how to configure an interface for nonextended AppleTalk routing, see the section "Configuring a Nonextended AppleTalk Network Example" later in this chapter.
After you assign the address and zone name, the interface will attempt to verify them with another operational router on the connected network. If there are any discrepancies, the interface will not become operational. If there are no neighboring operational routers, the router will assume the interface's configuration is correct, and the interface will become operational.
To manually configure an interface for extended AppleTalk routing, perform the following tasks in interface configuration mode:
| Task | Command |
|---|---|
| Step 1 Assign a cable range to an interface. | appletalk cable-range start-end [network.node] |
| Step 2 Assign a zone name to the interface. | appletalk zone zone-name |
You can assign more than one zone name to a cable range. If you do so, the first name you assign is considered to be the default zone.
You can define up to 255 zones.
After you assign the address and zone name(s), the interface will attempt to verify them with another operational router on the connected network. If there are any discrepancies, the interface will not become operational. If there are no neighboring operational routers, the router will assume the interface's configuration is correct, and the interface will become operational.
If a nonextended or an extended interface is connected to a network that has at least one other operational AppleTalk router, you can dynamically configure the interface using discovery mode. In discovery mode, an interface acquires information about the attached network from an operational router and then uses this information to configure itself.
Using discovery mode to configure interfaces saves time if the network numbers, cable ranges, or zone names change. If this happens, you need to make the changes only on one operational router.
Discovery mode is useful when you are changing a network configuration or when you are adding a router to an existing network.
Note that discovery mode does not run over serial lines.
If there is no operational router on the attached network, you must manually configure the interface as described in the previous sections. Also, if a discovery mode interface is restarted, another operational router must be present before the interface will become operational.
A nondiscovery mode interface (also called a seed router) starts up as follows. The seed router acquires its configuration from memory. If the stored configuration is not completely specified with the appletalk address or appletalk cable-range command and the appletalk zone command, the interface will not start up. If completely specified, the interface will attempt to verify the stored configuration with another router on the attached network. If there is any discrepancy, the interface will not start up. If there are no neighboring operational routers, the router will assume the interface's stored configuration is correct, and the interface will become operational.
Using discovery mode does not affect an interface's ability to respond to configuration queries from other routers on the connected network once the interface becomes operational.
When activating discovery mode, you do not need to assign a zone name. The interface will acquire the zone name from another interface.
 | Caution Do not enable discovery mode on all routers on a network. If you do and all routers restart simultaneously (for instance, after a power failure), the network will be inaccessible until you manually configure at least one router. |
You can activate discovery mode on a nonextended interface in one of two ways, depending on whether you know the network number of the attached network.
In the first method, you immediately place the interface into discovery mode by specifying an AppleTalk address of 0.0. Use this method when you do not know the network number of the attached network. To use this method, perform the following task in interface configuration mode:
| Task | Command |
|---|---|
| Place the interface into discovery mode by assigning it the AppleTalk address 0.0. | appletalk address 0.0 |
For an example of how to configure discovery mode using this method, see the section "Configuring a Nonextended Network in Discovery Mode Example" later in this chapter.
In the second method, you first assign an address to the interface and then explicitly enable discovery mode. Use this method when you know the network number of the attached network. Note that you are not required to use this method when you know the network number. To use this method, perform the following tasks in interface configuration mode:
| Task | Command |
|---|---|
| Step 1 Assign an AppleTalk address to the interface. | appletalk address network.node |
| Step 2 Place the interface into discovery mode. | appletalk discovery |
You can activate discovery mode on an extended interface in one of two ways, depending on whether you know the cable range of the attached network.
In the first method, you immediately place the interface into discovery mode by specifying a cable range of 0-0. Use this method when you do not know the network number of the attached network. To use this method, perform the following task in interface configuration mode:
| Task | Command |
|---|---|
| Place the interface into discovery mode by assigning it the cable range 0-0. | appletalk cable-range 0-0 |
In the second method, you first assign cable ranges and then explicitly enable discovery mode. Use this method when you know the cable range of the attached network. Note, however, that you are not required to use this method if you know the cable range. To use this method, perform the following tasks in interface configuration mode:
| Task | Command |
|---|---|
| Step 1 Assign an AppleTalk address to the interface. | appletalk cable-range start-end [network.node] |
| Step 2 Place the interface into discovery mode. | appletalk discovery |
Our router can route packets between extended and nonextended AppleTalk networks that coexist on the same cable. This type of routing is referred to as transition mode.
To use transition mode, you must have two router ports connected to the same physical cable. One port is configured as a nonextended AppleTalk network, and the other port is configured as an extended AppleTalk network. Each port must have unique network numbers, because you are routing between two separate AppleTalk networks: the extended network and the nonextended network.
To configure transition mode, you must have two ports on the same router that are connected to the same physical cable. You configure one port as a nonextended AppleTalk network by performing the following tasks in interface configuration mode:
| Task | Command |
|---|---|
| Step 1 Assign an AppleTalk address to the interface. | appletalk address network.node |
| Step 2 Assign a zone name to the interface. | appletalk zone zone-name |
You configure the second port as an extended AppleTalk network by performing the following tasks in interface configuration mode:
| Task | Command |
|---|---|
| Step 1 Assign an AppleTalk cable range to the interface. | appletalk cable-range start-end [network.node] |
| Step 2 Assign a zone name to the interface. | appletalk zone zone-name |
In the two interface commands that you specify to enter interface configuration mode, the type must be the same (for example, both could be Ethernet) and the unit must be different (for example, 0 and 1).
For an example of how to configure transition mode, see the section "Configuring a Nonextended Network in Discovery Mode Example" later in this chapter.
An access list is a list of AppleTalk network numbers or zones that is maintained by the router and used to control access to or from specific zones or networks.
The router supports two general types of AppleTalk access lists:
AppleTalk-style access lists regulate the internetwork using zone names. Zone names are good control points, because they are the only network-level abstraction that users can access. You can express zones names either explicitly or by using generalized argument keywords. Thus, using AppleTalk access lists simplifies network management and allows for greater flexibility when adding segments, because reconfiguration requirements are minimal.
The main advantage of AppleTalk-style access lists is that they allow you to define access regardless of the existing network topology or any changes in future topologies--because they are based on zones. A zone access list is effectively a dynamic list of network numbers. The user specifies a zone name, but the effect is as if the user had specified all the network numbers belonging to that zone.
IP-style access lists control network access based on network numbers. This feature may useful in defining access lists that control the disposition of networks that overlap, are contained by, or exactly match a specific network number range. One class of problem addressed by the use of network number-based access lists involves the potential assignment of conflicting network numbers to different networks. An access list can be used to restrict the network numbers and zones that a department can advertise, thereby limiting advertisement to an authorized set of networks. In general, zone-based access lists are insufficient for this application.
In general, however, using IP-style access lists is not recommended, because the controls are not optimal: they ignore the logical mapping provided by AppleTalk zones. One problem with IP-style access lists is that when you add networks to a zone, you must reconfigure each secure router. Another problem is that because anyone can add network segments (for example, if one group of users gets a LaserWriter and installs a Cayman GatorBox, this creates a new network segment), the potential for confusion and misconfiguration is significant.
You can combine zone and network entries in a single access list. Network filtering is performed first, then zone filtering is applied to the result. However, for optimal performance, access lists should not include both zones and numeric network entries.
There are three types of filters you can use on AppleTalk networks:
AppleTalk network access control differs from that of other protocols in that the order of the entries in an access list is unimportant. However, there are still some constraints you need to keep in mind when defining access lists:
You perform the following tasks to control access to AppleTalk networks. These tasks are described in the sections that follow.
Step 1 Create access lists.
Step 2 Create filters.
An access list defines the conditions used to filter packets sent in to or out of the interface. Each access list is identified by a number. All access-list commands that specify the same access list number create a single access list.
A single access list can contain any number and any combination of access-list commands. You can include network and cable range access-list commands and zone access-list commands in the same access list. However, you can only specify one each of the commands that specify default actions to take if none of the access conditions are matched (that is, a single access list can include only one access-list other-access command to handle networks and cable ranges that do not match the access conditions and only one access-list additional-zones command to handle zones that do not match the access conditions).
To create access lists that define access conditions for networks and cable ranges, perform one or more of the following tasks in global configuration mode:
The access list number can be a decimal value from 600 to 699.
To create access lists that define access conditions for zones, perform one or more of the following tasks in global configuration mode:
The access list number can be a decimal value from 600 to 699.
A filter examines specific packets that pass through an interface and permits or denies them based on the conditions defined in the access lists that have been applied to that interface.
You can filter the following types of AppleTalk packets:
You can apply one of each type of filter to each interface, for a total of three filters per interface. Each filter can use the same access list or different access lists.
Data packet filters and incoming routing table update filters use access lists that define conditions for networks and cable ranges only. Outgoing routing update filters use access lists that define conditions for networks, cable ranges, and zones. GZL filters use access lists that define conditions for zones only.
The following sections explain the tasks for creating AppleTalk filters.
A data packet filter checks data packets being sent out an interface. If the packets' source network or cable range has access denied, these packets are not transmitted but rather, are discarded.
Data packet filters use access lists that define conditions for networks and cable ranges only. They ignore any zone information that may be in the access list.
When you apply a data packet filter to an interface, you should ensure that all networks or cable ranges within a zone are governed by the same filters.
To create a data packet filter, perform the following tasks:
Step 1 Create a network-only access list.
Step 2 Apply a data packet filter to an interface.
To create a network-only access list, perform one or more of the following tasks in global configuration mode:
Note that several of the commands used to perform the above tasks are functionally equivalent.
To apply the data packet filter to an interface, perform the following task in interface configuration mode:
| Task | Command |
|---|---|
| Apply the data packet filter to the interface. | appletalk access-group access-list-number |
For an example of how to create data packet filters, see the section "AppleTalk Access List Examples" later in this chapter.
Routing table update filters control which updates the local routing table accepts and which routes the local router advertises in its routing updates. You create distribution lists to control the filtering of routing updates.
Filters for incoming routing updates use access lists that define conditions for networks and cable ranges only. Filters for outgoing routing updates use access lists that define conditions for networks and cable ranges, and for zones.
When filtering incoming routing updates, each network number and cable range in the update is checked against the access list. If you have not applied an access list to the interface, all network numbers and cable ranges in the routing update are added to the routing table. If an access list has been applied to the interface, only network numbers and cable ranges that satisfy the following condition are added to the routing table:
The following conditions also are applied when filtering routing updates generated by the local router:
To create a filter for routing table updates received on an interface, perform the following tasks:
Step 1 Create an access list.
Step 2 Apply a routing table update filter to an interface.
To create an access list, perform one or more of the following tasks in global configuration mode:
| Caution Ensure that access list(s) used to filter incoming routing updates do not contain any zone entries. If they do, these entries may cause undefined behavior. |
To apply the filter to incoming routing updates on an interface, perform the following task in interface configuration mode:
| Task | Command |
|---|---|
| Apply the routing update filter. | appletalk distribute-list access-list-number in |
For an example of how to create a filter for incoming routing table updates, see the section "AppleTalk Access List Examples" later in this chapter.
To create a filter for routing table updates sent out on an interface, perform the following tasks:
Step 1 Create an access list.
Step 2 Apply a routing table update filter to an interface.
To create an access list, perform one or more of the following tasks in global configuration mode:
To apply a filter to routing updates sent out on an interface, perform the following task in interface configuration mode:
| Task | Command |
|---|---|
| Apply the routing update filter. | appletalk distribute-list access-list-number out |
The Macintosh Chooser uses ZIP GetZoneList (GZL) requests to compile a list of zones from which the user can select services. Any router on the same network as the Macintosh can respond to these requests with a GZL reply. You can create a GZL filter on the router to control which zones the router mentions in its GZL replies. This has the effect of controlling the list of zones that are displayed by the Chooser.
When defining GZL filters, you should ensure that all routers on the same network filter GZL replies identically. Otherwise, the Chooser will list different zones depending upon which router responded to the request. Also, inconsistent filters can result in zones appearing and disappearing every few seconds when the user remains in the Chooser. Because of these inconsistencies, you should normally use the appletalk getzonelist-filter command only when all routers in the internetwork are our routers, unless the other vendors' routers have a similar feature.
When a ZIP GetZoneList reply is generated, only zones that satisfy the following conditions are included:
Replies to GetZoneList requests also are filtered by any appletalk distribute-list out filter that has been applied to the same interface. You need to specify an appletalk getzonelist-filter command only if you want additional filtering to be applied to GZL replies. This filter is rarely needed except to eliminate zones that do not contain user services.
Using a GZL filter is not a complete replacement for anonymous network numbers. In order to prevent users from seeing a zone, all routers must implement the GZL filter. If there are any routers on the network from other vendors, the GZL filter will not have a consistent effect.
To create a GZL filter, perform the following tasks:
Step 1 Create an access list.
Step 2 Apply a GZL filter to an interface.
To create an access list, perform one or more of the following tasks in global configuration mode:
To apply the GZL filter to an interface, perform the following task in interface configuration mode:
| Task | Command |
|---|---|
| Apply the GZL filter. | appletalk getzonelist-filter access-list-number |
If access to any network in a zone is denied, access to that zone is also denied by default. However, if you enable partial zones, access to other networks in that zone is no longer denied.
The permitting of partial zones provides IP-style access control. If enabled, the access control list behavior associated with prior software releases is restored. In addition, NBP cannot ensure consistency and uniqueness of name bindings.
If you permit partial zones, AppleTalk cannot maintain consistency for the nodes in the affected zones, and the results are undefined. With this option enabled, an inconsistency is created for the zone, and several assumptions made by some AppleTalk protocols are no longer valid.
To enable partial zone filters, perform the following task in global configuration mode:
| Task | Command |
|---|---|
| Permit access to networks in a zone in which access to a network in that zone is denied. | appletalk permit-partial-zones |
Permitting partial zones affects the appletalk distribute-list out and appletalk getzonelist-filter commands.
The AppleTalk Name Binding Protocol (NBP) associates AppleTalk network entity names (that is, AppleTalk network-addressable services) with network addresses. NBP allows you to specify descriptive or symbolic names for entities instead of their numerical addresses. When you specify the name of an AppleTalk device, NBP translates the device's entity name into the entity's network address. The name binding process includes name registration, name confirmation, name deletion, and name lookup.
Node addresses can change frequently, because AppleTalk uses dynamic addresses. Therefore, NBP associates numerical node addresses with aliases that continue to reference the correct addresses if the addresses change. These node addresses do not change very frequently, because each device keeps track of the last node number it was assigned. Typically, node numbers change only if a device is shut down for an extended period of time or if it is moved to another network segment.
To control the router's name display facility, perform one or both of the following tasks in global configuration mode:
This section describes the tasks you must perform to set up the following special configurations:
A free-trade zone is a part of an AppleTalk internet that is accessible by two other parts of the internet, neither of which can access the other. You might want to create a free-trade zone to allow the exchange of information between two organizations that otherwise want to keep their internets isolated from each other or that do not have physical connectivity with one another.
To establish a free-trade zone, perform the following task in interface configuration mode:
| Task | Command |
|---|---|
| Establish a free-trade zone. | appletalk free-trade-zone |
SNMP normally uses UDP, IP's connectionless datagram service, to monitor network entities. Our router software lets you run SNMP using DDP, the AppleTalk datagram service. Use DDP if you have SNMP consoles running on a Macintosh.
You must configure AppleTalk routing globally and on an interface basis before you configure SNMP for the router.
To configure SNMP in AppleTalk networks, perform the following tasks:
For an example of configuring SNMP, see the section "SNMP-over-DDP Example" later in this chapter.
Refer to Chapter 5 for information about configuring SNMP on the router.
When connecting two AppleTalk networks with a non-AppleTalk backbone, such as IP, the relatively high bandwidth consumed by the broadcasting of Routing Table Maintenance Protocol (RTMP) data packets can severely hamper the backbone's network performance. This problem can be solved by tunneling AppleTalk through a foreign protocol, such as IP. Tunneling encapsulates an AppleTalk packet inside the foreign protocol packet, which is then sent across the backbone to a destination router. The destination router then de-encapsulates the AppleTalk packet and, if necessry, routes the packet to a normal AppleTalk network. Because the tunnel exists between only two points on the network and because the encapsulated AppleTalk packet is sent in a directed manner to a remote IP address, bandwidth usage is greatly reduced. Furthermore, the encapsulated packet benefits from any features normally enjoyed by IP packets, including default routes and load balancing.
There are two ways to tunnel AppleTalk. The first method implements Cayman tunneling as designed by Cayman Systems. This method enables routers to interoperate with Cayman GatorBoxes. The second method is a proprietary tunneling protocol known as generic route encapsulation (GRE).
When you use Cayman tunneling, you can have our routers at either end of the tunnel, or you can have a GatorBox at one end and our router at the other end. When you use GRE tunneling, you must have only our routers at both ends of the tunnel connection.
Multiple tunnels originating from the router are supported.
Logically, tunnels are point-to-point links. This requires that you configure a separate tunnel for each link.
To configure a Cayman tunnel, perform the following tasks.
| Caution Do not configure a Cayman tunnel with an AppleTalk network address. |
To configure a GRE tunnel, perform the following tasks. Note that a GRE tunnel requires an AppleTalk network address and a zone.
Our routers implement MacIP, which is a protocol that allows routing of IP datagrams to IP clients using the AppleTalk Datagram Delivery Protocol (DDP) for low-level encapsulation.
Our routers implement the MacIP address management and routing services described in the ANF draft RFC, A Standard for the Transmission of Internet Packets over AppleTalk Networks. Our implementation of MacIP conforms to the September 1991 draft RFC with the following exceptions:
Some situations require the use of MacIP. For example, if some of your Macintosh users use AppleTalk Remote Access, or are connected to the network using LocalTalk or PhoneNet cabling systems, then MacIP is required to provide access to IP network servers for those users.
MacIP services also can be useful when you are managing IP address allocations for a large, dynamic Macintosh population. There are several advantages to using MacIP in this situation:
However, there are several disadvantages in implementing MacIP on our routers:
To configure MacIP on our routers, AppleTalk must be configured as follows:
When setting up MacIP routing, keep the following address range issues in mind:
To configure MacIP, perform the following tasks:
Step 1 Establish a MacIP server for a specific zone.
Step 2 Allocate IP addresses for Macintosh users by specifying at least one dynamic or static resource address assignment command for each MacIP server.
To establish a MacIP server for a specific zone, perform the following global configuration task:
| Task | Command |
|---|---|
| Establish a MacIP server for a zone. | appletalk macip server ip-address zone server-zone |
You can configure multiple MacIP servers for a router, but you can assign only one MacIP server to a zone, and you can assign only one IP interface to a MacIP server. In general, you must be able to establish an alias between the IP address you assign with the appletalk macip server command and an existing IP interface. For implementation simplicity, it is suggested that the address you specify in this command match an existing IP interface address.
A server is not registered by NBP until at least one MacIP resource is configured.
Dynamic clients are those that accept any IP address assignment within the dynamic range specified. Dynamic addresses are for users who do not require a fixed address, but can be assigned addresses from a pool.
To allocate IP addresses for Macintosh users if you are using dynamic addresses, perform the following global configuration task:
| Task | Command |
|---|---|
| Allocate an IP address to a MacIP client. | appletalk macip dynamic ip-address [ip-address] zone server-zone |
For an example of configuring MacIP with dynamic addresses, see the section "MacIP Examples" later in this chapter.
Static addresses are for users who require fixed addresses for IP DNS services and for administrators who do not want addresses to change so they always know the IP addresses of the devices on their network.
To allocate IP addresses for Macintosh users if you are using static addresses, perform the following global configuration task:
| Task | Command |
|---|---|
| Allocate an IP address to be used by a MacIP client that has reserved a static IP address. | appletalk macip static ip-address [ip-address] zone server-zone |
For an example of configuring MacIP with static addresses, see the section "MacIP Examples" later in this chapter.
In general, it is recommended that you do not use fragmented address ranges in configuring ranges for MacIP. However, if this is unavoidable, use the appletalk macip dynamic command to specify as many addresses or ranges as required, and use the appletalk macip static command to assign a specific address or address range.
IPTalk is a protocol for encapsulating AppleTalk packets in IP datagrams. IPTalk is used to route AppleTalk packets across non-AppleTalk backbones and to communicate with applications on hosts that cannot otherwise communicate via AppleTalk, such as the Columbia AppleTalk Package (CAP). IPTalk also allows serial connections to use IPTalk Serial Line Interface Protocol (SLIP) drivers.
To configure IPTalk on an interface, perform the following tasks:
Step 1 Configure IP encapsulation of AppleTalk packets.
Step 2 Specify the User Datagram Protocol (UDP) port number that is the beginning of the range of UDP ports used in mapping AppleTalk well-known DDP socket numbers to UDP ports.
For a description of setting up UNIX-based systems and the router to use CAP IPTalk and other IPTalk implementations, see the section "IPTalk Example" later in this chapter.
The installation instructions for CAP refer to KIP gateways and to the file atalkatab. If you use our IPTalk support, it is not necessary nor is it desirable to use atalkatab. Our IPTalk support assumes that you want to use the standard AppleTalk routing protocols to perform all wide-area AppleTalk routing. KIP and atalkatab are based on an alternative routing strategy in which AppleTalk packets are transmitted using IP routing. It is possible to use both strategies at the same time; however, the interaction between the two routing techniques is not well defined.
If your network has other vendors' routers that support atalkatab, you should disable atalkatab support on them to avoid mixing the routing strategies. The installation instructions provided with some of these products encourage you to use atalkatab for complex networks. However, with our routers this is not necessary, because our implementation of IPTalk integrates IPTalk into the standard AppleTalk network routing.
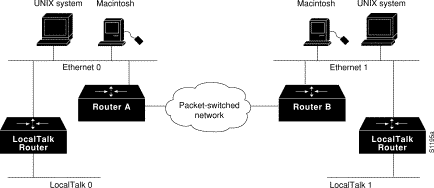
The network diagram in Figure 12-1 illustrates how you should set up IPTalk. In this configuration, you enable both standard AppleTalk (EtherTalk) and IPTalk on the Ethernet networks on Router A and Router B. These routers then use EtherTalk to communicate with the LocalTalk routers and Macintosh computers, and IPTalk to communicate with the UNIX systems. On the LocalTalk routers, you also should enable both EtherTalk and IPTalk, making sure you configure IPTalk with atalkatab disabled. These routers then use IPTalk to communicate with the UNIX systems adjacent to them and EtherTalk to communicate with the rest of the AppleTalk network. This configuration strategy minimizes the number of hops between routers. If you did not enable IPTalk on the LocalTalk routers, systems on the LocalTalk router that wanted to communicate with the adjacent UNIX system would have to go through Router A or Router B. This creates an unnecessary extra hop.
To allow AppleTalk to communicate with UNIX hosts running older versions of CAP that do not support native AppleTalk EtherTalk encapsulations, you need to configure IP encapsulation of AppleTalk packets. (Typically, Apple Macintosh users would communicate with these servers by routing their connections through a Kinetics FastPath router running KIP [Kinetics IP] software.) Newer versions of CAP provide native AppleTalk EtherTalk encapsulations, so the IPTalk encapsulation is not longer required. Our implementation of IPTalk assumes that AppleTalk is already being routed on the backbone, because there is currently no LocalTalk hardware interface for our routers.
You can configure IPTalk on an interface that already has a configured IP address.
Our implementation of IPTalk does not support manually configured AppleTalk-to-IP-address mapping (atab). The address mapping provided is the same as the Kinetics IPTalk implementation when the atab facility is not enabled. This address mapping works as follows: The IP subnet mask used on the router Ethernet interface on which IPTalk is enabled is inverted (one's complement). The result is then masked against 255 (0xFF hexadecimal), and the result of this is then masked against the low-order 8 bits of the IP address to give the AppleTalk node number.
The following example configuration illustrates how the address mapping is done:
interface ethernet 0
ip address 131.108.1.118 255.255.255.0
appletalk address 20.129
appletalk zone Native AppleTalk
appletalk iptalk 30.0 UDPZone
First, the IP subnet mask of 255.255.255.0 is inverted to give 0.0.0.255. This value then is masked with 255 to give 255. Next, 255 is masked with the low-order 8 bits of the interface IP address (118) to yield an AppleTalk node number of 118. This means that the AppleTalk address of the Ethernet 0 interface seen in the UDPZone zone is 30.118.
You should note the following caveat: If the host field of an IP subnet mask for an interface is longer than 8 bits, it will be possible to obtain conflicting AppleTalk node numbers. For instance, if the subnet mask for the Ethernet 0 interface above is 255.255.240.0, the host field is 12 bits wide.
To configure IP encapsulation of AppleTalk packets, perform the following tasks in interface configuration mode:
| Task | Command |
|---|---|
| Step 1 Configure an IP address on the interface. | ip address address [mask] |
| Step 2 Enable IPTalk encapsulation on the interface. | appletalk iptalk net.node zone |
For an example of configuring IPTalk, see the section "IPTalk Example" later in this chapter.
Implementations of IPTalk prior to April 1988 mapped well-known DDP socket numbers to privileged User Datagram Protocol (UDP) ports starting at port number 768. In April 1988, the NIC assigned a range of UDP ports for the defined DDP well-known sockets starting at UDP port number 200 and assigned these ports the names at-nbp, at-rtmp, at-echo, and at-zis. Release 6 and later of the CAP program dynamically decides which port mapping to use. If there are no AppleTalk service entries in the UNIX system's /etc/services file, CAP uses the older mapping starting at UDP port number 768.
The default UDP port mapping supported by our implementation of IPTalk is 768. If there are AppleTalk service entries in the UNIX system's /etc/services file, you should specify the beginning of the UDP port mapping range with the appletalk iptalk-baseport command.
To specify the UDP port number that is the beginning of the range of UDP ports used in mapping AppleTalk well-known DDP socket numbers to UDP ports, perform the following task in global configuration mode:
| Task | Command |
|---|---|
| Specify the starting UDP port number. | appletalk iptalk-baseport port-number |
For an example of configuring IPTalk, see the section "IPTalk Example" later in this chapter.
To tune AppleTalk network performance, you can perform one or more of the following tasks:
The Routing Table Maintenance Protocol (RTMP) establishes and maintains the AppleTalk routing table. You can perform the following tasks to control packet routing and control routing updates:
By default, the router performs strict RTMP checking, which discards any RTMP packets sent by routers that are not directly connected to the local router (that is, sent by routers that are not neighbors). This means that the local router does not accept any routed RTMP packets whose source is a remote network.
In almost all situations, you should leave RTMP checking enabled.
To disable RTMP checking and enable the processing of routed RTMP packets, perform the following task in global configuration mode:
| Task | Command |
|---|---|
| Disable strict checking of RTMP updates. | no appletalk strict-rtmp-checking |
By default, routers receive routing updates from their neighboring routers and periodically send routing updates to their neighbors. You can configure a router so that it only receives routing updates, but does not send any. You might want to do this to keep a particular router from sending routing updates to its neighbors because it is unreliable.
To disable the transmission of routing updates, perform the following task in interface configuration mode:
| Task | Command |
|---|---|
| Disable the transmission of routing updates on an interface. | no appletalk send-rtmps |
The Name Binding Protocol (NBP) uses the Zone Information Protocol (ZIP) to determine which networks belong to which zones. The router uses ZIP to maintain a table of the AppleTalk internetwork that maps network numbers to zone names.
By default, the router does not advertise routes to networks that have no associated zones. This prevents the occurrence of ZIP protocol storms, which can arise when corrupt routes are propagated and routers broadcast ZIP requests to determine the network-zone associations. Not advertising routes to networks that do not have associated zones limits any ZIP protocol storms to a single network rather than allowing them to spread to the entire internetwork.
To allow the advertisement of routes to networks that have no associated zones, perform the following task in global configuration mode:
| Task | Command |
|---|---|
| Allow the advertisement of routes to networks that have no associated zones. | no appletalk require-route-zones |
The user zone lists can be configured to vary from interface to interface. However, this practice is discouraged, because AppleTalk users expect to have the same user zone lists at any end node in the internet. This kind of filtering does not prevent explicit access via programmatic methods, but should be considered a user optimization whereby unused zones are suppressed. Other forms of AppleTalk access control lists should be used to actually secure a zone or network.
The router sends routing table updates at regular intervals. In rare instances you might want to change this interval, such as when a router is busy and cannot send routing updates every 10 seconds, or when slower routers are incapable of processing received routing updates in a large network. If you do change the routing update interval, be sure to do so for all routers on the network.
| Caution Modifying the routing timers can degrade or destroy AppleTalk network connectivity. Many other AppleTalk router vendors provide no facility for modifying their routing timers, so adjusting our router's AppleTalk timers such that routing updates do not arrive at these other routers within the normal interval may result in loss of information about the network or loss of connectivity. |
To change the routing table update timers, perform the following task in global configuration mode:
| Task | Command |
|---|---|
| Change the routing update timers. | appletalk timers update-interval valid-interval invalid-interval |
It is possible to have an AppleTalk internetwork in which some routers support only nonextended AppleTalk and others support only extended AppleTalk. You can enable interoperability between these two types of AppleTalk networks by assigning a proxy network number for each zone in which there is a router that supports only nonextended AppleTalk.
To assign proxy network numbers, perform the following task in global configuration mode:
| Task | Command |
|---|---|
| Assign a proxy network number for each zone in which there is a router that supports only nonextended AppleTalk. | appletalk proxy-nbp network-number zone-name |
For an example of configuring proxy network numbers, see the section "Proxy Network Number Example" later in this chapter.
| Caution Do not also assign the proxy network number to a router or to a physical network. |
You must assign one proxy network number for each zone. You can optionally define additional proxies with different network numbers to provide redundancy. Each proxy network number generates one or more packets for each forward request it receives, but discards all other packets sent to it. Thus, defining redundant proxy network numbers increases the NBP traffic linearly.
By default, the router generates and verifies checksums for all AppleTalk packets (except routed packets). You might want to disable checksum generation and verification if you have older devices, such as LaserWriter printers, that cannot receive packets with checksums.
To disable checksum generation and verification, perform the following task in global configuration mode:
| Task | Command |
|---|---|
| Disable the generation and verification of checksums for all AppleTalk packets. | no appletalk checksum |
You can perform the following tasks to control the AppleTalk ARP table:
By default, entries in the AppleTalk ARP table are removed from the table if no update has been received in the last 4 hours. To change the ARP timeout interval, perform the following task in interface configuration mode:
| Task | Command |
|---|---|
| Set the timeout for ARP table entries. | appletalk arp-timeout interval |
The AppleTalk Address Resolution Protocol (AARP, or AppleTalk ARP) associates AppleTalk network addresses with media (data link) addresses. When AppleTalk must send a packet to another network node, the protocol address is passed to AppleTalk ARP, which undertakes a series of address negotiations to associate the protocol address with the media address.
If your AppleTalk network has devices that respond slowly, such as printers and overloaded file servers, you can lengthen the interval between AppleTalk ARP packets in order to allow the responses from these devices to be received. To do this, perform one or both of the following tasks in global configuration mode:
The router automatically derives ARP table entries from incoming packets. This process is referred to as "gleaning." Gleaning speeds up the process of populating the ARP table. To disable the gleaning of ARP table entries, perform the following task in interface configuration mode:
| Task | Command |
|---|---|
| Disable the gleaning of ARP information from incoming packets. | no appletalk glean-packets |
By default, the router sends ZIP queries every 10 seconds and uses the information received to update its zone table. To change the ZIP query interval, perform the following task in global configuration mode:
| Task | Command |
|---|---|
| Set the ZIP query interval. | appletalk zip-query-interval interval |
You can log information about significant network events performed on the router, including routing changes, zone creation, port status, and address. To do this, perform the following task in global configuration mode:
| Task | Command |
|---|---|
| Log significant events. | appletalk event-logging |
Fast switching allows higher throughput by switching a packet using a cache created by previous packets. Fast switching is enabled by default on all interfaces that support fast switching.
Packet transfer performance is generally better when fast switching is enabled. However, you may want to disable fast switching in order to save memory space on interface cards and to help avoid congestion when high-bandwidth interfaces are writing large amounts of information to low-bandwidth interfaces.
To disable AppleTalk fast switching on an interface, perform the following task in interface configuration mode:
| Task | Command |
|---|---|
| Disable AppleTalk fast switching. | no appletalk route-cache |
To have the router recognize AppleTalk packets sent on the FDDI ring from routers running Cisco software releases prior to Release 9.0(3) or 9.1(2), perform the following task in interface configuration mode:
| Task | Command |
|---|---|
| Enable the recognition of pre-FDDITalk packets. | appletalk pre-fdditalk |
You can configure AppleTalk over X.25, Frame Relay, and SMDS networks. To do this, configure the appropriate address mappings as described in Chapters 7, 8, and 9, respectively.
For X.25, you can configure only a nonextended AppleTalk network. Logically, this network is the same as a LocalTalk network, because both are always nonextended networks. All AppleTalk nodes within an X.25 network must be configured with the same AppleTalk network number. Also, the network numbers and zone names on both sides of the serial link must be the same. When mapping the AppleTalk address to the X.121 address of the router with the x25 map command, include the keyword broadcast to simulate the AppleTalk broadcast capability. This is necessary because X.25 does not support broadcasts, but AppleTalk does. The broadcast simulation is done as follows: If the broadcast flag is set, whenever a broadcast packet is sent, each X.121 address specified will receive it.
The router software provides several commands you can use to monitor an AppleTalk network. In addition, you can use network monitoring packages, such as Apple Computer's Inter·Poll, to verify that a router is configured and operating properly. Use the commands described in this section to monitor an AppleTalk network using both router commands and network monitoring packages.
To monitor the AppleTalk network, perform one or more of the following tasks at the EXEC prompt:
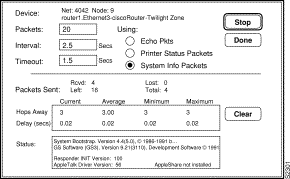
The router software supports network monitoring packages, such as Apple Computer's Inter·Poll, which are tools that use the AppleTalk responder and listener for verifying the router's configuration and operation. The router answers Appletalk responder requests. These response packets are received by the listener, which is installed on the Appletalk interface name registration socket. The response packets include the bootstrap firmware version string, followed by the router operating software version string. These strings are displayed in the Macintosh System version and the Macintosh printer driver version fields, respectively, in applications such as Apple's Inter·Poll. The response packet contains strings similar to those displayed by the show version EXEC command.
The router returns the following information in response to responder requests:
Figure 12-2 illustrates a typical output display for Inter·Poll that lists this information.
.
Use the following configuration examples to help you configure AppleTalk routing on your router:
The following example configures an extended AppleTalk network. It defines the zones Purgatory and Underworld. The cable range of one allows compatibility with nonextended AppleTalk networks.
appletalk routing
interface ethernet 0
appletalk cable-range 69-69 69.128
appletalk zone Purgatory
appletalk zone Underworld
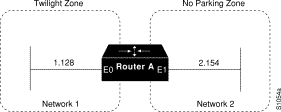
The following example configures a nonextended AppleTalk network that allows routing between two Ethernet networks. Ethernet interface 0 is connected to network 1 at node 128, and Ethernet interface 1 is connected to network 2 at node 154. Network 1 is in the Twilight zone, and network 2 is in the No Parking zone. See Figure 12-3.
appletalk routing
!
interface ethernet 0
appletalk address 1.128
appletalk zone Twilight
!
interface ethernet 1
appletalk address 2.154
appletalk zone No Parking
The following example configures a nonextended network in discovery mode. There are seed routers on both networks to provide the zone and network number information to the interfaces when they start. See Figure 12-4.
Use the following commands to configure this nonextended network in discovery mode:
appletalk routing
!
interface ethernet 0
appletalk address 0.0
!
interface ethernet 1
appletalk address 0.0
When in transition mode, the router can route packets between extended and nonextended AppleTalk networks that exist on the same cable.
To configure transition mode, you must have two ports connected to the same physical cable. One port is configured as a nonextended AppleTalk network, and the other is configured as an extended AppleTalk network. Both ports must have unique network numbers, because they are two separate networks. Figure 12-5 shows an example of the topology of this configuration.
Use the following commands to configure this network. Note that networks 2-2 and 4-4 must have a cable range of one and a single zone in their zone lists. This is required to maintain compatibility with the nonextended network, network 3.
!This is an extended network.
interface ethernet 0
appletalk cable-range 2-2
appletalk zone No Parking
!
!This is a nonextended network.
interface ethernet 1
appletalk address 3.128
appletalk zone Twilight
!
!This is an extended network.
interface ethernet 2
appletalk cable-range 4-4
appletalk zone Do Not Enter
Our implementation of AppleTalk provides several access-list commands that you can use to control access to AppleTalk networks. The examples that follow illustrate how to use these commands and show different approaches in applying access lists.
The following commands create access list 601:
!Permit packets to be routed from network 55.
access-list 601 permit network 55
!Permit packets to be routed from network 500.
access-list 601 permit network 500
!Permit packets to be routed from networks 900 through 950.
access-list 601 permit cable-range 900-950
!Do not permit packets to be routed from networks 970 through 990.
access-list 601 deny includes 970-990
!Do not permit packets to be routed from networks 991 through 995.
access-list 601 permit within 991-995
!Deny routing to any network and cable range not specifically enumerated.
access-list 601 deny other-access
To use this access list to filter data packets, you apply it an interface (here, Ethernet interface 0) using the following commands:
appletalk routing
interface ethernet 0
appletalk cable-range 50-50
appletalk zone No Parking
appletalk access-group 601
The following examples illustrate how Ethernet interface 0 would handle outgoing data packets:
The following commands create access list 602. This section uses this example to illustrate how packets are processed by access lists; you would probably never create such a redundant access list.
access-list 602 permit network 55
access-list 602 permit cable 55-55
access-list 602 permit includes 55-55
access-list 602 permit within 55-55
To use this access list to filter routing table updates received on Ethernet interface 0, apply it to the interface using the following commands:
appletalk routing
interface ethernet 0
appletalk cable-range 50-50
appletalk zone No Parking
appletalk distribute-list 602 in
The following tables illustrate the process for accepting or rejecting routing update information. If the outcome of a test is true, the condition passes the access list specification and the distribute-list command specification is then applied.
Routing updates from network 55 would be processed as follows:
| Access List Command | Outcome of Test |
|---|---|
| access-list 602 permit network 55 | True |
| access-list 602 permit cable 55-55 | False |
| access-list 602 permit includes 55-55 | True |
| access-list 602 permit within 55-55 | True |
Routing updates from cable range 55-55 would be processed as follows:
| Access List Command | Outcome of Test |
|---|---|
| access-list 602 permit network 55 | False |
| access-list 602 permit cable 55-55 | True |
| access-list 602 permit includes 55-55 | True |
| access-list 602 permit within 55-55 | True |
Routing updates from cable range 55-60 would be processed as follows:
| Access List Command | Outcome of Test |
|---|---|
| access-list 602 permit network 55 | False |
| access-list 602 permit cable 55-55 | False |
| access-list 602 permit includes 55-55 | True |
| access-list 602 permit within 55-55 | False |
With the flexibility allowed by our access list implementation, determining the optimal method to segment an AppleTalk environment using access control lists can be unclear. The following scenario and configuration examples illustrate two solutions to a particular problem and point out the inherent advantages of using AppleTalk-style access lists.
Consider a situation in which a company wants to permit customers to have direct access to several corporate file servers. Access is to be permitted to all devices in the zones named MIS and Corporate, but access is restricted to the Engineering zone because the file servers in these zones contain sensitive information. The solution is to create the appropriate access lists to enforce these access policies.
The company's AppleTalk internet consists of the following networks and zones:
| Zone | Network Number or Cable Range |
|---|---|
| Engineering | 69-69 3 4160-4160 15 |
| MIS | 666-777 |
| Corporate | 70-70 55 51004 4262-4262 |
| World | 88-88 9 9000-9999 (multiple networks exist in this range) |
The router named Gatekeeper is placed between the World zone and the various company-specific zones. There can be an arbitrary number of routers on either side of Gatekeeper. An Ethernet backbone exists on each side of Gatekeeper, connecting these other routers to Gatekeeper. On the router Gatekeeper, Ethernet interface 0 (E0) connects to the World backbone and Ethernet interface 1 (E1) connects to the Corporate backbone.
For the purposes of this configuration, assume Gatekeeper is the only router that needs any access list configuration. There are two solutions, depending on the level of security desired.
A minimal configuration might be as follows. In this configuration, the Engineering zone is secured, but all other zones are publicly accessible.
appletalk routing
access-list 603 deny zone Engineering
access-list 603 permit additional-zones
access-list 603 permit other-access
interface ethernet 0
appletalk network 3
appletalk distribute-list 603 out
appletalk access-group 603
A more comprehensive configuration might be the following, in which the Corporate and MIS zones are public and all other zones are secured:
appletalk routing
access-list 603 permit zone Corporate
access-list 603 permit zone MIS
access-list 603 deny additional-zones
access-list 603 deny other-access
interface ethernet 0
appletalk network 3
appletalk distribute-list 603 out
appletalk access 603
Both configurations satisfy the basic goal of isolating the engineering servers, but the second example will continue to be secure when more zones are added in the future.
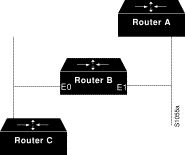
Figure 12-6 illustrates a configuration in which you might want to allow partial advertisement of a particular zone.
Assume that Router B includes a router-update filter (applied with the appletalk distribute-list interface subcommand) on the Ethernet interface 3 that does not accept routing table updates from network 10, nor does it send routing table updates to that network:
access-list 612 deny network 10
access-list 612 permit other-access
interface ethernet 3
appletalk distribute-list 612 out
appletalk distribute-list 612 in
For Network 30, normal (default) behavior would be for Network 10 and Network 20 to be eliminated from any routing updates sent, although Network 15 would be included in routing updates (same zone as Network 30). Using the appletalk permit-partial-zones configuration command has the following effects:
Table 12-2 summarizes the associations between the networks shown in Figure 12-6. Table 12-3 details the effects of enabling and disabling partial-zone advertisement with the appletalk permit-partial-zones command.
| Network 10 | Network 15 | Network 20 | Network 30 | |
|---|---|---|---|---|
| Zone | A | B | A | B |
| Interface(s) | Ethernet 0 | Ethernet 4 | Ethernet 1 Ethernet 2 | Ethernet 3 |
| Command Condition | Network 10 | Network 15 | Network 20 | Network 30 |
|---|---|---|---|---|
| Enabled | Not Advertised on Network 30 | Advertised on Network 30 | Advertised on Network 30 | -- |
| Disabled | Not Advertised on Network 30 | Advertised on Network 30 | Not Advertised on Network 30 | -- |
The following examples illustrate the use of AppleTalk access lists to manage access to certain resources.
A free-trade zone is a part of an AppleTalk internet that is accessible by two parts of the internet, neither of which can access the other. One such situation, illustrated in Figure 12-7, shows a configuration in which you want to provide access to several AppleShare servers on a network that is directly connected to two routers, but you want to restrict access to other networks that are connected to these routers.
In this example, the goal of configuration is to allow all the users on all the networks connected to Routers A and B to be able to access the AppleShare servers AS1 and AS2 in the zone FreeAccessZone. A second requirement is to block cross-access through this zone. In other words, users in the zones MIS1, MIS2, and LocalTalk (which are connected to Ethernet interface 0 on Router A) are not allowed access to any of the resources on networks connected to Ethernet interface 4 on Router B. Similarly, users in the zones Engineering, Test, and LocalTalk (which are connected to Ethernet interface 4 on Router B, interface E4) are not allowed access to any of the resources on networks connected to Ethernet interface 0 on Router A.
The following commands configure Router A and Router B for this access control. You have to configure only Ethernet interface 1 on Router A and Ethernet interface 2 on Router B to provide the desired access.
appletalk routing
!
interface ethernet 1
appletalk cable-range 5-5
appletalk zone FreeAccessZone
appletalk free-trade-zone
appletalk routing
!
interface ethernet 2
appletalk cable-range 5-5
appletalk zone FreeAccessZone
appletalk free-trade-zone
When configuring both routers, you do not need to define any access lists to prevent users on networks connected to Router A from accessing resources on networks connected to Router B, and vice versa. The appletalk free-trade-zone interface configuration command implements the necessary restrictions.
In the preceding example, shared-resource access was granted to all users in the various AppleTalk zones connected to the two routers. At the same time, access between resources on either side of the common zone was completely denied. There may be instances where a greater degree of control is required--possibly where resources in some zones are to be allowed access to resources in certain other zones, but are denied access to other specific zones. Figure 12-8 illustrates such a situation.
The following are the objectives of this configuration:
To meet these specifications, you define the following access lists:
access-list 609 permit cable 9-9
access-list 609 deny other-access
!
access-list 610 permit zone Finance
access-list 610 permit zone FreeAccessZone2
access-list 610 deny additional-zones
!
access-list 611 deny cable-range 1000-1000
access-list 611 deny cable-range 9-9
access-list 611 permit cable-range 7000-7010
access-list 611 permit cable-range 22-30
The effects of these access lists are as follows:
Ethernet interface 0 is associated with the MIS zone. Use the following commands to configure this interface:
interface ethernet 0
appletalk cable-range 7000-7010
appletalk zone MIS
appletalk distribute-list 611 out
appletalk distribute-list 611 in
Specifying access list 611 results in the following filtering:
Ethernet interface 5 is associated with the Finance zone. Use the following commands to configure this interface:
interface ethernet 5
appletalk cable-range 1000-1000
appletalk zone Finance
appletalk distribute-list 610 out
appletalk access-group 610
The effects of these access lists are as follows:
Ethernet interface 6 is associated with the FreeAccessZone2 zone. Use the following commands to configure this interface:
interface ethernet 6
appletalk cable 9-9
appletalk zone FreeAccessZone2
appletalk distribute-list 609 out
appletalk distribute-list 609 in
Ethernet interface 7 is associated with the Engineering zone. The configuration for this interface mirrors that for Ethernet interface 0, because the users in both the MIS and Engineering zones need to have access to each other's resources. Use the following commands to configure Ethernet interface 7:
interface ethernet 7
appletalk cable-range 22-30
appletalk zone Engineering
appletalk distribute-list 611 out
appletalk distribute-list 611 in
Omitted from this configuration example are any specific configuration commands pertaining to the zones Test-Lab (Ethernet interface 9 on Router T) and Admin (Ethernet interface 4 on Router C). No configuration is done for these zones, because there are no requirements relating to them listed in the original objectives. The following access control is implicitly handled with the assignment of the stated access lists:
The following example illustrates MacIP support for dynamically addressed MacIP clients with dynamically allocated IP addresses in the range 131.108.0.2 to 131.108.0.10
!Specify server address and zone
appletalk macip server 131.108.0.1 zone Snark
!
!Specify dynamically addressed clients
!appletalk macip dynamic 131.108.0.2 131.108.0.10 zone Snark
!
!Assign the address and subnet mask for Ethernet interface 0
interface ethernet 0
ip address 131.108.0.2 255.255.255.0
!
!Enable AppleTalk routing
appletalk routing
!
interface ethernet 0
appletalk cable range 69-69 69.128
appletalk zone Snark
The following example illustrates MacIP support for MacIP clients with statically allocated IP addresses:
!Specify the server address and zone
appletalk macip server 131.108.0.1 zone Snark
!
Specify statically addressed clients
appletalk macip static 131.108.0.11 131.108.0.20 zone Snark
appletalk macip static 131.108.0.31 zone Snark
appletalk macip static 131.108.0.41 zone Snark
appletalk macip static 131.108.0.49 zone Snark
!
!Assign the address and subnet mask for Ethernet interface 0
interface ethernet 0
ip address 131.108.0.1 255.255.255.0
!
!Enable AppleTalk routing
appletalk routing
!
interface ethernet 0
appletalk cable range 69-69 69.128
appletalk zone Snark
The following example configuration sequence illustrates proper activation of SNMP and AppleTalk on a router:
!Disable SNMP on the router.
no snmp-server
!
!Enable AppleTalk routing and event logging on the router.
appletalk routing
appletalk event-logging
!
!Configure IP and AppleTalk on Ethernet interface 0.
interface Ethernet 0
ip address 131.108.29.291 255.255.255.0
appletalk cable-range 29-29 29.180
appletalk zone Zombie
!
!Enable SNMP on the router.
snmp-server community propellerhead RW
snmp-server trap-authentication
snmp server host 131.108.2.160 propellerhead
!
Assume that your network topology looks like the one in Figure 12-9. Also assume that Router A supports only nonextended AppleTalk, that Router B supports only extended AppleTalk (not in transition mode), and that Router C supports only extended AppleTalk.
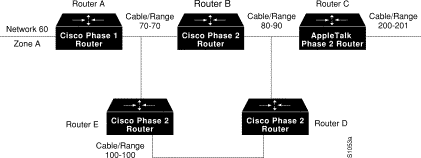
If Router C generates a NBP hookup request for zone A, Router B will convert this request to a forward request and send it to Router A. Since Router A supports only nonextended AppleTalk, it does not handle the forward request and ignores it. Hence, the NBP lookup from Router C fails.
To work around this problem without putting a transition router adjacent to the nonextended-only router (Router A), you could configure Router D with an NBP proxy.
If you configured router D with a NBP proxy as follows, any forward requests received for Zone A are converted into lookup requests, and therefore, the nonextended router for Net 60 can properly respond to NBP hookup requests generated beyond Router C. The following example demonstrates the command needed to describe this configuration:
appletalk proxy 60 A
This example describes how to set up UNIX-based systems and our routers to use CAP IPTalk and other IPTalk implementations.
If your system is a Sun or DEC ULTRIX system, it may be possible to run CAP directly in a mode that supports EtherTalk. In this case, your system would look like any other AppleTalk node and does not need any special IPTalk support. However, other UNIX systems for which EtherTalk support is not available in CAP must run CAP in a mode that depends upon IPTalk.
The following procedure outlines the basic steps for setting up our routers and UNIX hosts for operation using IPTalk implementations.
Step 1 Enable AppleTalk routing on all the routers that are going to use IPTalk and any routers between these routers.
Step 2 Enable IP routing on the interfaces that will communicate with the UNIX system. (Refer to Chapters 15 and 16 of this manual for more information about configuring IP). These interfaces must be on the same subnet as the UNIX system. Also, ensure that IP is enabled on the UNIX system.
Step 3 Allocate an AppleTalk network number for IPTalk. You need a separate AppleTalk network number for each IP subnet that is to run IPTalk.
There can be a number of UNIX machines on the same subnet. They all use the same AppleTalk network number for IPTalk. However, they must have their own individual node identifiers.
It is possible for the same router to have IPTalk enabled on several interfaces. Each interface must have a different AppleTalk network number allocated to IPTalk, because each interface will be using a different IP subnet.
Step 4 Determine the CAP format of the AppleTalk network number. The CAP software is based on an older AppleTalk convention that expresses AppleTalk network numbers as two octets (decimal numbers from 0 to 255) separated by a dot. The current AppleTalk convention uses decimal numbers from 1 to 65,279. Use the following formula to convert between the two:
CAP format: x.y
Apple format: d
Example
AppleTalk format: 14087
CAP format: 55.7
Step 5 Choose a zone name for IPTalk. There are no special constraints on zone name choices. You can use the same zone name for several networks, and you can combine IPTalk and normal AppleTalk networks in the same zone.
Step 6 Decide which UDP ports to use for IPTalk. The default is to use ports beginning with 768. Thus, RTMP uses port 769, NBP port 770, and so on. These are the original AppleTalk ports, and their numbers are hardcoded into older versions of CAP. The only problem with using them is that they are not officially assigned by the Internet's Network Information Center (NIC). NIC has assigned a set of UDP ports beginning with 200. Thus, other applications could use them, possibly causing conflicts--although this is unlikely. With CAP releases 5.0 and later, you can configure CAP to use the officially allocated ports. If you do so, RTMP will use port 201, NBP port 202, and so on. Whichever ports you use, you must configure both CAP and the router to use the same ones.
Step 7 Enable IPTalk on each interface of the router as required. This is illustrated by the following example:
In this example, AppleTalk routing is enabled on the interface in two ways:
If you choose to use the official UDP ports (those beginning with 200), include the following global configuration command in your configuration:
Step 8 Configure each UNIX host with a network number, zone name, and router.
As an example, the following are the contents of the /etc/atalk.local file from a UNIX system with the IP address 128.6.7.26 and a network mask of 255.255.255.0:
The first noncomment line defines the address of the UNIX system, and the second noncomment line defines the address of the router. In both cases, the first column is 55.7, which is the AppleTalk network number, in CAP format, for use by IPTalk. The second column is the AppleTalk node identifier, which must be the same as the IP host number. The third column on the first line is the zone name, and on the second line it is the IP address of the router.
Note the following about these entries:
Step 9 Ensure that your CAP software is using the same UDP port numbers as the router. Currently, the CAP default is the same as the router default, which is port numbers beginning with 768. If you want to use this default, you do not need to take any further action. However, if you want to use the official UDP port numbers (port numbers beginning with 200), ensure that you have included the following command in your router configuration:
Step 10 On the UNIX system, add the following lines to the /etc/services file:
If you are using Network Information Services (NIS), previously known as Yellow Pages, remember to do a make in /var/yp after changing /etc/services. If you are using the default ports (those starting with 768), you do not need to modify /etc/services.
|
|