|
|

This chapter describes how to configure the system.You will find information about the following tasks in this chapter:
The "Startup and Basic Configuration" chapter provides the procedures for basic system configuration using the setup facility, and for entering system configuration mode. The "Protocol Translator User Commands" chapter provides an overview of system operation and user-level commands available with the protocol translator.
A command summary is included at the end of the chapter.
The following sections contain procedures and command descriptions for configuring the global system characteristics, host name and passwords, and configuring system security and system management functions. The global configuration commands described in the following sections are entered in configuration mode. See the section "The Configure Command" in the chapter "Startup and Basic Configuration" for the procedures to enter into this mode.
The hostname global configuration command specifies the host name for the network server, which is used in prompts and default configuration file names. To specify or modify the host name for the network server, use the hostname global configuration command. The command has this syntax:
hostname nameThe argument name is the new host name for the network server and is case-sensitive. The factory assigned default host name is CPT or GATEWAY. However, you are required to enter a new name during initial setup.
This command changes the host name to sandbox.
hostname sandbox
A banner is the message that the EXEC command interpreter displays whenever a user starts any EXEC process or activates a line.With the protocol translator, this command applies only to two-step translations.
The general form of the banner command is:
banner {motd|exec|incoming} d message dThe motd, exec, and incoming keywords control when the banner message is displayed. The use of these keywords is described in the following paragraphs.
The argument d is a delimiting character of your choice. The argument text specifies the message to be shown on the screen whenever an interface line is activated.
Follow the banner command with one or more blank spaces and then type the delimiting character, one or more lines of text, terminating the message with the second occurrence of the delimiting character. There is no limit to the amount of characters that can be used for the banner, with the exception of buffer limits and what is appropriate for a banner.
The order of display at startup is banner MOTD, login and password prompts, then EXEC banner.
The following example uses the # as a delimiting character:
banner motd #
Building power will be off from 7:00 AM until 9:00 AM this coming Tuesday.
#
To specify a message-of-the-day (MOTD) banner, use the banner motd global configuration command. The command syntax follows:
banner motd d message dThis message-of-the-day banner is displayed to all terminals connected, and is useful for sending messages that effect all users, impending system shutdowns, for example.
The banner command without any keywords specified defaults to the banner motd command.When a new banner motd command is added to the configuration, it overwrites the existing banner command (no keyword specified). Similarly, if a banner command is added to the configuration, any exiting banner motd command is overwritten.
To be able to display a message on terminals with an interactive EXEC, use the banner exec global configuration command. The command syntax follows:
banner exec d message dThis specifies a message to be displayed on when an EXEC process is created (line activated, or incoming connection to VTY).
To display messages on terminals connected to reverse Telnet lines, use the banner incoming global configuration command. An incoming connection is one initiated from the Ethernet side of the protocol translator.
The command syntax follows:
banner incoming d message dThis command is useful for displaying messages and instructions directed to users of reverse Telnet connections. Reverse Telnet connections are described in more detail in "Rotary Groups on the Protocol Translator Lines" in this chapter.
The EXEC banner can be suppressed on certain lines using the no exec-banner line subcommand. This line should not display the EXEC or MOTD banners when an EXEC is created.
Suppose you want a message explaining that the server is going to be reloaded with new software. The following example shows how to use the banner global configuration command and no exec-banner line subcommand to accomplish this.
! Both messages are inappropriate for the VTYs.
line vty 0 4
no exec-banner
!
banner exec /
This is Cisco Systems training group protocol translator.
Unauthorized access prohibited.
/
!
!
banner incoming /
You are connected to a Hayes-compatible modem.
Enter the appropriate AT commands.
Remember to reset anything to change before disconnecting.
/
!
!
banner motd /
The protocol translator will go down at 6pm for a software upgrade
/
In normal system operation, there are several pools of different sized buffers. These pools grow and shrink based upon demand. Some buffers are temporary and are created and destroyed as needed. Other buffers are permanently allocated and cannot be destroyed. The buffers command allows a network administrator to adjust initial buffer pool settings and the limits at which temporary buffers are created and destroyed. It is normally not necessary to adjust these parameters; do so only after consulting with Cisco support personnel. Improper settings could adversely impact system performance. The full syntax of this command follows:
buffers {small|middle|big|large|huge} {permanent|max-free|min-free|initial} numberThe first argument to the command is the name of the buffer pool; the name denotes the size of buffers in the pool--small, big, huge, and so forth. The default number of the buffers in a pool is determined by the hardware configuration, and can be displayed with the EXEC show buffers command.
The second argument specifies the buffer management parameter to be changed, and can be one of the following arguments:
The argument number specifies the number of buffers to be allocated.
The no buffers command with appropriate keywords and arguments restores the default buffer values.
An optional global configuration command for adjusting huge buffer settings is the buffers huge size command. As with the above command, use only after consulting with Cisco staff:
buffers huge size numberThe buffers huge size command dynamically resizes all huge buffers to the value that you supply. The buffer size cannot be lowered below the default. The no version of the command with the keyword and argument restores the default buffer values.
In the following example, the system will try to keep at least 50 small buffers free.
buffers small min-free 50
In this example the system will try to keep no more than 200 medium buffers free.
buffers medium max-free 200
With the following command, the system will try to create one large temporary extra buffer, just after a reload:
buffers large initial 1
In this example the system will try to create one permanent huge buffer:
buffers huge permanent 1
In this example, the system will resize huge buffers to 20000 bytes:
buffers huge size 20000
To display statistics about the buffer pool on the system, use the command show buffers. For more information, refer to the section on "Monitoring System Processes" in the chapter "System Management."
To display a specific message when a connection fails with a specified host, use the busy-message configuration command. With the protocol translator, this command is only useful in two-step translations. The command syntax follows:
busy-message hostname d message dThe busy-message command defines a message that the protocol translator displays whenever an attempt to connect to the specified host fails.
The argument hostname is the name of the host. Follow hostname with one or more blank spaces and a delimiting character (d) you choose. Then, type one or more lines of text (message), terminating the message with the second occurrence of the delimiting character.
This command applies only to Telnet connections. Defining a busy message for a host prevents all protocol translator-initiated user messages, including the initial message that indicates the connection is "Trying..." The busy-message command can be used in the
autocommand command to suppress these messages. See the section "Creating an
Autocommand" in this chapter for more information.
The no busy-message command disables the busy message from displaying on the specified host.
The following example uses the # as a delimiting character. The message will be displayed on the terminal whenever an attempt to connect to the host named dross fails:
busy-message dross #
Cannot connect to host. Contact the computer center.
#
To send a specific string after a successful connection, use the login-string global configuration command. With the protocol translator, this command is only useful in two-step translations. The command syntax follows:
login-string hostname d message [%secp] [%secw] [%b] dThis command applies only to rlogin and Telnet sessions. The login-string command defines a string of characters that the protocol translator sends to a host after a successful connection attempt. The argument hostname is the name of the host to receive the message. Follow hostname with one or more blank spaces and a delimiting character (d) you choose. Then type one or more lines of text message, terminating the message with the second occurrence of the delimiting character.
The %secp option sets a pause in seconds. To insert pauses into the login string, embed a percent sign (%) followed by the number of seconds to pause and the letter "p."
The %secw option prevents users from issuing commands or keystrokes during a pause.
The %b option sends a Break character.
To use a percent sign in the login string, precede it with another percent sign; that is, type the characters "%%."
The no login-string subcommand removes the login string.
In the following example, the value "%5p" causes a five-second pause:
login-string office #ATDT 555-1234
%5p hello
#
To enable the EXEC Command lock, use the lockable global configuration command. With the protocol translator, this command is only useful in two-step translations. The command syntax follows:
lockableThe lockable command allows a terminal to be temporarily locked by the EXEC command lock.
The no lockable command reinstates the default, which does not allow the terminal to be locked.
A state machine allows packet dispatch based upon a sequence of characters, instead of a single character. The dispatch-character commands (described in the "State Machine Specification" section later in this chapter) enable packets to be buffered, then transmitted upon receipt of a character. The state-machine command allows packets to be buffered, then transmitted upon receipt of a sequence of characters. This allows for packet transmission by pressing a function key, which is typically defined as a sequence of characters ("Esc I C," for example).
State machines allow control of TCP processes based upon a set of inputs. The current state of the device determines what will happen next given an expected input. The state-machine commands configure the protocol translator to search for and recognize a particular sequence of characters, then cycle through a set of states. The user defines these states using the state-machine command; up to eight states can be defined. (Think of each state as a step the protocol translator takes based upon the assigned configuration commands, and the type of information received.)
The protocol translator code supports user-specified state machines for determining whether data from an asynchronous port should be sent to the network. This is an extension of the concept of the dispatch character, and allows, for example, the equivalent of multicharacter dispatch strings.
To specify the transition criteria for the state of a particular state machine, use the state-machine global configuration command. With the protocol translator, this command is only useful in two-step translations. The command syntax follows:
state-machine name state firstchar lastchar nextstate [transmit] [delay]The argument name is the user-specified name for the state machine (used in the dispatch-machine line subcommand). There can be any number of state machines specified by the user, but each line can only have a single state machine associated with it.
The argument state defines which state is being modified. There are a maximum of eight states per state machine. Lines are initialized to state 0, and return to state 0 after a packet is transmitted.
The arguments firstchar and lastchar specify a range of characters. If the state machine is in the indicated state, and the next character input is within this range, the process goes to the specified next state. Full 8-bit character comparisons are done, so the maximum value is 255. Take care that the line is configured to strip parity bits (or not generate them) or duplicate the low characters in the upper half of the space.
The argument nextstate defines the state to enter if the character is in the specified range.
Specifying the transmit keyword causes the packet to be transmitted, and the state machine to be reset to state zero. Characters that recur, and that have not been explicitly defined to have a particular action, return the state machine to state zero.
The optional delay keyword specifies that the destination state is transitory. If no additional input is received, the packet will be sent after 100 microseconds, and the state reset to zero.
This command is entered with the dispatch-machine line subcommand, which defines the line on which the state machine is effective.
For more information on setting the state machine for TCP, see the section "State Machine Specification." The following two examples show two different ways to setup state machines:
Following are two examples that show two different ways to set up state machines.
The first example is on the same line as an asynchronously-based packet format. A packet is terminated by a sequence DLE, ETX, CHKSUM, (16, 3, some number) DLE can occur in the packet itself if escaped by another DLE. (In particular, this means that the sequence "DLE, DLE, ETX, x" should not terminate the packet.)
Use a long dispatch time-out to ensure that large packets can be generated, and to prevent the line from getting permanently stuck in the event of lost data.
!If we see the first DLE, go to state 1 (from state 0)
!
state-machine packet 0 16 16 1
!
! If we see ETX after the DLE, go to state 2, otherwise (including
! another DLE) return to state 0
!
state-machine packet 1 3 3 2
!
! In state 2, receipt of the checksum causes the packet to be sent
!
state-machine packet 2 0 255 transmit
!
! Add this state machine to the appropriate lines
!
line 1 20
dispatch-machine packet
The second example insures that the characters from the function keys on an ANSI terminal are all lumped together into a single packet. Because of this, systems that attempt to distinguish between function keys and the same bytes typed individually do not become confused by variable network delays. An ANSI function key usually generates "Esc [ random upper-case-alpha":
! Recall that the default is to remain in state 0 without
! transmitting anything. We want normal type-in to be transmitted
! immediately
!
state-machine function 0 0 255 transmit
!
! Except for "escape," which starts waiting for the rest of a
! function key.  However, if the user types "escape" we want it
! to be transmitted pretty soon.  This is what the "delay"
! keyword does.
state-machine function 0 27 27 1 delay
!
! Again, "esc foo" should transmit immediately, unless foo is "["
!
state-machine function 1 0 255 transmit
state-machine function 1 91 91 2 delay
!
! Finally, we want to collect perhaps many characters in state 2,
! until we run into an upper case alphabetic character, or the
! line stays idle for a while.
!
state-machine function 2 0 255 2 delay
state-machine function 2 65 90 transmit
This section describes the boot global configuration commands used to configure boot files. The boot command can be used to perform these tasks:
The commands to load files over the network take effect the next time the software is reloaded, provided they have been written into nonvolatile memory. See the section "Storing the System Image in Flash Memory" for information about configuring and using the Flash memory (MC+) card.
The network configuration file contains commands that apply to all network servers on a network. The default name of this file is network-config. To change the name of the network-config file, use the boot network global configuration command. The full command syntax follows:
boot network filename [address]The keyword network changes the network configuration file from network-confg. The argument filename is the new name for the network configuration file.
The argument address is the new broadcast address. If you omit the argument address, the protocol translator uses the default broadcast address of 255.255.255.255. If you use address, you can specify a specific network host or a subnet broadcast address.
The host configuration file contains commands that apply to one network server in particular. To change the host configuration file name, use the boot host global configuration command. The full command syntax follows:
boot host filename [address]The keyword host changes the host configuration file name to a name you specify in the filename argument.
By default, the protocol translator uses its name to form a host configuration file name. To form this name, the protocol translator converts its name to all lowercase letters, removes all domain information, and appends "-confg." By default, the host file name is pt-confg.
Normally, the protocol translator uses a buffer the size of the system non volatile memory to hold configuration commands read from the network. You can increase this size if you have a very complex configuration using the boot buffersize command. The command syntax follows:
boot buffersize bytesThe argument bytes specifies the size of the buffer to be used. By default it is the size of the nonvolatile memory, and there is no minimum or maximum size that may be specified.
The EXEC commands write terminal and write network use the information specified by the buffersize keyword when performing their functions.
A protocol translator can execute its system software stored in ROM, or it can be configured to load a different version across the network. Network loading is only supported on systems with at least four megabytes of memory (for example, CSC/3 or expanded IGS). The system uses the default file name cisconn-cpu, where "nn" is a value from the configuration register and "cpu" is the processor board in the system. You can override this with the boot system command.
boot system filename [address]The keyword system indicates this is a request to set the system image filename. In this case, the argument filename is the file name of the operating software to load, and the argument address is the address of the network host holding that file.
To use the nonvolatile memory option to specify netbooting, place a boot system command in nonvolatile memory. This command is used to specify both the file name of the operating software to load, and the Internet address of the server host holding that file.
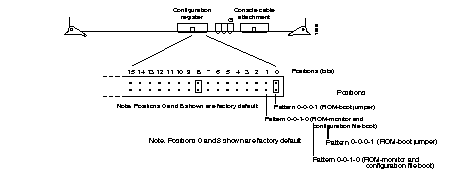
The boot system command overrides the processor configuration register setting unless the register specifies the use of default (ROM) operating software. Therefore, to permit netbooting, set the configuration register bits on the processor card to any pattern other than 0-0-0-0 or 0-0-0-1 (see Figure 1-1).
To remove a file-name-and-address pair from the list, use the no form of the boot command syntax.
This command uses the nonvolatile memory to specify the file name /usr/local/tftpdir/cisco.ts2 to load, and the Internet address 192.7.31.19 of the server host holding that file:
boot system /usr/local/tftpdir/cisco.ts2 192.7.31.19
You can configure multiple instances of the boot commands. When issued, each command is executed in order and so can be used to begin a systematic search or to build a specific list. For example, you can issue multiple boot commands to build an ordered list of configuration-file-name-and-host-address pairs. The protocol translator scans this list until it successfully loads the appropriate network or host configuration file or system boot image. In this example, the protocol translator looks first for fred-confg on 192.31.7.24 and, if it cannot load that file, then for wilma-confg on 192.31.7.19:
boot host /usr/local/tftpdir/fred-confg 192.31.7.24
boot host /usr/local/tftpdir/wilma-confg 192.31.7.19
If the protocol translator cannot find either file, a background process tries at ten-minute intervals (default) to load one or the other of the files.
You may issue multiple instances of all variations of the boot command, including the no boot forms. This feature can be useful for removing configuration files. To remove a configuration file-name-and-host-address pair from the list, use the no form of the boot command syntax.
Following is an overview of the steps to configure the Flash card. This overview assumes that the CSC-MC+ card and the appropriate level of system software EPROMs are installed in your server. See the Cisco publication Installing and Configuring the Flash Memory Card (78-0889-01) for specific installation instructions.
Once you have successfully installed and tested the CSC-MC+ card, you may want to configure the system with the no boot system flash command in order to revert back to booting from ROM.
When netbooting, either with or without Flash memories, it is often desirable to be able to specify that the ROM image is to be booted if other boot images are not available.
boot system romUse the boot system rom global configuration command to specify the use of the ROM system image when other boot system commands exist in the configuration.
This example illustrates a list specifying two possible internet locations for a system image, with the ROM software being used as a backup.
boot system pt3-rx.90-1 192.31.7.24
boot system pt3-rx.83-2 192.31.7.19
boot system rom
You can auto-boot from Flash using the boot system flash system configuration command:
boot system flash filename boot system configuration commands regardless of argument. Specifying the arguments flash, filename, or IP address with the no boot system command will disable only the command specified by these arguments.
The boot system flash command will boot the first valid file in Flash memory. The boot system flash filename will boot the file specified by this filename.
Configure the system to automatically boot from the desired file in Flash memory using the configure terminal command and the boot system flash filename system configuration command.
The no boot system flash command disables the feature.
Write the configuration to nonvolatile memory with the write memory command. Following this, boot the system with the reload command. See the following example for an illustration of this procedure.
The following illustrates this sequence of commands:
PT#configure terminal
boot system flash ptxx
^Z
PT#write memory
[ok]
PT#reload
[confirm]<Return>
System Bootstrap, Version 4.5(0.3)
Copyright (c) 1986-1990 by cisco Systems
CSC3 processor with 4096 Kbytes of memory
F3: 1578668+35572+156084 at 0x1000
RRRRRRRRRRRRRRRRRRRRRRRRRRRRRRRRRRRRRRRRRRRRRRRRRRRRRRRRRRRRRRRRRRRRRRRRRRRRRRRRRRRRRR.... [OK - 162132/2110400 bytes]
F3: 1586072+36028+156004 at 0x1000
{ROM Monitor copyrights...}
Occasionally network failures make booting across the network impossible. To lessen the effects of network failure, consider the following boot strategy.
After Flash is installed and configured, you can configure the system to boot in the following order:
This boot order will provide a more fault-tolerant alternative in the netbooting environment. The order of the commands needed to implement this strategy is shown in the following example:
PT#configure terminal
boot system flash ptxx
boot system ptxx 131.131.101.101
boot system rom
^Z
PT#write memory
[ok]
PT#
In addition to these commands, the ROM boot jumper on the configuration register of the processor card must be changed to pattern 0-0-0-1 (Position 0) see Figure 1-1.
Using this strategy, a system used primarily to boot across the network would have three
alternative sources from which to boot. These alternative sources would help cushion the negative affects of a failure with the TFTP file server, and the network in general.
This section describes how to configure password protection and terminal access security.
You can set passwords to control access to the privileged command level and to individual lines. Additionally, you can configure a protocol translator to use a special protocol called Terminal Access Controller Access Control System (TACACS) to allow a finer level of control using a server running on a timesharing system. The Defense Data Network (DDN) developed TACACS to control access to its TAC protocol translators; Cisco patterned its TACACS support after the DDN application.
Additional protection using access lists may also be required. The use of access lists applies to TCP/IP-based connections. Refer to the chapter "TCP/IP Configuration and Management" for more information.
To assign a password for the privileged command level, use the enable password global configuration command. The command syntax follows:
enable password passwordThe argument password is case-sensitive and specifies the password prompted for in response to the EXEC command enable. The password argument may contain any alphanumeric characters, including spaces, up to 80 characters. The password checking is also case-sensitive. The password Secret is different than the password secret, for example, and the password two words is an acceptable password.
When you use the enable command at the console terminal, the EXEC does not prompt you for a password if the privileged mode password is not set. Additionally, if the enable password is not set and the line 0 (console line) password is not set, it is only possible to enter privileged mode on the console terminal. This feature allows you to use physical security rather than passwords to protect privileged mode if that is what you prefer to do.
If the enable password is not set and the line 0 (console) password is set, it is possible to enter privileged command mode either without entering a password at the console terminal or by entering the console line password when prompted while using any other line.
This example sets the password secretword for the privileged command level on all lines, including the console:
enable password secretword
When an EXEC is started on a line with password protection, the EXEC prompts for the password. If the user enters the correct password, the EXEC prints its normal privileged prompt. The user may try three times to enter a password before the EXEC exits and returns the terminal to the idle state.
To specify a password, use the password line subcommand. The command syntax looks like this:
password textThe text argument may contain any alphanumeric characters, including spaces, up to 80 characters. The password checking is also case-sensitive. The password Secret is different than the password secret, for example, and the password two words is an acceptable password.
To enable checking for the password specified by the password command, use the line subcommand login:
loginAlternatively, to select the TACACS-style user ID and password checking mechanism instead, use the following subcommand:
login tacacsTo disable all password checking, use the command:
no loginThe protocol translator prints the message-of-the-day banner before prompting for a password, so the user immediately sees messages such as "no trespassing" notifications. By default, virtual terminals require a password. If you do not set a password for a virtual terminal, it will respond to attempted connections by displaying an error message and closing the connection. Use the no login subcommand to disable this behavior and allow connections without a password.
This example sets the password letmein on line 5:
line 5
password letmein
login
If your server has the nonvolatile memory option, you can lock yourself out if you enable password checking on the console terminal line and then forget the line password.
To recover from this, force the server into factory diagnostic mode by turning off the server, inserting a jumper in bit 15 of the processor configuration register, (or bit 7 of the processor configuration register in the IGS), and turning on the server. Follow these steps.
Step 1: You will be asked if you want to set the manufacturers' addresses. Respond by typing "Yes." You then see the following prompt:
TEST-SYSTEM>
Step 2: Type the enable command to get the privileged prompt:
TEST-SYSTEM#enable
Step 3: Type the show configuration command to review the system configuration and find the password. Do not change anything in the factory diagnostic mode.
Step 4: To resume normal operation, turn off the server, remove the jumper from bit 15 (or bit 7) of the configuration register, and turn on the server again.
Step 5: Log into the server with the password that was shown in the configuration file.
The processor configuration registers are described in the hardware configuration and reference publication for your particular product.
Cisco Systems provides unsupported versions of standard and extended TACACS servers that run on most VMS and UNIX systems; they are available from Cisco through the IP FTP protocol. The servers may be used to create accounting records to track server usage.
The configuration commands in the following paragraphs tailor the behavior of the standard TACACS software running on the Cisco server.
The tacacs-server host global configuration command specifies a TACACS host. The command syntax follows:
tacacs-server host nameThe argument name is the name or Internet address of the host. You can use multiple tacacs-server host subcommands to specify multiple hosts. The server will search for the hosts in the order you specify them.
The no tacacs-server host global configuration command deletes the specified name or address.
The tacacs-server attempts global configuration command controls the number of login attempts that may be made on a line set up for TACACS verification. The command syntax follows:
tacacs-server attempts countThe argument count is the number of attempts. The default is three attempts.
The no tacacs-server attempts global configuration command restores the default.
This command changes the login attempt to just one try:
tacacs-server attempts 1
The tacacs-server retransmit global configuration command specifies the number of times the server will search the list of TACACS server hosts before giving up. The server will try all servers, allowing each one to time-out before increasing the retransmit count. The command syntax follows:
tacacs-server retransmit retriesThe argument retries is the retransmit count. The default is two retries.
The no tacacs-server retransmit global configuration command restores the default.
This command specifies a retransmit counter value of five times:
tacacs-server retransmit 5
The tacacs-server timeout global configuration command sets the interval the server waits for a server host to reply. The command syntax follows:
tacacs-server timeout secondsThe argument seconds specifies the number of seconds. The default interval is five seconds.
The no tacacs-server timeout global configuration command restores the default.
This command changes the interval timer to ten seconds:
tacacs-server timeout 10
If, when running the TACACS server, the TACACS server does not respond, the default action is to deny the request. The tacacs-server last-resort global configuration command can be used to change that default. The command syntax follows:
tacacs-server last-resort {password|succeed}The command causes the network server to request the privileged password as verification, or forces successful login without further input from the user, depending upon the keyword specified, as follows:
The no tacacs-server last-resort global configuration command restores the system to the default behavior.
Use the following variations of the enable command to configure privileged-level command access using the TACACS protocol.
The enable use-tacacs global configuration command is used to enable use of the TACACS protocol to determine whether a user can access the privileged command level. The command syntax follows:
enable use-tacacsWhen you use this command, the EXEC enable command prompts for a new user name and password pair. This pair is then passed to the TACACS server for authentication. If you are using the Extended TACACS, it will also pass any already-existing UNIX user identification code to the server.
The enable last-resort global configuration command allows the user to specify what happens if the TACACS servers used by the enable command do not respond. The command syntax follows:
enable last-resort {succeed|password}The default action is to fail. Use of the keyword changes the action, as follows:
The no enable last-resort global configuration command restores the default.
The configuration commands in the following paragraphs tailor the behavior of the extended TACACS server.
The tacacs-server extended global configuration command enables an extended TACACS mode. The command syntax follows:
tacacs-server extendedThis mode provides information about the terminal requests for use in setting up UNIX auditing trails and accounting files for tracking use of protocol translators, terminal servers, and routers. The information includes responses from protocol translators and routers, and validation of user requests. An unsupported, extended TACACS server is available from Cisco Systems using FTP for UNIX users who want to create the auditing programs. Extended TACACS differs from standard TACACS in that standard TACACS provides only user name and password information.
The tacacs-server notify global configuration command causes a message to be transmitted to the TACACS server, with retransmission being performed by a background process for up to five minutes. The terminal user, however, receives an immediate response allowing access to the feature specified. The command syntax follows:
tacacs-server notify {connect|enable|logout}The optional keywords are used to specify notification of the TACACS server whenever a user does one of the following:
The tacacs-server authenticate command requires a response from the network or protocol translator to indicate whether the user may perform the indicated action. The command syntax follows:
tacacs-server authenticate {connect|enable}Actions that require a response include the following, specified as optional keywords:
You can specify that the first TACACS request to a TACACS server be made without password verification. This option is configured with the tacacs-server optional-passwords global configuration command:
tacacs-server optional-passwordsWhen the user types in the login name, the login request is transmitted with the name and a zero-length password. If accepted, the login procedure completes. If the TACACS server refuses this request, the server software prompts for a password, and tries again when the user supplies a password. The TACACS server must support authentication for users without passwords to make use of this feature. This feature supports all TACACS requests--login, SLIP, enable, and so on.
Networks that cannot support a TACACS service may still wish to use a user name-based authentication system. In addition, it may be useful to define "special" user names that get special treatment (for example, an "info" user name that does not require a password, but connects the user to a general purpose information service).
The software supports these needs by implementing a local username global configuration command. The command syntax follows:
username name [nopassword|password encryptiontype password]Multiple username commands can be used to specify options for a single user.
The nopassword keyword means that no password is required for this user to log in. This is usually most useful in combination with the autocommand keyword.
The password keyword specifies a possibly encrypted password for this user name.
The encryptiontype argument is a single digit number. Currently defined encryption types are 0, which means no encryption, and 7, which specifies a Cisco-specified encryption algorithm. Passwords entered unencrypted are written out with the Cisco encryption. A password can contain imbedded spaces and must be the last option specified in the username command.
The accesslist keyword specifies an outgoing access list that overrides the access list specified in the access class line configuration subcommand. It is used for the duration of the user's session. The access list number is specified by the number argument.
The autocommand keyword causes the command specified by the command argument to be issued automatically after the user logs in. When the command is complete, the session is terminated. As the command can be any length and contain imbedded spaces, commands using the autocommand keyword must be the last option on the line.
The nohangup keyword prevents the protocol translator from disconnecting the user after an automatic command (set up with the autocommand keyword) has completed. Instead, the user gets another login prompt.
The noescape keyword prevents a user from using an escape character on the host to which he is connected.
To implement a service similar to the UNIX who command, which can be given at the login prompt and lists the current users of the protocol translator, the command takes the following form:
username who nopassword nohangup autocommand show users
To implement an information service that does not require a password to be used, the command may take the following form:
username info nopassword noescape autocommand telnet nic.ddn.mil
To implement an ID that will work even if the TACACS servers all break, the command takes the following form:
username superuser password superpassword
Simple Network Management Protocol (SNMP) provides a way to access and set configuration and runtime parameters for the network server. Cisco Systems' implementation of SNMP is compatible with RFCs 1155, 1157, and 1213. The Cisco Management Information Base (MIB) supports all of RFCs 1155 and 1213, and provides Cisco-specific variables.
A separate document, available in RFC 1212-type format (concise MIB), describes all the Cisco-specific SNMP variables in the Cisco portion of the MIB. It also describes what is required to establish minimum configuration. Contact Cisco Systems to obtain a copy of this document, which includes instructions for accessing the variables using SNMP.
To set up an access list that determines which hosts can send requests to the network server, use the snmp-server access-list global configuration command. The command syntax follows:
snmp-server access-list listThe server ignores packets from hosts that the access list denies. The access list applies only to the global read-only SNMP agent configured with the command snmp-server community.
The argument list is an integer from 1 through 99 that specifies an IP access list number.
The no snmp-server access-list global configuration command removes the specified access list.
This command allows the protocol translator to process only those packets from hosts passing access list 21:
snmp-server access-list 21
To set the system contact string (syscontact), use the snmp-server contact command. The command syntax follows:
snmp-server contact textThe text argument is a string that specifies the system contact information.
To set the system location string, use the snmp-server location command. The command syntax follows:
snmp-server location textThe text argument is a string that specifies the system location information.
To set up the community access string, use the snmp-server community global configuration command. The command syntax follows:
snmp-server community [string [RO|RW] [list]]This command enables SNMP server operation on the network server. The argument string specifies a community string that acts like a password and permits access to the SNMP protocol.
By default, an SNMP community string permits read-only access (keyword RO); use the keyword RW to allow read-write access. The optional argument list is an integer from 1 through 99 that specifies an access list of Internet addresses that may use the community string.
The no snmp-server community global configuration command removes the specified community string or access list.
This command assigns the string comaccess to the SNMP allowing read-only and specifies that Internet address list 4 may use the community string:
snmp-server community comaccess RO 4
To establish the message queue length for each TRAP host, use the snmp-server queue-length global configuration command. The command syntax follows:
snmp-server queue-length lengthThis command defines the length of the message queue for each TRAP host.
The argument length is the number of TRAP events that can be held before the queue must be emptied; the default is ten. Once a TRAP message is successfully transmitted, software will continue to empty the queue, but never faster than at a rate of four TRAP messages per second.
This command establishes a message queue that traps four events before it must be emptied:
snmp-server queue-length 4
To establish the maximum packet size, use the snmp-server packetsize global configuration command. The command syntax follows:
snmp-server packetsize bytesThis command allows control over the largest SNMP packet size permitted when the SNMP server is receiving a request or generating a reply.
The argument bytes is a byte count from 484 through 8192. The default is 484.
This command establish a packet filtering of a maximum size of 1024 bytes:
snmp-server packetsize 1024
To specify the recipient of the TRAP message, use the snmp-server host global configuration command. The command syntax follows:
snmp-server host address community-string [snmp|tty]This command specifies which host or hosts should receive TRAP messages. You need to issue the snmp-server host command once for each host acting as a TRAP recipient.
The argument address is the name or Internet address of the host. The argument community-string is the password-like community string to send with the TRAP messages.
The optional keywords define whether the TRAPS are to be included, as follows:
The no snmp-server host command removes the specified host.
This example causes all the SNMP-type messages to be sent to the host specified by the name cisco.com. The command uses the community-string comaccess as a password. The command syntax follows:
snmp-server host cisco.com comaccess snmp
By default, the protocol translator sends all tty events to a host specified in the snmp-server host command. To disable the reporting of these events, you must explicitly specify so in a no snmp-server host command. To limit the sending of events to the seven SNMP traps, enter a global configuration command sequence as follows:
snmp-server host 131.108.2.160
no snmp-server host 131.108.2.160 tty
This sequence blocks the sending of the tty events to the host at the specified address.
To establish the TRAP message authentication, use the snmp-server trap-authentication global configuration command. The command syntax follows:
snmp-server trap-authenticationThis command enables the network server to send a TRAP message when it receives a packet with an incorrect community string.
The SNMP specification requires that a TRAP message be generated for each packet with an incorrect community string. However, because this action can result in a security breach, the network server by default does not return a TRAP message when it receives an incorrect community string. Note also that the community string is checked before any access list that may be set, so it is possible to get spurious TRAP messages. The only workarounds are to disable TRAP authentication or to configure an access list on a router between the SNMP agent and the SNMP manager to prevent packets from getting to the SNMP agent.
To define how often to try resending TRAP messages on the retransmission queue, use this global configuration command. The command syntax follows:
snmp-server trap-timeout secondsThe argument seconds sets the interval for resending the messages. The default is set to 30 seconds.
This command sets an interval of 20 seconds to try resending TRAP messages on the retransmission queue:
snmp-server trap-timeout 20
Using SNMP packets, a network management tool can send messages to users on virtual terminals and the protocol translator's console. This facility operates in a similar fashion to the EXEC send command; however, the SNMP request that causes the message to be issued to the users also specifies the action to be taken after the message is delivered. One possible action is a shutdown request.
Requesting "shutdown-after-message" is similar to issuing a send command followed by a reload command. Because the ability to cause a reload from the network is a powerful feature, it is protected by this configuration command. To use this SNMP message reload feature the device configuration must include the snmp-server system-shutdown global configuration command. The syntax of this command is as follows:
snmp-server system-shutdownThe no snmp-server system-shutdown option prevents an SNMP system-shutdown request (from an SNMP manager) from resetting the Cisco agent.
To understand how to use this feature with SNMP requests read the document mib.txt available by anonymous ftp from ftp.cisco.com. This document is available in RFC 1212-type format. It describes all the Cisco-specific SNMP variables in the Cisco portion of the MIB. It also describes what is required to establish minimum configuration. Contact Cisco Systems to obtain a copy of this document, which includes instructions for accessing the variables using SNMP.
To disable SNMP server operations on the protocol translator after the protocol translator has been started, use the no snmp-server global configuration command. The command syntax follows:
no snmp-serverYou can configure the protocol translator to act as a limited Trivial File Transfer Protocol (TFTP) server from which other Cisco servers can boot their software. As a TFTP server host, the protocol translator responds to TFTP read request messages by sending a copy of its ROM software to the requesting host. The TFTP read request message must use the file name that you specified in the network server configuration.
To specify TFTP server operation for a communications server, use the tftp-server system global configuration command. The full syntax follows.
tftp-server system filename [list]This command has two arguments: filename and list. The argument filename is the name you give the communications server ROM file, and the argument list is an IP access-list number.
The system sends a copy of the ROM software to any host which issues a TFTP read request with this file name. To learn how to specify an access list, see the "Configuring IP Access Lists" section in the chapter "TCP/IP Configuration and Management."
You can specify multiple file names by repeating the tftp-server system command. To remove a previously defined file name, use the no tftp-server system command and append the appropriate file name and an access-list number.
This command causes the protocol translator to send, via TFTP, a copy of the ROM software when it receives a TFTP read request for the file version-9.0. The requesting host is checked against access list 22.
tftp-server system version-9.0 22
Theservice command tailors use by the network server of network-based services. Some service commands also configure system defaults; refer to the decimal-tty command for an example.
The command syntax is as follows:
service keywordThe argument keyword is one of the following:
The no service subcommand with the appropriate keyword disables the specified service or function.
To enable TFTP autoloading of the configuration files, enter this subcommand:
service config
To disable use of the Nagle algorithm, enter this subcommand:
no service nagle
By default, the protocol translator sends the output from the EXEC command debug and system error messages to the console terminal.
To redirect these messages, as well as output from asynchronous events such as interface transition, to other destinations, use the logging global configuration command with the appropriate destination options.
These destinations include the console terminal, virtual terminals, internal buffers, and UNIX hosts running a syslog server; the syslog format is compatible with 4.3 BSD UNIX.
The following sections describe how to implement these redirection options on the protocol translator.
To configure the logging of messages, you need to be in the configuration command collection mode. To enter this mode use the EXEC command configure at the EXEC prompt. (Refer to the section on "The Configure Command" in the chapter "Startup and Basic Configuration" for more details on this process.)
Enable the message logging using the logging on command. The command syntax follows:
logging onThis command enables message logging to all destinations except the console. This behavior is the default.
The no logging on command enables logging to the console terminal only.
The default logging device is the console; all messages are displayed on the console unless otherwise specified.
To log messages to an internal buffer, use the logging buffered command. The command syntax follows:
logging bufferedThis command copies logging messages to an internal buffer instead of writing them to the console terminal.
The buffer is circular in nature, so newer messages overwrite older messages.
To display the messages that are logged in the buffer, use the EXEC command show logging. The first message displayed is the oldest message in the buffer.
The no logging buffered command cancels the use of the buffer and writes messages to the console terminal, which is the default.
To limit messages logged to the console based on severity, use the logging console command. The command syntax follows:
logging console levelThis command limits the logging messages displayed on the console terminal to messages with a level at or above level.
The argument level is one of the keywords listed in Table 1-1, which describes each message priority level and lists the UNIX syslog definition.
| Level/Keyword | Description | Syslog Definition |
|---|---|---|
| 0 emergencies | System unusable | LOG_EMERG |
| 1 alerts | Immediate action needed | LOG_ALERT |
| 2 critical | Critical conditions | LOG_CRIT |
| 3 errors | Error conditions | LOG_ERR |
| 4 warnings | Warning conditions | LOG_WARNING |
| 5 notification | Normal but significant condition | LOG_NOTICE |
| 6 informational | Informational messages only | LOG_INFO |
| 7 debugging | Debugging messages | LOG_DEBUG |
There are four categories of messages generated by the software:
The default is to log messages to the console at the warning level (4). To display all levels of messages, set console logging to level 7 with the debugging keyword.
The EXEC command show logging displays the addresses and levels associated with the current logging setup, as well as any other logging statistics. The no logging console command disables logging to the console terminal.
By default, the console initializes to the warning level. Any message with a priority less than or equal to level 4 will be printed on the console and any terminal line for which a terminal monitor EXEC command has been issued.
The following example changes the default to the alert level, so that messages with a priority less than or equal to 1 are displayed to the console.
logging console alerts
To limit messages logged to the terminal lines (monitors) based on severity, use the logging monitor command. The command syntax follows:
logging monitor levelThis command limits the logging messages displayed on terminal lines other than the console line to messages with a level at or above level.
The argument level is one of the keywords described in Table 1-2.
To display logging messages on a terminal, use the privileged EXEC command terminal monitor.
The no logging monitor command disables logging to terminal lines other than the console line.
To log messages to a syslog server host, use the logging command with the appropriate Internet address. The command syntax follows:
logging hostThe logging command identifies a syslog server host to receive logging messages. By issuing this command more than once, you build a list of syslog servers that receive logging messages.
The argument host is the name or the Internet address of the host to be used as a syslog server.
The no logging command deletes the syslog server with the specified address from the list of syslogs.
To limit messages logged to the syslog servers based on severity, use the logging trap command. The command syntax follows:
logging trap levelThe logging trap command limits the logging messages sent to syslog servers to only the messages with a level at or above level.
The argument level is one of the keywords described for the logging console command in the "Logging Messages to the Console" section.
The no logging trap command disables logging to syslog servers.
Current software generates four categories of syslog messages:
The EXEC command show logging displays the addresses and levels associated with the current logging setup. The command output also includes ancillary statistics.
To set up the syslog daemon on a 4.3 BSD UNIX system, include a line such as the following in the file /etc/syslog.conf:
local7.debugging /usr/adm/logs/tiplog
The local7 keyword specifies the logging facility to be used.
The debugging argument specifies the syslog level. (Refer to the level arguments list in Table 1-2 for other arguments that can be listed.)
The UNIX system sends messages at or above this level to the file specified in the next field. The file must already exist, and the syslog daemon must have permission to write to it.
This section describes the commands for configuring asynchronous terminal lines and their characteristics.
To configure your console and virtual terminal lines, you need to be in the configuration command collection mode. To enter this mode, use the EXEC command configure at the EXEC prompt. (Refer to the section on "The Configure Command" in the chapter "Startup and Basic Configuration" for detailed instructions.)
To start configuring a terminal line, use the line command. This command identifies a specific line for configuration and starts the line configuration command collection. The command syntax follows:
line [type-keyword] first-line [last-line]This command can take up to three arguments: a keyword, a line number, or a range of lines numbers.
The optional argument type-keyword specifies the type of line to be configured, it is one of the following keywords:
Note that there are two ways to address lines: by absolute line number, or the line's position in the line table, and by relative line number, or by the type of line it is, either console, auxiliary port or virtual terminal line (vty). The line types are ranked as follows in the line table:
When the line type is specified, the argument first-line is the relative number of the terminal line (or the first line in a contiguous group) you want to configure. Numbering begins with zero.
The optional argument last-line is the relative number of the last line in a contiguous group you want to configure.
If you omit type-keyword, then first-line and last-line are absolute rather than relative line numbers. To display absolute and relative line numbers, use the EXEC command show users all.
The protocol translator displays an error message if you do not specify a line number.
The line command enables you to easily configure a large group of lines all at once. After you set the defaults for the group, you can use additional line commands and subcommands to set special characteristics, such as location, for individual terminal lines.
Once in line configuration command collection mode, you can enter the line subcommands described in the rest of this section. The line configuration command collection mode ends when you enter a command that is not a line subcommand, or when you type Ctrl-Z.
The following sample command starts configuration for the first five virtual terminal lines, 0 through 4:
line vty 0 4
The line command keyword aux allows use of an auxiliary RS-232 DTE port available on all processor cards. Use this port to attach to an RS-232 port of a CSU/DSU, protocol analyzer, or modem. You can monitor that port remotely by connecting to the TCP port whose number is 2000 decimal plus the line number of the auxiliary port. For example, if the auxiliary port was line 1 (obtained from the EXEC command show users all), then the TCP port would be 2001. You must order a special cable from Cisco Systems for use with this auxiliary port.
When configuring the auxiliary port, address it using the aux keyword as line 0, as in this sample:
line aux 0
The auxiliary ports assert DTR only when a Telnet connection is established. The console port does not use RTS/CTS handshaking for flow control.
By default, the auxiliary port supports an EXEC process. This default can be re-enabled using the exec line subcommand.
You must order a special cable from Cisco Systems for use with this auxiliary port.
These commands configure the auxiliary port with a line speed of 2400 baud, and enable the EXEC.
line aux 0
exec
speed 2400
No modem control signals are supported on this line. If an auto-answer modem is configured on the line, you must dial up, log in, then hang up. The DTR signal will be active whenever an EXEC is configured on the auxiliary port.
When an EXEC is started on a line with password protection, the EXEC prompts for the password. If the user enters the correct password, the EXEC prints its normal prompt. The user may try three times to enter a password before the EXEC exits and returns the terminal to the idle state.
To specify a password, use the password line subcommand. The command syntax is as follows:
password textThe text argument may contain up to 80 alphanumeric characters, including spaces. The password checking is also case-sensitive.
The password Secret is different than the password secret, for example, and the password two words is an acceptable password.
The no password line subcommand removes the password.
This example sets the virtual terminal line 4 password to "secret":
line vty 4
login
password secret
The protocol translator displays a message on the console or terminal when there is no active EXEC. This message, referred to as the vacant message, is different from the banner message displayed when an EXEC process is activated. To turn the vacant message banner on or off, use the vacant-message line configuration subcommands. The command syntaxes follow:
vacant-messageThe vacant-message subcommand enables the banner to be displayed on the screen of an idle terminal.
The vacant-message subcommand without any arguments causes the default message to be displayed.
If a banner is desired, follow the vacant-message subcommand with one or more blank spaces and a delimiting character (d) of your choice. Then type one or more lines of text message, terminating the text with the second occurrence of the delimiting character.
The no vacant-message line configuration subcommand suppresses a banner message.
This example turns on the system banner and display a message:
line 0
vacant-message #
                Welcome to Cisco Systems, Inc.
        This is the console terminal of the protocol translator Gross.
#
The protocol translator allows you to specify the message to be displayed when an incoming connection is attempted and lines are in use. If you do not define a message, when all lines are in use the user will receive a system-generated default message. Use the refuse-message line subcommand to define this message. The command syntax follows:
refuse-message d message dThe argument d is a delimiting character of your choice.
The argument message is the message you want to show on the terminal.
To type the message, start with a delimiting character, followed by one or more lines of text, and then terminate the text with the second occurrence of the delimiting character. You should not use the delimiting character within the text of the message.
When you define a message using this command, the protocol translator does the following:
Use the no refuse-message option to disable this command.
In the following example, line 5 is configured with the refuse-message command, and the user is given information about what to try next.
line 5
refuse-message  /The dial-out modem is currently in use.
Please try again later, or use the slow speed modem available as
hostname "dialout-slow."
/
To set the terminal type, use the terminal-type line subcommand. The command syntax follows:
terminal-type terminal-nameThe terminal-type subcommand records, in the argument terminal-name, the type of terminal connected to the line for use in Telnet terminal-type negotiation; the Telnet terminal-type negotiation uses terminal-name to inform the remote host of the terminal type. Text is used by TN3270 for display management.
The no terminal-type subcommand removes any information about the type of terminal.
To set the location of the terminal, use the location line subcommand. The command syntax follows:
location textThe location subcommand enters information about the terminal location and/or status.
The argument text is the desired description. The description appears in the output of the EXEC command systat.
The no location subcommand removes this information.
To set the line as in an insecure location, use the insecure line subcommand. The command syntax follows:
insecureThis information is presently only used by the LAT software, which reports such connections as dialups to remote systems.
In previous versions of Cisco software, any line which used modem control was reported as a dialup through the LAT protocol; this allows more direct control.
To set the terminal screen length, use the length line subcommand. The command syntax follows:
length screen-lengthThe argument screen-length is the number of lines on the screen.
The network server uses this value to determine when to pause during multiple-screen output.
The default length is 24 lines. A value of zero disables pausing between screens of output.
To set the terminal screen width, use the width line subcommand. The command syntax follows:
width columnsThis subcommand sets the number of characters columns on a single line of the attached terminal.
The default is 80 columns. The rlogin protocol uses columns to set up terminal parameters on a remote UNIX host.
To define or reinstate the default escape character, use the escape-character line subcommand. The command syntax follows:
escape-character decimal-numberThe escape-character subcommand defines the escape character.
The argument decimal-number is either the ASCII decimal representation of the character or a control sequence (Ctrl-E, for example).
The default escape character is Ctrl ^ X.
The no escape-character subcommand sets the escape character to Break.
To define the disconnect character, use the disconnect-character command. The command syntax follows:
disconnect-character decimal-numberThis subcommand defines the character you type to end a session with the protocol translator.
The argument decimal-number is the ASCII decimal representation of the session-disconnect character.
The Break character is represented by zero; NULL cannot be represented. By default, the no session-disconnect character is set.
To use the session-disconnect character in normal communications, precede it with the escape character.
The no disconnect-character subcommand removes the disconnect character.
To set the flow control, use the flowcontrol subcommand. The command syntax follows:
flowcontrol {none|software [in|out]}The flowcontrol subcommand sets the method of data flow control between the terminal or other serial device and the protocol translator.
The keyword software sets software flow control.
An additional keyword specifies the direction: in causes the protocol translator to listen to flow control from the attached device, and out causes the protocol translator to send flow control information to the attached device. If you do not specify a direction, both are assumed.
For software flow control, the default stop and start characters are Ctrl-S and Ctrl-Q (XOFF and XON).
By default, no flow control method is set for a line.
To set the padding on a specific output character, use the padding command. The command syntax follows:
padding decimal-number count The argument decimal-number is the ASCII decimal representation of the character. The argument count is the number of NULL bytes sent after that character. The no padding
subcommand removes padding for the specified output character.
This example pads a Return (ASCII character 13) with 25 NULL bytes:
padding 13 25
To determine the protocols allowed on individual lines, and to select default protocols, use the transport line configuration subcommands. There are three transport commands: transport output, transport input, and transport preferred. Selection of which command to use is determined by whether it is for incoming or outgoing connections, or as a method of preferred selection.
The transport output line subcommand specifies which protocols may be used for outgoing connections from a line, and has the following syntax:
transport output [telnet|lat|rlogin|pad|none]By default, all protocols supported are allowed on the line. Use one of these optional keywords to change the default:
An example using this command is included at the end of this section.
The transport input line subcommand allows the system administrator to define which protocols to use to connect to a specific line of the protocol translator. It has the following syntax:
transport input [telnet|lat|pad|none]This command can be useful in distributing resources among different types of users, or making certain that only specific hosts can access a particular port. When using protocol translation, the transport input command is useful in controlling exactly which protocols can be translated to other protocols when using two-step translation.
By default, all protocols supported are allowed on the line. Use these optional keywords to change the default:
Access lists for each individual protocol may be defined in addition to the allowances created by the transport input command.
An example using this command is included at the end of this section.
The transport preferred line subcommand has the following syntax:
transport preferred [telnet|lat|rlogin|pad|none]This line configuration subcommand specifies the preferred protocol to use when a command does not specify one. For protocol translators that support LAT, the default protocol is LAT. For those that do not support LAT, the default is Telnet. The choices for this command follow:
This example sets specific lines for specific protocol translation.
! On a protocol translator, reserve approximately 1/3 of the available lines
! for each possible transport protocol. Also prevent users from "hopping"
! off with the same protocol they came in with.
!
line vty 0 32
transport input lat
transport output telnet pad
!
line vty 33 65
transport input telnet
transport output pad lat
!
line vty 66 99
transport input pad
transport output lat telnet
This example sets the preferred protocol to rlogin on terminal line 1:
line tty 1
transport preferred rlogin
Refer to the section "Selecting the Preferred Terminal Transport Protocol" in the chapter "Protocol Translator User Commands" for more examples illustrating transport protocol specification.
You can set it up so that a command that will automatically execute its function for you by using autocommand. The command syntax follows:
autocommand commandThe autocommand command causes whatever commands associated with it to be executed.
The argument command is any appropriate EXEC command, including the hostname and any switches that occur with the EXEC command.
The following example forces an automatic connection to a host named dustbin (which could be an IP address). In addition, the UNIX UUCP application specifies TCP socket 25, and the /stream switch enables a raw TCP stream with no Telnet control sequences.
autocommand connect dustbin uucp /stream
To configure the Automatic Line Disconnect feature for the protocol translator, use the following command:
autohangupThis subcommand causes the EXEC to issue the exit command when the last connection closes. This subcommand is useful for UNIX UUCP applications that require this behavior, because UUCP scripts cannot issue the exit command to hang up the telephone line.
To set the dispatch character for the packets, use the dispatch-character line subcommand. The command syntax follows:
dispatch-character decimal-number1 [decimal-number2. . . decimal-numbern]This line subcommand defines a character that causes the packet to be sent, even if the dispatch timer has not expired.
The argument decimal-number is the ASCII decimal representation of the character, such as Return (ASCII character 13) for line-at-a-time transmissions.
The subcommand can take multiple arguments, so you can define any number of characters as the dispatch character.
The no dispatch-character subcommand removes the definition of the specified dispatch character.
To set the dispatch timer, use the dispatch-timeout line subcommand. The command syntax follows:
dispatch-timeout millisecondsThe argument milliseconds specifies the number of milliseconds the protocol translator waits after putting the first character into a packet buffer before sending the packet. During this interval, more characters may be added to the packet, thus increasing the processing efficiency of the remote host.
The no dispatch-timeout subcommand removes the time-out definition.
The dispatch-character and dispatch-timeout subcommands together cause the protocol translator to attempt to buffer characters into larger-sized packets for transmission to the remote host. The protocol translator normally dispatches each character as it is typed.
To specify the state machine for TCP packet dispatch, use the dispatch-machine command. The command syntax follows:
dispatch-machine nameThe name argument specifies the name of the state machine that determines when to send packets on the asynchronous line.
Any dispatch characters specified using the dispatch-character command are ignored if a state machine is also specified.
When the dispatch-timeout command is specified, a packet being built will be sent when the timer expires, and the state will be reset to zero.
If a packet becomes full, it will be sent regardless of the current state. However, the state is not reset. The packet size is dependent on the amount of traffic on the asynchronous line, as well as the dispatch time out. There is always room for 60 data bytes, and if the dispatch-timeout is 100 ms or greater, a packet size of 536 (data bytes) is allocated.
For more examples and information about the state machine, refer to the "Setting Up State Machines for TCP" in this chapter.
To turn the EXEC on or off, use the exec subcommand. The command syntax follows:
execThis subcommand determines whether or not the protocol translator will start an EXEC process on the line. A serial printer, for example, should not have an EXEC started.
By default, the protocol translator starts EXECs on all lines.
Use the exec-banner subcommand to control whether banners are displayed or suppressed. The command syntax follows:
exec-bannerThis line subcommand determines whether or not the server software will display the EXEC banner or message-of-the-day (MOTD) banner when an EXEC is created.
By default, the messages defined with banner motd and banner exec are displayed on all lines. The no exec banner subcommand is useful for temporarily suppressing these banner messages. Specify exec-banner to reinstate.
This example suppresses the banner on virtual terminal lines 0 through 4:
line vty 0 4
no exec-banner
The EXEC command interpreter waits for a specified interval of time until the user starts input, if no input is detected, the EXEC resumes the current connection, or if no connections exist, it returns the terminal to the idle state and disconnects the incoming session.
To set this interval use the exec-timeout subcommand. The command syntax follows:
exec-timeout minutes [seconds]The argument minutes is the number of minutes.
The optional argument seconds specifies additional time intervals in seconds. The default interval is 10 minutes; an interval of zero specifies no time-outs.
The no exec-timeout subcommand removes the time-out definition. It is the same as entering exec-timeout 0.
This command sets a time interval of 2 minutes, 30 seconds:
exec-timeout 2 30
This command sets an interval of 10 seconds:
exec-timeout 0 10
To set the interval for closing the connection when there is no traffic, use the session-timeout subcommand. The command syntax follows:
session-timeout minutesThis subcommand sets the interval that the protocol translator waits for input or output traffic before closing the connection to a remote computer and returning the terminal to an idle state.
The argument minutes specifies the time interval in minutes.
The default interval is zero, indicating the protocol translator maintains the connection indefinitely.
The following subcommand sets an interval of 10 minutes:
session-timeout 10
The no session-timeout subcommand removes the time-out definition; however, you can specify a session time out on each port.
To set the maximum number of sessions, use the session-limit command. The command syntax follows:
session-limit session-numberThe argument session-number specifies the maximum number of sessions.
To save configurations between sessions, use the private subcommand. The command syntax is:
privateThe private subcommand ensures that the configuration options the user can set, will remain in effect between terminal sessions. This behavior is desirable for terminals in private offices.
By default, user-set configuration options are cleared with the EXEC command exit or when the interval set with the exec-timeout subcommand has passed.
To enable terminal notification about pending output from other connections, use the notify command. The command syntax follows:
notifyThe notify subcommand sets a line to inform a user who has multiple, concurrent Telnet connections when output is pending on a connection other than the current connection.
This subcommand performs the same function as the EXEC command terminal notify described in "Changing Terminal Parameters" in the chapter "Protocol Translator User Commands."
The no notify subcommand ends notification.
Connections to the protocol translator made to the next free line in a group of lines, is called a rotary group. A line may be in only one rotary group; however, a rotary group may consist of a single line or many lines.
To define each group of lines, use the rotary line subcommand. The command syntax follows:
rotary groupThis subcommand adds a line to the specified rotary group.
The argument group is an integer you choose between 1 and 100 that identifies the rotary group.
To list the defined rotary groups, use the privileged EXEC command show line. For more information, refer to the "Maintaining the Asynchronous Lines" section in the chapter "System Management."
As for connections to an individual line, the remote host must specify a particular TCP port on the protocol translator to connect to a rotary group. The available services are the same, but the TCP port numbers are different. Table 1-2 lists the services and port numbers for both rotary groups and individual lines.
Services Provided | Base TCP Port for Rotaries | Base TCP Port for Individual Lines |
|---|---|---|
| Telnet Protocol | 3000 | 2000 |
| Raw TCP protocol (no Telnet) | 5000 | 4000 |
| Telnet protocol, binary mode | 7000 | 6000 |
For example, if Telnet protocols are required, the remote host connects to the TCP port numbered 3000 (decimal) plus the rotary group number. If the rotary group is 13, the corresponding TCP port is 3013.
If a raw TCP stream is required, the port is 5000 (decimal) plus the rotary group number. If rotary group 5 requires a raw TCP (printer) line, it connects to TCP port 5005. If Telnet binary mode is required, the port is 7000 (decimal) plus the rotary group number.
A rotary group can refer to a particular group of virtual terminal lines on a protocol translator. Different line characteristics can be assigned to each rotary group, the most useful being line security and the ability to automatically establish a connection using the autocommand line subcommand.
It is possible, for example, to reserve several virtual terminal lines as special lines and allow the rest to be used for protocol translation. To do this, assign a group of lines, (typically the last virtual terminal lines) to a rotary group with a special password:
interface ethernet 0
ip address 131.108.2.34 255.255.0.0
line vty 0 94
no login
line vty 95 99
login
password managementpassword
rotary 1
ip alias 131.108.2.35 3001
Now, when a user connects to the protocol translator's main address, he or she will probably get a standard virtual terminal line and will not have to log in (unless the first 95 virtual terminal lines are already in use). A network manager can always make a Telnet connection to the alias address or rotary port (3001), and access a line that no one else can use.
If the X.25 network supports subaddressing (for IP, the numbers following the first ten in an address), the protocol translator treats any subaddress on incoming PAD calls as a rotary group number. This can be used as in the above example, or combined with the autocommand command to achieve a primitive form of the "one-step" translation method from PAD to Telnet/rlogin.
! Incoming calls (up to 10) to sub-address 5 get connected to TEST1
line vty 90 99
autocommand test1
rotary 5
! Incoming calls to sub-address 6 get connected to ENG2
line vty 80 89
autocommand eng2
rotary 6
! Incoming calls to sub-address 7 get connected to Host3
host host3 513 131.104.5.12
line vty 70 79
autocommand host3
rotary 7
! All other vtys require a password to get greater freedom
line vty 0 69
login
password goanywhere
This example shows how to configure a controlled line with no terminal EXEC, with software flow control set in both directions (to and from an attached device). The dispatch-timeout subcommand causes the server software to wait 100 milliseconds after the first character is put into a packet before it is sent.
line 12
no exec
flowcontrol software
dispatch-timeout 100
<Ctrl-Z>
This section lists all of the global system configuration commands in alphabetical order:
banner [exec|incoming|motd] d message d
Modifies the banner name for the protocol translator. Follow the banner command with one or more blank spaces, a delimiting character (d), then type one or more lines of text (message), terminating the message with the second occurrence of the delimiting character.
The exec keyword specifies a message to be displayed when an EXEC process is created (line activated, or incoming connection to VTY).
The incoming keyword specifies a message to be displayed on incoming connections to particular terminal lines, for example, lines used for milking machine applications.
The motd keyword displays a message-of-the-day type banner whenever a line is activated or when an incoming Telnet connection is created.
Specifies the size of the buffer to be used for netbooting a host or a network configuration file. The argument bytes specifies the size of the buffer to be used. By default, it the size of nonvolatile memory, and there is no minimum or maximum size that may be specified.
[no] boot {host|network|system} filename [address]
Changes the host configuration file name.
The keyword host changes the host configuration file name to a name you specify in the filename argument.
The keyword network changes the network configuration file. The argument filename is the new name for the network configuration file. The argument address is the new broadcast address. If you omit the argument address, the protocol translator uses the default broadcast address of "255.255.255.255." If you use address, you can specify a specific network host or a subnet broadcast address.
The keyword system indicates that the file name and host addresses for booting operating software over the network are in nonvolatile memory. The argument filename is the file name of the operating software to load, and the argument address is the address of the network host holding that file.
[no] boot system flash filename
Auto-boots system from the Flash memories. Specify a name to associate with the image from Flash memories with the filename parameter.
Auto boot the system from the ROM system image. This command is usually used as a backup to other boot system commands which specify system images that exist either on the network or in Flash memories.
[no] buffers {small|middle|big|large|huge} {permanent|max-free|min-free|initial} number
Allows a network administrator to adjust initial buffer pool settings and set limits at which temporary buffers are created and destroyed.The first argument denotes the size of buffers in the pool; the default number of the buffers in a pool is determined by the hardware configuration. The second argument specifies the buffer management parameter to be changed, as follows:
The no buffers command with appropriate keywords and arguments restores the default buffer values.
[no] busy-message hostname d message d
Sets a message that the protocol translator displays whenever an attempt to connect to the specified host fails. The argument hostname is the name of the host. Follow the argument hostname with one or more blank spaces and any delimiting character (d) you choose. Then type one or more lines of text message, terminating the message with the second occurrence of the delimiting character.
[no] enable last-resort {succeed|password}
Allows the user to specify what happens if the TACACS server used by the enable command does not respond. The default is to fail. The keyword succeed allows the user to enable without further question. The keyword password allows the user to enable by entering the privileged command level. The no enable last-resort command restores the default.
Assigns a password for the privileged command level. The argument password is case-sensitive and specifies the password prompted for in response to the EXEC command enable.
Uses TACACS to check the user ID and password supplied to the EXEC enable command.
Modifies the host name for the protocol translator. The argument name is the new host name for the network server and is case-sensitive. The default host name is gateway.
Allows a terminal to be temporarily locked by the EXEC command lock. The no lockable command reinstates the default, which does not allow the terminal to be locked.
Identifies a syslog server host to receive logging messages. The argument host is the name or the Internet address of the host. The no logging command deletes the syslog server with the specified address from the list of syslogs.
Copies logging messages to an internal buffer instead of writing them to the console terminal. Newer messages overwrite older messages. The no logging buffered command cancels the use of the buffer and writes messages to the console terminal, which is the default.
Limits the logging messages displayed on the console terminal to messages with a level at or above level. The argument level is one of the following keywords, listed here in order from the most severe to the least severe level.
The default is to log messages to the console at the warnings level. The no logging console command disables logging to the console terminal.
Limits the logging messages displayed on terminal lines other than the console line to messages with a level at or above level. The argument level is one of the keywords listed in the logging console command description. The no logging monitor command disables logging to terminal lines other than the console line.
Enables message logging to all destinations except the console. This behavior is the default. The no logging on command enables logging to the console terminal only.
Limits the logging messages sent to syslog servers to messages with a level at or above level. The argument level is one of the keywords listed in the logging console command description. The no logging trap command disables logging to syslog servers.
[no] login-string hostname d message [%secp] [%secw] [%b] d
Defines a string of characters that the protocol translator sends to a host after a successful connection attempt. The argument hostname is the name of the host to receive the message. Follow hostname with one or more blank spaces and a delimiting character (d), then type one or more lines of text (message), terminating the message with the second occurrence of the delimiting character. The argument sec is the number of seconds. The options effect display of the message:
This command applies only to rlogin and Telnet sessions.
Disables SNMP server after it has been started.
[no] service keyword
Tailors network-based services. The argument keyword is one of the following:
The no service subcommand disables the specified service or function.
[no] snmp-server access-list list
Sets up an access list that determines which hosts can send requests to the protocol translator. The argument list is an integer from 1 through 99 that specifies an access list. The no snmp-server access-list command removes the specified access list.
[no] snmp-server community [string [RO|RW] [list]]
no snmp-server [community [string]]
Sets up the community access string. This command enables SNMP server operation on the protocol translator. The argument string specifies a community string that acts like a password and permits access to the SNMP protocol. By default, an SNMP community string permits read-only access (keyword RO); use the keyword RW to allow read-write access. The optional argument list is an integer from 1 through 99 that specifies an access list of Internet addresses that may use the community string. The no snmp-server community command removes the specified community string or access list.
Sets the system contact string (syscontact). The text argument is a string that specifies the system contact information.
[no] snmp-server host address community-string [snmp|tty]
Specifies which hosts should receive TRAP messages. Issue the snmp-server host command once for each host acting as a TRAP recipient. The argument address is the name or Internet address of the host. The argument community-string is the password-like community string set with the snmp-server community command. The optional keyword snmp causes all SNMP-type TRAP messages to be sent and sends the Cisco-specific RELOAD TRAP message. The optional keyword tty causes TCP connection TRAP messages to be included. The no snmp-server host command removes the specified host.
Sets the system location string. The text argument is a string that specifies the system location information.
Allows control over the largest SNMP packet size permitted when the SNMP server is receiving a request or generating a reply. The argument bytes is a byte count from 484 through 8192. The default is 484.
snmp-server queue-length length
Establishes the message queue length for each TRAP host. The argument length is the number of TRAP events that can be held before the queue must be emptied; the default is 10. Once a TRAP message is successfully transmitted, software will continue to empty the queue, but never faster than at a rate of four TRAP messages per second.
[no] snmp-server system-shutdown
This command requests a "shutdown-after-message" and is similar to issuing a send command followed by a reload command. Because the ability to cause a reload from the network is a powerful feature, it is protected by this configuration command. To use this SNMP message reload feature, the device configuration must include the snmp-server system-shutdown global configuration command. The no snmp-server system-shutdown option prevents an SNMP system-shutdown request (from an SNMP manager) from resetting the Cisco agent.
[no] snmp-server trap-authentication
Enables the network server to send a TRAP message when it receives a packet with an incorrect community string. The SNMP specification requires that a TRAP message be generated for each packet with an incorrect community string. However, because this action can result in a security breach, the network server by default does not return a TRAP message when it receives an incorrect community string.
snmp-server trap-timeout seconds
Defines how often to try resending TRAP messages on the retransmission queue. The argument seconds sets the interval for resending the messages. The default is set to 30 seconds.
state-machine name state firstchar lastchar nextstate [transmit] [delay]
Specifies the transition criteria for the state of a particular state machine.
The argument name is the user-specified name for the state machine (specified by the dispatch-machine line subcommand). There can be any number of state machines specified by the user, but each line can only have a single state machine associated with it.
The argument state defines which state is being modified. There are a maximum of eight states per state machine.
The arguments firstchar and lastchar specify a range of characters. If the state machine is in the indicated state, and the next character input is within this range, go to the specified next state.
The argument nextstate defines the state to enter if the character is in the specified range.
Specifying the transmit keyword causes the packet to be transmitted, and the state machine to be reset to state 0.
The optional delay keyword specifies that the destination state is transitory. If no additional input is received, the packet will be sent after 100 milliseconds, and the state reset to zero.
[no] tacacs-server attempts count
Controls the number of login attempts that may be made on a line set up for TACACS verification. The argument count is the number of attempts. The default is three attempts. The no tacacs-server attempt subcommand restores the default.
tacacs-server authenticate {connect|enable}
Causes the server software to require a response from the TACACS server to indicate whether the user may perform the indicated action. Actions which require a response include the following, specified as optional keywords: Keyword connect specifies that the user makes TCP connections. Keyword enable specifies use of enable command.
Enables an extended TACACS mode. This mode provides information about the terminal requests for use in setting up UNIX auditing trails and accounting files for tracking use of devices which use extended TACACS. This information includes responses from devices and validation of user requests. An unsupported, extended TACACS server is available from Cisco Systems for UNIX users who want to create the auditing programs.
Specifies a TACACS host. The argument name is the name or Internet address of the host. You can use multiple tacacs-server host subcommands to specify multiple hosts. The server will search for the hosts in the order you specify them. The no tacacs-server host subcommand deletes the specified name or address.
[no] tacacs-server last-resort {password|succeed}
Causes the network server to request the privileged password as verification, or forces successful login without further input from the user, depending upon the keyword specified.
The keyword password allows the user to access the privileged-level command mode by entering the password set by the enable password configuration command.
The keyword succeed allows the user to access the privileged-level command mode without further question.
The no tacacs-server last-resort command restores the system to the default behavior.
tacacs-server notify {connect|enable|logout}
Causes a message to be transmitted to the TACACS server when various events occur.
The optional keywords are used to specify notification of the TACACS server whenever users do one of the following:
tacacs-server optional-passwords
Specifies that the first TACACS request to a TACACS server be made without password verification. When the user types in the login name, the login request is transmitted with the name and a zero-length password. If accepted, the login procedure completes. If the TACACS server refuses this request, the server software prompts for a password, and tries again when the user supplies a password. The TACACS server must support authentication for users without passwords to make use of this feature. This feature supports all TACACS requests--login, enable, and so on.
[no] tacacs-server retransmit retries
Specifies the number of times the server will search the list of TACACS server hosts before giving up. The server will try all servers, allowing each one to time-out before increasing the retransmit count. The argument retries is the retransmit count. The default is two retries.
The no tacacs-server retransmit subcommand restores the default.
[no] tacacs-server timeout seconds
Sets the time interval that the server waits for a server host to reply. The argument seconds specifies the number of seconds. The default interval is 5 seconds.
The no tacacs-server timeout subcommand restores the default.
[no] tftp-server system filename list
Specifies TFTP server operation for a communications server. The argument filename is the name you give the communications server ROM file, and the argument list is an IP access-list number.
username name [accesslist number]
username name [autocommand command]
username name [noescape] [nohangup]
username name [nopassword|password encryptiontype password]
Specifies options for a single user.
The nopassword keyword means that no password is required for this user to log in. This is usually most useful in combination with the autocommand keyword.
The password keyword specifies a possibly encrypted password for this user name.
The encryptiontype argument is a single digit number. Currently defined encryption types are 0, which means no encryption, and 7, which specifies a Cisco-specified weak encryption algorithm. Passwords entered unencrypted are written out with the Cisco encryption. Passwords can contain imbedded spaces and must be the last option specified in the username command.
The accesslist keyword specifies an outgoing access list to be used for the life of the user's login. The access list number is specified by the number argument.
The autocommand keyword causes the command specified by the command argument to be issued automatically after the user logs in. When the command is complete, the session is terminated. As the command can be any length and contain imbedded spaces and such, commands using the autocommand keyword must be the last option on the line.
The nohangup keyword prevents the protocol translator from disconnecting the user's connection after an automatic command (set up with the autocommand keyword) has completed. Another login prompt is provided to the user.
The noescape keyword prevents a user from using an escape character on the host to which he is connected.
This section lists all of the line configuration subcommands in alphabetical order:
Automatically executes the EXEC command defined by the command argument. The command can include any argument normally associated with it such as host names or switch.
Causes the EXEC to issue the exit command when the last connection closes.
Sets the number of data bits per character. If parity is being generated, specify 7 data bits per character. If no parity generation is in effect, specify 8 data bits per character. The default is 8 data bits per character.
[no] disconnect-character decimal-number
Defines the character you type to end a session with the protocol translator. The argument decimal-number is the ASCII decimal representation of the session-disconnect character.
[no] dispatch-character decimal-number1 [decimal-number2. . . decimal-number]
Defines a character that causes the packet to be sent, even if the dispatch timer has not expired. The argument decimal-number is the ASCII decimal representation of the character, such as Return (ASCII character 13) for line-at-a-time transmissions. The no dispatch-character subcommand removes the definition of the specified dispatch character.
Specifies the name of the state machine to determine when to send packets on the asynchronous line.
[no] dispatch-timeout milliseconds
Sets the dispatch timer. The argument milliseconds specifies the number of milliseconds the protocol translator waits after putting the first character into a packet buffer before sending the packet. During this interval, more characters may be added to the packet, thus increasing the processing efficiency of the remote host. The no dispatch-timeout subcommand removes the time-out definition.
[no] escape-character decimal-number
Defines the escape character. The argument decimal-number is either the ASCII decimal representation of the character or a control sequence (Ctrl-E, for example). The default escape character is Ctrl ^ X. The no escape-character subcommand reinstates the default.
This EXEC subcommand determines whether or not the protocol translator will start an EXEC process on the line. By default, the protocol translator starts EXECs on all lines.
Determines whether or not the protocol translator will display the EXEC banner or message-of-the-day (MOTD) banner when an EXEC is created. By default, the messages defined with banner motd and banner exec are displayed on all lines. The no exec-banner subcommand is useful for temporarily suppressing these banner messages. Specify exec-banner to reinstate.
[no] exec-timeout minutes [seconds]
Sets a time interval before returning the terminal to the idle state. The argument minutes is the number of minutes. The optional argument seconds specifies additional interval time in seconds. The default interval is 10 minutes; an interval of zero specifies no time-outs. The no exec-timeout subcommand removes the time-out definition. It is the same as entering exec timeout 0.
flowcontrol { none|software [in|out]}
Sets the method of data flow control between the terminal or other serial device and the protocol translator.
The keyword software sets software flow control. An additional keyword specifies the direction: in causes the protocol translator to listen to flow control from the attached device, and out causes the protocol translator to send flow control information to the attached device. If not specified, both directions are assumed.
The keyword hardware sets hardware flow control. No modem control is necessary on a line utilizing hardware flow control.
By default, no flow control is set for a line. Use the none keyword to re-instate the default.
Sets the line as in an insecure location. This line subcommand applies only to LAT connections.
Sets the terminal screen length. The argument screen-length is the number of lines on the screen. Default is 24 lines.
line [type-keyword] first-line [last-line]
Takes up to three arguments: a keyword, a line number, or a range of line numbers. The optional argument type-keyword specifies the type of line to be configured; it is one of the following keywords:
When the line type is specified, the argument first-line is the relative number of the terminal line (or the first line in a contiguous group) you want to configure. Numbering begins with zero. The optional argument last-line is the relative number of the last line in a contiguous group you want to configure. If you omit type, then first-line and last-line are absolute rather than relative line numbers.
Enters a description about the terminal location and/or status into the configuration file. The argument text is the desired description.
Causes the protocol translator to prompt for a password before starting the EXEC process when you have set a password for the line. The no login line subcommand disables password and allows connections without a password.
Sets up the TACACS verification mechanism to handle the password checking. The no login tacacs subcommand disables TACACS password checking.
Sets a line to inform a user who has multiple, concurrent Telnet connections when output is pending on a connection other than the current connection. This subcommand performs the same function as the EXEC command terminal notify described in the chapter "Protocol Translator User Commands." The no notify subcommand ends notification.
[no] padding decimal-number count
Sets padding for a specified output character. The argument decimal-number is the ASCII decimal representation of the character. The argument count is the number of NULL bytes sent after that character. The no padding subcommand removes padding for the specified output character.
Specifies a password.The text argument may contain any alphanumeric characters, including spaces, up to 80 characters. The password checking is also case-sensitive. The no password line subcommand removes the password.
Ensures that the configuration options the user can set remain in effect between terminal sessions. This behavior is desirable for terminals in private offices. By default, user-set configuration options are cleared with the EXEC command exit or when the interval set with the exec-timeout subcommand has passed.
[no] refuse-message d message d
Defines an error message that is displayed when a user attempts to connect to a line that is busy. The argument d is a delimiting character which denotes the beginning and end of the text entered for the message argument.
Defines a group of lines as a rotary group. The argument group is an integer you choose between 1 and 100 that identifies the rotary group.
[no] session-limit session-number
Sets the maximum number of concurrent sessions allowed. The argument session-number specifies the maximum number of sessions.
[no] session-timeout minutes [output]
Sets the interval the protocol translator waits for input or output traffic before closing the connection to a remote computer and returning the terminal to the idle state. The argument minutes specifies the interval in minutes. The optional keyword output specifies that when traffic is sent to an asynchronous line from the terminal server (within the specified interval), the connection is retained. If not specified, the session time-out interval is based only on user input, not output. The default interval is zero, indicating the protocol translator maintains the connection indefinitely.
[no] terminal-type terminal-name
Records, in the argument terminal-name, the type of terminal connected to the line for use in Telnet terminal-type negotiation; the Telnet terminal-type negotiation uses terminal-name to inform the remote host of the terminal type. Terminal type is used by TN3270 for display management. The no terminal-type subcommand removes the information about the terminal type.
transport input [telnet|lat|pad|none]
Specifies which protocols may be used for connecting to a line. By default, all protocols supported are allowed. Use one of the keywords to change the default.
transport output [telnet|lat|rlogin|pad|none]
Specifies which protocols may be used for outgoing connections from a line.By default, all protocols supported are allowed. Use one of the keywords to change the default.
transport preferred [telnet|lat|rlogin|pad|none]
Specifies the preferred protocol to use for outgoing connections when a command does not specify one.For protocol translators that support LAT, the default protocol is LAT. For those that do not support LAT, the default is Telnet.
[no] vacant-message d message d
The vacant-message subcommand enables the banner to be displayed on the screen of an idle terminal.
The vacant-message subcommand without any arguments causes the default message to be displayed.
If a banner is desired, follow the vacant-message subcommand with one or more blank spaces and a delimiting character (d) you choose. Then type one or more lines of text (message), terminating the text with the second occurrence of the delimiting character.
Sets the number of columns on an attached terminal. Default is 80 columns.
This section lists system configuration EXEC commands in alphabetic order.
Begins the configuration process.
Copies a Flash TFTP image back to a TFTP server.
Copies a TFTP image into the current Flash configuration.
Disables the privileged level command.
Enables the privileged command level.
|
|