|
|

This chapter provides information about configuring your Cisco 627. Your unit is preconfigured for full operation. However, you might need to configure the Cisco 627 for management virtual connections (VCs).
Table 3-1 identifies the configuration procedures you might need.
| Configuration Procedures | Page Number |
|---|---|
After connecting all cables to the Cisco 627 and powering it on, start the terminal emulation program and press the Enter key until the Cisco Broadband Operating System (CBOS) welcome screen appears. When you see the welcome screen, you can log on to CBOS.
Hello!
Expanding CBOS image...
CBOS v2.3.5.012 - Release Software

Password:
After you log on to CBOS, you can use the show version command to determine the CBOS version of the Cisco 627:
cbos# show version
CBOS also has two modes of operation: exec and enable. The CBOS defaults to exec mode when you log on. The exec mode grants read-only (command execution) privileges to a user.
To write changes to NVRAM, you must work in enable mode. To invoke enable mode:
cbos> enable
Step 2 Enter the enable password when CBOS prompts you:
Password:
 |
Note If you have not set any passwords, press the Enter key when the system prompts you for a password. |
Your system comes preconfigured for full and immediate network operation. However, you might need to manage your Cisco 627 directly over the network. To do this, you must establish and set management virtual connections (VCs).
|
Note You must be in the enable mode to perform these procedures. |
Each interface is expressed as atmx, where x is either 0 or 1. The atm0 interface is reserved for ATM25. The atm1 interface is used for the ADSL remote interface.
The valid range for VPI is 0 to 255. 0 to 65535 is the valid range for VCI addresses.
|
Note The Cisco 627 is configured with atm0 using VPI/VCI 0/34 by default. The atm0 interface is used for management. Cisco recommends that you do not change VPI/VCI values for atm0. |
cbos# set interface atm1 vpi 2
Step 2 To begin using this connection with the new settings, enter:
cbos# set interface atm1 enable
Step 3 To verify your setting:
cbos# show interface atm1
A display similar to the following will appear on your screen:
atm1  RFC1483 Ethernet HWaddr 00:E0:D0:01:19:7F
      IP address 10.0.1.1 Mask 255.255.255.0
      MTU 1500 Metric 0
      RX packets 0 errors 0
      TX packets 0 errors 0
      Port is currently enabled with link status
      VCI 34          VPI 2
      Severely Errored Frame Count:0
       Data rate     6944 Kbps down;    480 Kbps up
       Line capacity 7456 Kbps down;    480 Kbps up
       SNR Margin       8 dB; previous    8 dB
       Attenuation   13.0 dB; previous 13.0 dB
Status:
   Last Self-Test Result:Not Available
   Modem Microcode:      0x1119be0d
Configured:
   Trellis Coding:          Enabled
   Echo Cancellation:      Disabled
   FDQ Adaptation:          Enabled
   Rate Adaptation:          Normal
   Overhead Framing:         Mode-3
   Bit-Swapping:           Disabled
   ATM Payload Scrambling: Disabled
   PGA-Cutback:                0 dB
Actual:
   FEC Redundancy Bytes:
      Interl. Path:   downstream:   16, upstream     0
         Fast Path:   downstream:    0, upstream     0
   Interleaver Depth: downstream:    0, upstream     0
   Trellis Coding:         Not-Used
   Echo Cancellation:      Not-Used
   FDQ Adaptation:           In-Use
   Overhead Framing:         Mode-0 (910 compatible)
   Bit-Swapping:           Not-Used
Last Line Fault:  NONE
ATM Statistics:
   Interleaved-Path Counters:
      HEC errors:                 0
      LOCD events:                0
   Fast-Path Counters:
      HEC errors:                 0
      LOCD events:                0
DSL Statistics:
   Superframes:                 956
   Corrected Superframes:         0  (+INF)
   Uncorrected Superframes:       0
   LOCD Retrains                  0
   LOS Retrains:                  0
   LOF/RFI Retrains:              0
   ES Events:                     0
   Time Trained (h:m:s)      0:00:16
      Trained...
Step 4 To save the new WAN port configuration, enter:
cbos# write
Step 5 To exit CBOS, enter:
cbos# quit
|
Note To close an ATM management connection, enter: set interface atmx disable. To set the ATM25 management VPI, repeat the previous steps substituting atm0 for atm1. |
cbos# set interface atm0 vci 32
To verify your setting:
cbos# show interface atm0
A display similar to the following will appear on your screen:
atm0 RFC1483 Ethernet Hwaddr 00:E0:D0:01:19:7F

IP address 192.168.1.100 Mask 255.255.255.0

MTU 1500 Metric 0

RX packets 0 errors 0

TX packets 0 errors 0

Port is currently disabled with no link status

VCI 32          VPI 0
Step 2 To begin using this connection with the new settings, enter:
cbos# set interface atm0 enable
Step 3 To save the new WAN port configuration, enter:
cbos# write
Step 4 To exit CBOS, enter:
cbos# quit
|
Note To close an ATM management connection, enter: set interface atmx disable. To set the ADSL ATM VCI, repeat the previous steps substituting atm1 for atm0. |
Telnet provides a command-line interface for remote login connections between machines on many networks, including the Internet. To establish a Telnet connection to the CPE, Telnet must be enabled in CBOS.
 |
Caution Before closing a Telnet connection, always enter exit or quit at the cbos# prompt. |
Step 2 Select the Run... option.
Step 3 When the Run box appears, enter telnet in the space provided.
Step 4 Click the OK button. The Connect menu appears.
Step 5 Select the Remote System... option from the Connect menu. The Remote System List Box appears. (See Figure 3-1.)
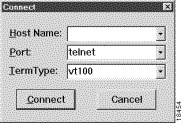
Step 6 Enter the atm0 IP address of your modem in the Host Name box and click Connect. The system then initiates a connection session. When connection is initiated, information similar to the following displays:
User Access Verification
Password:
|
Note Press the Enter key several times to establish a connection. |
Step 7 Provide the logon and password information. After the system authenticates your password, you have access to the CBOS.
|
Note You can log on to the CPE using no password by pressing the Enter key at the password prompt. Refer to the "Set Passwords" section on page 3-19 for more information about how to set and change passwords. |
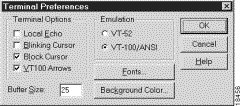
Windows' Telnet client does not support NVT (Network Virtual Terminal) or any extra form of option negotiation. However, if you are going to use the Windows Telnet client, complete the following steps to set your terminal settings.
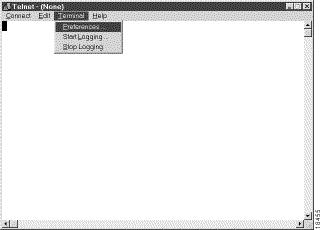
Step 2 Set the terminal settings on the Terminal Preferences menu to the values shown in Figure 3-3.
When you run Linux without installing the Term/Termcap database, the message BAD ADDRESS displays during a connection attempt. Use the original Linux installation disks to install the Term/Termcap database.
The following procedure describes how to log on to your modem from a UNIX system:
telnet IP address of atm0
After you have connected, information similar to the following appears on your display:
Cisco Broadband Operating System
CBOS (tm) 2.3.5.012 - Release Software
Copyright (c) 1986-1999 by cisco Systems, Inc.
cbos>
Step 2 Provide the login and password information. After the system authenticates your password, you have access to CBOS.
Telnet sessions time out after a period of inactivity. Enter the following commands to keep the Telnet client from timing out.
cbos# set telnet timeout off
cbos# write
The set telnet timeout off setting is not saved in NVRAM after a reboot. You must explicitly set it for every session.
The Trivial File Transfer Protocol (TFTP) enables you to transfer files to and from your modem. Your system runs a tftp daemon that enables remote users who have TFTP client software, to transfer files to and from the system. The TFTP client is enabled and disabled from the CBOS or the Web Management Interface.
|
Caution For security reasons, Cisco recommends that you disable the TFTP application, except when uploading or downloading a file. |
Use the TFTP utility to transfer a new software image from Cisco to your system, where the filename equals nsrouter.c627.x.ima, where x is the release number.
Versions of CBOS 2.3 or higher use the filename format c627.x.bin, where x is the release number.
Use the TFTP utility to back up a copy of your configuration file before changing it,
so you can easily recover the old file if necessary. The naming conventions for the configuration file are:
For information on the UNIX TFTP client, access the online manual on your UNIX system. At the command-line prompt, enter:
man tftp
The manual page for TFTP appears. The TFTP UNIX man page contains all the information you need to establish and invoke a remote TFTP session.
Before attempting to use TFTP, make sure of the following:
To use TFTP:
C:>ping IP address
Step 2 Enter one of the following commands:
C:>tftp -i IP address put nsrouter software image filename
C:>tftp -i IP address put system configuration config filename
C:>tftp -i IP address put DSP firmware file name
where IP address is the IP address of the ATMx port.
Where necessary, implement the following options:
-i - Sets the transfer mode to binary mode.
put - Uploads a file to that IP address.
|
Note The CPE might take up to 2 minutes to upgrade the firmware. Wait until the management console reappears before rebooting the CPE. |
Step 3 Be sure that you reboot the device to activate the new image. When you log back on to your system after the reboot, use the following command to verify the version of the firmware that is active:
cbos# show version
Windows 95 does not have a TFTP client. If you want to utilize TFTP on a Windows 95 system, you must install a TFTP client from a third-party vendor on your system. One way to locate a TFTP client is to use an Internet search engine to locate a vendor who sells a TFTP client. Some TFTP clients are provided as share or freeware on the Internet. By request, Cisco will provide a TFTP client.
You can upgrade software on your CPE using the serial interface:
Step 2 To turn debug monitor on, enter:
debug monitor on
Step 3 To save your changes, enter:
write
Step 4 To reboot the device, enter:
reboot
After the modem reboots, press Enter twice. The prompt should change to =>.
Step 5 To erase sector 0, enter:
es 0
Repeat this step for sectors 1 through 5.
Step 6 To start serial download, enter:
df 10008000
Step 7 Use a terminal emulation application, such as Hyperterminal, to start an Xmodem download of a new Cisco 67x image.
Step 8 When the download is complete, the following message appears:
Transferred xxxxxxxx bytes
Record the number of bytes transferred.
Step 9 To program the area of memory to Flash, enter:
pb 10008000 fef00000 xxxxxxxx
where xxxxxxxx is the value recorded in Step 6.
Step 10 To turn debug monitor off, enter:
m0
Step 11 To reboot, enter:
rb
The Cisco 627 allows you to choose transmission protocols to match your network configuration by changing the CPE's configuration file and operating system. You will use the TFTP to transfer files to and from the CPE. This section describes procedures to configure the Cisco 627 for G.Lite and G.DMT protocols.
|
Note Changes to your CPE must be coordinated with the central office equipment. |
Step 2 Enable TFTP by entering:
cbos#set tftp enabled
TFTP is enabled
Step 3 Set the remote address for the TFTP host computer by entering:
cbos # tftp remote ip address
This command tells the CPE to accept TFTP transfers from a specific IP address. An example remote IP address would be 192.168.35.4. This address is an example only; do not use it to configure the router.
|
Note If you do not have the CPE address, consult your network
administrator. For more information about TFTP, see " Using a Trivial File Transfer Protocol Server" section on page 3-10. |
Step 4 To start the file transfer from a PC, start a DOS session and enter the following command:
C:>tftp -i CPE IP address put image_filename
To start the file transfer from a UNIX machine, enter the following commands:
root@staten-</6xx>tftp
tftp> mode binary
tftp> put CPE IP address:image_filename
Sent 922294 bytes in 54.9 seconds
Where necessary, implement the following values:
-i | Sets the transfer mode to binary mode |
get | Downloads a file to a specified IP address |
put | Uploads a file onto that IP address |
Substitute the filename for the software image update. See the latest Release Notes for the Cisco Broadband Operating System available on CCO for the appropriate filenames to use.
|
Caution Do not turn off the power to the router until after the file transfer is completed. |
Step 5 Be sure to reboot the CPE to activate the new image. When you log back in to the CPE after the reboot, use the show version command to verify the version of the firmware that is active. Note the DMT firmware version.
cbos#set tftp enabled
TFTP is enabled

cbos#tftp image TFTP_server_IP_address image_filename
Starting download...
        Downloading in progress...... done.
        Saving image...........done.
        Please reboot the CPE for the new downl
cbos#reboot
Hello!
C6xx self-update code: Release 2.3.5.012
NOTE: Do not power off router until update is finished!

Decompressing router...
Erasing FLASH......
Programming...
Decompressing monitor...
Erasing FLASH.........
Programming...
Finished.  Rebooting...
Hello!
Expanding CBOS image...
CBOS v2.3.5.012 - Release Software

User Access Verification
Password:

cbos>enable
Password:

cbos#show version

Cisco Broadband Operating System
CBOS (tm) 627 Software (C627-I-M), Version v2.3.0.053, RELEASE
SOFTWARE
Copyright (c) 1986-1999 by cisco Systems, Inc.
Compiled Feb 13 2000 17:36:16
Monitor build  111 (Feb 13 2000 17:37:07)
Before the CPE can be configured for G.DMT, the .full image must be loaded. See the latest Release Notes for the Cisco Broadband Operating Sytsem for the appropriate filenames to use. The central office hardware must be correctly configured to accept a G.DMT service user.
cbos# set interface atm1 standard g.992.1
Step 2 Be sure to retrain the CPE to activate the new line code. When the CPE is retrained, use the show interface atm1 command to verify the G.DMT standard is active. Note that the standard configuration for the .full image is DMT2.
|
Note Changes made to the running configuration must be written to NVRAM for changes to be seen on reboot. |
cbos#set interface atm1 standard
SET INTERFACE WANx STANDARD requires one of the following arguments
T1.413
G.dmt (G992.1)

cbos#set interface atm1 standard g.992.1
Note:  Change will take effect on next retrain.

cbos#show interface atm1
atm1 ADSL Physical Port
       Line Trained
Actual Configuration:
  Overhead Framing:          3
  Trellis Coding:            Disabled
  Standard Compliance:       g.992.1
  Downstream Data Rate:      8032 Kbps
  Upstream Data Rate:        864 Kbps
  Interleave S Downstream:   1
  Interleave D Downstream:   64
  Interleave R Downstream:   2
  Interleave S Upstream:     4
  Interleave D Upstream:     8
  Interleave R Upstream:     16
  Modem Microcode:           G96
  DSP version:               0
  Operating State:           Showtime/Data Mode
Configured:
  Echo Cancellation:         Disabled
  Overhead Framing:          3
  Coding Gain:               Auto
  TX Power Attenuation:      0dB
  Trellis Coding:            Enabled
  Bit Swapping:              Disabled
  Standard Compliance:       Multimode
  Remote Standard Compliance:g.992.1
  Tx Start Bin:              0x6
  Tx End Bin:                0x1f
  Data Interface:            Utopia L1
Status:
  Local SNR Margin:          3.5dB
  Local Coding Gain:         0.0dB
  Local Transmit Power:      12.5dB
  Local Attenuation:         28.5dB
  Remote Attenuation:        18.5dB
Local Counters:
  Interleaved RS Corrected Bytes:        0
  Interleaved Symbols with CRC Errors:   2
  No Cell Delineation Interleaved:       0
  Out of Cell Delineation Interleaved:   0
  Header Error Check Counter Interleaved:0
  Count of Severely Errored Frames:      0
  Count of Loss of Signal Frames:        0
Remote Counters:
  Interleaved RS Corrected Bytes:        0
  Interleaved Symbols with CRC Errors:   0
  No Cell Delineation Interleaved:       0
  Header Error Check Counter Interleaved:0
  Count of Severely Errored Frames:      0
  Count of Loss of Signal Frames:        0
The default Cisco 627 system prompt is cbos#. The command prompt is limited to 8 characters. You can change this prompt to a unique subscriber identifier as shown in the following example.
Step 2 To change the default prompt to 4412883 as the subscriber identifier, enter:
cbos# set prompt 4412883
4412883#
Step 3 To save your changes, enter:
4412883# write
Step 4 To exit the CBOS, enter:
4412883# quit
After you have configured your system, you should pick new passwords for both the enable and exec modes. Keep in mind that the enable mode provides all the functionality of a system administrator for the CPE. Examples of good and bad passwords are:
Use the set password command to change both the enable and exec passwords as in the following:
cbos# set password mode new password
Example:
set password enable 33Low44PassMe
set password exec 44High55Pass
Step 2 To save your changes, enter:cbos# write
Step 3 To exit CBOS, enter:cbos# quit
Use the write command to save any changes you have made during provisioning to the NVRAM configuration file:
cpe627# write
|
Caution If you do not use the write command after changes, all the changes you made during your current session will be lost when you reboot the Cisco 627. |
Table 3-2 describes the LEDs and their status.
| LED Label | Full Name | Description |
|---|---|---|
WAN-LNK | WAN Link | When this light is ON, it indicates that a link has been established on the WAN port. The WAN-LNK light blinks steadily during ADSL line training activities. When the light is solid, the system is connected and trained. |
WAN-ACT | WAN Activity | When this light blinks, it indicates that the WAN port is transmitting or receiving data. |
LAN-LNK | ATM25 LAN Link | When this light is ON, it indicates that a link has been established on the ATM-25 port. Note For some ATM-25 routers or NICs, this light may not be on till data is sent to the modem. |
LAN-ACT | ATM25 LAN Activity | When this light blinks, it indicates activity on the ATM-25 port. |
PWR | Power Light | When this light is Green, the system is ON and working correctly. |
ALARM | Alarm Light | When the light is Red, the system is ON but indicates a problem that needs to be resolved. |
The stats command shows information about the number of packets transmitted and received and activity information about general applications.
To retrieve statistics:
cbos# stats
Step 2 To display specific statistics, enter:
cbos# stats variable from list
Step 3 To exit the CBOS, enter:
cbos# quit
Use the stats atm0 and show interface atm1 commands to retrieve key statistics regarding ADSL performance. These statistics are:
![]()
![]()
![]()
![]()
![]()
![]()
![]()
![]()
Posted: Fri May 4 14:36:45 PDT 2001
All contents are Copyright © 1992--2001 Cisco Systems, Inc. All rights reserved.
Important Notices and Privacy Statement.