|
|

| Unpack the Box |
When you unpack the box that contains your Cisco 1417 router, you should find the items shown below. If you did not receive everything shown here, contact your Cisco reseller.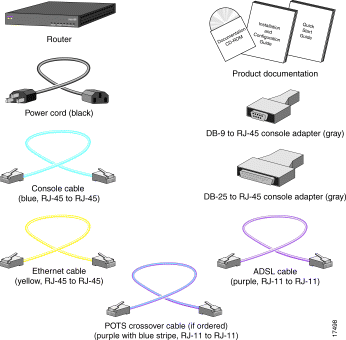
If you are not sure when to use POTS splitters and microfilters, read the "Installation" chapter of the hardware installation guide that came with your router. If you are not sure what type of splitter or microfilter to use, contact your ISP or your Cisco reseller.
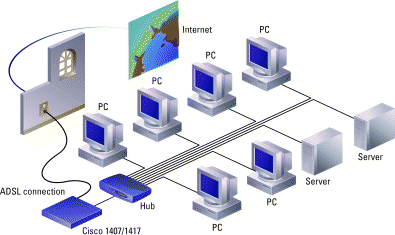
| Install the Router |
Use the included yellow Ethernet cable for connecting the router to the local Ethernet network. For more information on this cable, refer to the "Cabling Specifications" chapter in the hardware installation guide that came with the router.
Step 1 Connect one end of the yellow Ethernet cable to the yellow ETHERNET port.
Step 2 Connect the other end to a port on the Ethernet hub or switch.

| Install the Router (continued) |
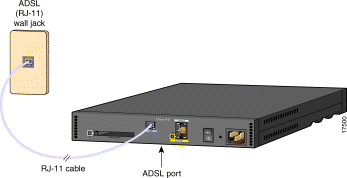
Use the included purple ADSL cable for connecting the router to the ADSL line.
Step 1 Connect one end of the purple cable to the purple ADSL port on the router.
Step 2 Connect the other end of the purple cable to the ADSL wall jack.
Step 3 Either install a POTS splitter, or confirm that your service provider installed a POTS splitter. If you are not sure about what type of POTS splitter to use, contact your ADSL service provider or your Cisco reseller.
Step 4 Install microfilters if you need them for optimal telephone call quality.
 | Caution |
| Install the Router (continued) |
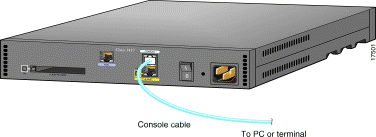
To use Cisco IOS software to configure the router, it must be connected to a terminal or to a PC with terminal-emulation software. Terminal-emulation software should be configured with the following settings: 9600 baud, 8 data bits, no parity bits, and 1 stop bit.
Take the following steps to connect the router to one of these devices:
Step 1 Connect one end of the blue console cable (included) to the CONSOLE port on the router rear panel.
Step 2 Depending on the console port connector (DB-25 or DB-9) on your terminal or PC, connect one of the gray adapters (included) to the other end of the console cable.
Step 3 Connect the gray adapter to the DB-25 or DB-9 connector on your terminal or PC.
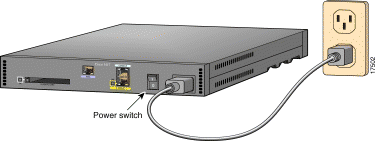
| Install the Router (continued) |
Step 1 Connect the power-supply cord to the power socket on the rear panel.
Step 2 Connect the other end of the cord to a power outlet.
Step 3 Turn on the router by pressing the power switch to the on ( | ) position.
Step 4 Confirm that the router has power by checking that the PWR LED on the front panel is on.
| Verify Your Installation. |
After the router is powered up, the following LEDs confirm that you have correctly installed your router.
| LED | Location | What to Look for |
|---|---|---|
PWR | Front | On when power is being supplied to the router. |
OK | Front |
|
LNK | Rear | On when the router is correctly connected to the local Ethernet network through the ETHERNET port. |
WAN CARRIER | Front | On when the router has synchronized with the DSL access multiplexer (DSLAM) at the service provider office. |
ETHERNET ACT | Front | Blinking when there is network traffic on the Ethernet LAN. |
OK | Rear | On when the Flash PC card is correctly installed in the router. If this LED is off, refer to the installation and configuration guide that came with your router for instructions on how to reinstall the Flash PC card. |
For more information about installing or configuring your Cisco 1417 router, refer to the following sources:
![]()
![]()
![]()
![]()
![]()
![]()
![]()
![]()
Posted: Sat Sep 28 00:08:01 PDT 2002
All contents are Copyright © 1992--2002 Cisco Systems, Inc. All rights reserved.
Important Notices and Privacy Statement.


