|
|

This chapter contains procedures for the initial provisioning of a Cisco 6700 network element (NE). These procedures should be followed in this order:
1. Configure TCP/IP on the EMS Workstation
2. Connect Cisco 6700 NE to EMS Workstation
3. Start EMS on the Workstation
6. Open the NE Provision Window
The following conditions must be met before you can provision the Cisco 6700 NE:
 | Caution Do not assign an IP address to the Cisco 6700 NE unless the IP address is specifically designated for this NE. Improper use and assignment of IP addresses can create severe problems, including network failure. |
Before the EMS workstation can initially provision the Cisco 6700 NE, the IP address of the workstation must be provisioned for the same IP subnet as the NE.
The following procedure is used to configure TCP/IP on a Windows 95 or Windows 98 workstation.
Step 1 From the Windows NT desktop, right-click the Network Neighborhood icon, and select Properties from the pop-up menu. (See Figure 3-1.)

EMS launches the network properties window.

Step 2 From the list of network components at the top of the window, click TCP/IP. (See Figure 3-3.) If there are multiple TCP/IP protocols listed, click the icon for the correct network interface. Contact your network adminstrator if you are not sure which network interface is used to connect to the Cisco 6700 NE.

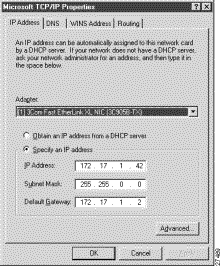
Step 3 Click Properties at the lower right of the window to launch the TCP/IP properties window. (See Figure 3-4.)

Step 4 Click the button next to "Specify an IP address."
Step 5 In the IP Address field, enter 192.168.0.x, where x is a number from 4 to 254.
Step 6 In the Subnet Mask field, enter 255.255.255.0.
Step 7 Click OK to set the new IP address and subnet mask. (See Figure 3-5.)

Use the following procedure to configure TCP/IP on a Windows NT workstation.
Step 1 From the Windows NT desktop, right-click the Network Neighborhood icon, and select Properties from the pop-up menu to launch the network properties window.
Step 2 Windows NT launches the network properties window. (See Figure 3-7.)

Step 3 Click the Protocols tab at the top of the window.

Step 4 Make sure that the TCP/IP icon is highlighted in the Network Protocols display. The TCP/IP icon becomes highlighted when clicked.
Step 5 Click the Properties button at the lower right of the window to launch the TCP/IP properties window. (See Figure 3-9.)
Step 6 Make sure that the correct network interface (adapter) appears in the Adapter field. If your workstation is using a different network interface than the one shown, select the correct interface from the pull-down list. Contact your network adminstrator if you are not sure which network interface is used to connect to the Cisco 6700 NE.
Step 7 Click the button next to Specify an IP address.
Step 8 In the IP Address field, enter 192.168.0.x, where x is a number from 4 to 254.
Step 9 In the Subnet Mask field, enter 255.255.255.0.
Step 10 The Default Gateway field does not need to be changed.
Step 11 Click OK to set the new IP address and subnet mask. You do not need to reboot the workstation.
For information on configuring TCP/IP addresses on UNIX workstations, please contact your network administrator.
To connect the NE to the EMS workstation, use a crossover Ethernet cable with RJ-45 connectors. Insert one end of the cable into the workstation's Ethernet port. Insert the other end of the cable into the 10BaseT port on the active main common control card (MCC).
Alternatively, you can use a hub to connect the NE to the EMS workstation. Use straight Ethernet cables with RJ-45 connectors to connect the workstation to the hub, and to connect the hub to the AMM or MCC port.
For more information, contact your EMS administrator, and consult the Cisco 6732 Full Access Device Hardware Installation Guide or the Cisco 6705 Integrated Access Device Hardware Installation Guide.
Once the NE is physically connected to the workstation, launch EMS on the workstation. Select one of the following launch procedures, depending on the workstation's operating system:
If EMS has been properly installed on your workstation, the EMS Alarm Server icon and EMS Netview icon will be placed on your workstation's desktop. See "EMS Installation," for the installation procedure.
From your workstation's desktop view, click the EMS Alarm Server icon to launch the alarm server. The hourglass (system busy icon) cursor will appear briefly (indicating that the server is being launched).
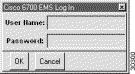
Click the EMS Netview icon to launch EMS. When the EMS login window appears (see Figure 3-10), enter your username and password. If you do not have a valid username and password, contact your EMS administrator. Click OK after entering a valid username and password.
After clicking OK, the EMS net view will appear. Proceed to the "Create a Node" section to create a node representing the NE.
If EMS Lite has been properly installed on your workstation, the EMS Lite Netview icon will be placed on your workstation's desktop. See "EMS Installation," for the installation procedure.
Click the EMS Lite Netview icon to launch EMS. When the EMS login window appears (see Figure 3-10), enter your username and password. If you do not have a valid username and password, contact your EMS administrator. Click OK after entering a valid username and password.
After entering a valid username and password, the net view will appear. Proceed to the "Create a Node" section to create a node representing the NE.
To start EMS and the EMS alarm server, two scripts are provided:
They reside in EMS installation directory/bin directory, and they can be invoked from any directory if they are included in the path.
Proceed to the "Create a Node" section to create a node representing your Cisco 6700 system.
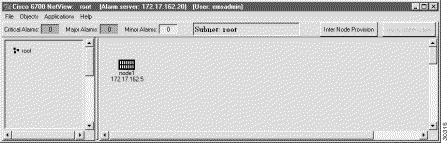
After logging in with a valid username and password, EMS presents the net view. (See Figure 3-11.) Net view displays the Cisco 6700 network topology, including all nodes and subnets.

Before EMS can communicate with the NE, you must create a node in the net view. EMS uses nodes to represent each NE in the network.
To create a node:
Step 1 From the net view, select Objects > New Node.

EMS presents the node information window. (See Figure 3-13.)

Step 2 Enter a node name (and optional node alias) for the NE. The node name identifies the node in the net view; the node alias provides additional description information (such as location or organization name).
Step 3 In the IP address text box, enter the primary IP address of the NE. If you are provisioning the NE for the first time, enter the default IP address: 192.168.0.2.
Step 4 In the Type field, and select the proper NE type (6732 or 6705).
Step 5 EMS provides a default node ID number for the NE. Consult your EMS administrator for the correct node ID for use with this NE. Highlight the number and enter a new node ID, or use the slider to change the node ID.
Step 6 Click the OK button when finished. You will return to the net view. The newly created node will appear as an icon, with the node name and IP address below the icon. (See Figure 3-14.)
To verify connectivity between EMS and the Cisco 6700 NE, double-click the node icon, or select Node View from the popup menu. (See Figure 3-15.)
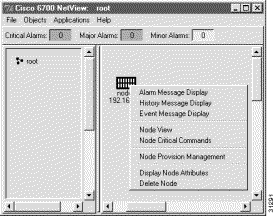
Depending on the chassis type, EMS launches the Cisco 6732 node view (see Figure 3-16) or the Cisco 6705 node view (see Figure 3-17).


If the node ID entered in EMS differs from the current node ID assigned to the NE, EMS reports a node ID conflict. (See Figure 3-18.)

Example: You create a node in EMS net view and assign a node ID of 3, but the Cisco 6700 NE is provisioned with a node ID of 1. When you double-click the node icon, EMS reports a node ID conflict. Selecting Yes changes the NE node ID to 3. Selecting No leaves the NE with its node ID of 1.
If EMS is unable to connect with the NE, you will see a warning message describing the problem. The following list identifies common issues that may prevent the EMS workstation from communicating with the NE:
To open the NE provision window, double-click the node nameplate in node view. (See Figure 3-19.)

EMS launches the NE provisioning window. (See Figure 3-20.)

The left side of the window contains the function bar, a group of buttons used to navigate the NE provision window. Note that the System Basic Provisioning button is grayed out in the button bar. This indicated that the system basic provisioning window is now open. To open a different provisioning window, click one of the buttons in the function bar.
The NE must be assigned an appropriate IP address before it can be introduced in the Cisco 6700 network. Your EMS administrator should provide IP information for the NE, including subnet masks.
| Caution Do not assign an IP address to the Cisco 6700 NE unless the IP address is specifically designated for this NE. Improper use and assignment of IP addresses can create severe problems, including network failure. |
To configure IP information for the NE:
Step 1 Click IP Address Configuration in the function bar to bring up the IP address configuration window. (See Figure 3-21.)

The Cisco 6732 NE is factory configured with the following default IP addresses and subnet masks:
The Cisco 6705 NE is factory configured with the following default IP address and subnet mask:
Step 2 Enter the IP addresses and netmasks as instructed by your EMS administrator.
Step 3 (Optional) The Ethernet IP address allows you to specify a separate route for Ethernet network traffic. If a unique Ethernet IP address (and netmask) is not assigned, Ethernet traffic will be routed through the primary IP address.
Step 4 Click the Apply button to confirm the IP address provisioning. EMS displays a warning message, indicating that you will become disconnected with the NE. Click Yes to confirm the changes.
Any changes made to the NE IP address must also be made to the node.
Step 1 From the NE provision window, click Exit in the function bar. EMS returns to node view.
Step 2 Select File > Exit from the node view menu bar. EMS returns to net view.

Step 3 Right-click the node icon to bring up the node popup menu. (See Figure 3-23.)
Step 4 Select Display Node Attributes to display the node information window. (See Figure 3-24.)
Step 5 In the IP Address field, enter the IP address assigned to the NE in the "Assign Network IP Addresses for the NE" procedure. For the Cisco 6732, this is the Active MCC IP Address; for the Cisco 6705, this is the MCC IP Address.
Step 6 Click OK. EMS returns to net view. The node icon displays the newly assigned IP address.
This section covers basic provisioning that is required for each Cisco 6700 NE:
The following procedures are performed in the NE provisioning window. To bring up the NE provisioning window:
Step 1 From node view, double-click the node nameplate. (See Figure 3-25.)
EMS launches the NE provisioning window. (See Figure 3-26.)
Each Cisco 6700 NE can send alarms to one or more EMS alarm servers. EMS workstations using Windows NT or UNIX use the EMS alarm server application to gather alarms from the Cisco 6700 network. Use of the alarm server is detailed in "Element Management System Alarm Server."
To provision alarms for the NE:
Step 2 Click Alarm Provisioning (in the function bar). EMS displays the alarm provisioning window. (See Figure 3-27.)

Step 3 In the Alarm Destination/Server IP Address field, enter the IP address of an alarm destinations (EMS alarm server).
Step 4 Click Apply when you are finished.
Setting the node clock synchronizes the Cisco 6700 NE clock with the EMS clock. Select NE Time of Day Set from the management function list, then click the Set button to synchronize the NE clock with the EMS workstation clock. The Refresh button updates the time displayed on the screen.

From the NE provision window, select Timing Source Selection & Control to bring up the timing source provisioning window. (See Figure 3-29.)

Set the following fields to provision a timing source for the NE:
Click Apply to provision a timing source or sources for the NE.
![]()
![]()
![]()
![]()
![]()
![]()
![]()
![]()
Posted: Fri Mar 3 15:36:43 PST 2000
Copyright 1989 - 2000©Cisco Systems Inc.