|
|

Product Numbers:
CSC-HSCI=
CSC-C2HSCI=
APP-LHS=
APP-ULA=
This document provides the procedures for installing the High-Speed Serial Interface (HSSI) and UltraNet interfaces in your AGS+ router. The HSSI product comprises the CSC-HSCI or CSC-C2HSCI network interface cards, and the APP-LHS applique. The UltraNet product comprises the CSC-HSCI or CSC-C2HSCI card and the APP-ULA applique. The CSC-HSCI is compatible only with the first-generation ciscoBus controller card (CSC-CCTL); the CSC-C2HSCI is compatible only with the second-generation ciscoBus controller card (CSC-CCTL2). ciscoBus compatibility is described in the section "ciscoBus Configuration" on page 11.
The sections in this document include the following:
With the exception of compatibility requirements and the LEDs used to verify the installation, the installation procedure is the same for both the CSC-HSCI (first-generation ciscoBus) and CSC-C2HSCI (second-generation ciscoBus) cards. Therefore, the term CSC-HSCI is used to indicate both cards unless otherwise indicated.
The following sections contain physical descriptions and brief functional overviews of the High-Speed Serial Communications Interface (CSC-HSCI) card and the APP-LHS and APP-ULA appliques. The CSC-HSCI card is used with an APP-LHS applique for an HSSI interface or with an APP-ULA applique for an UltraNet interface.
The CSC-HSCI card, shown in Figure 1, provides a full duplex synchronous serial interface for transmitting and receiving data at rates of up to 52 megabits per second (Mbps) with the APP-LHS applique, or up to 125 Mbps with the UltraNet APP-ULA applique; the actual rate is determined by the external data service unit (DSU) and the service to which the interface is connected.
All ciscoBus interface cards contain card-specific firmware (microcode), which determines whether the card is compatible with the first- or second-generation ciscoBus controller. Any ciscoBus cards with microcode versions earlier than 10.0 are compatible only with the first-generation ciscoBus controller (CSC-CCTL); those with Microcode Version 10.0 or later are compatible only with the second-generation ciscoBus controller (CSC-CCTL2). The CSC-HSCI and CSC-C2HSCI cards are otherwise the same. You can upgrade a CSC-HSCI to a CSC-C2HSCI by replacing the microcode with Version 10.0 or later. Microcode and ciscoBus compatibility are described in the section "ciscoBus Configuration" on page 11.

The CSC-HSCI connects to the APP-LHS or APP-ULA applique in the back of the chassis with internally-routed ribbon cables. The transmit, power, and receive ports connect to either the APP-LHS or APP-ULA applique; the control port connects only to the APP-LHS applique. Figure 2 shows a block diagram of the internal connections between the card and applique for an HSSI interface. For an UltraNet interface, the APP-ULA applique is used, and the control cable (labeled B) is not installed.

The CSC-HSCI card must be installed in a router that is running Software Release 8.3 or later and that contains a CSC-CCTL ciscoBus controller card.
The CSC-C2HSCI must be installed in a router that is running Software Release 9.1 or later, and which contains a CSC-CCTL2 ciscoBus controller card.
Instructions for determining your current software release and the type of ciscoBus controller installed are provided in the section "System Requirements" on page 9.
The CSC-HSCI can be installed in any available ciscoBus slot except the center slot (which contains the ciscoBus controller card); however, each ciscoBus slot has a predetermined priority. If other ciscoBus interface cards are installed, refer to the section "Slot Priority" on page 12 for a description of this slot priority and recommended slot placement for various ciscoBus configurations.
The APP-LHS applique, shown in Figure 3, provides the interface between the CSC-HSCI card and an external HSSI network at speeds of up to 53 Mbps, including DS3 (44.736 Mbps) or E3 (34.368 Mbps). Internally, the APP-LHS connects to the CSC-HSCI card by way of a 6-pin power cable, a 34-pin control cable, and two 50-pin ribbon cables: receive and transmit. (See Figure 3.)

Externally, a single 50-pin HSSI connector on the applique provides the connection for an HSSI interface cable, which is secured to the applique connector with a spring latch located in the cable connector housing. The opposite end of the HSSI cable connects to an external DSU. This HSSI connector can also be used with a null modem cable to connect two routers back to back in order to verify operation of the HSSI interface or to directly link the routers and build a larger node. Refer to the section ""Cables" on page 7 for cable descriptions.
The APP-ULA applique is installed in the rear of a router in an applique card cage. One or two appliques can be installed in each card cage.Because of space limitations, no more than two applique card cages can be installed in the router chassis. Also, a maximum of four slots are available for ciscoBus interface cards, so a maximum of four APP-LHS appliques can be installed. Detailed instructions for installing the applique and card cage are provided in the section "Installing the APP-LHS and APP-ULA Appliques" on page 21.
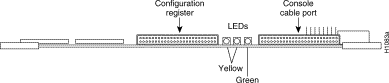
The APP-LHS also contains a bank of 12 LEDs, shown in Figure 4, which indicate power and operating status of the HSCI module. The mnemonic, normal state, and signal name for each LED are listed in Table 1.

Signals | At Power On1 | Normal2 | Signal Function | Direction DCE DTE |
|---|---|---|---|---|
| +5V | O | O | VCC | - |
| -5V | O | O | VEE | - |
| RT | O | O | Receive Timing | --> |
| ST | O | O | Send Timing | <-- |
| CA | O | O | DCE Available | <-- |
| TA | O | O | DTE Available | --> |
| LA | · | · | Loopback Circuit A | --> |
| LB | · | · | Loopback Circuit B | --> |
| LC | · | · | Loopback Circuit C | <-- |
| LI | O | · | Loopback Internal3 | - |
| OK | · | O | SW OK4 | - |
| ER | · | · | Ribbon cable Error | - |
The APP-LHS applique draws its power from the CSC-HSCI card; the +5 and -5 LEDs indicate when the applique is receiving power.
The RT and ST LEDs indicate that a clock signal is present inside the APP-LHS transmitter and receiver. The clock source is external during normal operation and internal during loopback.
CA indicates that the DCE (DSU) is prepared to send and receive data to and from the DTE (the router). TA indicates the DTE (router) is prepared to send and receive data to and from the DCE (DSU). Data transmission can begin only after both CA and TA have been asserted.
The green OK LED is on to indicate that the applique is correctly connected to the CSC-HSCI card, and that it is receiving power. The red ER LED, when on, indicates that the internal ribbon cables between the applique and CSC-HSCI card are connected to the wrong ports.
When on, LA, LB, LC, and LI indicate that the system is in an internal or external loopback diagnostic mode. These loopbacks enable the system diagnostics to verify the links between the DTE and DCE. LA, LB, and LC are software-controlled functions. LA and LB are sent from the DTE (router) to request loopbacks in the DSU. LC is sent by the DCE (DSU) to request loopback from the DTE (router); by default, LC is inhibited by software and must be enabled with a software command. LI indicates that a hardware internal loopback diagnostic test is in process. Procedures for performing the loopback test and for enabling LC are described in the section "Ribbon-Cable Loopback Test" on page 38.
The APP-ULA applique, shown in Figure 5, connects a router with an UltraNet hub for supercomputer interconnection. Internally, the APP-ULA connects to the CSC-HSCI card via a 6-pin power cable, a 50-pin transmit cable, and a 50-pin and receive cable. (Note that the 34-pin control cable is not used on the APP-ULA.)
Externally, two BNC-type connectors provide the input and output ports for the 75-ohm coax fiber cables between the UltraNet hub and the router. There are no LEDs on the APP-ULA applique.

The APP-ULA applique is installed in the rear of the chassis in an applique card cage. One or two appliques can be installed in a card cage. Because of traffic limitations and the high-speed switching required, a maximum of two APP-ULA appliques can be used in a router, and the remaining two ciscoBus slots must remain empty. If any cards other than a CSC-HSCI with an APP-ULA interface are installed in the ciscoBus, only one APP-ULA is supported. Detailed instructions for installing the applique and card cage are provided in the section "Installing the APP-LHS and APP-ULA Appliques" on page 21.
Two types of cables are available for use with the HSCI complex: the HSSI interface cable used to connect your router to an external DSU (and HSSI network) and a null modem cable, which allows you to connect two collocated routers back to back.
The HSSI interface between the APP-LHS port and the external DSU is a SCSI-type cable with male 50-pin connectors at both ends. The pinouts for this cable are listed in Table 2.
DTE | DTE | Direction1 DTE DCE | Signal Mnemonic and Name | |
|---|---|---|---|---|
| 1 | 26 | - | SG | Signal Ground |
| 2 | 27 | <-- | RT | Receive Timing |
| 3 | 28 | <-- | CA | DCE Available |
| 4 | 29 | <-- | RD | Receive Data (reserved) |
| 5 | 30 | <-- | LC | Loopback Circuit C |
| 6 | 31 | <-- | ST | Send Timing |
| 7 | 32 | - | SG | Signal Ground |
| 8 | 33 | --> | TA | DTE Available |
| 9 | 34 | --> | TT | Terminal Timing |
| 10 | 35 | --> | LA | Loopback Circuit A |
| 11 | 36 | --> | SD | Send Data |
| 12 | 37 | --> | LB | Loopback Circuit B |
| 13 | 38 | - | SG | Signal Ground |
| 14-18 | 39-43 | --> | 5 | Ancillary to DCE |
| 19 | 44 | - | SG | Signal Ground |
| 20-24 | 45-49 | <-- | 5 | Ancillary from DCE |
| 25 | 50 | - | SG | Signal Ground |
The null modem cable can directly connect two routers back to back; the two routers must be in the same location. This setup allows you to verify the operation of the HSSI or to directly link the routers in order to build a larger node. The pinouts for the null modem cable connectors are listed in Table 3.
To connect two routers, attach a null modem cable between an HSSI port on each. You must then enable the internal transmit clock in both routers by entering the hssi internal-clock command. Be sure to configure each port on each router with this command. When the internal clock has been enabled in a router, the yellow ST (send timing) LED on the applique is on. When the internal clock has been enabled in both routers (each end), the ST and RT (send timing and receive timing) LEDs will be on for each router.
To disconnect the null modem cable, disable the internal transmit clock with the no hssi internal-clock command. Use this command to turn off the transmit clock for each port on both routers.
| From Pins | Signal Name | Direction | To Pins | Signal Name |
|---|---|---|---|---|
| 2, 27 | Receive Timing | - | 9, 34 | Terminal Timing |
| 3, 28 | DCE Available | - | 8, 33 | DTE Available |
| 4, 29 | Received Date | - | 11, 36 | Send Data |
| 5, 30 | Loopback C | - | 10, 35 | Loopback A |
| 6, 31 | Send Timing | - | 6, 31 | Send Timing |
| 8, 33 | DTE Available | --> | 3, 28 | DCE Available |
| 9, 34 | Terminal Timing | --> | 2, 27 | Receive Timing |
| 10, 35 | Loopback A | --> | 5, 30 | Loopback C |
| 11, 36 | Send Data | --> | 4, 29 | Receive Data |
| 12, 37 | Loopback (NC) | - | 12, 37 | Loopback (NC) |
| 1, 26, 7, 32, 13, 38 19, 44 25, 50 | Ground | - | 1, 26, 7, 32, 13, 38 19, 44 25, 50 | Ground |
| 14-18, 20-24, 39-43, 45-49 | - | - | 14-18, 20-24, 39-43, 45-49 | - |
Before installing the HSCI components, read the following sections to ensure that your existing system components meet the compatibility requirements, and that you have the necessary parts and tools you will need to perform the installation without interruption.
The router in which you will install the components must meet the following physical requirements:
or
In addition to the physical requirements, your system must also meet the following software requirements, depending on the type of interface card (CSC-HSCI or CSC-C2HSCI) you are installing:
You can display the current software version and the type of processor card installed with the show version EXEC command. The current software version is displayed in the first line of the output; the processor card information is displayed on the eighth line, followed by a list of the installed interface cards. A sample of the display, which shows a system running Software Release 9.1(1), follows:
router# show version
GS Software (GS3), Version 9.1(1)
Copyright (c) 1986-1992 by cisco Systems, Inc.
Compiled Wed 29-Jul-92 17:02
System Bootstrap, Version 4.5(0.5)
router uptime is 22 days, 12 hours, 23 minutes
System restarted by power-on
System image file is "router-system", booted via tftp from 131.108.1.30
CSC4 (68040) processor with 16384K bytes of memory.
X.25 software.
Bridging software.
1 MCI controller (2 Ethernet, 0 Serial).
1 cBus controller.
1 MEC controller (6 Ethernet).
Environmental Controller.
8 Ethernet/IEEE 802.3 interface.
1 Token Ring/IEEE 802.5 interface.
1 HSSI network interface.
1 FDDI network interface.
64K bytes of multibus memory.
64K bytes of non-volatile configuration memory.
4096K bytes of flash memory on MC+ card (via MCI).
Configuration register is 0x2002
You can display a description of the current ciscoBus controller and ciscoBus interface cards with the show controller cbus EXEC command. The ciscoBus controller type is displayed, followed by the descriptions of each ciscoBus interface card, the ciscoBus slot in which it is installed, and the microcode version of each.
The following example of the show controller cbus display shows a first-generation ciscoBus controller (CSC-CCTL2), which is a controller type 3.0. The HSCI interface shown in the display is a CSC-HSCI:
router# show cont cbus
cBus 1, controller type 3.0, microcode version 2.0
  128 Kbytes of main memory, 32 Kbytes cache memory
  (text omitted)
 FDDI 0, controller type 4.1, microcode version 2.0
  Interface 0 - Fddi0, station address 0000.0c01.7bbd (bia 0000.0c01.7bbd)
  (text omitted)
 HSCI 1, controller type 10.0, microcode version 1.1
  Interface 6 - Hssi0, electrical interface is Hssi DTE
The next example of the show controller cbus command shows a second-generation ciscoBus controller, which is a controller type 6.0. The HSCI interface shown in the display is a CSC-C2HSCI.
router# show cont cbus
cBus 1, controller type 6.0, microcode version 10.0
  512 Kbytes of main memory, 128 Kbytes cache memory
  	(text omitted)
FDDI-T 0, controller type 7.1, microcode version 10.0
  Interface 0 - Fddi0, station address 0000.0c02.6aa3 (bia
	(text omitted)
CTR 1, controller type 9.0, microcode version 10.0
  Interface 8 - TokenRing0, station address 0000.3040.e004 (bia
	(text omitted)
HSCI 2, controller type 10.0, microcode version 10.0
  Interface 16 - Hssi0, electrical interface is Hssi DTE
    	(text omitted)
If your system does not meet these prerequisites, contact a customer service representative for upgrade information.
Before installing the CSC-HSCI in the card cage, ensure that you have the correct type of ciscoBus controller installed (CSC-CCTL or CSC-CCTL2) and that the ciscoBus interface cards will be placed in the correct slots per the requirements described in the section "Slot Priority" on page 12.
All ciscoBus interface cards, which are listed in Table 4, contain card-specific firmware (microcode) that determines whether the card is compatible with the first- or second-generation ciscoBus controller, as follows:
The C2 designator added to the name of a ciscoBus interface card indicates that the card is running Microcode Version 10.0 or later and is, therefore, compatible with the CSC-CCTL2. With the exception of a Revision 5.0 CSC-MEC card (see the footnote in Table 4), the first- and second-generation ciscoBus interface cards are otherwise the same. For example, you can upgrade a CSC-HSCI to a CSC-C2HSCI by replacing the microcode with Version 10.0 or later. When you upgrade the microcode on a CSC-HSCI card to Version 10.0, the name of the card also changes from CSC-HSCI to CSC-C2HSCI to indicate that it is CCTL2-compatible.
| CCTL Controller | CCTL2 Controller | Description |
|---|---|---|
| CSC-CCTL | CSC-CCTL2 | ciscoBus controller |
| CSC-FCI | CSC-C2FCI | Fiber Distributed Data Interface (FDDI) |
| CSC-C2FCIT | FDDI with translational bridging | |
| CSC-HSCI | CSC-C2HSCI | High-Speed Serial Interface (HSSI) |
| CSC-C2CTR | ciscoBus Token Ring interface, 4/16 Mbps | |
| CSC-MEC | CSC-C2MEC1 | Multiport Ethernet Controller interface |
When you upgrade a ciscoBus interface card to Microcode Version 10.0 or later, you must also upgrade all other ciscoBus interface card to Microcode Version 10.0 or later and replace the CSC-CCTL with a CSC-CCTL2.
You can display a description of the current ciscoBus controller and ciscoBus interface cards with the show controller cbus EXEC command, an example of which is described on page 10.
The system card cage, shown in Figure 6, has nine slots, five of which are designated ciscoBus slots. The center ciscoBus slot is reserved for the ciscoBus controller card, leaving four ciscoBus slots available for ciscoBus interface cards.
The system uses a slot priority scheme that assigns a priority to each ciscoBus card according to the ciscoBus slot in which the card resides. The card in ciscoBus slot 0 receives the highest ciscoBus priority, while the card in ciscoBus slot 3 receives the lowest ciscoBus priority.
Slot priorities are set to accommodate the amount of traffic generated by each interface card and the amount of card buffering required. Each ciscoBus interface card is placed in a specific slot with regard to other ciscoBus interface cards, if any. The order of priority is the same for both first- and second-generation ciscoBus controllers, except that the cards with the C2 designation can only be used with the CSC-CCTL2.
Following is a list of ciscoBus interface cards in order of priority, from highest to lowest:
Install CSC-MEC or C2MEC cards in the lowest-numbered slots, beginning with slot 0 (which has the highest priority), followed by CSC-C2CTR cards. After all CSC-MEC and CSC-C2CTR cards are installed, install CSC-HSCI and C2HSCI cards with the APP-LHS applique in the lowest-numbered available slots. Follow with the CSC-FCI and C2FCI cards. Next, install CSC-C2FCIT cards. Last, install the CSC-HSCI and C2HSCI cards with the APP-ULA (UltraNet) applique. Always install cards in the lowest-numbered available slot. For example, if you are using only CSC-C2HSCI cards (with APP-ULA), place the first in slot 0, the second in slot 1, and so forth.

The CSC-HSCI card will interoperate with any other ciscoBus interface cards; however, buffering and switching demands on the ciscoBus controller and processor card limit the number of interfaces that can be mixed without impeding performance of the high-speed ciscoBus interfaces.
The maximum numbers of CSC-HSCI ports (interfaces) that can be combined with other ciscoBus ports are shown in Table 5. These limits are for both first- and second-generation ciscoBus systems. (For first-generation systems, disregard the FCIT and CTR ports.) Some cards, such as the CSC-MEC, have up to six ports per card; the number of cards needed for the maximum number of ports is also listed (in parentheses). Exceeding these maximum limits may impede performance on any or all installed ciscoBus interfaces.
| (C2)HSSI Ports (Cards) | (C2)MEC Ports (Cards) | C2FCIT/(C2)FCI Ports (Cards) | C2CTR Ports (Cards) | ||||
|---|---|---|---|---|---|---|---|
| 0 | (0) | 24 | (4) | 0 | (0) | 0 | (0) |
| 0 | (0) | 18 | (3) | 1 | (1) | 0 | (0) |
| 1 | (1) | 18 | (3) | 0 | (0) | 0 | (0) |
| 0 | (0) | 18 | (3) | 0 | (0) | 4 | (1) |
| 0 | (0) | 12 | (2) | 2 | (2) | 0 | (0) |
| 1 | (1) | 12 | (2) | 1 | (1) | 0 | (0) |
| 0 | (0) | 12 | (2) | 1 | (1) | 4 | (1) |
| 2 | (2) | 12 | (2) | 0 | (0) | 0 | (0) |
| 1 | (1) | 12 | (2) | 0 | (0) | 4 | (1) |
| 0 | (0) | 12 | (2) | 0 | (0) | 8 | (2) |
| 0 | (0) | 6 | (1) | 1 | (1) | 6 | (2) |
| 1 | (1) | 6 | (1) | 0 | (0) | 6 | (2) |
| 0 | (0) | 6 | (1) | 3 | (3) | 0 | (0) |
| 3 | (3) | 6 | (1) | 0 | (0) | 0 | (0) |
| 1 | (1) | 6 | (1) | 2 | (2) | 0 | (0) |
| 0 | (0) | 6 | (1) | 2 | (2) | 4 | (1) |
| 2 | (2) | 6 | (1) | 0 | (0) | 4 | (1) |
| 1 | (1) | 6 | (1) | 1 | (1) | 4 | (1) |
| 2 | (2) | 6 | (1) | 1 | (1) | 0 | (0) |
| 0 | (0) | 0 | (0) | 3 | (3) | 2 | (1) |
| 1 | (1) | 0 | (0) | 2 | (2) | 2 | (1) |
| 2 | (2) | 0 | (0) | 1 | (1) | 2 | (1) |
| 3 | (3) | 0 | (0) | 0 | (0) | 2 | (1) |
| 0 | (0) | 0 | (0) | 4 | (4) | 0 | (0) |
| 1 | (1) | 0 | (0) | 3 | (3) | 0 | (0) |
| 2 | (2) | 0 | (0) | 2 | (2) | 0 | (0) |
| 3 | (3) | 0 | (0) | 1 | (1) | 0 | (0) |
| 4 | (4) | 0 | (0) | 0 | (0) | 0 | (0) |
The router uses a card numbering scheme to identify cards in the chassis, and an interface addressing scheme to identify the ports (interfaces) on each card. Each Multibus interface card and the ciscoBus controller card have a unique card number that you set with switch S1 on the card.
Table 6 shows the switch settings (S1) on the ciscoBus controller cards. All four pins are in the down (off) position when the ciscoBus controller is viewed from the front edge of the card (as installed in the card cage). The system processor uses card numbers to assign interface addresses to the ports on each card and to control traffic across the Multibus. The ciscoBus controller card controls the traffic between the Multibus and all ciscoBus cards and is the only ciscoBus card that needs a card number. The card number of the ciscoBus controller is always 0, which is the factory default. No Multibus cards can be set for card number 0.
| Card No. | S1-1 | S1-2 | S1-3 | S1-4 |
|---|---|---|---|---|
| 0 | Off | Off | Off | Off |
At startup, the system polls each Multibus interface card, beginning with the lowest card number, and assigns a sequential interface address to each port (interface) on each card. When all Multibus interfaces are assigned, the system proceeds to the ciscoBus and continues the interface address sequence as it polls the ciscoBus cards according to the ciscoBus slot priority. (Refer to the section "Slot Priority" on page 12.) These numbering schemes allow the system to distinguish each interface card while sequentially numbering like interfaces throughout the system (such as Ethernet interfaces E0 and E1 on a CSC-MCI, and E2 through E7 on a CSC-MEC6).
The total number of high-speed interfaces must not exceed the following limits:
In a chassis shipped on or after October 1, 1991, the total power drawn by all installed cards must not exceed 300 watts (W) per chassis. In chassis shipped before October 1, 1991, the total power cannot exceed 260W. (The earlier chassis contained a 5 amp (A) circuit breaker, rather than the 7.5A circuit breaker used in the current chassis configuration.) Table 7 lists the power requirements for each card available for the router, including the CSC-HSCI.
| Card | Power (Watts) |
|---|---|
| CSC/3 | 31 |
| CSC/4 | 35 |
| CSC-ENVM | 10 |
| CSC-MC+ | 3 |
| CSC-MCI | 281 |
| CSC-SCI | 20 |
| CSC-R16M | 34 |
| CSC-1R | 30 |
| CSC-2R | 30 |
| CSC-CCTL1 | 29 |
| CSC-CCTL2 | 34 |
| CSC-FCI | 50 |
| CSC-FCIT | 36 |
| CSC-MEC | 222 |
| CSC-HSCI | 48 |
| CSC-C2CTR with 1 applique (2 ports) | 30 |
| CSC-C2CTR with 2 appliques (4 ports) | 42 |
Before installing new cards, check the power requirements of the existing system and the new card(s) to avoid exceeding the power budget. To calculate the power requirements of an existing system, add the values for each card in the chassis: the sum is the power requirement. To determine the available power budget, subtract that sum from 300W (260W for chassis shipped before 10/1/91): the result is the power budget available for new interface cards.
For example, to determine if you can install two CSC-HSCI cards in a router that already contains two CSC-FCI cards and Flash memory, determine the power requirements of the existing system, subtract that sum from 300, and compare the result to the total power requirement of the two new cards.
Following is an example calculation with all values in watts:
| One CSC-ENVM card | 1 x 10 = 10 |
| One CSC/3 processor card | 1 x 31 = 31 |
| Two CSC-FCI cards | 2 x 50 = 100 |
| One CSC-MC+ Flash memory card | 1 x 3 = 3 |
| One CSC-CCTL card | 1 x 29 = 29 |
| Power requirement of present system | 173 |
| Available power budget | 300 - 173 = 127 |
| Two CSC-HSCI cards | 2 x 48 = 96 |
| New cards within power budget | 96 < 127 |
The CSC-HSCI card will interoperate with any ciscoBus interface card that is compatible with the current ciscoBus controller (within the limits specified in the section "ciscoBus Port Limitations" on page 13), and with any Multibus interface card that is compatible with the current software. However, as new features are added with software releases, the microcode (firmware) on interface cards may need to be upgraded in order to take advantage of the new features.
For example, the CSC-C2HSCI requires a CSC-CCTL2 ciscoBus controller and software Release 9.1 or later. (See the section "System Requirements" on page 9.) If you are upgrading your software and ciscoBus controller to a CSC-CCTL2 along with this card installation, you must upgrade the microcode on all existing ciscoBus interfaces to Version 10.0 or later and, to ensure that all the features of a software release are available, you must upgrade the microcode on existing Multibus interface and controller cards to the minimum versions required for System Software Release 9.1 compatibility.
The Microcode Release Note publication (Document Number 78-1069-xx, where xx is the most latest version) provides the latest information on both the recommended and minimum required microcode versions for using all cards with System Software Releases 8.2 through 9.1. If the latest version implements features that you are not using in your system and you already have the minimum required version installed, then there is no requirement to update the microcode. However, new microcode versions occasionally fix bugs and provide performance enhancements in addition to implementing new features. You will obtain maximum performance and reliability by upgrading to the recommended version. Refer to the latest Microcode Release Note for current microcode requirements and recommendations, and for a microcode revision history for each card.
Use the show controller command with appropriate variables [cBus, token, serial, or ethernet] to display the current microcode on any interface card, and use the show environment command (available with Software Release 9.0 and later) to display the current CSC-ENVM microcode. An example of the show controller cbus command is shown on page 10. The following partial sample display of the show environment command shows a CSC-ENVM with Microcode Version 2.2 installed.
router# show env
Environmental controller firmware version 2.2
... (display text omitted from example)
Verify that you received all of the following parts for each HSSI or UltraNet interface you will install. If any parts are missing, contact your service representative.
The following tools are required for installing the CSC-HSCI card and the APP-LHS and APP-ULA appliques:
Electrostatic discharge (ESD) is a discharge of stored static electricity that can damage equipment and impair electrical circuitry. It occurs when electronic components are improperly handled and can result in complete or intermittent failures.
Following are guidelines for preventing ESD damage:
 | Caution For safety, periodically check the resistance value of the antistatic strap. The measurement should be between 1 and 10 megohms. |
The following sections describe the procedures for installing a CSC-HSCI card and an APP-LHS or APP-ULA applique. The CSC-HSCI card is installed in the system card cage, which you access by removing the access panel on the front of the chassis. It is not necessary to disconnect cables from the rear of the chassis or to remove the top cover of the chassis to access the system card cage.
The APP-LHS and APP-ULA appliques are installed in the rear of the chassis; access to the rear of the chassis requires removing the front panel and top cover from the chassis. The appliques must be installed in an applique card cage, which is then installed in one of the two far right connector areas in the rear of the chassis.
A typical installation, showing the network interface card, the applique, and the internal connections, is shown in Figure 7. The system card cage and applique card cages are not shown in order to more clearly show the cable routing.
Before proceeding, ensure that your system and equipment meet the requirements listed in the section "System Requirements" on page 9.

Following is the procedure for accessing the interior of the chassis.
Step 1 Turn OFF power to the chassis and unplug it from AC power.
Step 2 If the chassis is rack-mounted, disconnect all external cables from the rear panel of the chassis. Note where these cables were connected, so you can easily reinstall them.
Step 3 Remove the chassis from the rack and transfer it to a desktop or work table.
Step 4 If you will need to handle any electronic components (cards, and so forth), attach appropriate ESD protection and attach the AC power cord but, to prevent a shock hazard, make certain the chassis power is OFF.
Step 5 To access cards in the card cage, loosen the two thumbscrews and remove the front panel from the chassis. (See Figure 8.) If you wish to access cards in the card cage only, skip the next step.
Step 6 To access other system components, locate and remove the seven number 1 Phillips screws securing the top cover. (See Figure 8.) Set the top cover and screws aside.

Install the CSC-HSCI card in the predetermined ciscoBus slot in the system card cage. (Refer to the section "Slot Priority" on page 12 for slot priority requirements.) The card cage in the router is accessible from the front of the chassis. You need to remove only the front access panel; it is not necessary to remove the cover to install system cards.
All network interface cards have ejector levers that lock into place when the card is seated in the card cage and allow the card to be extracted easily from its slot. Handle the card as little as possible; try to limit contact to only the ejector levers and card edges. Install the CSC-HSCI card as follows.
| Caution Be sure to follow the ESD prevention procedures described in the section "Preventing Electrostatic Discharge Damage" on page 18. Failure to do so may cause intermittent or immediate equipment failure. |
Step 1 Open the chassis using the procedure described in the section "Chassis Access Procedure" on page 20.
Step 2 If you are replacing an existing CSC-HSCI card, disconnect the cables from the front of the card to be removed.
Step 3 If necessary, disconnect the cables from other interface cards so you can remove the CSC-HSCI from the ciscoBus. Before disconnecting cables, ensure that they are properly labeled to avoid mixing up interfaces when you reconnect them.
Step 4 Use your thumbs to pull the ejector levers out and away from the card edge to loosen it, and pull the card out of its slot. Place the removed card on an antistatic mat or antistatic foam.
Step 5 Hold the new CSC-HSCI card by the ejector levers and the card edges, component side up, with the bus edge away from you, and insert it into ciscoBus slot 3 or the highest-numbered available (empty) ciscoBus slot. (Refer to the section "ciscoBus Configuration" on page 11 for slot priority requirements.) A router card cage is shown in Figure 6 on page 12.
Step 6 Place your thumbs on the ejector levers, and push the card in firmly until it snaps into place and is firmly seated in the slot. The ejector levers close automatically when the card is seated properly.
Step 7 Place any additional CSC-HSCI cards sequentially into slot 2, then slot 1, then slot 0.
Step 8 If an APP-LHS or APP-ULA applique is already installed, connect the internal ribbon cables to the CSC-HSCI card according to the labels on the cables. Refer to Figure 7 on page 19 for the locations of the Transmit, Power, Receive, and (on the APP-LHS only) Control (labeled B) ports.
Step 9 Proceed to the next section to install the applique(s). If the appliques are already installed, skip to the section "Installation Checkout" on page 28.
The APP-LHS and APP-ULA appliques are installed in an applique card cage in the rear of the chassis; access to the rear of the chassis requires removing the front panel and top cover from the chassis. The following procedures describe how to first install the applique in the applique card cage, then install the card cage in the chassis. Applique card cages can be installed only in the two far right connector areas (when viewing the chassis from the rear). The MAS-10 blower assembly prevents installation in the other connector areas. (See Figure 9.)
 | Warning Before removing any cables or fasteners from the chassis, be sure to turn OFF the power and unplug the power cable from the power source. |

The following steps describe how to connect the internal cables between the APP-LHS or APP-ULA applique and the CSC-HSCI interface card. It is easier to connect the cables to the applique before installing the applique in the card cage. Refer to Figure 7 while performing the following steps.
Step 1 Place the applique on an antistatic mat or antistatic foam pad. When connecting the ribbon cables, handle the applique by its edges only.
Step 2 Connect the six-pin power cable to the power connector on the applique, shown in Figure 3 and Figure 5. Carefully run the other end of the cable under the system card cage to the front of the chassis and up to the six-pin power connector on the CSC-HSCI card.
Step 3 APP-LHS applique only: Connect the 34-pin cable to the 34-pin control (B) connector on the APP-LHS applique. (See Figure 3.) Thread the other end of the cable under the system card cage to the front of the chassis. Connect the cable to the 34-pin control (B) connector on the CSC-HSCI card. (See Figure 1.)
Step 4 Connect one of the 50-pin cables to the 50-pin transmit (T) connector on the applique, shown in Figure 2, Figure 3, and Figure 5. Thread the other end of the cable under the system card cage to the front of the chassis. Connect this end of the cable to the 50-pin Transmit (T) connector on the CSC-HSCI card. As shown in Figure 1, the transmit connector is the far left connector when viewing an installed CSC-HSCI card from the front of the chassis.
Step 5 Connect the other 50-pin cable to the 50-pin receive (R) connector on the applique. Thread the other end of the cable under the system card cage to the front of the chassis. Connect this end of the cable to the 50-pin receive (R) connector on the CSC-HSCI card. (See Figure 1.)
The following steps describe how to remove the applique card cage from the chassis.
Step 1 The top cover of the chassis should already have been removed. If it has not, remove it according to the steps in the section "Chassis Access Procedure" on page 20.
Step 2 If you have an empty card cage that is not installed in the chassis, skip to step 4.
or
If the applique card cage is installed in the chassis, disconnect all external connections to the applique it contains. (Do not disconnect the internal ribbon cables.)
Step 3 Remove the card cage from the chassis by removing the six screws that secure it to the chassis rear panel. Carefully lift the card cage up and out of the chassis, using care not to strain any internal ribbon cables.
Step 4 Remove the top cover of the applique card cage by loosening (not removing) the four thumb screws that secure it. (See Figure 10.)
Step 5 If the card cage is empty, remove both filler plates. (See Figure 10.) If one applique is already installed, leave it intact and remove only the filler plate.
Proceed to the next section to install the applique in the applique card cage.
These steps describe how to install appliques in the applique card cage (which has been removed from the chassis). Refer to Figure 10 while performing the following steps:
Step 1 If an applique is already installed in the card cage, skip to step 3. If the card cage is empty, install the new applique, with its attached faceplate, into the right side of the card cage (viewed from the rear of the chassis, as shown in Figure 10). Ensure that the tab on the bottom of the applique faceplate is inserted into the slot in the bottom of the applique card cage and that the applique is seated in the card guide.

Step 2 If you are installing only one applique, replace the blank filler plate on the left side of the card cage, sliding it down so that the edge interlocks with the faceplate of the applique on the right.
Step 3 If an applique is already installed in the card cage (or if you are installing a second APP-LHS or APP-ULA), install the second applique in the left side of the card cage by sliding it down so that the edge of the faceplate interlocks with the faceplate of the applique on the right side of the card cage. Ensure that the tab on the bottom of the applique faceplate is inserted into the slot in the bottom of the applique card cage and that the applique is seated in the card guide.
Step 4 Replace the top cover of the applique card cage. Align the cover by making sure the two guide pins on the bottom of the cover pass through the tabs on the top of each applique face-plate assembly or filler plate. (See Figure 11.) Secure the top cover to the card cage by tightening the four cover fasteners.
These steps describe how to install the applique card cage (in which at least one applique is already installed) in the chassis. The applique card cage can be installed only in one of the two far right connector plate areas. (See Figure 11.) If you removed the card cage to install the applique, skip to step 2. (The connector plate area will already be open.) Refer to Figure 11 while performing the following steps.

Step 1 Remove a blank connector plate from one of the two far-right plate areas (see Figure 11), by removing the six screws that secure it.
Step 2 Slide the applique card cage down into the rear of the chassis in the empty connector plate area. Align the six holes in the rear panel of the chassis with those in the applique card cage.
Step 3 Secure the card cage with the connector plate screws you removed in step 1, leaving appropriate holes empty for the ground straps. See Figure 12 and Figure 13 for ground strap configurations.
Step 4 Affix the appropriate label (HSSI 0, ULA 0, HSSI 1, and so forth) to the lower part of the applique faceplate, where it is visible.
Step 5 Decide if your installation requires short or long ground straps. Use a short ground strap if you are installing the applique next to a blank connector plate (see Figure 12) or next to an applique that does not contain a hole for the long ground strap screw. Use a long ground strap if you are installing the applique next to an applique that requires a ground strap --for example, another APP-LHS (see Figure 13).
Ground straps, which are included with all appliques, ground the applique to the chassis to prevent EMI noise on your network interface. The applique card cage containing the APP-LHS(s) should already be installed in the chassis and secured with at least three screws. Refer to Figure 12 while you install the short ground straps.

Step 1 Remove the Phillips screw from the top center of the applique.
Step 2 Position the ground strap so that it straddles the applique and the rear panel of the chassis. Align the holes in the ground strap with those on the rear panel of the chassis and the applique.
Step 3 Secure the ground strap with the two Phillips screws.
Step 4 Repeat the same process for the bottom ground strap.
Step 5 Connect ground straps to other appliques as necessary, and proceed to the section "Finishing the Installation" on page 27.
Ground straps, which are included with all appliques, ground the applique to the chassis to prevent EMI noise on your network interface. The applique card cage containing the APP-LHS(s) should already be installed in the chassis and secured with at least two screws. Refer to Figure 13 while you install the long ground straps.

Step 1 Remove the Phillips screw from the top center of each applique.
Step 2 Position the ground strap so that it straddles both appliques and the rear panel of the chassis. Align the holes in the ground strap with those on the rear panel of the chassis and the appliques.
Step 3 Secure the ground strap with the four Phillips screws.
Step 4 Repeat the same process for the bottom ground strap.
Step 5 Connect ground straps to other appliques as necessary, and proceed to the next section, "Finishing the Installation."
The following steps describe the final installation procedure:
Step 1 On the rear of the chassis, connect one of the following interface cables to your network:
Step 2 If necessary, reconnect other cables on the rear of the chassis.
Step 3 Replace the chassis cover, but do not secure it with the cover screws until you have verified successful installation. Note that you must replace the chassis cover before powering up the system for an installation check. However, you do not need to tighten the screws.
Step 4 Proceed to the next section, "Installation Checkout," to check the installation.
After you install a new interface, verify the installation before you replace the front panel by observing the LEDs on the APP-LHS applique and the ciscoBus controller card. (There are no LEDs on the CSC-HSCI card or the APP-ULA applique.)
After you configure the new interface(s), use the show EXEC commands to display status information. If the interface is not functioning properly, use the loopback test to isolate the problem to a hardware module.
The LEDs on the CSC/3 and CSC/4 processor cards indicate the status of the software. If the system detects a problem at startup, the error LED on the processor card will be on or will flash. The ciscoBus controller LEDs indicate the presence (correct installation) of the CSC-HSCI network interface card in the ciscoBus. If any of the internal cables are crossed, the error (ER) LED on the APP-LHS applique will be on. The other LEDs on the applique report the state of the interface line after it has been configured and brought up. To observe the LEDs on the applique, you have to be able to access the rear of the chassis.
Either a CSC/3 or a CSC/4 can be installed in your system. Both have three LEDs with similar functions. On both cards, the far right LED is the system OK LED, which comes on to indicate that the system is operating correctly. The far left LED on both is a system error LED, which comes on or flashes if the system detects an error during startup or is unable to start up the operating system.
The three CSC/4 LEDs are shown in Figure 14. The far left, yellow, status LED comes on momentarily during initialization, flashes if there is an error, and is off under normal conditions. The middle, yellow LED is not used. The far right, green, health LED comes on at startup and remains on to indicate that the software has booted and is operational.
The three CSC/3 LEDs are shown in Figure 15. The far left, red, status LED comes on momentarily during initialization, flashes if there is an error, and is off under normal conditions. The middle, red, halt LED comes on only when the processor is in a halt state (which indicates an error). The far right, green, health LED comes on at startup and remains on to indicate that the software has booted and is operational.

Depending on whether you installed a CSC-HSCI or a CSC-C2HSCI, you will check one of the following ciscoBus controller cards:
The ciscoBus controller card (CSC-CCTL or CSC-CCTL2) is always installed in the center ciscoBus slot as shown in Figure 6 on page 12.
The bank of LEDs used on the CSC-CCTL is different from that on the CSC-CCTL2. Descriptions of both types of ciscoBus controllers follow; review them so you can anticipate how the LEDs should be on or off. Before turning on the chassis power to check the installation, note the ciscoBus slot number(s) that contain the CSC-HSCI card(s) you just reinstalled.
The CSC-CCTL contains a bank of 16 LEDs as shown in Figure 16: four sets of four LEDs, one set for each interface slot in the ciscoBus. Figure 16 shows the LEDs as viewed with the card installed in the card cage, component side up. The numbers above each LED indicate the corresponding ciscoBus slot number. (Slot numbers and locations are shown in Figure 6.) Only the first (far left) LED in each set of four is used to indicate when an interface is present in a ciscoBus slot. On power up, all the LEDs come on, indicating that the CSC-CCTL card is active. When the system boot is completed, only those LEDs that indicate the presence of a card in the corresponding ciscoBus slot should remain on; the LEDs for empty ciscoBus slots should go off.

The CSC-CCTL2 contains a bank of five LEDs: one red LED for each ciscoBus slot and one green OK LED. Figure 17 shows the LEDs as viewed with the card installed in the card cage, component side up. In the illustration, the numbers above each LED indicate the corresponding ciscoBus slot number. (Slot numbers and locations are shown in Figure 6.) Upon power-up, all the LEDs come on indicating that the CSC-CCTL2 card is active. When the system boot is completed, only those LEDs that indicate the presence of a card in the corresponding ciscoBus slot should remain on; the LEDs for empty ciscoBus slots should go off.

The APP-LHS applique contains a bank of 12 LEDs, shown in Figure 18. These LEDs report the state of the hardware at power on, and the state of the HSSI interface after it has been configured and brought up. The mnemonic, normal state, and signal name for each LED are described in the section "APP-LHS LEDs" on page 5.
When you restart the system to begin the installation, observe the top two LEDs (+5 and -5) and the bottom two LEDs (OK and ER). The top two LEDs come on to indicate that the applique is receiving power from the CSC-HSCI card. If any of the internal ribbon cables are connected to the wrong port on the card or applique, the red ER LED comes on. The green OK LED comes on after the software performs its startup verification. The remaining LEDs will come on to indicate network activity after the HSSI interface is brought up, or to indicate that a loopback test is in progress.
To check your upgrade installation, first verify the ciscoBus controller card LEDs, then the applique LEDs, using the following steps. Before turning on the system power, ensure that you are able to access the rear of the chassis to observe the LEDs on the applique.
| Caution Be sure to replace the chassis cover before restarting the system. Operating the system with the cover removed misdirects the flow of cooling air and can cause the chassis to overheat and force the environmental monitor to shut down the system. |
Step 1 Plug in the power cord and turn ON the system power.
Step 2 Verify that the LEDs on the ciscoBus controller card (CSC-CCTL or CSC-CCTL2) are on according to the descriptions in "ciscoBus Controller Card LEDs." If they do not come on, do the following:
Step 3 When the system has booted, check the LEDs on the CSC/3 or CSC/4 system processor card. The far right, green LED should be on; the other two LEDs should be off. If the far right LED is off, or if either of the other two LEDs is on or flashing, do the following:
Step 4 CSC-CCTL2 only: When the system has completed its boot cycle (it will beep when complete), verify that the far right, green OK LED comes on and remains on. If it does not come on, proceed with the installation. If it later appears that the LED is faulty, contact a service representative for replacement instructions.
Step 5 Check the LEDs on the applique and ensure that the red ER LED (the bottom LED) is off. If the ER LED is on, the internal ribbon cables between the applique and the CSC-HSCI card have been crossed. Turn OFF the system power and do the following:
Step 6 On the applique, ensure that the green OK LED (the second LED from the bottom) is on. (See Figure 18.) If it is off, check the following:
Step 7 Check the four red LEDs on the ciscoBus controller card. (Refer to the section "Checking LEDs" on page 28, if necessary.) Ensure that the LED for each occupied ciscoBus slot is on. In particular, check the slots for the CSC-HSCI card(s) you just installed. If the LEDs do not come on properly, check the following:
Step 8 Check the console terminal and verify that the system banner is displayed, followed by a list of the installed hardware. (See page 9 for an example of this display, which is the same as the output from the show version command.) The CSC-HSCI cards are listed as HSSI interfaces or UltraNet interfaces.
Step 9 When the installation check is successful, do the following:
Step 10 Proceed to the next section, "Configuring the Interfaces." Do not affix the interface labels (E0, E1, and so forth) until you have configured all interfaces.
When new hardware is installed, the system automatically defaults to the setup command facility. You can either remain in setup mode and answer each prompt, or exit from setup mode and configure any new interfaces with the configure command. If you have no new interfaces to configure (you replaced a card), exit from setup mode by answering no to the following prompt:
Continue with configuration dialog [yes]? no
When the system is configured and running, use the show controller cBus command to display the name, controller type, microcode version, and interfaces on each card in the ciscoBus. Refer to the Router Products Configuration Guide and Router Products Command Reference publications for descriptions of other show commands.
The system automatically invokes the setup command facility whenever new hardware components are installed. This facility determines which interfaces are installed and prompts you for configuration information for each one. After you complete one interface, the facility automatically starts over for the next, continuing until each interface has been configured. When you add new interfaces, the configuration information for the system and all existing interfaces is retained and displayed as the default (in square brackets) in the prompts. Press the Return key to accept the defaults (existing configuration information) at each prompt. You have the option of continuing in setup mode to configure the new interfaces, or of exiting setup mode and configuring the new interfaces with the configure EXEC command.
Before beginning this configuration procedure, be prepared with the information you will need, such as the ring speed and protocols you plan to route on each interface, IP addresses if you will configure the interfaces for IP, and which interfaces, if any, will use bridging.
The system banner and a list of all installed interfaces, including those you just installed, should be displayed. (See page 9 for an example of this display, which is the same as the output from the show version command.) If this information is not displayed, return to the procedure described in the section "Installation Checkout" on page 28, and recheck the installation. The system configuration dialog text is displayed below the list of installed hardware, with the following message at the end of the display:
Default settings are in square brackets '[ ]'. Continue with
configuration dialog [yes]?
To continue with the setup facility, answer yes at the prompt and proceed to the next section, "Using Setup." To exit from setup mode and use the configure EXEC command to configure the new interfaces, answer no at the prompt and proceed to the section "Using the Configure EXEC Command" on page 35.
After you choose to continue with the setup command (by answering yes to the system configuration dialog prompt), the remainder of the script is the actual configuration process. The dialog prompts you first for global system parameters, then for configuration information for each interface. The existing configuration is displayed as the default, in brackets ([ ]), at the end of each prompt. Press Return to accept the default settings.
Step 1 The following script is displayed, with the name of your router as the default in brackets:
Step 2 Press Return to accept the default and keep the router name. (If you do want to change the name of the router, enter the new name before pressing Return.)
Step 3 Proceed through the remainder of the global parameter prompts, pressing Return to accept the defaults. After the global parameters are configured, the system prompts you for interface configuration information, one interface at a time.
The following is a partial display of the script for a previously configured interface:
Step 4 Press Return to accept the default at each prompt and retain the existing configuration information.
Step 5 When you reach the scripts for configuring new interfaces, enter the new configuration information at each prompt.
Step 6 When all interfaces are configured, the system displays the entire configuration script followed by the following prompt for which there is no default (you must enter yes or no):
Step 7 Enter yes at the prompt (unless you want to discard the configuration file and start over). The following message is displayed:
The configuration process is complete. Proceed to the section "Checking the Configuration" on page 37 for descriptions of show commands you can use to display and verify the configuration information.
You must enter the privileged level of the EXEC in order to use the configure command. After specifying an interface, you will enter the configuration information with interface subcommands. Before beginning this procedure, use the show interfaces command to determine which interfaces you must configure.
The show configuration EXEC command displays the configuration information stored in nonvolatile memory. Before entering any new interface information, you may want to use this command to review the current configuration. The following example shows a partial display of the show configuration command output:
router# show config

Using 2648 out of 65536 bytes
version 9.1
!
hostname router
!
enable-password meepmeep
!
(display text omitted)
!
interface Hssi 0
ip address 131.108.8.35 255.255.255.0
ip helper-address 131.108.7.255
ip helper-address 131.108.9.255
appletalk zone Twilight
!
interface Hssi 1
ip address 131.108.9.5 255.255.255.0
ip helper-address 131.108.11.255
ip route-cache cbus
!
(remainder of display text omitted)
In configuration mode, you identify the specific interface to be configured with the interface configuration command, which begins the configuration subcommand collection mode for the specified interface. The syntax is interface type unit, where type identifies the type of interface (such as HSSI) and unit identifies the interface address. Then you enter the configuration subcommands that define the specific configuration for the interface. For example, new interfaces are shut down by default; you must enable each one with the no shutdown interface subcommand. You need other interface subcommands to specify encapsulation methods and define routing protocols. Refer to the Router Products Configuration Guide and Router Products Command Reference publications for complete descriptions of the configuration subcommands.
In the following a sample configuration, two new HSSI interfaces are enabled and assigned IP addresses using the configure terminal command, then the configuration is written to memory.
router# end
Password:
router# config term
Enter configuration commands, one per line.
Edit with DELETE, CTRL/W, and CTRL/U; end with CTRL/Z
interface hssi 0
ip address 145.22.4.67 255.255.255.0
no shut
interface hssi 1
ip address 145.22.4.68 255.255.255.0
no shut
^z
router# write memory
[ok]
router#
The following steps provide instructions for a basic configuration: enabling an interface and specifying IP routing. You may also need to enter other configuration subcommands, depending on the requirements for your system configuration. (Configuration subcommands are described in the Router Products Configuration Guide and Router Products Command Reference publications.)
When using HSSI with AppleTalk, the CSC-HSCI requires a Phase 2 address to enable fast switching.
The following steps provide line-by-line instructions for configuring the interfaces. Refer to the previous example as necessary.
Step 1 At the system prompt, enter enable and the appropriate password to enter the EXEC command level.
Step 2 Enter configuration mode by entering the following:
configure terminal <Return>
Step 3 At the prompt, specify the first HSSI interface to configure by entering the following:
interface hssi 0 <Return>
Step 4 If IP routing is enabled on the system, you can assign an IP address and subnet mask to the interface with the ip address configuration subcommand as follows:
ip address 145.22.4.67 255.255.255.0 <Return>
Step 5 Specify the routing or bridging interface subcommands for this interface. (You may need to refer to the Router Products Configuration Guide and Router Products Command Reference publications for information on bridging interface subcommands.)
Step 6 Change the default shutdown state and bring the interface up by entering the following:
no shut <Return>
Step 7 Specify the next HSSI interface to configure by entering the following:
interface HSSI 1 <Return>
Step 8 Repeat steps 3 through 6 for each new HSSI interface.
Step 9 When all new interfaces are configured, enter Ctrl/Z. (Hold the Control key down and press Z.)
Step 10 Write the new configuration to memory by entering the following:
write memory <Return>
The system will display an [OK] message to indicate that the configuration has been stored.
Step 11 Enter quit to exit configuration mode.
Step 12 Check the configuration as described in the following section.
After you configure each new interface, check the LEDs on the APP-LHS applique (if present) and use EXEC command displays to verify the new HSSI interfaces. When the system is started, the interface cards query the appliques for interface information. If an applique is not connected to its interface card when the system initializes, it will be not be recognized until it is properly connected to the card and the system is restarted.
Step 1 Turn the system power OFF and then ON again to reboot the system. (The system will beep when it has booted.)
Step 2 At the rear of the chassis, check the LEDs on the APP-LHS applique. Verify that the LEDs are functioning as described in the section "APP-LHS LEDs" on page 5.
Step 3 If any of the LEDs indicate that an interface is not active (but should be), return to configuration mode as described in steps 1 through 3 on page 34. Enter the interface address, then specify no shut as shown in the following example:
config term
Enter configuration commands, one per line.interface hssi 1
no shut
^z
router# write memory
[ok]Step 4 When the LEDs indicate that all interfaces are configured correctly, affix the new labels (HSSI 0, HSSI 1, and so forth) below the appropriate connectors on the applique.
Step 5 You can now enter the commands described in the following paragraphs to verify the configuration.
The show controller cbus EXEC command displays the current status of the CSC-HSCI and all ciscoBus interface cards, but it does not indicate the state of the individual lines or protocols on the interfaces. Following is a partial display of the show controller cBus command:
To obtain more extensive information about the interfaces, such as the state of the lines and protocol types, use the show interface hssi EXEC command to display statistics about each of the HSSI interfaces in the server.
The first line of the show interface display names the interface and its interface address (HSSI 0) and indicates whether the hardware and line protocol is up or down. If the line protocol is down (and you did not administratively shut it down), the hardware is not functioning properly; ensure that the network interface is properly connected and terminated. Following is a partial sample display:
Refer to the Router Products Configuration Guide and Router Products Command Reference publications for descriptions of additional commands and examples.
Loopback tests route packets in a closed loop between the router (or module in the router) and a specific point on the interface (usually a DSU) to enable you to isolate equipment failures. The hardware ribbon cable loopback test isolates the CSC-HSCI card; the software-controlled loopback subcommands isolate the lines between (and including) the router and DSU. Use these diagnostics after installation if necessary to isolate problems that may be caused by faulty hardware.
The ribbon cable loopback is a hardware troubleshooting and verification feature. After installing or swapping a CSC-HSCI card or an APP-ULA or APP-LHS applique, or if the HSSI complex or the UltraNet complex is not functional, use this test to verify operation of the CSC-HSCI card. The LI LED on the applique is on when this test is in progress.
When performing the hardware ribbon-cable loopback function, it is not necessary to use the loopback command if a physical loopback is already created.
Perform the ribbon cable loopback test as follows:
Step 1 Turn OFF the power.
Step 2 Remove the front card cage access panel.
Step 3 On the CSC-HSCI card, disconnect both 50-pin cables and, if present, the 34-pin cable.
Step 4 Connect a cable with two 50-pin connectors between the transmit and receive ports of the CSC-HSCI card. (See Figure 19.)

Step 5 Turn the power back ON. The software will recognize the CSC-HSCI as an UltraNet interface, which is the default when no applique is installed.
Step 6 At the system prompt, enter the following command sequence. For the ultra address parameters, use any non-0/0 value. For the IP address, use any valid IP address, such as the one already assigned to the serial interface you are testing.
config
interface ultranet 0
ultra address 88/20
ip address [addr] [mask]
no shutdown
^Z
Step 7 Then ping the interface.
ping [addr]
Step 8 If the ping returns a series of exclamation points (!!!!!), the ping was successful. Any fault with the installation of the interface is now isolated to the applique or farther out on the interface. If the ping returns a series of dots (.....), the ping was not successful; the fault is isolated to the CSC-HSCI card.
Step 9 Turn OFF the power and remove the 50-pin cable from the CSC-HSCI transmit and receive ports.
Step 10 Reconnect the two internal 50-pin cables (and, if present, the 34-pin cable) to the CSC-HSCI card.
Step 11 Replace the front card cage access panel.
This completes the ribbon-cable loopback test.
The software loopback tests, enabled with variations of the loopback subcommand, can help isolate problems with the router hardware and with the external line and DSU. To enable the loopback operation, use the loopback interface subcommand with the appropriate keyword. To disable the loopback, use no loopback with the appropriate keyword. These tests are valid only when the DSU or other external device supports the specific loopback function.
To test a DTE-to-DCE cable, use the loopback dte subcommand, which loops packets to DTE within the DSU at the DTE interface.
To test the DSU device, use the loopback line subcommand, which loops packets completely through the DSU to create a CSU loop.
To test a remote DSU and DS3 link, use the loopback remote subcommand, which loops packets through the local DSU, over the DS3 link to the remote DSU, and back. This function is only valid when the DCE supports remote functions, and is usually used to test data communications channels. This loopback is performed at the line port (rather than the DTE port) of the remote DSU.
The HSCI complex also supports externally requested loopback request from the DSU. The DSU uses the LC signal to request a loopback from the router in order to check the integrity of the connection between the router and the DSU. By default, this feature is enabled on the router. When the DSU asserts LC and the router enables the external loopback, the connection is blocked by the loopback. If the DSU does not support this feature, it should be disabled with the no external-loop-request subcommand to avoid noise on the LC line (which could trip the external loopback request line and block the normal data flow).
On the applique, the LA and LB indicators are on when a DTE, line, or remote loopback test is in progress. The LC indicator is on during the external loopback test.
The LI indicator is on when the hardware ribbon cable loopback test is in progress (described in the section "Ribbon-Cable Loopback Test" on page 38).
This completes the software loopback test.
Refer to the Router Products Configuration Guide and Router Products Command Reference publications for complete command descriptions and configuration instructions.
Cisco Information Online (CIO) is Cisco Systems' primary, real-time support channel. You can use your product serial number to activate CIO for a single user during your warranty period. Maintenance customers and partners can self-register on CIO to obtain additional content and services.
Available 24 hours a day, 7 days a week, CIO provides a wealth of standard and value-added services to Cisco's customers and business partners. CIO services include product information, software updates, release notes, technical tips, the Bug Navigator, configuration notes, brochures, descriptions of service offerings, and download access to public and authorized files.
CIO serves a wide variety of users through two interfaces that are updated and enhanced simultaneously--a character-based version and a multimedia version that resides on the World Wide Web (WWW). The character-based CIO (called "CIO Classic") supports Zmodem, Kermit, Xmodem, FTP, Internet e-mail, and fax download options, and is excellent for quick access to information over lower bandwidths. The WWW version of CIO provides richly formatted documents with photographs, figures, graphics, and video, as well as hyperlinks to related information.
You can access CIO in the following ways:
http://www.cisco.com.
cio.cisco.com (198.92.32.130).
For a copy of CIO's Frequently Asked Questions (FAQ), contact ciohelp@cisco.com. For additional information, contact cioteam@cisco.com.
If you are a network administrator and need personal technical assistance with a Cisco product that is under warranty or covered by a maintenance contract, contact Cisco's Technical Assistance Center (TAC) at 800 553-2447, 408 526-7209, or tac@cisco.com. To obtain general information about Cisco Systems, Cisco products, or upgrades, contact 800 553-6387, 408 526-7208, or csrep@cisco.com.

|
|