|
|

This document contains instructions for installing the ONS 15194 IP Transport Concentrator.
Do not remove the Cisco ONS 15194 from its shipping container until you are ready to install it. Keep it in the shipping container to prevent accidental damage until you determine where you will install it. When you are ready to unpack the Cisco ONS 15194, follow the unpacking instructions in this document. Inspect all items for shipping damage. If anything is damaged, immediately contact a customer service representative.
Before you install your Cisco ONS 15194, consider power and cabling requirements that must be in place at your installation site, the equipment you will need to install the system, and the environmental conditions your installation site must meet to maintain normal operation. This document guides you through the process installing your Cisco ONS 15194.
Included are the following sections:
 |
Warning Carefully read all enclosed documentation before you install the ONS 15194 to avoid harming yourself or the ONS 15194. |
Safety guidelines for working with the ONS 15194 are presented in the following sections:
Whenever one of the following messages appear, it indicates a procedure, that if performed incorrectly, might cause harm to you or the equipment. Note all such warnings and cautions and act accordingly.
 |
Caution You are about to perform an action which, if performed incorrectly, may cause damage to the ONS 15194. |
|
Warning This warning symbol means danger. You are in a situation that could cause bodily injury. Before you work on any equipment, be aware of the hazards involved with electrical circuitry and be familiar with standard practices for preventing accidents. |
The single-mode transmitter in the line cards uses a class 1 laser product to transmit the light signal to the network. Keep the transmit port covered whenever a fiber cable is not connected to it, and avoid staring into open ports or apertures. A warning icon is printed on the line card panel (see top right corner in Figure 1).

|
Warning Do not insert fingers or other objects into the area of the fan mechanism. |
General guidelines for working with electrical equipment follow:
Electrostatic discharge (ESD) can damage equipment and impair electrical circuitry. It occurs when electronic components are improperly handled and can result in intermittent or complete failures. Always ensure that the chassis is electrically connected to earth ground. Wear an ESD-preventive wrist strap, ensuring that it makes good skin contact. To safely channel unwanted ESD voltages to ground, connect the clip to an unpainted surface of the chassis frame.
Site preparation information is presented in the following sections:
|
Warning This product requires an external disconnect device in the building's installation. Ensure that a Listed and Certified ciruit breaker, rated 40 A, minimum 60 VDC is used on all current-carrying conductors. |
Before unpacking the ONS 15194, verify that you have the following:
Open the boxes and unpack the equipment at the location where you are installing the ONS 15194. The basic ONS 15194 includes the following:
Any additional line or switch cards that you ordered will be packaged separately.
Verify that all listed equipment is contained in the package. If any items are missing, report this immediately to a support representative.
After you prepare the area for installation and verify that all equipment is present, you can proceed with the ONS 15194 installation.
|
Caution To prevent ESD damage, use an ESD-preventive wrist strap when you unpack and install system components. |
The ONS 15194 is not designed to be installed as a shelf-mounted or a free-standing system. You must install the ONS 15194 in a rack, as follows:
Step 1 Open the rack-mount installation kit containing the paper stencil and eight nuts, bolts, and washers.
Step 3 Insert a nut from the back of the rack toward the front (so that the bolt can be screwed into the nut from the front of the rack) at the location of each of the eight marked holes.
|
Warning Two people are required to lift the chassis. To prevent injury, keep your back straight and lift with your legs, not your back. |
Step 4 Lift the ONS 15194 up to the location of the nuts and have a second person screw in two of the bolts (one on each side) with the washers placed between the bolt and the ONS 15194 panel.
Step 5 When the chassis is in place with one bolt on each side, screw in the other six bolts to secure the chassis to the rack.
The possible cards and their respective slots in the ONS 15194 chassis are labeled in Figure 2:
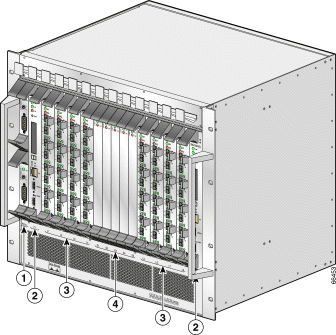
| Card Type | ONS 15194 Chassis Slots | |
|---|---|---|
| 1 | PEM cards | PEM |
| 2 | Controller cards | C1, C2 |
| 3 | Line card | L1 to L8 |
| 4 | Switch cards | S1 to S5 |
Open the packaging for one card. Keep unused cards in their original packaging until use. Remove the blank card from the slot where the card is to be inserted and insert the card into the empty slot. If there is currently a card in the slot, refer to "Removing Cards" for information on removing the card.
To insert a card into the chassis, do the following:
Step 1 Gently push the card into the slot until it is inserted into the backplane.
Step 2 Press on the two black handles toward the center of the card, to lock the card in place.
Step 3 Screw the card in place on the top and bottom.
Continue to install all necessary line and switch cards into the chassis. Leave blank cards in any unused slots.
|
Caution Make sure that all cards are inserted completely into the backplane because a partially inserted card can cause unexpected behavior. |
To remove a card from the chassis, do the following:
Step 1 Unscrew the card from the chassis (one screw each on the top and bottom of the card).
Step 2 Pull the two black handles out, toward the top and bottom of the card, respectively.
Step 3 Gently pull the card out of the slot.
Store any unused cards in their original packaging to protect them.
Before powering up the ONS 15194, take note of the following safety warnings:
|
Warning This equipment shall be connected directly to the DC supply system earthing electrode conductor or to a bonding jumper from an earthing terminal bar or bus to which the DC supply system earthing electrode is connected. |
|
Warning This equipment shall be located in the same immediate area (such as, adjacent cabinets) as any other equipment that has a connection between the earthed conductor of the same DC supply circuit and the earthing conductor, and also the point of earthing of the DC system. The DC system shall not be earthed elsewhere. |
|
Warning The DC supply source is to be located within the same premises as this equipment. |
|
Warning There shall be no switching or disconnecting devices in the earthed circuit conductor between the DC source and the point of connection of the earthing electrode conductor. |
|
Warning Connect the equipment only to a 48 Volt DC power source that complies with the Safety Extra-Low Voltage (SELV) requirements in IEC 60950 based safety standards. |
|
Warning Only use the power cable shipped with the ONS 15194. |
After you install all the necessary cards into the chassis, power up the ONS 15194 as follows:
Step 1 Attach the power cable three-pin connector to the mating connector of the PEM, and tighten the thumbscrews.
Step 2 Connect the power cable leads to the power source connecting the ground lead first, followed by the 48VDC leads. Observe proper polarity when connecting the leads. Connect the red lead to the -48 VDC source and connect the black lead to the -48 VDC return.
|
Caution Use only listed compression-type connectors for 48 VDC connections. The connectors shall be suitable for use with copper conductors. Do not use soldering lug connectors, screwless (push-in) connectors, quick-connect or other friction fit connectors for terminating power and ground connections. |
Step 3 Power up each of the PEM cards using the On/Off switch located on the card. The PWR LED should go on (green) immediately.
Step 4 Verify that the controller card PWR LED is on. If it is not on, verify that there is power to the ONS 15194. Initially, the FAIL LED will be on. Approximately 30 seconds after power up, the FAIL LED should go off. The ACT LED should begin to flash once per second. The standby controller card ACT LED should flash once per 3 seconds.
Step 5 Verify that the PWR LEDs for each line and switch cards is on. The ACT LED should flash fast for 3 to 4 seconds and then, as it becomes synchronized with the active controller card, it should flash once per second. The FAIL LED will initially go on for 3 to 4 seconds, after which it should turn off.
Cable connections are presented in the following sections:
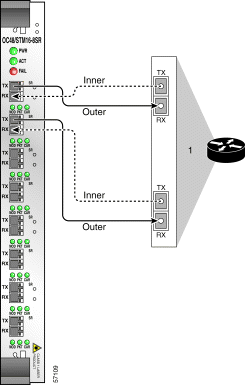
Fiber-optic cable connections depend on the type of line card being used in the connected router and the configuration of the ONS 15194. Possible scenarios are presented in the following sections:
When an interface is correctly connected to functional equipment, the respective CARRIER LED on the line card should go on. Verify the corresponding link connectivity indication on the router interface card.
Connect each router DPT line card to the ONS 15194 as shown in Figure 3.
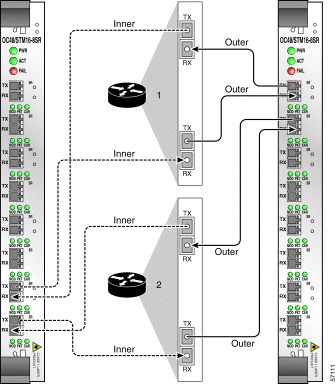
Two ONS 15194s can operate in an "inner-outer" fiber topology by connecting all inner SRP ring fibers to one ONS 15194 and all outer SRP ring fibers to another ONS 15194. Such a connection, in conjunction with the SRR protocol on the SRP nodes, provides ONS 15194 system redundancy.
You must connect the Tx/Rx connector pair of the router to different ONS 15194s. Connect both inner fibers of a node to the same connector pair in one ONS 15194 chassis and both outer fibers of the node to the same connector pair in a second ONS 15194 chassis as shown in Figure 4.
 |
Note In order for two ONS 15194s to work together and provide system redundancy, all routers in the ring must support the single ring redundancy (SRR) functionality. SRR is supported in IOS Release 12.0(16)S and later S releases. |
Connect each POS node to a single interface. Connect automatic protection switching (APS) nodes to two separate interfaces one for working and one for protection. The working and protection links for the ONS 15194 must correspond to the working and protection connections on the router.
|
Warning The ports labeled "Eth," "Console," "Maint," and "PCMCIA" are safety extra-low voltage (SELV) circuits. SELV circuits should only be connected to other SELV circuits. Avoid connecting the SELV circuits to the telephone network voltage (TNV) circuits." |
|
Note Before the ONS 15194 can be accessed via Ethernet, you must configure the networking parameters using a direct serial connection to the active controller card. See the ONS 15194 Installation and Configuration Guide on the Documentation CD. |
Connect the RS-232C serial cable between the CONSOLE connector on one of the controller cards and the COM port on your PC. The CONSOLE port controls the active controller card in the ONS 15194, even if it is connected via the standby controller card.
Use the MAINT connector only in the following instances:
|
Caution Do not leave the UART password key plugged into the MAINT port. In addition to being a security hazard, the software will not run if the ONS 15194 is powered down and powered back up again. |
Do not establish a permanent connection to this serial interface.
The default RS-232C connection parameters are 9600 bps, no parity, and no flow control.
|
Note You can connect to only one of the controller cards via its CONSOLE port at any one time. |
Step 1 Unscrew all screws holding the fan tray grid on the lower front of the ONS 15194.
Step 2 Remove the fan tray grid.
Step 3 Gently pull the fan tray out of the chassis.
|
Caution Do not leave the fan tray out of the chassis for more than 2 minutes while the ONS 15194 is operational to avoid over-heating the system. |
Step 4 Slide the replacement fan tray into place.
Step 5 Replace the fan tray grid and replace the screws.
The ONS 15194 meets the agency approvals for safety and EMI as listed in Table 1.
| Category | Agency Approval |
|---|---|
UL 1950, Third Edition (US) | |
| CSA C22.2, No. 950-95, Third Edition (Canada) |
| EN/IEC 60950 (EC, Japan) |
| EN 41003 |
| AUSTEL TS001 |
| AS/NZS 3260 (Australia) |
| EN 60825 Laser Safety (Class 1) |
FCC subpart B Class A (US) | |
| AS/NZS 3548 Class A (Australia) |
| EMC Directive 89/336/EEC: |
| VCCI Class A (Japan) |
| |||
Waarschuwing | Dit waarschuwingssymbool betekent gevaar. U verkeert in een situatie die lichamelijk letsel kan veroorzaken. Voordat u aan enige apparatuur gaat werken, dient u zich bewust te zijn van de bij elektrische schakelingen betrokken risico's en dient u op de hoogte te zijn van standaard maatregelen om ongelukken te voorkomen. | ||
Varoitus | Tämä varoitusmerkki merkitsee vaaraa. Olet tilanteessa, joka voi johtaa ruumiinvammaan. Ennen kuin työskentelet minkään laitteiston parissa, ota selvää sähkökytkentöihin liittyvistä vaaroista ja tavanomaisista onnettomuuksien ehkäisykeinoista. | ||
Attention | Ce symbole d'avertissement indique un danger. Vous vous trouvez dans une situation pouvant causer des blessures ou des dommages corporels. Avant de travailler sur un équipement, soyez conscient des dangers posés par les circuits électriques et familiarisez-vous avec les procédures couramment utilisées pour éviter les accidents. | ||
Warnung | Dieses Warnsymbol bedeutet Gefahr. Sie befinden sich in einer Situation, die zu einer Körperverletzung führen könnte. Bevor Sie mit der Arbeit an irgendeinem Gerät beginnen, seien Sie sich der mit elektrischen Stromkreisen verbundenen Gefahren und der Standardpraktiken zur Vermeidung von Unfällen bewußt. | ||
Avvertenza | Questo simbolo di avvertenza indica un pericolo. La situazione potrebbe causare infortuni alle persone. Prima di lavorare su qualsiasi apparecchiatura, occorre conoscere i pericoli relativi ai circuiti elettrici ed essere al corrente delle pratiche standard per la prevenzione di incidenti. | ||
Advarsel | Dette varselsymbolet betyr fare. Du befinner deg i en situasjon som kan føre til personskade. Før du utfører arbeid på utstyr, må du vare oppmerksom på de faremomentene som elektriske kretser innebærer, samt gjøre deg kjent med vanlig praksis når det gjelder å unngå ulykker. | ||
Aviso | Este símbolo de aviso indica perigo. Encontra-se numa situação que lhe poderá causar danos físicos. Antes de começar a trabalhar com qualquer equipamento, familiarize-se com os perigos relacionados com circuitos eléctricos, e com quaisquer práticas comuns que possam prevenir possíveis acidentes. | ||
¡Advertencia! | Este símbolo de aviso significa peligro. Existe riesgo para su integridad física. Antes de manipular cualquier equipo, considerar los riesgos que entraña la corriente eléctrica y familiarizarse con los procedimientos estándar de prevención de accidentes. | ||
Varning! | Denna varningssymbol signalerar fara. Du befinner dig i en situation som kan leda till personskada. Innan du utför arbete på någon utrustning måste du vara medveten om farorna med elkretsar och känna till vanligt förfarande för att förebygga skador. | ||
| |||
Waarschuwing | Omdat er onzichtbare laserstraling uit de opening van de poort geëmitteerd kan worden wanneer er geen kabel aangesloten is, dient men om blootstelling aan laserstraling te vermijden niet in de open openingen te kijken. | ||
Varoitus | Kun porttiin ei ole kytketty kaapelia, portin aukosta voi vuotaa näkymätöntä lasersäteilyä. Älä katso avoimiin aukkoihin, jotta et altistu säteilylle. | ||
Attention | Etant donné qu'un rayonnement laser invisible peut être émis par l'ouverture du port quand aucun câble n'est connecté, ne pas regarder dans les ouvertures béantes afin d'éviter tout risque d'exposition au rayonnement laser. | ||
Warnung | Aus der Öffnung des Ports kann unsichtbare Laserstrahlung austreten, wenn kein Kabel angeschlossen ist. Kontakt mit Laserstrahlung vermeiden und nicht in offene Öffnungen blicken. | ||
Avvertenza | Poiché quando nessun cavo è collegato alla porta, da quest'ultima potrebbe essere emessa radiazione laser invisibile, evitare l'esposizione a tale radiazione e non fissare con gli occhi porte a cui non siano collegati cavi. | ||
Advarsel | Usynlige laserstråler kan sendes ut fra åpningen på utgangen når ingen kabel er tilkoblet. Unngå utsettelse for laserstråling og se ikke inn i åpninger som ikke er tildekket. | ||
Aviso | Evite uma exposição à radiação laser e não olhe através de aberturas expostas, porque poderá ocorrer emissão de radiação laser invisível a partir da abertura da porta, quando não estiver qualquer cabo conectado. | ||
¡Advertencia! | Cuando no esté conectado ningún cable, pueden emitirse radiaciones láser invisibles por el orificio del puerto. Evitar la exposición a radiaciones láser y no mirar fijamente los orificios abiertos. | ||
Varning! | Osynliga laserstrålar kan sändas ut från öppningen i porten när ingen kabel är ansluten. Undvik exponering för laserstrålning och titta inte in i ej täckta öppningar. | ||
| |||
Waarschuwing | Het uiteindelijke wegruimen van dit product dient te geschieden in overeenstemming met alle nationale wetten en reglementen. | ||
Varoitus | Tämä tuote on hävitettävä kansallisten lakien ja määräysten mukaisesti. | ||
Attention | La mise au rebut ou le recyclage de ce produit sont généralement soumis à des lois et/ou directives de respect de l'environnement. Renseignez-vous auprès de l'organisme compétent. | ||
Warnung | Die Entsorgung dieses Produkts sollte gemäß allen Bestimmungen und Gesetzen des Landes erfolgen. | ||
Avvertenza | Lo smaltimento di questo prodotto deve essere eseguito secondo le leggi e regolazioni locali. | ||
Advarsel | Endelig kassering av dette produktet skal være i henhold til alle relevante nasjonale lover og bestemmelser. | ||
Aviso | Deitar fora este produto em conformidade com todas as leis e regulamentos nacionais. | ||
¡Advertencia! | Al deshacerse por completo de este producto debe seguir todas las leyes y reglamentos nacionales. | ||
Varning! | Vid deponering hanteras produkten enligt gällande lagar och bestämmelser. | ||
| |||
Waarschuwing | Deze apparatuur mag alleen worden geïnstalleerd, vervangen of hersteld door bevoegd geschoold personeel. | ||
Varoitus | Tämän laitteen saa asentaa, vaihtaa tai huoltaa ainoastaan koulutettu ja laitteen tunteva henkilökunta. | ||
Attention | Il est vivement recommandé de confier l'installation, le remplacement et la maintenance de ces équipements à des personnels qualifiés et expérimentés. | ||
Warnung | Das Installieren, Ersetzen oder Bedienen dieser Ausrüstung sollte nur geschultem, qualifiziertem Personal gestattet werden. | ||
Avvertenza | Questo apparato può essere installato, sostituito o mantenuto unicamente da un personale competente. | ||
Advarsel | Bare opplært og kvalifisert personell skal foreta installasjoner, utskiftninger eller service på dette utstyret. | ||
Aviso | Apenas pessoal treinado e qualificado deve ser autorizado a instalar, substituir ou fazer a revisão deste equipamento. | ||
¡Advertencia! | Solamente el personal calificado debe instalar, reemplazar o utilizar este equipo. | ||
Varning! | Endast utbildad och kvalificerad personal bör få tillåtelse att installera, byta ut eller reparera denna utrustning. | ||
| |||
Waarschuwing | Dit toestel is bedoeld voor installatie op plaatsen met beperkte toegang. Een plaats met beperkte toegang is een plaats waar toegang slechts door servicepersoneel verkregen kan worden door middel van een speciaal instrument, een slot en sleutel, of een ander veiligheidsmiddel, en welke beheerd wordt door de overheidsinstantie die verantwoordelijk is voor de locatie. | ||
Varoitus | Tämä laite on tarkoitettu asennettavaksi paikkaan, johon pääsy on rajoitettua. Paikka, johon pääsy on rajoitettua, tarkoittaa paikkaa, johon vain huoltohenkilöstö pääsee jonkin erikoistyökalun, lukkoon sopivan avaimen tai jonkin muun turvalaitteen avulla ja joka on paikasta vastuussa olevien toimivaltaisten henkilöiden valvoma. | ||
Attention | Cet appareil est à installer dans des zones d'accès réservé. Ces dernières sont des zones auxquelles seul le personnel de service peut accéder en utilisant un outil spécial, un mécanisme de verrouillage et une clé, ou tout autre moyen de sécurité. L'accès aux zones de sécurité est sous le contrôle de l'autorité responsable de l'emplacement. | ||
Warnung | Diese Einheit ist zur Installation in Bereichen mit beschränktem Zutritt vorgesehen. Ein Bereich mit beschränktem Zutritt ist ein Bereich, zu dem nur Wartungspersonal mit einem Spezialwerkzeugs, Schloß und Schlüssel oder anderer Sicherheitsvorkehrungen Zugang hat, und der von dem für die Anlage zuständigen Gremium kontrolliert wird. | ||
Avvertenza | Questa unità deve essere installata in un'area ad accesso limitato. Un'area ad accesso limitato è un'area accessibile solo a personale di assistenza tramite un'attrezzo speciale, lucchetto, o altri dispositivi di sicurezza, ed è controllata dall'autorità responsabile della zona. | ||
Advarsel | Denne enheten er laget for installasjon i områder med begrenset adgang. Et område med begrenset adgang gir kun adgang til servicepersonale som bruker et spesielt verktøy, lås og nøkkel, eller en annen sikkerhetsanordning, og det kontrolleres av den autoriteten som er ansvarlig for området. | ||
Aviso | Esta unidade foi concebida para instalação em áreas de acesso restrito. Uma área de acesso restrito é uma área à qual apenas tem acesso o pessoal de serviço autorizado, que possua uma ferramenta, chave e fechadura especial, ou qualquer outra forma de segurança. Esta área é controlada pela autoridade responsável pelo local. | ||
¡Advertencia! | Esta unidad ha sido diseñada para instalarse en áreas de acceso restringido. Área de acceso restringido significa un área a la que solamente tiene acceso el personal de servicio mediante la utilización de una herramienta especial, cerradura con llave, o algún otro medio de seguridad, y que está bajo el control de la autoridad responsable del local. | ||
Varning! | Denna enhet är avsedd för installation i områden med begränsat tillträde. Ett område med begränsat tillträde får endast tillträdas av servicepersonal med ett speciellt verktyg, lås och nyckel, eller annan säkerhetsanordning, och kontrolleras av den auktoritet som ansvarar för området. | ||
| |||
Waarschuwing | Deze eenheid kan meer dan één stroomtoevoerverbinding bevatten. Alle verbindingen dienen ontkoppeld te worden om de eenheid te ontkrachten. | ||
Varoitus | Tässä laitteessa voi olla useampia kuin yksi virtakytkentä. Kaikki liitännät on irrotettava, jotta jännite poistetaan laitteesta. | ||
Attention | Pour supprimer toute tension et tout courant électrique de l'unité, TOUTES les connexions d'alimentation doivent être débranchées. | ||
Warnung | Dieses Gerät kann mehr als eine Stromzufuhr haben. Um sicherzustellen, daß der Einheit kein Strom zugeführt wird, müssen alle Verbindungen entfernt werden. | ||
Avvertenza | Questo prodotto può avere più di una connessione di alimentazione elettrica. Tutte le connessioni devono essere staccate per togliere la corrente dal prodotto. | ||
Advarsel | Denne enheten kan ha mer enn én strømtilførselskobling. Alle koblinger må fjernes fra enheten for å utkoble all strøm. | ||
Aviso | Esta unidade poderá ter mais do que uma conexão de fonte de energia. Todas as conexões necessitam de ser removidas para desactivar a unidade. | ||
¡Advertencia! | Esta unidad puede contar con más de una conexión para fuentes de alimentación. Para cortar por completo el suministro de energía, deben desconectarse todas las conexiones. | ||
Varning! | Denna enhet har eventuellt mer än en strömförsörjningsanslutning. Alla anslutningar måste tas bort för att göra enheten strömlös. | ||
| |||
Waarschuwing | Sluit de eenheid alleen maar aan op een gelijkstroombron die voldoet aan de veiligheidsvereisten voor extra-laag voltage (SELV) in de op IEC 60950 gebaseerde veiligheidsnormen. | ||
Varoitus | Liitä laite ainoastaan tasavirtalähteesen, joka on yhdenmukainen IEC 60950:n suojattujen erittäisen alhaisen jännitteen (SELV) turvavaatimusten kanssa. | ||
Attention | Connectez l'unité uniquement à une alimentation CC compatible avec les recommandations SELV (Safety Extra-Low Voltage) des normes de sécurité IEC 60950. | ||
Warnung | Schließen Sie die Einheit nur an eine Gleichstrom-Stromquelle an, die mit den Safety Extra-Low Voltage (SELV)-Anforderungen in den auf IEC 60950 basierenden Sicherheitsstandards übereinstimmen. | ||
Avvertenza | Collegare l'unità esclusivamente a una presa di corrente continua rispondente ai requisiti SELV (Safety Extra-Low Voltage) in base alle norme di sicurezza IEC 60950. | ||
Advarsel | Koble bare enheten til en likestrømsforsyning som er i henhold til kravene for lavspenning (SELV) i IEC 60950-baserte sikkerhetsstandarder. | ||
Aviso | Conecte a unidade apenas à fonte da energia de CC que se encontra em conformidade com os requisitos dos circuitos de segurança de baixa tensão (SELV) constantes dos padrões de segurança baseados no IEC 60950. | ||
¡Advertencia! | Conecte la unidad sólo en una fuente de energía DC que cumpla con los requisitos de voltaje extra bajo (SELV - Extra-Low Voltage) en los estándares de seguridad IEC 60950. | ||
Varning! | Anslut enheten endast till en likströmsförsörjningsenhet som uppfyller kraven för SELV (skyddskretsar för mycket låg spänning) i IEC 60950-baserade säkerhetsstandarder. | ||
| |||
Waarschuwing | Deze apparatuur hoort geaard te worden Zorg dat de host-computer tijdens normaal gebruik met aarde is verbonden. | ||
Varoitus | Tämä laitteisto on tarkoitettu maadoitettavaksi. Varmista, että isäntälaite on yhdistetty maahan normaalikäytön aikana. | ||
Attention | Cet équipement doit être relié à la terre. S'assurer que l'appareil hôte est relié à la terre lors de l'utilisation normale. | ||
Warnung | Dieses Gerät muß geerdet werden. Stellen Sie sicher, daß das Host-Gerät während des normalen Betriebs an Erde gelegt ist. | ||
Avvertenza | Questa apparecchiatura deve essere collegata a massa. Accertarsi che il dispositivo host sia collegato alla massa di terra durante il normale utilizzo. | ||
Advarsel | Dette utstyret skal jordes. Forviss deg om vertsterminalen er jordet ved normalt bruk. | ||
Aviso | Este equipamento deverá estar ligado à terra. Certifique-se que o host se encontra ligado à terra durante a sua utilização normal. | ||
¡Advertencia! | Este equipo debe conectarse a tierra. Asegurarse de que el equipo principal esté conectado a tierra durante el uso normal. | ||
Varning! | Denna utrustning är avsedd att jordas. Se till att värdenheten är jordad vid normal användning. | ||
| |||
Waarschuwing | Er zijn twee personen nodig om het chassis op te tillen. Om letsel te voorkomen dient u uw rug recht te houden en met uw benen te tillen in plaats van met uw rug. | ||
Varoitus | Asennuspohjan nostamiseen tarvitaan kaksi henkilöä. Nosta jalkojen (ei selän) avulla pitäen selkäsi suorana, jotta välttäisit loukkaantumista. | ||
Attention | Le châssis doit être soulevé par au minimum deux personnes. Pour éviter tout risque d'accident, maintenez le dos droit et poussez sur vos jambes. Ne soulevez pas l'unité avec votre dos. | ||
Warnung | Um das Chassis anzuheben, sind zwei Leute erforderlich. Um Verletzungsgefahr auszuschalten, halten Sie den Rücken gerade und heben Sie mit den Beinen, nicht dem Rücken. | ||
Avvertenza | Per sollevare il chassis occorre l'intervento di due persone. Onde evitare il rischio di lesioni personali, tenere sempre ben dritta la schiena e piegare solo le gambe durante il sollevamento in modo da scaricare il peso sulle gambe e non sulla schiena. | ||
Advarsel | Det er nødvendig at to personer løfter kabinettet. Hold ryggen rett og løft med beina - ikke ryggen - for å unngå personskade. | ||
Aviso | São necessárias duas pessoas para levantar o chassis. Para evitar lesões, mantenha as costas direitas e levante o peso com ambas as pernas, sem forçar as costas. | ||
¡Advertencia! | Se requieren dos personas para elevar el chasis. Para evitar lesiones, mantenga su espalda en posición recta y levante con sus piernas, no con su espalda. | ||
Varning! | Det krävs två personer för att lyfta chassit. För att undvika skador ska du hålla ryggen rak och lyfta med benen, inte ryggen. | ||
Cisco, Cisco IOS, the Cisco IOS logo, Cisco Press, Cisco Systems, Cisco Systems Capital and the Cisco Systems logo are registered trademarks of Cisco Systems, Inc. and/or its affiliates in the U.S. and certain other countries.
All other trademarks mentioned in this document or Web site are the property of their respective owners. The use of the word partner does not imply a partnership relationship between Cisco and any other company. (0108R)
Copyright © 2001, Cisco Systems, Inc.
All rights reserved.
![]()
![]()
![]()
![]()
![]()
![]()
![]()
![]()
Posted: Thu Oct 31 05:34:45 PST 2002
All contents are Copyright © 1992--2002 Cisco Systems, Inc. All rights reserved.
Important Notices and Privacy Statement.