|
|

This document provides instructions for installing and removing Gigabit Interface Converters (GBICs) on the Cisco 7200 series routers, the Cisco 7304 router, the Cisco 7401ASR router, and the Cisco 12000 series routers. The GBIC is an input/output device that plugs into a Gigabit Ethernet (GE) port, linking the port with a 1000BASE-X fiber-optic network. The device is used on Cisco platforms that have GE interfaces.
This document contains the following sections:
The Cisco IOS software running on your router contains extensive features and functionality, which are documented online and in the following resources:
 |
Note You can access Cisco IOS software configuration and hardware installation and maintenance documentation on the World Wide Web at http://www.cisco.com , http://www-china.cisco.com , or http://www-europe.cisco.com . |
For hardware installation and maintenance information, refer to the following documents:
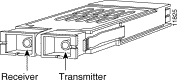
The GBIC is an input/output device that plugs into a Gigabit Ethernet port, linking the port with a 1000BASE-X fiber-optic network. A GBIC is shown in Figure 1.
The GBIC has a receiver port (RX) and a transmitter port (TX) that make up one optical interface. Table 1 lists the available GBIC options and their Product Numbers. Table 2 lists GBIC transmit power, receive power, and power budget information.
| GBIC | Transmit Power | Receive Power | Power Budget | ||
|---|---|---|---|---|---|
| Minimum | Maximum | Minimum | Maximum | ||
-4 dBm1 |
|||||
| 1For fiber types 50/125 mm, NA = 0.20 fiber and 62.5/125 mm, NA = 0.275 fiber.
2For fiber types 50/125 mm MMF and 62.5/125 mm MMF. 3For fiber types 9/125 mm SMF. 4For fiber types 62.5/125 mm MMF and 50/125 mm MMF. 5For fiber types 9/125 mm SMF, 62.5/125 mm MMF, and 50/125 mm MMF. 6For fiber types 50/125 mm MMF and 62.5/125 mm MMF. 7For fiber type 10 mm SMF. |
Table 3 lists GBIC physical specifications.
| Specification | Description |
|---|---|
SX: 1804 feet (550 m) |
The 1000BASE-SX (short wavelength) GBIC operates on standard multimode fiber-optic link spans of up to 1804 feet (550 m). (See Table 4.)
The 1000BASE-LX/LH (long wavelength/long haul) GBIC interfaces fully comply with the IEEE 802.3z 1000BASE-LX standard. However, their higher optical quality allows them to reach 10 km over single-mode fiber (SMF) versus the 3.1 miles (5 km) specified in the standard.
The 1000BASE-ZX (extended wavelength) GBIC operates on ordinary single-mode fiber-optic link spans of up to 43.5 miles (70 km). Link spans of up to 62.1 miles (100 km) are possible using premium single-mode fiber or dispersion-shifted single-mode fiber (premium single-mode fiber has a lower attenuation per unit length than ordinary single-mode fiber; dispersion-shifted single-mode fiber has both lower attenuation and less dispersion).
The 1000BASE-ZX GBIC must be coupled to single-mode fiber-optic cable, which is the type of cable typically used in long-haul telecommunications applications. The 1000BASE-ZX GBIC will not operate correctly when coupled to multimode fiber, and it is not intended to be used in environments where multimode fiber is frequently used (for example, building backbones, horizontal cabling).
The 1000BASE-ZX GBIC is intended to be used as a Physical Medium Dependent (PMD) component for Gigabit Ethernet interfaces found on various switch and router products. It operates at a signaling rate of 1250 Mbaud, transmitting and receiving 8B/10B encoded data.
When shorter lengths of single-mode fiber are used, it may be necessary to insert an in-line optical attenuator in the link to avoid overloading the receiver.
The GBIC receptacle is a 1000-Mbps optical interface in the form of an SC-type duplex receptacle (see Figure 1) that supports IEEE 802.3z interfaces compliant with the 1000BASE-X standard.
Table 4 provides cabling specifications for the GBICs that you install in Gigabit Ethernet devices. Note that all GBIC ports have SC-type connectors. Also, the minimum cable distance for the GBIC-SX and GBIC-LX/LH (multimode fiber [MMF] and single-mode fiber [SMF]) is 6.5 feet (2 m), and the minimum link distance for the GBIC-ZX is 6.2 miles (10 km) with an 8-dB attenuator installed at each end of the link. Without attenuators, the minimum link distance for the GBIC-ZX is 24.9 miles (40 km).
| GBIC | Wavelength (nm) | Fiber Type | Core Size (micron) | Modal Bandwidth (MHz/km) | Maximum Cable Distance |
|---|---|---|---|---|---|
| 1Multimode fiber (MMF) only.
2A mode-conditioning patch cord (Product Number CAB-GELX-625 or equivalent) is required. 3You can have a maximum of 12 1000BASE-ZX GBICs per system to comply with EN55022 Class B and 24 1000BASE-ZX GBICs per system to comply with FCC Class A regulations. 4Dispersion-shifted single-mode fiber-optic cable. |
|
Note The 1000BASE-ZX GBIC provides an optical power budget of 21.5 dB. You should measure your cable plant with an optical loss test set to verify that the optical loss of the cable plant (including connectors and splices) is less than or equal to 21.5 dB. The optical loss measurement must be performed with a 1550-nm light source. |
A mode-conditioning patch cord (Cisco Product Number CAB-GELX-625=) can be used with the GBIC-LX/LH to allow reliable laser transmission between the single-mode laser source on the GBIC and a multimode optical fiber cable.
When an unconditioned laser source designed for operation on single-mode optical fiber is directly coupled to a multimode optical fiber cable, an effect known as differential mode delay (DMD) might result in a degradation of the modal bandwidth of the optical fiber cable.
This degradation results in a decrease in the link span (the distance between a transmitter and a receiver) that can be supported reliably. The effect of DMD can be overcome by conditioning the launch characteristics of a laser source. A practical means of performing this conditioning is to use a device called a mode-conditioning patch cord.
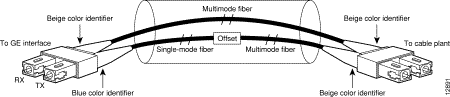
A mode-conditioning patch cord is an optical fiber cable assembly that consists of a pair of optical fibers terminated with connector hardware. Specifically, the mode-conditioning patch cord is composed of a single-mode optical fiber permanently coupled off-center (see Offset in Figure 2) to a graded-index multimode optical fiber. Figure 2 shows a diagram of the mode-conditioning patch cord assembly.
The mode-conditioning patch cord assembly is composed of duplex optical fibers, including a single-mode-to-multimode offset launch fiber connected to the transmitter, and a second conventional graded-index multimode optical fiber connected to the receiver. The use of a plug-to-plug patch cord maximizes the power budget of multimode 1000BASE-LX and 1000BASE-LH links.
|
Note The mode-conditioning patch cord (CAB-GELX-625 or equivalent) is required to comply with IEEE standards. The IEEE found that link distances could not be met with certain types of fiber-optic cable cores. The solution is to launch light from the laser at a precise offset from the center, which is accomplished by using the mode-conditioning patch cord. At the output of the patch cord, the GBIC-LX/LH is compliant with the IEEE 802.3z standard for 1000BASE-LX. |
This section describes safety and compliance guidelines you should observe before you install the GBIC in your Gigabit Ethernet device.
Before handling a GBIC, observe the following guidelines:
 |
Warning Class 1 laser product. |
|
Warning Class 1 LED product. |
|
Warning Because invisible laser radiation may be emitted from the aperture of the port when no fiber cable is connected, avoid exposure to laser radiation and do not stare into open apertures. |
This equipment has been tested and found to comply with the limits for a Class A digital device, pursuant to part 15 of the FCC rules. These limits are designed to provide reasonable protection against harmful interference when the equipment is operated in a commercial environment. This equipment generates, uses, and can radiate radio-frequency energy and, if not installed and used in accordance with the instruction manual, may cause harmful interference to radio communications. Operation of this equipment in a residential area is likely to cause harmful interference, in which case users will be required to correct the interference at their own expense.
You can determine whether your equipment is causing interference by turning it off. If the interference stops, it was probably caused by the Cisco equipment or one of its peripheral devices. If the equipment causes interference to radio or television reception, try to correct the interference by using one or more of the following measures:
|
Note This product has been designed to meet these requirements. Modifications to this product that are not authorized by Cisco Systems, Inc., could void the various approvals and negate your authority to operate the product. |
GBICs might ship already installed in your device, or they might arrive packaged separately. This section describes how to install or remove the GBIC from your Gigabit Ethernet interface.
|
Note You can install and remove GBICs with power on to the system; however, we strongly recommend that you do not install or remove the GBIC with optical fiber cables attached to it. Disconnect all cables before removing or installing a GBIC. |
 |
Caution To prevent system problems, do not use GBICs from third-party vendors. Use only GBICs supplied by Cisco Systems. |
|
Warning Ultimate disposal of this product should be handled according to all national laws and regulations. |
|
Note You can install and remove GBICs with power on to the system; however, we strongly recommend that you do not install or remove the GBIC with optical fiber cables attached to it. |
To remove a GBIC, perform the following steps:
Step 2 Release the GBIC from the slot by simultaneously squeezing the two plastic tabs (one on each side of the GBIC).
Step 3 Slide the GBIC out of the slot. A flap drops down to protect the GBIC connector.
This completes the procedure to remove a GBIC from the chassis.
Use the following procedure to install a GBIC in a vertically oriented slot:
Step 2 Locate the alignment groove on the GBIC. (See the enlargement in Figure 3.)
Step 3 Align the groove on the GBIC with the interface opening.
Step 4 Squeeze the tabs on each side of the GBIC using your thumb and forefinger, and insert the GBIC into the slot on the front panel of your device. (See Figure 3.)
Step 5 Insert the GBIC into the GBIC slot guides.
Step 6 Carefully slide the GBIC into the GBIC slot and seat it. When installed, the GBIC input/output panel should be flush with the face of the router. The tabs on either side of the GBIC will snap into place when the GBIC is properly inserted.
Step 7 Proceed to "Installing the GBIC Interface Cables" section to reattach the SC-type fiber-optic cable to the GBIC.
This completes the procedure for installing a GBIC in a vertically-oriented system.
Use the following procedure to install a GBIC in a horizontally oriented slot:
Step 2 Locate the alignment groove on the GBIC. (See the enlargement in Figure 4 and Figure 6.)
Step 3 Align the groove on the GBIC with the interface opening (see Figure 5 and Figure 7).
|
Note Some horizontally oriented devices accept the GBIC with the alignment groove on top (see Figure 4) and the plug in the orientation shown in Figure 5. Other devices accept the GBIC with the alignment groove on the bottom (see Figure 6) and the plug in the orientation shown in Figure 7. If the GBIC does not go into the interface slot, ensure that the alignment groove and the interface opening are lined up and, if necessary, flip the GBIC over (rotate it 180 degrees) and try inserting it again. |
Step 4 Holding the GBIC with your thumb and forefinger, insert the GBIC into the slot on the front panel of your chassis, as shown in Figure 8, Figure 9, Figure 10, and Figure 11.
Step 5 Carefully slide the GBIC into the GBIC slot and seat it. When installed, the GBIC input/output panel should be flush with the face of the router.
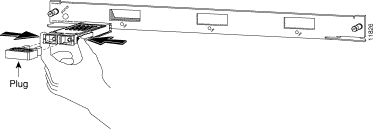
Step 6 Attach the network interface fiber-optic cable, as described in the "Installing the GBIC Interface Cables" section, remove the plug from the GBIC optical bores and save the plug for future use.
This completes the procedure for installing a GBIC in horizontally-oriented systems.
This section describes how to attach the interface cables to the GBIC.
|
Note Optical fiber cables are commercially available; they are not available from Cisco Systems. |
Attach the appropriate optical fiber cable directly to the SC-type receptacle on the GBIC. You can use either simplex or duplex connectors for most devices. (See Figure 12.)
|
Caution If you plan to use a GBIC-LX/LH at distances greater than 984.25 feet (300 meters) over 50/125-micron or 62.5/125-micron multimode fiber, to prevent data transmission problems you must use the mode-conditioning patch cord. (See the "Attaching the Mode-Conditioning Patch Cord" section.) |
Perform the following steps to attach the mode-conditioning patch cord:
Step 2 Attach the network ends of your patch cord to the appropriate 1000BASE-X equipment in your building cable plant.
|
Note Ensure that you connect the TX and RX ports on one end of the patch cord to the RX and TX ports (respectively) on the other end. Connect TX to RX and RX to TX. |
This completes the procedure for attaching a mode-conditioning patch cord.
The following sections explain how to obtain documentation from Cisco Systems.
You can access the most current Cisco documentation on the World Wide Web at the following URL:
Translated documentation is available at the following URL:
http://www.cisco.com/public/countries_languages.shtml
Cisco documentation and additional literature are available in a Cisco Documentation CD-ROM package, which is shipped with your product. The Documentation CD-ROM is updated monthly and may be more current than printed documentation. The CD-ROM package is available as a single unit or through an annual subscription.
Cisco documentation is available in the following ways:
http://www.cisco.com/cgi-bin/order/order_root.pl
http://www.cisco.com/go/subscription
If you are reading Cisco product documentation on Cisco.com, you can submit technical comments electronically. Click the Fax or Email option under the "Leave Feedback" at the bottom of the Cisco Documentation home page.
You can e-mail your comments to bug-doc@cisco.com.
To submit your comments by mail, use the response card behind the front cover of your document, or write to the following address:
Cisco Systems
Attn: Document Resource Connection
170 West Tasman Drive
San Jose, CA 95134-9883
Cisco provides Cisco.com as a starting point for all technical assistance. Customers and partners can obtain documentation, troubleshooting tips, and sample configurations from online tools by using the Cisco Technical Assistance Center (TAC) Web Site. Cisco.com registered users have complete access to the technical support resources on the Cisco TAC Web Site.
Cisco.com is the foundation of a suite of interactive, networked services that provides immediate, open access to Cisco information, networking solutions, services, programs, and resources at any time, from anywhere in the world.
Cisco.com is a highly integrated Internet application and a powerful, easy-to-use tool that provides a broad range of features and services to help you to
You can self-register on Cisco.com to obtain customized information and service. To access Cisco.com, go to the following URL:
The Cisco TAC is available to all customers who need technical assistance with a Cisco product, technology, or solution. Two types of support are available through the Cisco TAC: the Cisco TAC Web Site and the Cisco TAC Escalation Center.
Inquiries to Cisco TAC are categorized according to the urgency of the issue:
Which Cisco TAC resource you choose is based on the priority of the problem and the conditions of service contracts, when applicable.
The Cisco TAC Web Site allows you to resolve P3 and P4 issues yourself, saving both cost and time. The site provides around-the-clock access to online tools, knowledge bases, and software. To access the Cisco TAC Web Site, go to the following URL:
All customers, partners, and resellers who have a valid Cisco services contract have complete access to the technical support resources on the Cisco TAC Web Site. The Cisco TAC Web Site requires a Cisco.com login ID and password. If you have a valid service contract but do not have a login ID or password, go to the following URL to register:
http://www.cisco.com/register/
If you cannot resolve your technical issues by using the Cisco TAC Web Site, and you are a Cisco.com registered, you can open a case online by using the TAC Case Open tool at the following URL:
http://www.cisco.com/tac/caseopen
If you have Internet access, it is recommended that you open P3 and P4 cases through the Cisco TAC Web Site.
The Cisco TAC Escalation Center addresses issues that are classified as priority level 1 or priority level 2; these classifications are assigned when severe network degradation significantly impacts business operations. When you contact the TAC Escalation Center with a P1 or P2 problem, a Cisco TAC engineer will automatically open a case.
To obtain a directory of toll-free Cisco TAC telephone numbers for your country, go to the following URL:
http://www.cisco.com/warp/public/687/Directory/DirTAC.shtml
Before calling, please check with your network operations center to determine the level of Cisco support services to which your company is entitled; for example, SMARTnet, SMARTnet Onsite, or Network Supported Accounts (NSA). In addition, please have available your service agreement number and your product serial number
![]()
![]()
![]()
![]()
![]()
![]()
![]()
![]()
Posted: Sun Jan 19 08:09:08 PST 2003
All contents are Copyright © 1992--2002 Cisco Systems, Inc. All rights reserved.
Important Notices and Privacy Statement.