- Preface
- 1. Command-Line Interface
- 2. CLI Command Reference
- Syntax and Conventions
- CLI Commands
- ?
- aaa accounting commands
- aaa authentication attempts
- aaa authentication enable default
- aaa authentication login default
- accelerate-packet-drops
- access-class
- access-list
- active-port
- application slot replace force completion
- attack-detector default
- attack-detector
- attack-detector <number>
- attack-detector tcp-port-list|udp-port-list
- attack-filter (Linecard Interface Configuration)
- attack-filter (Privileged Exec)
- attack-filter subscriber-notification ports
- auto-fail-over
- auto-negotiate (GigabitEthernet only)
- bandwidth
- blink
- boot system
- calendar set
- cd
- clear arp-cache
- clear interface linecard
- clear interface linecard mpls vpn
- clear interface linecard subscriber
- clear interface linecard subscriber db counters
- clear interface linecard traffic-counter
- clear interface linecard vas-traffic-forwarding vas counters health-check
- clear scmp name counters
- clear logger
- clear management-agent notifications counters
- clear rdr-formatter
- clock read-calendar
- clock set
- clock summertime
- clock timezone
- clock update-calendar
- configure
- connection-mode (SCE 1000 platform)
- connection-mode (SCE 2000 platform)
- copy
- copy ftp://
- copy-passive
- copy running-config startup-config
- copy source-file ftp://
- copy source-file startup-config
- copy startup-config destination-file
- default subscriber template all
- delete
- dir
- disable
- do
- duplex
- enable
- enable password
- erase startup-config-all
- exit
- failure-recovery operation-mode
- force failure-condition (SCE 2000 only)
- help
- history
- history size
- hostname
- interface fastethernet (SCE 2000 4/8xFE platform only)
- interface gigabitethernet
- interface linecard
- interface mng
- ip access-class
- ip address
- ip advertising
- ip default-gateway
- ip domain-lookup
- ip domain-name
- ip filter fragment
- ip filter monitor
- ip ftp password
- ip ftp username
- ip host
- ip name-server
- ip radius-client retry limit
- ip route
- ip rpc-adapter
- ip rpc-adapter port
- ip rpc-adaptor security-level
- ip ssh
- ip ssh access-class
- ip ssh key
- ip-tunnel l2tp skip
- l2tp identify-by
- line vty
- link failure-reflection
- link mode
- logger add-user-message
- logger device
- logger device user-file-log max-file-size
- logger get support-file
- logger get user-log file-name
- logout
- mac-resolver arp
- management-agent sce-api logging
- management-agent sce-api timeout
- management-agent system
- mkdir
- more
- more user-log
- mpls
- mpls vpn pe-id
- no mpls vpn pe-database
- no subscriber
- no subscriber anonymous-group
- no subscriber mappings included-in
- ping
- pqi install file
- pqi rollback file
- pqi uninstall file
- pqi upgrade file
- pwd
- queue
- rdr-formatter category-number
- rdr-formatter destination
- rdr-formatter forwarding-mode
- rdr-formatter history-size
- rdr-formatter protocol
- rdr-formatter protocol rdrv2 connection-timeout
- rdr-formatter rdr-mapping
- reload
- reload shutdown
- rename
- rmdir
- scmp
- scmp keepalive-interval
- scmp loss-of-sync-timeout
- scmp name
- scmp reconnect-interval
- scmp subscriber force-single-sce
- scmp subscriber id append-to-guid
- scmp subscriber send-session-start
- script capture
- script print
- script run
- script stop
- service-bandwidth-prioritization-mode
- service password-encryption
- service rdr-formatter
- service telnetd
- setup
- show access-lists
- show blink
- show calendar
- show clock
- show failure-recovery operation-mode
- show hostname
- show hosts
- show interface fastethernet
- show interface gigabitethernet
- show interface linecard
- show interface linecard accelerate-packet-drops
- show interface linecard application
- show interface linecard attack-detector
- show interface linecard attack-filter
- show interface linecard connection-mode
- show interface linecard counters
- show interface linecard duplicate-packets-mode
- show interface linecard flow-open-mode
- show interface linecard ip-tunnel
- show interface linecard l2tp
- show interface linecard link mode
- show interface linecard link-to-port-mappings
- show interface LineCard mac-mapping
- show interface linecard mac-resolver arp
- show interface linecard mpls vpn
- show interface linecard physically-connected-links (SCE 2000 only)
- show interface linecard service-bandwidth-prioritization-mode
- show interface linecard shutdown
- show interface linecard silent
- show interface linecard subscriber
- show interface linecard subscriber aging
- show interface linecard subscriber anonymous
- show interface linecard subscriber anonymous-group
- show interface linecard subscriber db counters
- show interface linecard subscriber mapping
- show interface linecard subscriber name
- show interface linecard subscriber properties
- show interface linecard subscriber sm-connection-failure
- show interface linecard subscriber templates
- show interface linecard subscriber tp-mappings statistics
- show interface linecard subscriber tp-ip-range
- show interface linecard subscriber mapping included-in tp-ip-range
- show interface linecard tos-marking mode
- show interface linecard tos-marking table
- show interface linecard traffic-counter
- show interface linecard traffic-rule
- show interface linecard vas-traffic-forwarding
- show interface linecard vlan
- show interface linecard vlan translation
- show interface linecard wap
- show interface mng
- show inventory
- show ip access-class
- show ip advertising
- show ip default-gateway
- show ip filter
- show ip radius-client
- show ip route
- show ip rpc-adapter
- show ip ssh
- show line vty
- show log
- show logger device
- show management-agent
- show pqi file
- show pqi last-installed
- show rdr-formatter
- show rdr-formatter connection-status
- show rdr-formatter counters
- show rdr-formatter destination
- show rdr-formatter enabled
- show rdr-formatter forwarding-mode
- show rdr-formatter history-size
- show rdr-formatter protocol
- show rdr-formatter rdr-mapping
- show rdr-formatter statistics
- show running-config
- show scmp
- show snmp
- show snmp community
- show snmp contact
- show snmp enabled
- show snmp host
- show snmp location
- show snmp mib
- show snmp traps
- show sntp
- show startup-config
- show system operation-status
- show system-uptime
- show tacacs
- show telnet sessions
- show telnet status
- show timezone
- show users
- show version
- show version all
- show version software
- silent
- snmp-server
- snmp-server community
- snmp-server contact
- snmp-server enable traps
- snmp-server host
- snmp-server location
- sntp broadcast client
- sntp server
- sntp update-interval
- speed
- subscriber anonymous-group export csv-file
- subscriber anonymous-group import csv-file
- subscriber anonymous-group name scmp name
- subscriber export csv-file
- subscriber import csv-file
- subscriber name property
- subscriber sm-connection-failure
- subscriber template export csv-file
- subscriber template import csv-file
- subscriber tp-ip-range name ip-range target-tp
- subscriber tp-mappings
- subscriber tp-ip-range {import | export} csv-file
- subscriber aging
- tacacs-server host
- tacacs-server key
- tacacs-server timeout
- telnet
- timeout
- tos-marking mode
- tos-marking reset-table
- tos-marking set-table-entry
- tracert
- traffic-counter
- traffic-rule
- unzip
- username
- username privilege
- vas-traffic-forwarding
- vas-traffic-forwarding traffic-link
- vas-traffic-forwarding traffic-link auto-select
- vas-traffic-forwarding vas health-check
- vas-traffic-forwarding vas server-id health-check
- vas-traffic-forwarding vas server-group
- vas-traffic-forwarding vas server-group failure
- vas-traffic-forwarding vas server-id
- vas-traffic-forwarding server-id vlan
- vlan
- vlan translation
- wap
This guide contains Command-Line Interface (CLI) commands to maintain the SCE platform. This guide assumes a basic familiarity with telecommunications equipment and installation procedures.
This reference provides a complete listing of all commands at the admin authorization level or below, with examples of how to use each command to perform typical SCE platform management functions.
|
Cisco Service Control Release |
Part Number |
Publication Date |
|---|---|---|
|
Release 3.0.5 |
OL-7825-06 |
February, 2007 |
Description of Changes
Updated sections relating to the Viewer authorization level.
|
Cisco Service Control Release |
Part Number |
Publication Date |
|---|---|---|
|
Release 3.0.5 |
OL-7825-05 |
November, 2006 |
Description of Changes
Added CLI commands related to the following new features:
SCMP
Unique Device Identifier (UDI)
|
Cisco Service Control Release |
Part Number |
Publication Date |
|---|---|---|
|
Release 3.0.3 |
OL-7825-04 |
May, 2006 |
Description of Changes
Added CLI commands related to the following new features:
MPLS/VPN support
VLAN translation
VAS over 10G
|
Cisco Service Control Release |
Part Number |
Publication Date |
|---|---|---|
|
Release 3.0 |
OL-7825-03 |
December, 2005 |
Description of Changes
Added CLI commands related to the following new features:
Value Added Services traffic forwarding
TACACS+ authentication, authorization and accounting
Management port redundancy
|
Release 2.5.7 |
OL-7825-02 |
August, 2005 |
Description of Changes
Complete reorganization and revision of product documentation.
This guide is intended for the networking or computer technician responsible for configuring and maintaining the SCE platform on-site. It is also intended for the operator who manages the SCE platform(s). This guide does not cover high-level technical support procedures available to Root administrators and Cisco technical support personnel.
This guide covers the following topics:
|
Chapter |
Title |
Description |
|---|---|---|
|
Chapter 1 |
Describes how to use the SCE platform Command-Line Interface (CLI), its hierarchical structure, authorization levels and its help features. | |
|
Chapter 2 |
Provides an alphabetical list of the available CLI commands that you can use to configure the SCE platform. |
This Cisco Service Control Engine (SCE) CLI Command Reference should be used in conjunction with the following SCE platform manuals to provide a detailed explanation of the commands:
Cisco SCE 2000 4xGBE Installation and Configuration Guide
Cisco SCE 2000 4/8xFE Installation and Configuration Guide
Cisco SCE 1000 2xGBE Installation and Configuration Guide
Cisco Service Control Engine (SCE) Software Configuration Guide
This document uses the following conventions:
|
Convention |
Description |
|---|---|
|
boldface font |
Commands and keywords are in boldface. |
|
italic font |
Arguments for which you supply values are in italics. |
|
[ ] |
Elements in square brackets are optional. |
|
{x | y | z} |
Alternative keywords are grouped in braces and separated by vertical bars. |
|
[x | y | z] |
Optional alternative keywords are grouped in brackets and separated by vertical bars. |
|
string |
A nonquoted set of characters. Do not use quotation marks around the string, or the string will include the quotation marks. |
|
|
Terminal sessions and information that the system displays are in |
|
|
Information you must enter is in |
|
|
Arguments for which you supply values are in |
|
< > |
Nonprinting characters, such as passwords, are in angle brackets. |
|
[ ] |
Default responses to system prompts are in square brackets. |
|
!, # |
An exclamation point (!) or a pound sign (#) at the beginning of a line of code indicates a comment line. |
Note
Means reader take note. Notes contain helpful suggestions or references to materials not covered in this manual.
Caution
Means reader be careful. In this situation, you might do something that could result in equipment damage or loss of data.
Warning
Means reader be warned. In this situation, you might do something that could result in bodily injury.
The following sections provide sources for obtaining documentation from Cisco Systems.
You can access the most current Cisco documentation on the World Wide Web at the following sites:
Cisco documentation and additional literature are available in a CD-ROM package that ships with your product. The Documentation CD-ROM is updated monthly and may be more current than printed documentation. The CD-ROM package is available as a single unit or as an annual subscription.
Cisco documentation is available in the following ways:
Registered Cisco Direct Customers can order Cisco Product documentation from the networking Products MarketPlace:
Registered Cisco.com users can order the Documentation CD-ROM through the online Subscription Store:
Nonregistered Cisco.com users can order documentation through a local account representative by calling Cisco corporate headquarters (California, USA) at 408 526-7208 or, in North America, by calling 800 553-NETS(6387).
If you are reading Cisco product documentation on the World Wide Web, you can submit technical comments electronically. Click Feedback in the toolbar and select Documentation. After you complete the form, click Submit to send it to Cisco.
You can e-mail your comments to bug-doc@cisco.com.
To submit your comments by mail, use the response card behind the front cover of your document, or write to the following address:
Attn Document Resource Connection Cisco Systems, Inc. 170 West Tasman Drive San Jose, CA 95134-9883
We appreciate your comments.
Cisco provides Cisco.com as a starting point for all technical assistance. Customers and partners can obtain documentation, troubleshooting tips, and sample configurations from online tools. For Cisco.com registered users, additional troubleshooting tools are available from the TAC website.
Cisco.com is the foundation of a suite of interactive, networked services that provides immediate, open access to Cisco information and resources at any time, from anywhere in the world. This highly integrated Internet application is a powerful, easy-to-use tool for doing business with Cisco.
Cisco.com provides a broad range of features and services to help customers and partners streamline business processes and improve productivity. Through Cisco.com, you can find information about Cisco and our networking solutions, services, and programs. In addition, you can resolve technical issues with online technical support, download and test software packages, and order Cisco learning materials and merchandise. Valuable online skill assessment, training, and certification programs are also available.
Customers and partners can self-register on Cisco.com to obtain additional personalized information and services. Registered users can order products, check on the status of an order, access technical support, and view benefits specific to their relationships with Cisco.
To access Cisco.com, go to http://www.cisco.com.
The Cisco Technical Assistance Center (TAC) website is available to all customers who need technical assistance with a Cisco product or technology that is under warranty or covered by a maintenance contract.
If you have a priority level 3 (P3) or priority level 4 (P4) problem, contact TAC by going to the TAC website http://www.cisco.com/tac.
P3 and P4 level problems are defined as follows:
P3—Your network is degraded. Network functionality is noticeably impaired, but most business operations continue.
P4—You need information or assistance on Cisco product capabilities, product installation, or basic product configuration.
In each of the above cases, use the Cisco TAC website to quickly find answers to your questions.
To register for Cisco.com, go to http://tools.cisco.com/RPF/register/register.do.
If you cannot resolve your technical issue by using the TAC online resources, Cisco.com registered users can open a case online by using the TAC Case Open tool at http://www.cisco.com/tac/caseopen.
If you have a priority level 1 (P1) or priority level 2 (P2) problem, contact TAC by telephone and immediately open a case. To obtain a directory of toll-free numbers for your country, go to http://www.cisco.com/warp/public/687/Directory/DirTAC.shtml.
P1 and P2 level problems are defined as follows:
P1—Your production network is down, causing a critical impact to business operations if service is not restored quickly. No workaround is available.
P2—Your production network is severely degraded, affecting significant aspects of your business operations. No workaround is available.
This chapter describes how to use the SCE platform Command-Line Interface (CLI), its hierarchical structure, authorization levels and its help features. The Command-Line Interface is one of the SCE platform management interfaces.
The CLI is accessed through a Telnet session or directly via the console port on the front panel of the SCE platform. When you enter a Telnet session, you enter as the simplest level of user, in the User Exec mode.
The SCE platform supports up to six concurrent CLI sessions; five sessions initiated by Telnet connection, and one session on the console port.
To obtain a list of commands that are available for each command mode, enter a question mark (?) at the system prompt. You also can obtain a list of keywords and arguments associated with any command using the context-sensitive help feature.
The following table lists commands you can enter to get help that is specific to a command mode, a command, a keyword, or an argument.
Table 1.1. Getting Help
|
Command |
Purpose |
|---|---|
|
abbreviated-command-entry? |
Obtain a list of commands that begin with a particular character string. (Do not leave a space between the command and question mark.) |
|
abbreviated-command-entry<Tab> |
Complete a partial command name. |
|
? |
List all commands available for a particular command mode. |
|
command ? |
List the keywords associated with the specified command. Leave a space between the command and question mark. |
|
command keyword ? |
List the arguments associated with the specified keyword. Leave a space between the keyword and question mark. |
When using the CLI there are two important concepts that you must understand in order to navigate:
Authorization Level — Indicates the level of commands you can execute. A user with a simple authorization level can only view some information in the system, while a higher level administrator can actually make changes to configuration.
This manual documents commands at the User, Viewer, and Admin authorization levels. See CLI Authorization Levels.
Command Hierarchy Level — Provides you with a context for initiating commands. Commands are broken down into categories and you can only execute each command within the context of its category. For example, in order to configure parameters related to the Line Card, you need to be within the LineCard Interface Configuration Mode. See CLI Command Hierarchy.
The following sections describe the available Authorization and Command Hierarchy Levels and how to maneuver within them.
The on-screen prompt indicates both your authorization level and your command hierarchy level, as well as the assigned host name. See Prompt Indications.
Note
Throughout the manual, SCE is used as the sample host name.
The set of all CLI commands is grouped in hierarchical order, according to the type of the commands. The first two levels in the hierarchy are the User Exec and Privileged Exec modes. These are non-configuration modes in which the set of available commands enables the monitoring of the SCE platform, file system operations, and other operations that cannot alter the configuration of the SCE platform.
The next levels in the hierarchy are the Global and Interface configuration modes, which hold a set of commands that control the global configuration of the SCE platform and its interfaces. Any of the parameters set by the commands in these modes should be saved in the startup configuration, such that in the case of a reboot, the SCE platform restores the saved configuration.
The following tableshows the available CLI modes.
Table 1.2. CLI Modes
|
Mode |
Description |
Level |
Prompt indication |
|---|---|---|---|
|
User Exec |
Initial mode with very limited functionality. |
User/ Viewer |
SCE> |
|
Privileged Exec |
General administration; file system manipulations and control of basic parameters that do not change the configuration of the SCE platform. |
Admin |
SCE# |
|
Global Configuration |
Configuration of general system parameters, such as DNS, host name, and time zone. |
Admin |
SCE(config)# |
|
Management Interface Configuration |
Configuration of management interface parameters, such as the Ethernet interface properties and selection of the active port. |
Admin |
SCE(config if)# |
|
Interface Configuration |
Configuration of specific system interface parameters, such as the Line Card, and the Ethernet interfaces. |
Admin |
SCE(config if)# |
|
Line Configuration |
Configuration of Telnet lines, such as an access-list. |
Admin |
SCE(config-line)# |
When you login to the system, you have the User authorization level and enter User Exec mode. Changing the authorization level to Viewer does not change the mode. Changing the authorization level to Admin automatically moves you to Privileged Exec mode. In order to move to any of the configuration modes, you must enter commands specific to that mode.
The list of available commands in each mode can be viewed using the question mark ‘?’ at the end of the prompt.
The figure below, illustrates the hierarchical structure of the CLI modes, and the CLI commands used to enter and exit a mode.
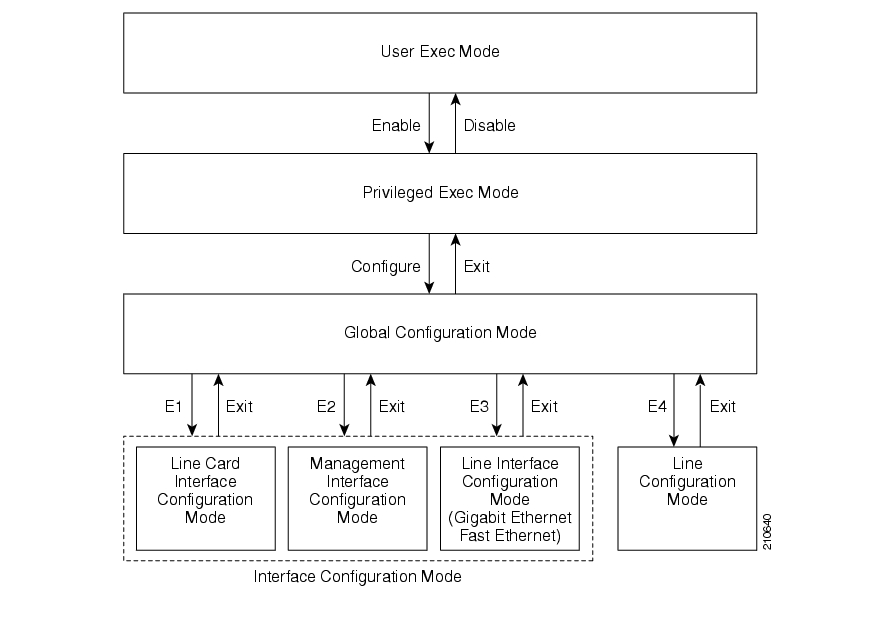
The following commands are used to enter the different configure interface modes and the Line Configuration Mode:
E1
interface LineCard 0E2
interface Mng0/1or0/2(management port, all platforms)E3
interface GigabitEthernet0/1or0/2(line ports, SCE 1000 platform)E3
interface GigabitEthernet0/1,0/2, 0/3,or0/4(line ports, SCE 2000 4xGBE platform)E3
interface FastEthernet0/1,0/2, 0/3, or 0/4E4
line vty 0
Note
Although the system supports up to five concurrent Telnet connections, you cannot configure them separately. This means that any number you enter in the line vty command (0, 1, 2, 3 or 4) will act as a 0 and configure all five connections together.
Note
In order for the auto-completion feature to work, when you move from one interface configuration mode to another, you must first exit the current interface configuration mode (as illustrated in the above figure).
Example:
This example illustrates moving into and out of configuration modes as follows:
Enter global configuration mode
Configure the SCE platform time zone
Enter Mng Interface configuration mode for Mng port 1
Configure the speed of the management interface
Exit the Mng Interface configuration mode to the global configuration mode
Enter the LineCard Interface configuration
Define the link mode.
Exit LineCard Interface configuration mode to the global configuration mode
Exit global configuration mode
SCE#configure
SCE(config)#clock timezone PST -10
SCE(config)#interface Mng 0/1
SCE(config if)#speed 100
SCE(config if)#exit
SCE(config)#interface LineCard 0
SCE(config if)#link-mode all-links forwarding
SCE(config if)#exit
SCE(config)#exit
SCE#The SCE platform has four authorization levels, which represent the user access permissions. When you initially connect to the SCE platform, you automatically have the most basic authorization level, that is User, which allows minimum functionality.
In order to monitor the system, you must have Viewer authorization, while in order to perform administrative functions on the SCE platform, you must have Admin or Root authorization. A higher level of authorization is accessed by logging in with appropriate password, as described in the procedures below.
In each authorization level, all the commands of the lower authorization layers are available in addition to commands that are authorized only to the current level.
Note
This manual covers the functions that can be performed by the Admin level user, unless otherwise noted.
The following CLI commands are related to authorization levels:
enable
disable
Each authorization level has a value (number) corresponding to it. When using the CLI commands, use the values, not the name of the level, as shown in the following table.
Table 1.3. Authorization Levels
|
Level |
Description |
Value |
Prompt |
|---|---|---|---|
|
User |
Password required. This level enables basic operational functionality. |
0 |
> |
|
Viewer |
Password required. This level enables monitoring functionality. All show commands are available to the Viewer authorization level, with the exception of those that display password information. |
5 |
> |
|
Admin |
Password required. For use by general administrators, the Admin authorization level enables configuration and management of the SCE platform. |
10 |
# |
|
Root |
Password required. For use by technical field engineers, the Root authorization level enables configuration of all advanced settings, such as debug and disaster recovery. The Root level is used by technical engineers only and is not documented in this manual. |
15 |
#> |
To change from User to Viewer level authorization:
From the
SCE>prompt, typeenable 5and press Enter.The system prompts for a password by showing the prompt
Password:Type in the password for the Viewer level and press Enter.
Note that the password is an access-level authorization setting, not an individual user password.
The system prompt
SCE>does not change when you move from User to Viewer level.
A telnet session begins with a request for password, and will not continue until the proper user password is supplied. This enhances the security of the system by not revealing its identity to unauthorized people.
To log in with Admin level authorization:
Initiate a telnet connection.
A
Password:prompt appears. Type in the user level password and press Enter.The
SCE>prompt appears.You now have user level authorization.
From the
SCE>prompt, typeenable 10and press Enter.The system prompts for a password by showing the prompt
Password:Type in the password for the Admin level and press Enter.
Note that the password is an access-level authorization setting, not an individual user password.
The system prompt changes to
SCE#to show you are now in Admin level.
Example:
The following example illustrates how to change the authorization level from User to Admin, and then revert back to Viewer. No password is required for moving to a lower authorization level.
SCE>enable 10
Password:  cisco
SCE#disable
SCE>The on-screen prompt indicates your authorization level, your command hierarchy level, and the assigned host name. The structure of the prompt is:
<hostname(mode-indication)level-indication>
Authorization levels are indicated as follows:
|
This prompt... |
Indicates this... |
|---|---|
|
> |
indicates User and Viewer levels |
|
# |
indicates Admin level |
|
#> |
indicates Root level |
Command hierarchy levels are indicated as follows:
|
This command hierarchy... |
Is indicated as... |
|---|---|
|
User Exec |
|
|
Privileged Exec |
|
|
Global Configuration |
|
|
Interface Configuration |
|
|
Line Configuration |
|
Example:
The prompt SCE1(config if)# indicates:
The name of the SCE platform is
SCE1The current CLI mode is Interface configuration mode
The user has Admin authorization level
This section describes how to revert to a previous mode.
To exit from one authorization level to the previous one, use the disable command.
To exit from one mode to another with the Admin authorization level (these are the various configuration modes), use the exit command.
To exit from the Privileged Exec mode and revert to the Viewer mode:
At the
SCE#prompt, typedisable, and press Enter.The
SCE>prompt for the Viewer and User Exec mode appears.
To exit from the Global Configuration Mode:
At the
SCE(config)#prompt, typeexit, and press Enter.The appropriate prompt for the previous level appears.
Example:
The following example shows the system response when you exit the Interface Configuration mode.
SCE(config if)#exit
SCE(config)#The components that are configured by the Interface Configuration Modes are:
Card
LineCard —
Interface LineCard 0The LineCard interface configures the main functionality of viewing and handling traffic on the line.
Ports
Telnet
Line Configuration Mode —
Line vty 0The Line Configuration Mode enables you to configure Telnet parameters.
The SCE platform contains the following physical port interfaces:
Management:
Interface Mng 0/1 or 0/2The Management Interface mode configures the settings for the interface to a remote management console. The two management ports support management interface redundancy.
The following commands are used to configure the management port:
active-port (SCE 2000 platform only)
Fast Ethernet (SCE 2000 4/8xFE):
Interface FastEthernet 0/1, 0/2, 0/3, or 0/4The FastEthernet Interface mode configures the settings for the FastEthernet interface to the Internet traffic on the wire. Each of the four ports can be set individually.
The following commands are used to configure the Fast Ethernet line ports:
Gigabit Ethernet (SCE 1000 platform):
Interface GigabitEthernet 0/1,or0/2The GigabitEthernet Interface mode configures the settings for the GigabitEthernet interface to the Internet traffic on the wire. Each of the two ports can be set individually.
Gigabit Ethernet (SCE 2000 4xGBE platform):
Interface GigabitEthernet 0/1,0/2, 0/3, or 0/4The GigabitEthernet Interface mode configures the settings for the GigabitEthernet interface to the Internet traffic on the wire. Each of the four ports can be set individually.
The following commands are used to configure the Gigabit Ethernet line ports:
Note
You must specify the slot number/interface number when referencing any interface. The slot number is always 0, and the interfaces are numbered as follows: Management Interface: 1,2 Ethernet Line Interfaces: SCE 1000 platform: 1,2 SCE 2000 platform: 1,2,3,4
Before you can configure the parameters for the management interface, you must be in the Mng Interface Configuration Mode.
To enter Mng Interface Configuration Mode, complete the following steps:
To enter Global Configuration Mode, type
configureand press Enter.The
SCE(config)#prompt appears.Type
interface Mng [0/1|0/2]and press Enter.The
SCE(config if)#prompt appears.The system prompt changes to reflect the higher level mode.
The following procedure is for entering Line Card Interface Configuration mode. The procedures for entering the other interfaces are the same except for the interface command as described above and in CLI Command Reference.
To enter LineCard Interface Configuration mode:
To enter Global Configuration Mode, at the
SCE#prompt, typeconfigure, and press Enter.The
SCE(config)#prompt appears.Type
interface LineCard0, and press Enter.The
SCE(config if)#prompt appears.To return to Global Configuration Mode, type
exitand press Enter.The
SCE(config)#prompt appears.To exit Global Configuration Mode, type
exitand press Enter.The
SCE#prompt appears.
To enter the FastEthernet Interface Configuration Mode:
To enter Global Configuration Mode, type
configureand press Enter.The
SCE(config)#prompt appears.For the SCE 2000, type
interface FastEthernet [0/1|0/2|0/3|0/4]and press Enter.The
SCE(config if)#prompt appears.
Example:
The following example shows how to enter Configuration Mode for the FastEthernet Interface number 3.
SCE(config)#interface FastEthernet 0/3
SCE(config if)#To enter the GigabitEthernet Interface Configuration Mode:
To enter Global Configuration Mode, type
configureand press Enter.The
SCE(config)#prompt appears.For the SCE 1000, type
interface GigabitEthernet [0/1|0/2]and press Enter.For the SCE 2000, type
interface GigabitEthernet [0/1|0/2|0/3|0/4]and press Enter.The
SCE(config if)#prompt appears.
Example:
The following example shows how to enter Configuration Mode for the GigabitEthernet Interface number 2.
SCE(config)#interface GigabitEthernet 0/2
SCE(config if)#There are four configuration command modes:
Global configuration mode
Management interface configuration mode
Interface configuration mode
Line configuration mode
When you are in one of these configuration modes, it is possible to execute an EXEC mode command (such as a show command) or a privileged EXEC (such as show running-config) without exiting to the relevant command mode. Use the 'do' command for this purpose.
To execute an exec mode command from a configuration command mode, use the following command:
At the
SCEconfig#(orSCEconfig if#)prompt, typedo<command>.The specified command executes without exiting to the appropriate exec command mode.
Example
The following example shows how to display the running configuration while in interface configuration mode.
SCEconfig if# do show running-configCLI provides context sensitive help. Two types of context sensitive help are supported:
Partial help
Argument help
To obtain a list of commands that begin with a particular character string, enter the abbreviated command entry immediately followed by a question mark (?). This form of help is called partial help, because it lists only the keywords or arguments that begin with the abbreviation you entered.
Example:
The following example illustrates how typing c? displays all available arguments that start with the letter c.
SCE(config)#snmp-server c?Community contactSCE(config)#snmp-server c
To obtain a list of command’s associated keywords or parameters, type a question mark (?) in place of a keyword or parameter on the command line.
Note that if <Enter> is acceptable input, the symbol <cr> represents the Enter key.
Example:
The following example illustrates how to get a list of all arguments or keywords expected after the command snmp-server.
SCE(config)#snmp-server ?
Community	Define community string
Contact		Set system contact
Enable		Enable the SNMP agent
Host   	 	Set traps destination
Location		Set system location
SCE(config)# snmp-server
When asking for help on particular parameter, the system informs you of the type of data that is an accepted legal value. The types of parameters supported are:
|
STRING |
When a String is expected, you can enter any set of characters or digits. If the string has a space as one of its characters, use double-quote (“) marks to enclose the string. |
|
DECIMAL |
Any decimal number. Positive number is assumed, for negative numbers use the “–” symbol. |
|
HEX |
A hexadecimal number; must start with either 0x or 0X. |
Example:
The following example illustrates the use of ? to get help on commands syntax. In this example, you can enter either the word running-config, or any name of a file, after the word copy.
SCE#copy ?
	running-config		Copy running configuration file
	STRING			Source file name
SCE#copyMany CLI commands offer the option of adding the word no before the command to disable the feature controlled by the command or revert it to its default configuration. This notation is shown in the CLI Command Reference as [no] to denote it is optional.
For example, no service telnetd disables the telnet server. Enabling the telnet server is done by typing service telnetd.
CLI maintains a history buffer of the most recent commands you used in the current CLI session for quick retrieval. Using the keyboard, you can navigate through your last commands, one by one, or all commands that start with a given prefix. By default, the system saves the last 30 commands you typed. You can change the number of commands remembered using the history size command.
To use the history functions, use the keys shown in the following table.
Table 1.4. Keyboard Shortcuts for History Functions
|
Arrow |
Shortcut |
Description |
|---|---|---|
|
Up arrow |
Ctrl-P |
Moves cursor to the previous command with the same prefix. |
|
Down arrow |
Ctrl-N |
Moves cursor to the next command with the same prefix as original. |
|
|
Ctrl-L Ctrl-R |
Re-display the current command line. |
The SCE platform has a number of keyboard shortcuts that make it easier to navigate and use the system. The following table shows the keyboard shortcuts available.
You can get a display the keyboard shortcuts at any time by typing help bindings.
Table 1.5. Keyboard Shortcuts
|
Description |
Shortcut Key |
|---|---|
|
Navigational shortcuts |
|
|
Move cursor one character to the right. |
CTRL-F /-> |
|
Move cursor one character to the left. |
CTRL-B /<- |
|
Move cursor one word to the right (forward). |
ESC-F |
|
Move cursor one word to the left (backward. |
ESC-B |
|
Move cursor to the start of the line. |
CTRL-A |
|
Move cursor to the end of the line. |
CTRL-E |
|
Editing shortcuts | |
|
Delete the character where the cursor is located. |
CTRL-D |
|
Delete from the cursor position to the end of the word. |
ESC-d |
|
Delete the character before the current location of the cursor. |
Backspace |
|
Delete the character before the current location of the cursor. |
CTRL-H |
|
Deletes from the cursor position to the end of the line |
CTRL-K |
|
Deletes all characters from the cursor to the beginning of the line |
CTRL-U |
|
Deletes all characters from the cursor to the beginning of the line. (Same functionality as CTRL-U.) |
CTRL-X |
|
Delete the word to the left of the cursor. |
CTRL-W |
|
Recall the last item deleted. |
CTRL-Y |
|
Completes the word when there is only one possible completion. |
<Tab> |
|
Completes the word when there is only one possible completion. (Same functionality as <Tab>.) |
CTRL-I |
The CLI interface features tab completion. When you type in the first letters of a command and type <Tab>, the system automatically fills in the rest of the command or keyword. This feature works only when there is one possible command that could be possible using the starting letters.
Example:
The letters snm followed by <Tab> will be completed to the command snmp-server.
SCE(config)#snm<Tab>
SCE(config)#snmp-server
If you type <Enter> instead of <Tab>, and there is no ambiguity, the system actually carries out the command which would be filled in by the rest of the word.
Example:
The following example displays how the system completes a partial (unique) command for the enable command. Because enable does not require any parameters, the system simply carries out the enable command when the user presses Enter.
SCE>en<Enter>
Password:
SCE#CLI enables saving ftp user name and password to be used in FTP operations—download and upload, per session.
These settings are effective during the current CLI session.
Example:
The following example illustrates how to set FTP password and user name and the use in these settings for getting a file named config.tmp from a remote station using FTP protocol.
SCE#ip ftp password vk
SCE#ip ftp username vk
SCE#copy ftp://@10.1.1.253/h:/config.tmp myconf.txt
connecting 10.1.1.253 (user name vk password vk) to retrieve config.tmp
SCE#Some commands, such as many show commands, may have many lines of output. There are several ways of managing the command output:
Scrolling options — When the command output is too large to be displayed all at once, you can control whether the display scrolls line by line or refreshes the entire screen.
Filtering options — You can filter the output so that output lines are displayed only if they include or exclude a specified expression.
Redirecting to a file — You can send the output to a specified file
The output of some show and dir commands is quite lengthy and cannot all be displayed on the screen at one time. Commands with many lines of output are displayed in chunks of 24 lines. You can choose to scroll the display line by line or refresh the entire screen. At the prompt after any line, you can type one of the following keys for the desired action:
<Enter>– show one more line
<Space> – show 24 more lines (a new chunk)
<g> – Stop prompting for more
<?> – Display a help string showing possible options
Any other key – quit showing the file
You can filter the output of certain commands, such as show, more, and dir, so that output lines are displayed only if they include or exclude a specified expression. The filtering options are as follows:
include — Shows all lines that include the specified text.
exclude — Does not show any lines that include the specified text.
begin — Finds the first line that includes the specified text, and shows all lines starting from that line. All previous lines are excluded.
The syntax of filtered commands is as follows:
<command> | include <expression>
<command> | exclude <expression>
<command> | begin <expression>
The <expression> in these commands is case sensitive.
Example
Following is an example of how to filter the show version command to display only the last part of the output, beginning with the version information.
SCE# show version begin revisionYou can redirect the output of commands, such as show, more, and dir, to a file. When writing the output of these commands to a file, you can specify either of the following options:
redirect — The new output of the command will overwrite the existing contents of the file.
append — The new output of the command will be appended to the existing contents of the file.
The syntax of redirection commands is as follows:
<command> | redirect <file-name><command> | append <file-name>Example
Following is an example of how to do the following:
Filter the
morecommand to display from a csv subscriber file only the gold package subscribers.Redirect that output to a file named current_gold_subscribers. The output should not overwrite existing entries in the file, but should be appended to the end of the file.
SCE#more subscribers_10.10.2004 include gold append current_gold_subscribers
The CLI scripts feature allows you to record several CLI commands together as a script and play it back. This is useful for saving repeatable sequence of commands , such as software upgrade. For example, if you are configuring a group of SCE platforms and you want to run the same configuration commands on each platform, you could create a script on one platform and run it on all the other SCE platforms.
The available script commands are:
script capture script stop script print script runTo create a script:
At the
SCE#prompt, typescript capturesample1.scrwheresample1.scris the name of the script.Perform the actions you want to be included in the script.
Type
script stop.The system saves the script.
Example:
The following is an example of recording a script for upgrading software.
SCE#script capture upgrade.scrSCE#configureSCE(config)#boot system new.pkgVerifying package file...Package file verified OK.SCE(config)#exitSCE#copy running-config startup-configWriting general configuration file to temporary location...Extracting files from‘/tffs0/images/new.pkg’...Verifying package file...Package file verified OK.Device‘/tffs0/’ has 81154048 bytes free, 21447973 bytes are needed for extraction, all is well.Extracting files to temp locations...Renaming temp files...Extracted OK.Backing-up general configuration file...Copy temporary file to final location...SCE#script stopSCE#To run the script recorded above, type:
SCE#script run upgrade.scr
This chapter contains all the CLI commands available on the SCE platform.
Each command description is broken down into the following sub-sections:
|
Command syntax |
The general format of the command. |
|
Description |
Description of what the command does. |
|
Default |
If relevant, the default setting for the command. |
|
Authorization |
The level of user authorization required for using the command. |
|
Mode |
The mode (command line) from which the command can be invoked. |
|
Parameters |
Description of parameters and switches for the command. |
|
Usage guidelines |
Information about when to invoke the command and additional details. |
|
Example |
An illustration of how the command looks when invoked. Because the interface is straightforward, some of the examples are obvious, but they are included for clarity. |
The CLI commands are written in the following format:
command required-parameter [optional-parameter]
[no] is an optional parameter that may appear before the command name.
When typing commands, you may enclose parameters in double-quote marks, and you must do so when there is a space within a parameter name.
Examples are shown in courier style. Bold courier is used to show the commands as you type them and regular
courieris used for system prompts and responses.
Lists all of the commands available for the current command mode. You can also use the ? command to get specific information on a keyword or parameter.
To obtain a list of commands that begin with a particular character string, enter the abbreviated command entry immediately followed by a question mark (?). This form of help is called partial help, because it lists only the keywords or arguments that begin with the abbreviation you entered.
Syntax Description
This command has no arguments or keywords
Defaults
This command has no default settings
Command Modes
All
Usage Guidelines
To list a command’s associated keywords or arguments, enter a question mark (?) in place of a keyword or parameter on the command line. This form of help is called argument help because it lists the keywords or arguments that apply based on the command, keywords, and arguments you have already entered.
Authorization: User
Examples
The following example shows ways of requesting help using the ? wildcard.
SCE(config)#ip ?
default-gateway  Sets the default gateway
domain-lookup    Enables the IP DNS-based host name-to-address translation
domain-name      Define a default domain name
host             Add a host to the host table
name-server      Specify the address of one or more name servers to use for name and address resolution
route            Add IP routing entry
SCE(config)#ip d?
default-gateway  domain-lookup  domain-name
SCE(config)#ip de?
default-gateway
SCE(config)#ip de
Related Commands
Enables TACACS+ accounting.
Use the no form of the command to disable TACACS+ accounting.
aaa accounting commands level default stop-start group tacacs+
no aaa accounting commands level default
Syntax Description
level The privilege level for which to enable the TACACS+ accounting
0: User
5: Viewer
10: Admin
15: Root
Defaults
By default, TACACS+ accounting is disabled.
Command Modes
Global Configuration
Usage Guidelines
If TACACS+ accounting is enabled, the SCE platform sends an accounting message to the TACACS+ server after every command execution. The accounting message is logged in the TACACS+ server for the use of the network administrator.
The start-stop keyword (required) indicates that the accounting message is sent at the beginning and the end (if the command was successfully executed) of the execution of a CLI command.
Authorization: admin
Examples
The following example enables TACACS+ accounting for the admin privilege level (10).
SCE>enable 10
Password:<cisco>
SCE#config
SCE(config)#aaa accounting commands 10 default stop-start group tacacs+
SCE(config)#
Related Commands
aaa authentication enable default
Sets the maximum number of login attempts that will be permitted before a Telnet session is terminated.
aaa authentication attempts login number-of-attempts
Syntax Description
number-of-attempts the maximum number of login attempts that will be permitted before the telnet session is terminated
Defaults
Default number-of-attempts = 3
Command Modes
Global Configuration
Usage Guidelines
The maximum number of login attempts is relevant only for Telnet sessions. From the local console, the number of re-tries is unlimited.
Authorization: admin
Examples
The following example shows how to set the maximum number of logon attempts to five.
SCE>enable 10
Password:<cisco>
SCE#config
product>(config)# aaa authentication attempts login 5
SCE(config)#
Related Commands
aaa authentication accounting commands
Specifies which privilege level authentication methods are to be used, and in what order of preference.
Use the no form of the command to delete the privilege level authentication methods list.
aaa authentication enable default method1 [method2...]
no aaa authentication enable default
Syntax Description
method the privilege level authentication methods to be used. You may specify up to four different methods, in the order in which they are to be used
Defaults
Default privilege level authentication method = enable only
Command Modes
Global Configuration
Usage Guidelines
Use this command to configure "backup" privilege level authentication methods to be used in the event of failure of the primary privilege level authentication method.
The following method options are available:
group tacacs+: Use TACACS+ authentication.
local: Use the local username database for authentication.
enable (default): Use the "enable" password for authentication
none: Use no authentication.
If the privilege level authentication methods list is deleted, the default privilege level authentication method only (enable password) will be used. TACACS+ authentication will not be used.
Authorization: admin
Example
This example shows how to configure privilege level authentication methods.
SCE>enable 10
Password:<cisco>
SCE#config
SCE(config)# aaa authentication enable default group tacacs+ enable none
SCE(config)#
Related Commands
aaa authentication login default
Specifies which login authentication methods are to be used, and in what order of preference.
Use the no form of the command to delete the login authentication methods list.
aaa authentication login default method1 [method2...]
no aaa authentication login default
Syntax Description
method the login authentication methods to be used. You may specify up to four different methods, in the order in which they are to be used
Defaults
Default login authentication method = enable only
Command Modes
Global Configuration
Usage Guidelines
Use this command to configure "backup" login authentication methods to be used in the event of failure of the primary login authentication method.
The following method options are available:
group tacacs+: Use TACACS+ authentication.
local: Use the local username database for authentication.
enable (default): Use the "enable" password for authentication
none: Use no authentication.
If the login authentication methods list is deleted, the default login authentication method only (enable password) will be used. TACACS+ authentication will not be used.
Authorization: admin
Example
This example shows how to configure login authentication methods.
SCE>enable 10
Password:<cisco>
SCE#config
SCE(config)# aaa authentication login default group tacacs+ enable none
SCE(config)#
Related Commands
aaa authentication enable default
Enables the drop-red-packets-by-hardware mode. This improves performance, but prevents the application from being able to count all dropped packets.
Use the no form to disable the drop-red-packets-by-hardware mode, enabling the software to count all dropped packets (at the expense of some loss of performance).
accelerate-packet-drops
no accelerate-packet-drops
Syntax Description
This command has no arguments or keywords.
Defaults
By default, accelerate-packet-drops (the drop-red-packets-by-hardware mode) is enabled.
Command Modes
Interface Linecard Configuration
Usage Guidelines
By default, the SCE platform hardware drops red packets (packets that are marked to be dropped due to BW control criteria). However, this presents a problem for the user who needs to know the number of dropped packets per service.
The user can disable the drop-red-packets-by-hardware mode. The application can then retrieve the number of dropped packets for every flow and provide the user with better visibility into the exact number of dropped packets and their distribution.
Note that counting all dropped packets has a considerable affect on system performance, and therefore, by default, the drop-red-packets-by-hardware mode is enabled.
Authorization: admin
Example
The following example shows how to disable the drop-red-packets-by-hardware mode so that the application can count all dropped packets.
SCE>enable 10
Password:<cisco>
SCE#>config
SCE(config)#interface linecard 0
SCE(config if)#no accelerate-packet-drops
SCE(config if)#
Related Commands
Restricts Telnet server access to those addresses listed in the specified access list.
Use the no form of this command to set the Telnet server to accept access from any IP address.
access-class number in
no access-class number in
Syntax Description
number An access-list number (1–99).
Defaults
By default, no access list is configured (Telnet access is available from any IP address).
Command Modes
Line Configuration Mode
Usage Guidelines
Authorization: admin
Examples
The following are examples of the access-class command:
Example 1
The following example configures an access class for all Telnet lines.
SCE>enable 10
Password:<cisco>
SCE#config
SCE(config)#line vty 0
SCE(config-line)#access-class 1 in
SCE(config-line)#
Example 2
The following example removes an access class for Telnet lines.
SCE>enable 10
Password:<cisco>
SCE#config
SCE(config)#line vty 0
SCE(config-line)#no access-class in
SCE(config-line)#
Related Commands
access-list
Adds an entry to the bottom of the specified access list.
Use the no form of the command to remove an entry from the specified access list.
access-list number permission address
no access-list number
Syntax Description
number An access-list number (1–99).
permission Indicates whether the IP address should be allowed or denied access permission as described in the Valid Permission Values table in the Usage Guidelines..
address Addresses to be matched by this entry as described in the Valid Address Values table in the Usage Guidelines.
Defaults
This command has no default settings.
Command Modes
Global Configuration
Usage Guidelines
The SCE platform can be configured with Access Control Lists (ACLs), which are used to permit or deny incoming connections on any of the management interfaces. An access list is an ordered list of entries, each consisting of the following:
A permit/deny field
An IP address
An optional wildcard “mask” defining an IP address range
The order of the entries in the list is important. The default action of the first entry that matches the connection is used. If no entry in the Access List matches the connection, or if the Access List is empty, the default action is deny.
Table 2.1. Valid Permission Values
|
deny |
Deny access to list member |
|
permit |
Permit access to list member. |
Table 2.2. Valid Address Values
|
any |
All IP addresses are matched by this entry. This is equivalent to specifying the address 0.0.0.0 255.255.255.255 |
|
ip-address |
The IP address or range of IP addresses, matched by this entry. This can be one address in the x.x.x.x format or a range of addresses in the format x.x.x.x y.y.y.y where x.x.x.x specifies the prefix bits common to all IP addresses in the range, and y.y.y.y is a mask specifying the bits that are ignored. In this notation, ‘1’ means bits to ignore. For example, the address 0.0.0.0 255.255.255.255 means any IP address. The address 10.0.0.0 0.1.255.255 means IP addresses from 10.0.0.0 to 10.1.255.255. The address 1.2.3.4 0.0.0.255 means IP addresses from 1.2.3.0 to 1.2.3.255 (A more natural way of expressing the same range is 1.2.3.0 0.0.0.255). |
Authorization: admin
Examples
The following examples illustrate the use of this command.
Example 1
The following example adds entries to the bottom of access-list 1. The first entry permits access to 10.1.1.0 through 10.1.1.255. The second entry denies access to any address. Together this list allows access only to addresses 10.1.1.*.
SCE>enable 10
Password:<cisco>
SCE#config
SCE(config)#access-list 1 permit 10.1.1.0 0.0.0.255
SCE(config)#access-list 1 deny any
SCE(config)#
Example 2
The following example defines access list 2, a list that denies access to all IP addresses in the range: 10.1.2.0 to 10.1.2.255, permits access to all other addresses in the range 10.1.0.0 to 10.1.15.255, and denies access to all other IP addresses. Note that since the first range is contained within the second range, the order of entries is important. If they had been entered in the opposite order, the deny entry would not have any effect.
SCE>enable 10
Password:<cisco>
SCE#config
SCE (config)#access-list 2 deny 10.1.2.0 0.0.0.255
SCE (config)#access-list 2 permit 10.1.0.0 0.0.15.255
SCE(config)#
Related Commands
Specifies which management port is currently active.
active-port
Syntax Description
This command has no arguments or keywords
Defaults
Default Mng port is 0/1.
Command Modes
Mng Interface Configuration
Usage Guidelines
The command must be executed from the Mng interface that is to be defined as the active port, as follows:
Use the interface mng command, specifying the desired port number (0/1 or 0/2) to enter the proper command mode.
Execute the
active-portcommand.
The use of this command varies slightly, depending on whether the management interface is configured as a redundant interface (auto fail-over enabled) or not (auto fail-over disabled)
auto fail-over enabled (automatic mode): the specified port becomes the currently active port, in effect forcing a fail-over action even if a failure has not occurred.
auto fail-over disabled (manual mode): the specified port should correspond to the cabled Mng port, which is the only functional port and therefore must be and remain the active management port
Authorization: admin
Examples
The following example shows how to use this command to configure Mng port 2 as the currently active management port.
SCE>enable 10
Password:<cisco>
SCE#config
SCE(config)#interface mng 0/2
SCE(config-if)#active-port
SCE(config-if)#
Related Commands
Forces the current application replace process to complete and immediately start finalization (killing all old flows).
application slot slot-number replace force completion
Syntax Description
slot-number The number of the identified slot. Enter a value of 0.
Defaults
This command has no default settings.
Command Modes
Privileged EXEC
Usage Guidelines
Authorization: admin
Examples
The following example illustrates how to force the application replace operation to complete immediately.
SCE>enable 10
Password:<cisco>
SCE#application slot 0 replace force completion
SCE#
Related Commands
Defines default thresholds and attack handling action. If a specific attack detector is defined for a particular situation (protocol/attack direction/side), it will override these defaults.
Use the no version of this command to delete the user-defined defaults. The system defaults will then be used.
attack-detector default protocol protocol attack-direction attack-direction side side [action action] [open-flows open-flows] [ddos-suspected-flows ddos-suspected-flows] [suspected-flows-ratio suspected-flows-ratio] [notify-subscriber|dont-notify-subscriber] [alarm|no-alarm]
no attack-detector default protocol protocol attack-direction attack-direction side side [action action] [open-flows open-flows] [ddos-suspected-flows ddos-suspected-flows] [suspected-flows-ratio suspected-flows-ratio]
Syntax Description
protocol TCP, UDP, IMCP, other
attack-direction attack-source, attack-destination, both
side subscriber, network, both
action report, block
open-flows Threshold for concurrently open flows (new open flows per second).
ddos-suspected-flows Threshold for DDoS-suspected flows (new suspected flows per second).
suspected-flows-ratio Threshold for ratio of suspected flow rate to open flow rate.
Defaults
The default values for the default attack detector are
Action = Report
Thresholds — Varies according to the attack type
Subscriber notification = Disabled
Sending an SNMP trap = Disabled
Command Modes
Linecard Interface Configuration
Usage Guidelines
The following arguments must always be specified:
protocol
attack-direction
side
The following arguments are optional:
action
open-flows
ddos-suspected-flows
suspected-flows-ratio
Use the optional keywords as follows:
Use the notify-subscriber keyword to enable subscriber notification. (Use the attack-filter subscriber-notification ports command to configure the port to be used for subscriber notification.)
Use the dont-notify-subscriber keyword to disable subscriber notification.
Use the alarm keyword to enable sending an SNMP trap.
Use the no-alarm keyword to disable sending an SNMP trap.
Use the attack-detector <number> command to configure a specific attack detector.
Authorization: admin
Examples
The following examples illustrate the use of the attack-detector default command:
Example 1:
The following example configures a default attack detector for TCP flows from the attack source.
SCE>enable 10
Password:<cisco>
SCE#config
SCE(config)#interface linecard 0
SCE(config if)#attack-detector default protocol TCP attack-direction attack-source side both action report open-flows 500 ddos-suspected-flows 75 suspected-flows-ratio 50
SCE(config if)#
Example 2:
The following example enables subscriber notification for the specified default attack detector.
SCE>enable 10
Password:<cisco>
SCE#config
SCE(config)#interface linecard 0
SCE(config if)#attack-detector default protocol TCP attack-direction attack-source side both notify-subscriber
SCE(config if)#
Related Commands
Enables the specified attack detector and assigns an access control list (ACL) to it.
attack-detector number access-list access-list
Syntax Description
number The attack detector number.
access-list The number of the ACL containing the IP addresses selected by this detector
Defaults
This command has no default settings.
Command Modes
Linecard Interface Configuration
Usage Guidelines
Use the following commands to define the attack detector and the ACL:
Attack detector: attack-detector <number>
ACL: access-list
Authorization: admin
Examples
The following example enables attack detector number "2", and assigns ACL "8".
SCE>enable 10
Password:<cisco>
SCE#config
SCE(config)#interface linecard 0
SCE(config if)#attack-detector 2 access-list 8
SCE(config if)#
Related Commands
access-list
Configures a specific attack detector for a particular attack type (protocol/attack direction/side) with the assigned number.
Use the attack-detector default form of this command to configure the default attack detector for the specified attack type.
Use the no form of this command to delete the specified attack detector.
Use the default attack-detector form of the command to use the default attack detector configuration for the specified attack detector(s).The all and all-numbered options also disable all numbered attack detectors.
attack-detector <number> protocol (((TCP|UDP) [dest-port (specific|not-specific|both)])|ICMP|other|all) attack-direction (single-side-source|single-side-destination|single-side-both|dual-sided|all) side (subscriber|network|both) [action (report|block)] [open-flows open-flows] [ddos-suspected-flows ddos-suspected-flows] [suspected-flows-ratio suspected-flows-ratio] [notify-subscriber|dont-notify-subscriber] [alarm|no-alarm]
no attack-detector <number>
attack-detector default protocol (((TCP|UDP) [dest-port (specific|not-specific|both)])|ICMP|other|all) attack-direction (single-side-source|single-side-destination|single-side-both|dual-sided|all) side (subscriber|network|both) [action (report|block)] [open-flows open-flows] [ddos-suspected-flows ddos-suspected-flows] [suspected-flows-ratio suspected-flows-ratio] [notify-subscriber|dont-notify-subscriber] [alarm|no-alarm]
no attack-detector default protocol (((TCP|UDP) [dest-port (specific|not-specific|both)])|ICMP|other|all) attack-direction (single-side-source|single-side-destination|single-side-both|dual-sided|all) side (subscriber|network|both)
default attack-detector {all |all-numbered}
default attack-detector <number> protocol (((all | IMCP | other | TCP | UDP) [dest-port (specific|not-specific|both)])|ICMP|other|all) attack-direction (single-side-source|single-side-destination|single-side-both|dual-sided|all) side (subscriber|network|both)
Syntax Description
number Assigned number for attack-detector
protocol TCP, UDP, IMCP, other
destination port {TCP and UDP protocols only): Defines whether the default attack detector applies to specific (port-based) or not specific (port-less) detections.
attack-direction single-side-destination|single-side-both|dual-sided|all
side subscriber, network, both
action report, block
open-flows-rate Threshold for rate of open flows (new open flows per second).
suspected-flows-rate Threshold for for rate of suspected DDoS flows (new suspected flows per second)
suspected-flows-ratio Threshold for ratio of suspected flow rate to open flow rate.
Defaults
The default values for the default attack detector are:
Action = Report
Thresholds = Varies according to the attack type
Subscriber notification = Disabled
Sending an SNMP trap = Disabled
Command Modes
Linecard Interface Configuration
Usage Guidelines
If a specific attack detector is defined for a particular attack type, it will override the configured default attack detector.
The following arguments must always be specified:
protocol
attack-direction
side
The following arguments are optional:
action
open-flows
ddos-suspected-flows
suspected-flows-ratio
Use the appropriate keyword to enable or disable subscriber notification by default:
notify-subscriber: Enable subscriber notification. (Use the attack-filter subscriber-notification ports command to configure the port to be used for subscriber notification.)
dont-notify-subscriber: Disable subscriber notification.
Use the appropriate keyword to enable or disable sending an SNMP trap by default:
alarm: Enable sending an SNMP trap.
no-alarm: Disable sending an SNMP trap.
If the selected protocol is either TCP or UDP, specify whether the destination port is specific, not specific, or both. If the destination port or ports are specific, the specific destination ports are configured using the attack-detector TCP-port-list|UDP-port-list command.
Use the attack-detector command to enable a configured attack detector.
Use the attack-detector default command to configure a default attack detector.
Authorization: admin
Examples
The following examples illustrate the use of the attack-detector <number> command:
Example 1:
The following example configures the attack detector number "2".
SCE>enable 10
Password:<cisco>
SCE#config
SCE(config)#interface linecard 0
SCE(config if)# attack-detector 2 protocol UDP dest-port not-specific attack-direction single-side-destination side both action block open-flows-rate 500 suspected-flows-rate 500 suspected-flows-ratio 50 notify-subscriber alarm
SCE(config if)#
Example 2:
The following example deletes attack detector number "2".
SCE>enable 10
Password:<cisco>
SCE#config
SCE(config)#interface linecard 0
SCE(config if)#no attack-detector 2
SCE(config if)#
Example 3:
The following example disables subscriber notification for attack detector number "2".
SCE>enable 10
Password:<cisco>
SCE#config
SCE(config)#interface linecard 0
SCE(config if)#attack-detector 2 protocol UDP dest-port not-specific attack-direction single-side-destination side both dont-notify-subscriber
SCE(config if)#
Related Commands
attack-detector tcp-port-list|udp-port-list
Defines the list of destination ports for specific port detections for TCP or UDP protocols.
attack-detector <number> (tcp-port-list|udp-port-list) (all|(<port1> [<port2> …]))
Syntax Description
number number of the attack detector for which this list of specific ports is relevant
Defaults
This command has no default settings.
Command Modes
Linecard Interface Configuration
Usage Guidelines
TCP and UDP protocols may be configured for specified ports only (port-based). Use this command to configure the list of specified destination ports per protocol.
Up to 15 different TCP port numbers and 15 different UDP port numbers can be specified.
Configuring a TCP/UDP port list for a given attack detector affects only attack types that have the same protocol (TCP/UDP) and are port-based (i.e. detect a specific destination port). Settings for other attack types are not affected by the configured port list(s).
Specify either TCP-port-list or UDP-port-list.
Use the all keyword to include all ports in the list.
Authorization: admin
Examples
This example shows how to configure the destination port list for the TCP protocol for attack detector #10.
SCE>enable 10
Password:<cisco>
SCE#config
SCE(config)#interface linecard 0
SCE(config if)#attack-detector 10 TCP-port-list 100 101 102 103
SCE(config if)#
Related Commands
Enables specific attack detection for a specified protocol and attack direction.
Use the no form of the command to disable attack detection.
attack-filter [protocol (((TCP|UDP) [dest-port (specific|non-specific|both)])|ICMP|other)] [attack-direction (single-side-source|single-side-destination|single-side-both|dual-sided|all)]
no attack-filter [protocol (((TCP|UDP) [dest-port (specific|non-specific|both)])|ICMP|other)] [attack-direction (single-side-source|single-side-destination|single-side-both|dual-sided|all)]
Syntax Description
protocol TCP, UDP, ICMP, or Other
attack direction: defines whether specific IP detection is enabled or disabled for single sided or dual sided attacks.
destination port (TCP and UDP protocols only): Defines whether specific IP detection is enabled or disabled for port-based (specific) or port-less (non-specific) detections.
Defaults
By default, attack-filter is enabled.
Default protocols = all protocols (no protocol specified)
Default attack direction = all directions
Default destination port = oth port-based and port-less
Command Modes
Linecard Interface Configuration
Usage Guidelines
Specific attack filtering is configured in two steps:
Enabling specific IP filtering for the particular attack type (using this command).
Configuring an attack detector for the relevant attack type (using the attack-detector <number> command). Each attack detector specifies the thresholds that define an attack and the action to be taken when an attack is detected.
In addition, the user can manually override the configured attack detectors to either force or prevent attack filtering in a particular situation (using the attack-filter (Privileged Exec) command).
By default, specific-IP detection is enabled for all attack types. You can configure specific IP detection to be enabled or disabled for a specific, defined situation only, depending on the following options:
For a selected protocol only.
For TCP and UDP protocols, for only port-based or only port-less detections.
For a selected attack direction, either for all protocols or for a selected protocol.
If the selected protocol is either TCP or UDP, specify whether the destination port is specific (port-based), not specific (port-less), or both. If the destination port or ports are specific, the specific destination ports are configured using the attack-detector TCP-port-list|UDP-port-list command.
Authorization: admin
Examples
The following examples illustrate the use of this command.
Example 1
The following example shows how to enable specific, dual-sided attack detection for TCP protocol only.
SCE>enable 10
Password:<cisco>
SCE#config
SCE(config)#interface linecard 0
SCE(config if)#attack-filter protocol TCP dest-port specific attack-direction dual-sided
SCE(config if)#
Example 2
The following example shows how to enable single-sided attack detection for ICMP protocol only.
SCE>enable 10
Password:<cisco>
SCE#config
SCE(config)#interface linecard 0
SCE(config if)#attack-filter protocol ICMP attack-direction single-side-source
SCE(config if)#
Example 3
The following example disables attack detection for all non TCP, UDP, or ICMP protocols.
SCE>enable 10
Password:<cisco>
SCE#config
SCE(config)#interface linecard 0
SCE(config if)#no attack-filter protocol other attack-direction all
SCE(config if)#
Related Commands
The attack-filter command prevents attack filtering for a specified IP address/protocol. If filtering is already in process, it will be stopped.
When attack filtering has been stopped, it remains stopped until explicitly restored by another CLI command (either specific or general). Use the no form of this command to restore attack filtering.
The force-filter keyword forces attack filtering for a specified IP address/protocol. When attack filtering has been forced, it continues until explicitly stopped by another CLI command (either specific or general). Use the no form of this command to stop attack filtering.
attack-filter slot-number ip ip-address protocol protocol attack-direction attack-direction side side [dont-filter]
attack-filter slot-number ip ip-address action action protocol protocol attack-direction attack-direction side side [force-filter]
no attack-filter slot-number [dont-filter] [all]
no attack-filter slot-number [force-filter] [all]
Syntax Description
slot-number The number of the identified slot. Enter a value of 0.
ip-address IP address from which traffic will not be filtered.
action report, block
protocol TCP, UDP, IMCP, other
attack-direction attack-source, attack-destination, both
side subscriber, network, both
Defaults
This command has no default settings.
Command Modes
Privileged EXEC
Usage Guidelines
After configuring the attack detectors, the SCE Platform automatically detects attacks and handles them according to the configuration. However, there are scenarios in which a manual intervention is desired, either for debug purposes, or because it is not trivial to reconfigure the SCE attack-detectors properly.
The user can use the CLI attack filtering commands to do the following:
Prevent/stop filtering of an attack related to a specified IP address
Force filtering of an attack related to a specified IP address
Attack filtering can be prevented for a specified IP address/protocol by executing a dont-filter CLI command. If filtering is already in process, it will be stopped. When attack filtering has been stopped, it remains stopped until explicitly restored by another CLI command (either force-filter or no dont-filter).
Attack filtering can be forced for a specified IP address/protocol. If filtering is already in process, it will be stopped. Forced attack filtering will continue until undone by an explicit CLI command (either no force-filter or dont-filter).
Use the all keyword to restore or stop all filtering.
Authorization: admin
Examples
The following are examples of the attack-filter command:
Example 1:
The following example prevents attack filtering for the specified conditions.
SCE>enable 10
Password:<cisco>
SCE#
SCE#attack-filter 0 ip 10.10.10.10 protocol TCP attack-direction attack-source side both dont-filter
SCE#
Example 2:
The following example restores all attack filtering.
SCE>enable 10
Password:<cisco>
SCE#no attack-filter 0 dont-filter all
SCE#
Example 3:
The following example forces attack filtering.
SCE>enable 10
Password:<cisco>
SCE#attack-filter 0 action block ip 10.10.10.10 protocol TCP attack-direction attack-source side both
SCE#
Example 4:
The following example stops all forced attack filtering.
SCE>enable 10
Password:<cisco>
SCE#no attack-filter 0 force-filter all
SCE#
Related Commands
Specifies a port as subscriber notification port. TCP traffic from the subscriber side to this port will never be blocked by the attack filter, leaving it always available for subscriber notification.
Use the [no] form of this command to remove the port from the subscriber notification port list.
attack-filter subscriber-notification ports port
no attack-filter subscriber-notification ports port
Syntax Description
port Port number. One port can be specified as the subscriber notification port.
Defaults
This command has no default settings.
Command Modes
Linecard Interface Configuration
Usage Guidelines
Use this command to configure the port to be used for subscriber notification as configured using the attack-filter (Linecard Interface Configuration) and attack-detector <number> commands.
Authorization: admin
Examples
The following example specifies port 100 as the subscriber notification port.
SCE>enable 10
Password:<cisco>
SCE#config
SCE(config)#interface linecard 0
SCE(config if)#attack-filter subscriber-notification ports 100
SCE(config if)#
Related Commands
show interface linecard attack-filter (subscriber-notification ports option)
Enables automatic fail-over on the Mng ports.
Use the no form of the command to disable automatic fail-over on the Mng ports.
auto-fail-over
no auto-fail-over
Syntax Description
This command has no arguments or keywords.
Defaults
By default, the auto fail-over mode is enabled.
Command Modes
Interface Management Configuration
Usage Guidelines
This parameter can be configured for either management port, and is applied to both ports with one command.
The automatic mode must be enabled to support management interface redundancy. This mode automatically switches to the backup management link when a failure is detected in the currently active management link.
When the automatic fail-over mode is disabled, by default Mng port 1 is the active port. If Mng port 2 will be the active port, it must be explicitly configured as such (see active-port)
Authorization: admin
Examples
This example shows how to disable the auto fail-over mode.
SCE>enable 10
Password:<cisco>
SCE#config
SCE(config)#interface Mng 0/1
SCE(config if)#no auto-fail-over
SCE(config if)#
Related Commands
Configures the GigabitEthernet interface auto-negotiation mode. Use this command to either enable or disable auto-negotiation. When set to no auto-negotiate, auto-negotiation is always disabled, regardless of the connection mode.
auto-negotiate
no auto-negotiate
default auto-negotiate
Syntax Description
This command has no arguments or keywords.
Defaults
By default, auto-negotiation is:
On for inline connection mode
Off for receive-only connection mode
Command Modes
GigabitEthernet Interface Configuration
Usage Guidelines
Note that auto-negotiation does not work when the SCE platform is connected via an optical splitter (receive-only connection mode).
Authorization: admin
Examples
The following example configures GigabitEthernet line interface #1 (0/1) to perform no auto-negotiation.
SCE_GBE>enable 10
Password:<cisco>
SCE_GBE#config
SCE_GBE(config)#interface GigabitEthernet 0/1
SCE_GBE(config if)#no auto-negotiate
SCE_GBE(config if)#
Related Commands
Sets Ethernet shaping for the FastEthernet or GigabitEthernet line interfaces.
bandwidth bandwidth burst-size burstsize
Syntax Description
bandwidth Bandwidth measured in kbps.
burstsize Burst size in bytes.
Defaults
bandwidth = 100000K (100 Mbps) burst-size = 5000 (5K bytes)
Command Modes
FastEthernet Interface Configuration GigabitEthernet Interface Configuration
Usage Guidelines
This command is valid for a specified FastEthernet or GigabitEthernet line interface only. It must be executed explicitly for each interface.
Use the interface fastethernet or interface gigabitethernet command to access the configuration mode for the desired interface.
Authorization: admin
Examples
The following examples illustrate how to use this command.
Example 1
The following sets bandwidth and burst size for a Fast Ethernet line interface (0/1) of a SCE 2000 4/8xFE.
SCEconfig
SCE(config)#interface FastEthernet 0/1
SCE(config-if)#bandwidth 100000 burstsize 5000
SCE(config-if)#
Example 2
The following sets bandwidth and burst size for a Gigabit Ethernet line interface (0/2) of a SCE 2000 4xGBE or SCE 1000 2xGBE.
SCEconfig
SCE(config)#interface GigabitEthernet 0/2
SCE(config-if)#bandwidth 100000 burstsize 5000
SCE(config-if)#
Related Commands
Blinks a slot LED for visual identification. Use the no form of this command to stop the slot blinking.
blink slot slot-number
no blink slot slot-number
Syntax Description
slot-number The number of the identified slot. Enter a value of 0.
Defaults
Not blinking
Command Modes
Privileged EXEC
Usage Guidelines
Authorization: admin
Examples
The following example configures the SCE platform to stop blinking.
SCE>enable 10
Password:<cisco>
SCE#no blink slot 0
SCE#
Related Commands
Specifies a new package file to install. The SCE platform extracts the actual image file(s) from the specified package file only during the copy running-config startup-config command.
boot system ftp://username[:password]@server-address[:port]/path/source-file destination-file
no boot system
Syntax Description
ftp://…destination-file The ftp site and path of a package file that contains the new firmware. The filename should end with the .pkg extension.
Defaults
This command has no default settings.
Command Modes
Global Configuration
Usage Guidelines
Use this command to upgrade the SCE platform embedded firmware. The package file is verified for the system and checked that it is not corrupted. The actual upgrade takes place only after executing the copy running-config startup-config command and rebooting the SCE platform.
Authorization: admin
Examples
The following example upgrades the system.
SCE>enable 10
Password:<cisco>
SCE#config
SCE(config)#boot system ftp://vk:vk@10.1.1.230/downloads/SENum.pkg.pkg
Verifying package file…
Package file verified OK.
SCE(config)#do copy running-config startup-config
Backing –up configuration file…
Writing configuration file…
Extracting new system image…

Extracted OK.
Related Commands
Sets the system calendar. The calendar is a system clock that continues functioning even when the system shuts down.
calendar set hh:mm:ss day month year
Syntax Description
hh:mm:ss Current local time in hours in 24-hour format, minutes and seconds (HH:MM:SS).
day Current day (date) in the month.
month Current month (by three-letter abbreviated name).
year Current year using a 4-digit number.
Defaults
This command has no default settings.
Command Modes
Privileged EXEC
Usage Guidelines
Always coordinate between the calendar and clock by using the clock read-calendar command after setting the calendar.
Authorization: admin
Examples
The following example sets the calendar to 20 minutes past 10 AM, January 13, 2006, synchronizes the real-time clock to the calendar time, and displays the result.
SCE>enable 10
Password:<cisco>
SCE#calendar set 10:20:00 13 jan 2006
SCE#clock read-calendar
SCE#show calendar
10:20:03  UTC  THU  January  13  2006
SCE#show clock
10:20:05  UTC  THU  January  13  2006
SCE#
Related Commands
Changes the path of the current working directory.
cd new-path
Syntax Description
new-path The path name of the new directory. This can be either a full path or a relative path.
Defaults
This command has no default settings.
Command Modes
Privileged EXEC
Usage Guidelines
The new path should already have been created in the local flash file system.
Authorization: admin
Examples
The following example shows the current directory (root directory) and then changes the directory to the log directory located under the root directory.
SCE>enable 10
Password:<cisco>
SCE#pwd
tffs0
SCE#cd log
SCE#pwd
tffs0:log
SCE#
Related Commands
Deletes all dynamic entries from the ARP cache.
The Address Resolution Protocol (ARP) is a TCP/IP protocol that converts IP addresses to physical addresses. Dynamic entries are automatically added to and deleted from the cache during normal use. Entries that are not reused age and expire within a short period of time. Entries that are reused have a longer cache life.
clear arp-cache
Syntax Description
This command has no arguments or keywords.
Defaults
This command has no default settings
Command Modes
Privileged EXEC
Usage Guidelines
Authorization: admin
Examples
The following example clears the ARP cache.
SCE>enable 10
Password:<cisco>
SCE#clear arp-cache
SCE#
Related Commands
Clears the linecard Interface counters.
clear interface linecard slot-number counters
Syntax Description
slot-number The number of the identified slot. Enter a value of 0.
Defaults
This command has no default settings.
Command Modes
Privileged EXEC
Usage Guidelines
Authorization: admin
Examples
The following example clears the Line-Card 0 counters.
SCE>enable 10
Password:<cisco>
SCE#clear interface linecard 0 counters
SCE#
Related Commands
Clears the specified MPLS VPN counter:
bypassed VPNs
non-VPN-mappings
clear interface linecard slot-number mpls vpn [bypassed-vpns][non-vpn-mappings]
Syntax Description
slot-number The number of the identified slot. Enter a value of 0.
bypassed-VPNs Displays all currently bypassed VPNs, grouped by downstream label
non-VPN-mappings Displays the mappings of upstream labels that belong to non-VPN flows
Defaults
This command has no default settings.
Command Modes
Privileged EXEC
Usage Guidelines
Authorization: admin
Examples
The following example clears the MPLS VPN counter for non-VPN-mappings.
SCE>enable 10
Password:<cisco>
SCE#clear interface linecard 0 mpls vpn non-vpn-mappings
SCE#
Related Commands
no mpls vpn pe-database
Clears all anonymous subscribers in the system.
clear interface linecard slot-number subscriber anonymous all
Syntax Description
slot-number The number of the identified slot. Enter a value of 0.
Defaults
This command has no default settings.
Command Modes
Privileged EXEC
Usage Guidelines
Authorization: admin
Examples
The following example clears all anonymous subscribers.
SCE>enable 10
Password:<cisco>
SCE#clear interface linecard 0 subscriber anonymous all
SCE#
Related Commands
Clears the “total” and “maximum” subscribers database counters.
clear interface linecard slot-number subscriber db counters
Syntax Description
slot-number The number of the identified slot. Enter a value of 0.
Defaults
This command has no default settings.
Command Modes
Privileged EXEC
Usage Guidelines
Authorization: admin
Examples
The following example clears all anonymous subscribers.
SCE>enable 10
Password:<cisco>
SCE#clear interface linecard 0 subscriber db counters
SCE#
Related Commands
Clears the specified traffic counter.
clear interface linecard slot-number traffic-counter name [all]
Syntax Description
slot-number The number of the identified slot. Enter a value of 0.
name Name of the traffic counter to be cleared.
Defaults
This command has no default settings.
Command Modes
Privileged EXEC
Usage Guidelines
Use the all keyword to clear all traffic counters.
Authorization: admin
Examples
The following example clears the traffic counter name counter1.
SCE>enable 10
Password:<cisco>
SCE#clear interface linecard 0 traffic-counter name counter1
SCE#
Related Commands
Clears the VAS health check counters.
Use the all keyword to clear counters for all VAS servers.
clear interface linecard slot-number vas-traffic-forwarding vas server-id number counters health-check
clear interface linecard slot-number vas-traffic-forwarding vas all counters health-check
Syntax Description
slot-number The number of the identified slot. Enter a value of 0.
number ID number of the specified VAS server clear the counters.
Defaults
This command has no default settings.
Command Modes
Privilege Exec
Usage Guidelines
Use the all keyword to clear counters for all VAS servers.
Authorization: admin
Examples
This example illustrates how to clear the health check counters for all VAS servers.
SCE>enable 10
Password:<cisco>
SCE#clear interface linecard 0 vas-traffic-forwarding vas all counters health-check
SCE#
Related Commands
vas-traffic-forwarding vas server-id health-check
show interface linecard vas-traffic-forwarding (To display the VAS health check counters)
Clears the counters for the specified SCMP peer device.
clear scmp name name counters
Syntax Description
name Name of the SCMP peer device.
Defaults
This command has no default settings.
Command Modes
Privileged EXEC
Usage Guidelines
Authorization: admin
Examples
The following example clears the counters for the SCMP peer device named device_1.
SCE>enable 10
Password:<cisco>
SCE#clear scmp name device_1 counters
SCE#
Related Commands
Clears SCE platform logger (user log files). This erases the information stored in the user log files.
When using the counters keyword, it clears the counters of the SCE platform logger (user log files). The counters keep track of the number of info, warning, error and fatal messages.
When using the nv-counters keyword, it clears the non-volatile counters for the entire log or only the specified SCE platform. These counters are not cleared during bootup, and must be cleared explicitly by using this command.
clear logger [device user-file-log|line-attack-file-log] [counters|nv-counters]
Syntax Description
device The device name to be cleared, either user-file-log or line-attack-file-log
Defaults
This command has no default settings.
Command Modes
Privileged EXEC
Usage Guidelines
The users log files have a size limit, with new entries overwriting the oldest entries. Therefore, there is no need to regularly clear the log files. Use this operation when you are certain that the information contained on the logs is irrelevant and might be confusing (For example, when re-installing the system at a new site, whose administrators should not be confused with old information).
Authorization: admin
Examples
The following examples illustrate the use of the clear logger command:
Example 1:
The following example clears the SCE platform user file logs:
SCE>enable 10
Password:<cisco>
SCE#clear logger device User-File-Log
Are you sure?Y
SCE#
Example 2:
The following example clears the SCE platform user log file counters.
SCE>enable 10
Password:<cisco>
SCE#clear logger device User-File-Log counters
Are you sure?Y
SCE#
Example 3:
The following example clears the user log file non-volatile counters.
SCE>enable 10
Password:<cisco>
SCE#clear logger device user-file-log nv-counters
Are you sure?Y
SCE#
Related Commands
Clears the counters for the number of notifications sent to the management agent.
clear management-agent notifications counters
Syntax Description
This command has no arguments or keywords.
Defaults
This command has no default settings
Command Modes
Privileged EXEC
Usage Guidelines
Authorization: admin
Examples
The following example clears the management agent notifications counters.
SCE>enable 10
Password:<cisco>
SCE#clear management-agent notifications counters
SCE#
Related Commands
Clears the RDR formatter counters.
clear rdr-formatter
Syntax Description
This command has no arguments or keywords.
Defaults
This command has no default settings.
Command Modes
Privileged EXEC
Usage Guidelines
Authorization: admin
Examples
The following example clears the RDR-formatter counters.
SCE>enable 10
Password:<cisco>
SCE#clear rdr-formatter
SCE#
Related Commands
Synchronizes clocks by setting the system clock from the calendar.
clock read-calendar
Syntax Description
This command has no arguments or keywords.
Defaults
This command has no default settings.
Command Modes
Privileged EXEC
Usage Guidelines
Authorization: admin
Examples
The following example updates the system clock from the calendar.
SCE>enable 10
Password:<cisco>
SCE#clock read-calendar
SCE#
Related Commands
Manually sets the system clock.
clock set hh:mm:ss day month year
Syntax Description
hh:mm:ss Current local time in hours in 24-hour format, minutes and seconds (HH:MM:SS).
day Current day (date) in the month.
month Current month (by three-letter abbreviated name).
year Current year using a 4-digit number.
Defaults
This command has no default settings.
Command Modes
Privileged EXEC
Usage Guidelines
Always coordinate between the calendar and clock by using the clock update-calendar command after setting the clock.
Authorization: admin
Examples
The following example sets the clock to 20 minutes past 10 PM, January 13, 2006.
SCE>enable 10
Password:<cisco>
SCE#clock set 22:20:00 13 jan 2006
SCE#clock update-calendar
SCE#show clock
22:21:10  UTC  THU  January  13  2006
SCE#show calendar
22:21:18  UTC  THU  January  13  2006
SCE#
Related Commands
Configures the SCE platform to automatically switch to daylight savings time on a specified date, and also to switch back to standard time. In addition, the three-letter time zone code can be configured to vary with daylight savings time if required. (For instance, in the eastern United States, standard time is designated EST, and daylight savings time is designated EDT).
Use the no form of this command to cancel the daylight savings time transitions configuration.
clock summertime
no clock summertime
The format of the command varies somewhat, depending on how the dates for the beginning and end of daylight savings time are determined for the particular location:
recurring: If daylight savings time always begins and ends on the same day every year, (as in the United States):
Use the clock summer-time recurring
The year
not recurring: If the start and end of daylight savings time is different every year, (as in Israel):
Use the clock summer-time
The year
General guidelines for configuring daylight savings time transitions:
Specify the three letter time zone code for daylight savings time.
recurring: specify a day of the month (week#|first|last/day of the week/month).
not recurring: specify a date (month/day of the month/year).
Define two days:
Day1 = beginning of daylight savings time.
Day2 = end of daylight savings time.
In the Southern hemisphere, month2 must be before month1, as daylight savings time begins in the fall and ends in the spring.
Specify the exact time that the transition should occur (24 hour clock).
Time of transition into daylight savings time: according to local standard time.
Time of transition out of daylight savings time: according to local daylight savings time.
For the clock summer-time recurring command, the default values are the United States transition rules:
Daylight savings time begins: 2:00 (AM) on the first Sunday of April.
Daylight savings time ends: 2:00 (AM) on the last Sunday of October.
Syntax Description
zone The 3-letter code for the time zone for daylight savings.
week1/week2 The week of the month on which daylight savings begins (week1) and ends (week2). A day of the week, such as Monday, must also be specified. The week/day of the week is defined for a recurring configuration only. Default: Not used
day1/day2 The day of the week on which daylight savings begins (day1) and ends (day2). For recurrent configuration: day is a day of the week, such as Sunday. Use the keywords first/last to specify the occurrence of a day of the week in a specified month: For example: last Sunday March. For non-recurrent configuration: day is a day in the month, such as 28. Default: day1 = first Sunday, day2 = last Sunday
month1/month2 The month in which daylight savings begins (month1) and ends (ends2).
Default: month1 = April, month2 = October
year1/year2 The year in which daylight savings begins (month1) and ends (ends2). For non -recurring configuration only. Default = not used
time1/time2 The time of day (24-hour clock) at which daylight savings begins (time1) and ends (time2). Required for all configurations.
Default: time1/time2 = 2:00
offset The difference in minutes between standard time and daylight savings time. Default = 60
Defaults
recurring, offset = 60 minutes
By default, the following recurrent time changes are configured:
Daylight savings time begins: 2:00 (AM) on the second Sunday of March.
Daylight savings time ends: 2:00 (AM) on the first Sunday of November.
Command Modes
Global Configuration
Usage Guidelines
Use the recurring keyword to enable subscriber notification.
Use the first/last keywords to specify the occurrence of a day of the week in a specified month: For example: last Sunday March.
Use a specific date including the year for a not recurring configuration. For example: March 29, 2004.
Use week/day of the week/month (no year) for a recurring configuration:
Use first/last occurrence of a day of the week in a specified month. For example: last, Sunday, March (the last Sunday in March).
Use the day of the week in a specific week in a specified month. For example: 4,Sunday, March (the fourth Sunday in March). This would be different from the last Sunday of the month whenever there were five Sundays in the month.
Authorization: admin
Examples
The following examples illustrate the use of the clock summertime command:
Example 1:
The following example shows how to configure recurring daylight savings time for a time zone designated "DST" as follows:
Daylight savings time begins: 0:00 on the last Sunday of March.
Daylight savings time ends: 23:59 on the Saturday of fourth week of November.
Offset = 1 hour (default)
SCE>enable 10
Password:<cisco>
SCE#config
SCE(config)#clock summer-time DST recurring last Sunday March 00:00 4 Saturday November 23:59
SCE(config)#
Example 2:
The following example shows how to configure non-recurring daylight savings time for a time zone designated "DST" as follows:
Daylight savings time begins: 0:00 on April 16, 2005.
Daylight savings time ends: 23:59 October 23, 2005.
Offset = 1 hour (default)
SCE>enable 10
Password:<cisco>
SCE#config
SCE(config)#clock summer-time DST April 16 2005 00:00 October 23 2005 23:59
SCE(config)#
Example 3:
The following example shows how to cancel the daylight savings configuration.
SCE>enable 10
Password:<cisco>
SCE#config
SCE(config)#no clock summer-time
SCE(config)#
Related Commands
Sets the time zone. Use the no version of this command to remove current time zone setting. The purpose of setting the time zone is that the system can correctly interpret time stamps data coming from systems located in other time zones.
clock timezone zone hours [minutes]
no clock timezone
Syntax Description
zone The name of the time zone to be displayed.
hours The hours offset from GMT (UTC). This must be an integer in the range –23 to 23.
minutes The minutes offset from GMT (UTC). This must be an integer in the range of 0 to 59. Use this parameter to specify an additional offset in minutes when the offset is not measured in whole hours.
Defaults
GMT (hours = 0)
Command Modes
Global Configuration
Usage Guidelines
Authorization: admin
Examples
The following example sets the time zone to Pacific Standard Time with an offset of 10 hours behind GMT.
SCE>enable 10
Password:<cisco>
SCE#config
SCE(config)#clock timezone PST –10
SCE(config)#
Related Commands
Synchronizes clocks by setting the calendar from the system clock.
clock update-calendar
Syntax Description
This command has no arguments or keywords.
Defaults
This command has no default settings.
Command Modes
Privileged EXEC
Usage Guidelines
Authorization: admin
Examples
The following example updates the calendar according to the clock.
SCE>enable 10
Password:<cisco>
SCE#clock update-calendar
SCE#
Related Commands
Enables the user to move from Privileged Exec Mode to Configuration Mode.
configure
Syntax Description
This command has no arguments or keywords.
Defaults
This command has no default settings.
Command Modes
Privileged EXEC
Usage Guidelines
After the user enters the configure command, the system prompt changes from <host-name># to <host-name>(config)#, indicating that the system is in Global Configuration Mode. To leave Global Configuration Mode and return to the Privileged Exec Mode prompt, type exit.
Authorization: admin
Examples
The following example enters the Global Configuration Mode.
SCE>enable 10
Password:<cisco>
SCE#configure
SCE(config)#
Related Commands
Sets the connection mode parameters for an SCE 1000 platform.
connection-mode connection-mode on-failure on-failure
Syntax Description
connection-mode inline or receive-only setting.
inline SCE platform is connected in a bump-in-the-wire topology.
receive-only SCE platform is connected in an out-of-line topology using a splitter or switch.
On-failure determines system behavior on failure of the SCE platform. (inline topologies only)
Bypass
cutoff
Defaults
connection mode = inline
Command Modes
Linecard Interface Configuration
Usage Guidelines
Authorization: admin
Examples
The following example sets the connection-mode to inline and the on-failure mode to cutoff.
SCE1000>enable 10
Password:<cisco>
SCE1000#config
SCE1000(config)#interface linecard 0
SCE1000(config if)#connection-mode inline on-failure cutoff
SCE1000(config if)#
Related Commands
Sets the connection mode parameters for an SCE 2000 platform.
connection-mode connection-mode physically-connected-links physically-connected-links Priority Priority On-failure On-failure
Syntax Description
connection mode inline: single SCE platform inline
receive-only: single SCE platform receive-only
inline-cascade: two SCE platforms inline
receive-only-cascade: two SCE platforms receive-only
physically-connected-links The number of the link connected to the SCE platform. (two SCE platform topology only)
link 0
link 1
priority Defines which is the primary SCE platform.(two SCE platform topologies only).
primary
secondary
on-failure Determines system behavior on failure of the SCE platform. (inline topologies only)
bypass
cutoff
Defaults
connection mode = inline
physically-connected-links =link 0
priority = primary
on-failure = bypass
Command Modes
Linecard Interface Configuration
Usage Guidelines
Authorization: admin
Examples
The following example shows how to configure the primary SCE 2000 platform in a two-SCE platform inline topology. Link "0" is connected to this SCE platform, and the behavior of the SCE platform if a failure occurs is “bypass”.
SCE2000>enable 10
Password:<cisco>
SCE2000#config
SCE2000(config)#interface linecard 0
SCE2000(config if)#connection-mode inline-cascade physically-connected-links link-0 priority primary on-failure bypass
SCE2000(config if)#
Related Commands
show interface linecard connection-mode
show interface linecard physically-connected-links (SCE 2000 only)
Copies any file from a source directory to a destination directory on the local flash file system.
copy source-file destination-file
Syntax Description
source-file The name of the original file.
destination-file The name of the new destination file.
Defaults
This command has no default settings.
Command Modes
Privileged EXEC
Usage Guidelines
Both file names should be in 8.3 format, that is, there are a maximum of 8 characters before the period and three characters following it.
Authorization: admin
Examples
The following example copies the local analysis.sli file located in the root directory to the applications directory.
SCE>enable 10
Password:<cisco>
SCE#copy analysis.sli applications/analysis.sli
SCE#
Related Commands
Downloads a file from a remote station to the local flash file system, using FTP.
copy ftp://username[:password]@server-address[:port]/path/source-file destination-file
Syntax Description
username The username known by the FTP server.
password The password of the given username.
server-address The dotted decimal IP address of the FTP server.
port Optional port number on the FTP server.
source-file The name of the source file located in the on the server.
destination-file The name of the file to be saved in the local flash file system. The file should be in 8.3 format, that is 8 digits, dot, then 3 digits.
Defaults
This command has no default settings.
Command Modes
Privileged EXEC
Usage Guidelines
Use the following syntax for remote upload/download using FTP:
ftp://username[:password]@server-address[:port]/path/file
You can configure keyword shortcuts for the copy command using the following commands:
ip ftp password to configure a password shortcut.
ip ftp username to configure a username shortcut.
Authorization: admin
Examples
The following example downloads the ftp.sli file from the host 10.1.1.105 with user name “vk” and password “vk”.
SCE>enable 10
Password:<cisco>
SCE#copy ftp://vk:vk@10.1.1.105/p:/applications/ftp.sli
SCE#
Related Commands
Uploads or downloads a file using passive FTP.
copy-passive source-file ftp://username[:password]@server-address[:port]/path/destination-file [overwrite]
Syntax Description
source-file The name of the source file located in the local flash file system.
username The username known by the FTP server.
password The password of the given username.
server-address The dotted decimal IP address.
port Optional port number on the FTP server.
destination-file The name of the file to be created in the FTP server.
Defaults
This command has no default settings.
Command Modes
Privileged EXEC
Usage Guidelines
Use the following format for remote upload/download using FTP: ftp://username[:password]@serveraddress[:port]/path/file
Use the overwrite keyword to permit the command to overwrite an existing file.
You can configure keyword shortcuts for the copy command using the following commands:
ip ftp password to configure a password shortcut.
ip ftp username to configure a username shortcut.
Authorization: admin
Examples
The following example performs the same operation as the previous copy ftp example using passive FTP.
SCE>enable 10
Password:<cisco>
SCE#copy-passive appl/analysis.sli ftp://myname:mypw@10.1.1.105/p:/applications/analysis.sli
SCE#
Related Commands
Builds a configuration file with general configuration commands called config.txt, which is used in successive boots.
copy running-config startup-config
Syntax Description
This command has no arguments or keywords.
Defaults
This command has no default settings.
Command Modes
Privileged EXEC
Usage Guidelines
This command must be entered to save newly configured parameters, so that they will be effective after a reboot. You can view the running configuration before saving it using the more running-config command.
The old configuration file is automatically saved in the tffs0:system/prevconf directory.
Authorization: admin
Examples
The following example saves the current configuration for successive boots.
SCE>enable 10
Password:<cisco>
SCE#copy running-config startup-config
Backing-up configuration file...
Writing configuration file...
SCE#
Related Commands
Uploads a file to a remote station, using FTP.
copy source-file ftp://username[:password]@server-address[:port]/path/destination-file
Syntax Description
source-file The name of the source file located in the local flash file system.
username The username known by the FTP server.
password The password of the given username.
server-address The dotted decimal IP address.
port Optional port number on the FTP server.
destination-file The name of the file to be created in the FTP server.
Defaults
This command has no default settings.
Command Modes
Privileged EXEC
Usage Guidelines
Use the following format for remote upload/download using FTP: ftp://username[:password]@serveraddress[:port]/path/file
You can configure keyword shortcuts for the copy command using the following commands:
IP ftp passwordto configure a password shortcut.IP ftp userNameto configure a username shortcut.
Authorization: admin
Examples
The following example uploads the analysis.sli file located on the local flash file system to the host 10.1.1.105.
SCE>enable 10
Password:<cisco>
SCE#copy /appl/analysis.sli ftp://myname:mypw@10.1.1.105/p:/applications/analysis.sli
SCE#
Related Commands
Copies the specified source file to the startup-config file.
Use this command to upload a backup configuration file created using the copy startup-config destination-file command.
This is useful in a cascaded solution for copying the configuration from one SCE platform to the other.
copy source-file startup-config
Syntax Description
source-file The name of the backup configuration file.
ftp://user:pass@host/drive:/dir/bckupcfg.txt
/tffs0
Defaults
This command has no default settings.
Command Modes
Privileged EXEC
Usage Guidelines
The source file name should be in 8.3 format, that is, there are a maximum of 8 characters before the period and three characters following it.
Authorization: admin
Examples
The following example shows how to upload a backup configuration file.
SCE>enable 10
Password:<cisco>
SCE#copy ftp://user:pass@host/drive:/dir/bakupcfg.txt startup-config
SCE#
Related Commands
Copies the startup-config file to the specified destination file.
Use this command to create a backup configuration file.
This is useful in a cascaded solution for copying the configuration from one SCE platform to the other. The file created by this command can then be uploaded to the second SCE platform using the copy source-file startup-config command.
copy startup-config destination-file
Syntax Description
destination-file The name of the file to which the configuration is copied.
ftp://user:pass@host/drive:/dir/bckupcfg.txt
/tffs0
Defaults
This command has no default settings.
Command Modes
Privileged EXEC
Usage Guidelines
The destination file name should be in 8.3 format, that is, there are a maximum of 8 characters before the period and three characters following it.
Authorization: admin
Examples
The following example shows how to create a backup configuration file.
SCE>enable 10
Password:<cisco>
SCE#copy startup-config ftp://user:pass@host/drive:/dir/bckupcfg.txt
SCE#
Related Commands
Removes all user-defined subscriber templates from the system. The default template only remains.
default subscriber template all
Syntax Description
This command has no arguments or keywords.
Defaults
This command has no default settings.
Command Modes
LineCard Interface Configuration
Usage Guidelines
Authorization: admin
Examples
The following example removes all user-defined subscriber templates.
SCE>enable 10
Password:<cisco>
SCE#config
SCE(config)#interface LineCard 0
SCE(config if)# default subscriber template all
SCE(config if)#
Related Commands
Deletes a file from the local flash file system.
Use the recursive switch to delete a complete directory and its contents. When used with the recursive switch, the filename argument specifies a directory rather than a file.
delete file-name [/recursive]
Syntax Description
file-name The name of the file or directory to be deleted.
Defaults
This command has no default settings.
Command Modes
Privileged EXEC
Usage Guidelines
Authorization: admin
Examples
The following examples illustrate how to use this command:
Example 1:
The following example deletes the oldlog.txt file.
SCE>enable 10
Password:<cisco>
SCE#delete oldlog.txt
SCE#
Example 2:
The following example deletes the oldlogs directory.
SCE>enable 10
Password:<cisco>
SCE#delete oldlogs /recursive
3 files and 1 directories will be deleted.
Are you sure? y
3 files and 1 directories have been deleted.
SCE#
Related Commands
Displays the files in the current directory.
dir [applications] [-r]
Syntax Description
applications Filters the list of files to display only the application files in the current directory.
-r Includes all files in the subdirectories of the current directory as well as the files in the current directory.
Defaults
This command has no default settings.
Command Modes
Privileged EXEC
Usage Guidelines
Authorization: admin
Examples
The following example displays the files in the current directory (root).
SCE>enable 10
Password:<cisco>
SCE#dir
File list for /tffs0/
512	TUE JAN 01 00:00:00 1980	LOGDBG   		DIR
512	TUE JAN 01 00:00:00 1980	LOG      		DIR
7653 	TUE JAN 01 00:00:00 1980	FTP.SLI
29 	TUE JAN 01 00:00:00 1980	SCRIPT.TXT
512 	TUE JAN 01 00:00:00 1980	SYSTEM    		DIR
SCE#
Related Commands
Moves the user from a higher level of authorization to a lower user level, as illustrated in the following figure.

disable [level]
Syntax Description
level User authorization level (0, 5, 10, 15) as specified in CLI Authorization Levels.
Defaults
This command has no default settings.
Command Modes
Privileged Exec and Viewer
Usage Guidelines
Use this command with the level option to lower the user privilege level. If a level is not specified, it defaults to User mode.
Note that you must exit to the Privileged Exec command mode to use this command.
Authorization: user
Examples
The following example shows how to change from root to admin mode:
SCE>enable 15
Password:<cisco>
SCE#>disable 10
SCE#
Related Commands
Use the 'do' command to execute an EXEC mode command (such as a show command) or a privileged EXEC command (such as show running-config) without exiting to the relevant command mode.
do command
Syntax Description
command command to be executed.
Defaults
This command has no default settings.
Command Modes
All configuration modes
Usage Guidelines
Use this command when in any configuration command mode (global configuration, linecard configuration, or any interface configuration) to execute a user exec or privileged exec command.
Enter the entire command with all parameters and keywords as you would if you were in the relevant command mode.
Authorization: admin
Examples
The following example assumes that the on-failure action of the SCE platform has been changed to 'bypass'. The connection mode configuration is then displayed to verify that the parameter was changed. The do command is used to avoid having to exit to the user exec mode.
SCE>enable 10
Password:<cisco>
SCE#config
SCE(config)#interface linecard 0
SCE(config if)#connection-mode on-failure bypass
SCE(config if)#do show interface linecard 0 connection-mode
Connection mode is inline
slot failure mode is bypass
Redundancy status is standalone
SCE(config if)#
Related Commands
Configures the duplex operation of a FastEthernet Interface (may be either line or management interface).
duplex mode
no duplex
Syntax Description
mode Set to the desired duplex mode:
full: full duplex
half: half duplex
auto: auto-negotiation (do not force duplex on the link)
Defaults
mode = Auto
Command Modes
FastEthernet Interface Configuration
Mng Interface Configuration
Usage Guidelines
Use this command to configure the duplex mode of any Fast Ethernet interface. There are two types of Fast Ethernet interfaces:
Fast Ethernet management interface: The management interfaces on all SCE platforms are Fast Ethernet interfaces.
command mode = Mng Interface Configuration
interface designation = 0/1 or 0/2
Fast Ethernet line interface: Only the SCE 2000 4/8xFE platform has Fast Ethernet line interfaces.
command mode = FastEthernet Interface Configuration
interface designation = 0/1, 0/2, 0/3, or 0/4
If the speed (see speed) of the relevant interface is configured to auto, changing this configuration has no effect.
Authorization: admin
Examples
The following examples illustrate how to use this command.
Example 1
The following example configures line FastEthernet port #3 to half duplex mode.
SCE2000>enable 10
Password:<cisco>
SCE2000FE#config
SCE2000FE(config)#interface FastEthernet 0/3
SCE2000FE(config if)#duplex half
SCE2000FE(config if)#
Example 2
The following example configures management port #2 to auto mode.
SCE>enable 10
Password:<cisco>
SCE#config
SCE(config)#interface mng 0/2
SCE(config if)#duplex auto
SCE(config if)#
Related Commands
Enables the user to access a higher authorization level, as illustrated in the following figure.

enable [level]
Syntax Description
level User authorization level (0, 5, 10, 15) as specified in CLI Authorization Levels.
Defaults
level = admin
Command Modes
User Exec
Usage Guidelines
If a level is not specified, the level defaults to admin authorization, level 10.
Note that you cannot use the enable command from the Privileged Exec or any of the configuration command modes.
Authorization: User
Examples
The following example accesses the administrator authorization level. Note that the prompt changes from SCE> to SCE#, indicating that the privilege is the administrator privilege level.
SCE>enable
Password:<cisco>
SCE#
Related Commands
Configures a password for the specified authorization level, thus preventing unauthorized users from accessing the SCE platform.
Use the no form of the command to disable the password for the specified authorization level.
enable password [Level level] [encryption-type] password
no enable password [Level level]
Syntax Description
level User authorization level (0, 5, 10, 15) as specified in CLI Authorization Levels. If no level is specified, the default is Admin (10).
encryption-type If you want to enter the encrypted version of the password, set the encryption type to 5, to specify the algorithm used to encrypt the password.
password A regular or encrypted password set for the access level. If you specify encryption-type, you must supply an encrypted password.
Defaults
password = cisco
Command Modes
Global Configuration
Usage Guidelines
After the command is entered, any user executing the enable command must supply the specified password.
Passwords must be at least 4 and no more than 100 characters long.
Passwords can contain any printable characters.
Passwords must begin with a letter.
Passwords cannot contain spaces.
Passwords are case-sensitive.
Authorization: admin
Examples
The following example sets a level 10 password as a123*man.
SCE>enable 10
Password:<cisco>
SCE#config
SCE(config)#enable password Level 10 a123*man
SCE(config)#
Related Commands
Removes all current configuration by removing all configuration files.
erase startup-config-all
Syntax Description
This command has no arguments or keywords.
Defaults
This command has no default settings.
Command Modes
Privileged EXEC
Usage Guidelines
The following data is deleted by this command:
General configuration files
Application configuration files
Static party DB files
Management agent installed MBeans
After using this command, the SCE platform should be reloaded immediately to ensure that it returns to the 'factory default' state.
You can use the copy startup-config destination-file command to create a backup of the current configuration before it is deleted.
Authorization: admin
Example
The following example shows how to erase the startup configuration.
SCE>enable 10
Password:<cisco>
SCE#erase startup-config-all
Related Commands
Exits from the current mode to the next "lower" mode, as illustrated in the following figure.

exit
Syntax Description
This command has no arguments and keywords.
Defaults
This command has no default settings.
Command Modes
All
Usage Guidelines
Use this command each time you want to exit a mode. The system prompt changes to reflect the lower-level mode.
Authorization: admin
Examples
The following example exits from the Linecard Interface Configuration Mode to Global Configuration Mode and then to Privileged Exec and Viewer Modes.
SCE>enable 10
Password:<cisco>
SCE#config
SCE(config)#interface linecard 0
SCE(config if)#exit
SCE(config)#exit
SCE#
Related Commands
Specifies the operation mode to be applied after boot resulting from failure. When using the default switch, you do not have to specify the mode.
failure-recovery operation-mode mode
default failure-recovery operation-mode
Syntax Description
mode operational or non-operational. Indicates whether the system will boot as operational or not following a failure.
Defaults
mode = operational
Command Modes
Global Configuration
Usage Guidelines
Authorization: admin
Examples
The following example sets the system to boot as operational after a failure
SCE>enable 10
Password:<cisco>
SCE#config
SCE(config)#failure-recovery operation-mode operational
SCE(config)#
Related Commands
Forces a virtual failure condition, and exits from the failure condition, when performing an application upgrade.
force failure-condition
no force failure-condition
Syntax Description
This command has no arguments or keywords
Defaults
This command has no default settings.
Command Modes
Linecard Interface Configuration
Usage Guidelines
When upgrading the application in a cascaded system, use this command to force failure in the active SCE 2000 platform (see 'System Upgrades' in the Chapter "Redundancy and Fail-Over" in the Cisco Service Control Engine Software Configuration Guide).
Authorization: admin
Examples
The following example forces a virtual failure condition.
SCE>enable 10
Password:<cisco>
SCE#config
SCE(config)#interface linecard 0
SCE(config if)#force failure-condition
SCE(config if)#
Related Commands
Displays information relating to all available CLI commands.
help bindings|tree
Syntax Description
This command has no arguments or keywords.
Defaults
This command has no default settings.
Command Modes
Exec
Usage Guidelines
Use the bindings keyword to print a list of keyboard bindings (shortcut commands).
Use the tree keyword to display the entire tree of all available CLI commands.
Authorization: User
Examples
The following example shows the partial output of the help bindings command.
SCE>help bindingsLine Cursor Movements
---------------------
Ctrl-F /->	Moves cursor one character to the right.
Ctrl-B /<-	Moves cursor one character to the left.
Esc-F		Moves cursor one word to the right.
Esc-B		Moves cursor one word to the left.
Ctrl-A		Moves cursor to the start of the line.
Ctrl-E		Moves cursor to the end of the line.
Esc F 		Moves cursor forward one word.
Esc B		Moves cursor backward one word.
Editing
-------
Ctrl-D		Deletes the character where the cursor is located.
Esc-D		Deletes from the cursor position to the end of the word.
Backspace	Deletes the character before the current location of the cursor.
Ctrl-H 		Deletes the character before the current location of the cursor.
Ctrl-K		Deletes from the cursor position to the end of the line.
Ctrl-U		Deletes all characters from the cursor to the beginning of the line.
Ctrl-X		Deletes all characters from the cursor to the beginning of the line.
Ctrl-W		Deletes the word to the left of the cursor.
Ctrl-Y		Recall the last item deleted.
Help and Operation Features
----------------------------
? Argument help.
<Tab> Toggles between possible endings for the typed prefix.
<Esc><Tab> Displays all the possible arguments backwards.
Ctrl-I <TAB>SCE>
Related Commands
Enables the history feature, that is, a record of the last command lines that executed. Use the no form of this command to disable history.
history
no history
Syntax Description
This command has no arguments or keywords.
Defaults
History is enabled.
Command Modes
Privileged EXEC
Usage Guidelines
Authorization: admin
Examples
The following examples illustrate how to use this command.
Example 1
The following example enables the history feature.
SCE>enable 10
Password:<cisco>
SCE#history
SCE#
Example 2
The following example disables the history feature.
SCE>enable 10
Password:<cisco>
SCE#no history
SCE#
Related Commands
Sets the number of command lines that the system records in the history.
history size size
no history size
Syntax Description
size The number of command lines stored in the history of commands for quick recall.
Defaults
size = 10 lines
Command Modes
Privileged EXEC
Usage Guidelines
The size of the history buffer can be any number from 0-50. Use the [no] form of this command to restore the default size.
Authorization: admin
Examples
The following example sets the history buffer size to 50 command lines.
SCE>enable 10
Password:<cisco>
SCE#history size 50
SCE#
Related Commands
Modifies the name of the SCE platform. The host name is part of the displayed prompt.
hostname host-name
Syntax Description
host-name The new host name. Maximum length is 20 characters.
Defaults
host-name = SCE
Command Modes
Global Configuration
Usage Guidelines
Authorization: admin
Examples
The following example changes the host name to MyHost.
SCE>enable 10
Password:<cisco>
SCE#config
SCE(config)#>hostname MyHost
MyHost(config)#>
Related Commands
Enters FastEthernet Interface Configuration mode to configure a specified Fast Ethernet line interface. This command is supported by the SCE 2000 4/8xFE platform only.
To configure a management port (which is also a Fast Ethernet interface) use the interface Mng command.
interface fastethernet slot-number/interface-number
Syntax Description
slot-number The number of the identified slot. Enter a value of 0.
interface-number The FastEthernet interface number. Enter a value between 1 and 4 to configure one of the line ports for an SCE 2000 4/8xFE platform.
Defaults
This command has no default settings.
Command Modes
Global Configuration
Usage Guidelines
This command is used to configure the line ports (SCE 2000 4/8xFE platform only).
To return to the Global Configuration Mode, type exit.
The system prompt changes to reflect the Fast Ethernet Interface Configuration mode.
Authorization: admin
Examples
The following example enters into FastEthernet Configuration Interface Mode for line port #3.
SCE2000FE>enable 10
Password:<cisco>
SCE2000FE#config
SCE2000FE(config)#interface fastethernet 0/3
SCE2000FE(config if)#
Related Commands
Enters GigabitEthernet Interface Configuration mode to configure a specified Gigabit Ethernet line interface. This command is not supported by the SCE 2000 4/8xFE platform, which has no Gigabit Ethernet interfaces.
To configure a management port, use the interface mng command.
interface gigabitethernet slot-number/interface-number
Syntax Description
slot-number Enter a value of 0.
interface-number The GigabitEthernet line interface number. SCE 2000 4xGBE platform: Enter a value between 1 and 4 SCE 1000 2xGBE platform: Enter a value of either 1 or 2
Defaults
This command has no default settings.
Command Modes
Global Configuration
Usage Guidelines
Use this command to configure the line ports for an SCE 2000 4xGBE or SCE 1000 2xGBE platform. This command is not used for configuring the management ports.
To return to the Global Configuration Mode, type exit.
The SCE 1000 platform uses line ports 1 - 2 and the SCE 2000 platform uses line ports 1 - 4.
The system prompt changes to reflect the GigabitEthernet Interface Configuration mode.
Authorization: admin
Examples
The following example enters into GigabitEthernet Configure Interface Mode to configure line port 1.
SCE>enable 10
Password:<cisco>
SCE#config
SCE(config)#interface gigabitethernet 0/1
SCE(config if)#
Related Commands
Enters Linecard Interface Configuration Mode.
interface linecard slot-number
Syntax Description
slot-number The number of the identified slot. Enter a value of 0.
Defaults
This command has no default settings.
Command Modes
Global Configuration
Usage Guidelines
The system prompt is changed to reflect the Line Card Configuration mode. To return to the Global Configuration Mode, type exit.
Authorization: admin
Examples
The following example enters LineCard Interface Configuration Mode.
SCE(config)#interface linecard 0
SCE(config if)#
Related Commands
Enters Management Interface Configuration mode.
interface mng slot-number/interface-number
Syntax Description
slot-number The number of the identified slot. Enter a value of 0.
interface-number The Management interface number. Enter a value of 1 or 2 to configure the desired Management port.
Defaults
This command has no default settings.
Command Modes
Management Interface Configuration
Usage Guidelines
Use this command to configure the management ports for the SCE platforms.
The system prompt is changed to reflect the Management Interface Interface Configuration mode. To return to the Global Configuration Mode, type exit.
Authorization: admin
Examples
The following example enters into Management Interface Configure Interface Mode.
SCE(config)#interface mng 0/1
SCE(config if)#
Related Commands
Sets the global IP access class. The access list defined here contains the definitions for all IP addresses with permission to access the SCE platform. IP addresses not permitted in this access list cannot access or detect the SCE platform, that is, even a ping command will receive no response if it is not from a permitted IP address.
Use the no form of the command to reset global access to the SCE platform from any IP address.
ip access-class number
no ip access-class
Syntax Description
number The number of the access list (1–99) to use to allow global access to the SCE platform.
Defaults
none (all IP addresses can access the system)
Command Modes
Global Configuration
Usage Guidelines
Authorization: admin
Examples
The following example sets access list 1 as the global access list.
SCE>enable 10
Password:<cisco>
SCE#config
SCE(config)#ip access-class 1
SCE(config)#
Related Commands
access-list
Sets the IP address and subnet mask of the Management Interface.
When both management ports are connected, only one port is active at any given time, while the second management port provides a redundant management interface. In this case, the configured IP address acts as a virtual IP address for the currently active management interface, regardless of which port is the active port.
ip address new-address subnet-mask
Syntax Description
new-address The new IP address.
subnet-mask The network mask for the associated IP network.
Defaults
This command has no default settings.
Command Modes
Mng Interface Configuration
Usage Guidelines
Since this IP address always acts as a virtual IP address for the currently active management port, regardless of which port is the active port, this command can be executed from the Mng Interface Configuration for either management port.
Note
Changing the IP address of the management interface via telnet will result in loss of the telnet connection and inability to reconnect with the interface.
If there is a routing table entry mapped to the old address, but not to the new address, the command may fail.
Authorization: admin
Examples
The following example sets the IP address of the SCE platform to 10.1.1.1 and the subnet mask to 255.255.0.0.
SCE>enable 10
Password:<cisco>
SCE#config
SCE(config)#interface mng 0/1
SCE(config if)#ip address 10.1.1.1 255.255.0.0
SCE(config if)#
Related Commands
Enables IP advertising. If the destination and/or interval is not configured, the default values are assumed.
Use the no version of the command to disable IP advertising.
Use the default version of the command to restore IP advertising destination or interval to the default values.
ip advertising [destination destination] [interval interval]
no ip advertising
default ip advertising [destination | interval]
Syntax Description
destination The IP address of the destination for the ping requests
interval The frequency of the ping requests in seconds
Defaults
By default, IP advertising is disabled
destination = 127.0.0.1
interval = 300 seconds
Command Modes
Global Configuration
Usage Guidelines
Authorization: admin
Examples
The following examples illustrate the use of the ip advertising command:
Example 1:
The following example enables IP advertising, specifying 10.1.1.1 as the destination and an interval of 240 seconds.
SCE>enable 10
Password:<cisco>
SCE#config
SCE(config)#ip advertising destination 10.1.1.1 interval 240
SCE(config)#
Example 2:
The following example restores the IP advertising destination to the default value.
SCE>enable 10
Password:<cisco>
SCE#config
SCE(config)#default ip advertising destination
SCE(config)#
Related Commands
Configures the default gateway for the SCE platform. Use the no form of this command to unset the SCE platform default gateway.
ip default-gateway x.x.x.x
no ip default-gateway
Syntax Description
x.x.x.x The IP address of the default gateway for the SCE platform.
Defaults
This command has no default settings.
Command Modes
Global Configuration
Usage Guidelines
Authorization: admin
Examples
The following example sets the default gateway IP of the SCE platform to 10.1.1.1.
SCE>enable 10
Password:<cisco>
SCE#config
SCE(config)#ip default-gateway 10.1.1.1
SCE(config)#
Related Commands
Enables or disables the domain name lookups.
Use the no form of the command to disable the domain name lookup.
ip domain-lookup
no ip domain-lookup
Syntax Description
This command has no arguments or keywords.
Defaults
By default, domain name lookup is enabled.
Command Modes
Global Configuration
Usage Guidelines
Authorization: admin
Examples
The following examples illustrate how to use this command.
Example 1:
The following example enables the domain lookup.
SCE>enable 10
Password:<cisco>
SCE#config
SCE(config)#ip domain-lookup
SCE(config)#
Example 2:
The following example disables the domain lookup.
SCE>enable 10
Password:<cisco>
SCE#config
SCE(config)#no ip domain-lookup
SCE(config)#
Related Commands
Defines a default domain name. Use the no parameter of this command to remove the current default domain name. When using the no parameter, you do not have to specify the domain name.
ip domain-name domain-name
no ip domain-name
Syntax Description
domain-name The default domain name used to complete host names that do not specify a domain. Do not include the initial period that separates an unqualified name from the domain name.
Defaults
This command has no default settings.
Command Modes
Global Configuration
Usage Guidelines
Authorization: admin
Examples
The following examples illustrate the use of the ip domain-name command:
Example 1:
The following example configures the domain name.
SCE>enable 10
Password:<cisco>
SCE#config
SCE(config)#ip domain-name Cisco.com
SCE(config)#
Example 2:
The following example removes the configured domain name.
SCE>enable 10
Password:<cisco>
SCE#config
SCE(config)#no ip domain-name
SCE(config)#
Related Commands
Use this command to enable the filtering out of IP fragments.
ip filter fragment enable
ip filter fragment disable
Syntax Description
This command has no arguments or keywords.
Defaults
By default, IP fragment filtering is disabled.
Command Modes
Global Configuration
Usage Guidelines
Management security is defined as the capability of the SCE platform to cope with malicious management conditions that might lead to global service failure.
There are two parallel security mechanisms:
Automatic security mechanism — monitors the TCP/IP stack rate at 200 msec intervals and throttles the rate from the device if necessary.
User-configurable security mechanism — accomplished via two IP filters at user-configurable intervals:
IP fragment filter: Drops all IP fragment packets
IP filter monitor: Measures the rate of accepted and dropped packets for both permitted and not-permitted IP addresses.
This command enables the IP fragment filter.
Use the ip filter moniter command to configure the IP filter monitor.
Use the enable keyword to enable IP fragment filtering.
Use the disable keyword to disable IP fragment filtering.
Authorization: admin
Examples
The following example shows how to enable IP fragment filtering.
SCE>enable 10
Password:<cisco>
SCE#config
SCE(config)#ip filter fragment enable
SCE(config)#
Related Commands
Configures the limits for permitted and not-permitted IP address transmission rates.
ip filter monitor {ip_permited | ip_not_permited} low_rate low_rate high_rate high_rate burst burst size
Syntax Description
low_rate lower threshold; the rate in Mbps that indicates the attack is no longer present
high_rate upper threshold; the rate in Mbps that indicates the presence of an attack
burst size duration of the interval in seconds that the high and low rates must be detected in order for the threshold rate to be considered to have been reached
Defaults
low rate = 20 Mbps
high rate = 20 Mbps
burst size = 10 seconds
Command Modes
Global Configuration
Usage Guidelines
Management security is defined as the capability of the SCE platform to cope with malicious management conditions that might lead to global service failure.
There are two parallel security mechanisms:
Automatic security mechanism — monitors the TCP/IP stack rate at 200 msec intervals and throttles the rate from the device if necessary.
User-configurable security mechanism — accomplished via two IP filters at user-configurable intervals:
IP fragment filter: Drops all IP fragment packets
IP filter monitor: Measures the rate of accepted and dropped packets for both permitted and not-permitted IP addresses.
This command configures the IP filter monitor.
Use the ip filter fragment command to enable the IP fragment filter.
Use the ip permitted keyword to apply configured limits to permitted IP addresses.
Use the ip not-permitted keyword to apply configured limits to not-permitted IP addresses.
If neither keyword is used, it is assumed that the configured limits apply to both permitted and not-permitted IP addresses.
Authorization: admin
Examples
The following example shows how to configure the rates for permitted IP addresses.
SCE>enable 10
Password:<cisco>
SCE#config
SCE(config)# ip filter monitor ip permitted low_rate 25 high_rate 30 burst 15
SCE(config)#
Related Commands
Specifies the password to be used for FTP connections for the current session. The system will use this password if no password is given in the copy FTP command.
ip ftp password password
Syntax Description
password The password for FTP connections.
Defaults
Default password is admin
Command Modes
Privileged EXEC
Usage Guidelines
Authorization: admin
Examples
The following example sets the password to be used in the FTP connection to mypw.
SCE>enable 10
Password:<cisco>
SCE#ip ftp password mypw
SCE#
Related Commands
Configures the username for FTP connections for the current session. This username will be used if no username is given in the copy FTP command.
ip ftp username user-name
Syntax Description
user-name The username for FTP connections.
Defaults
Default username is anonymous
Command Modes
Privileged EXEC
Usage Guidelines
Authorization: admin
Examples
The following example sets myname as the username for FTP connections.
SCE>enable 10
Password:<cisco>
SCE#ip ftp username myname
SCE#
Related Commands
Adds a host name and address to the host table.
Use the no form of the command to remove a host name and address from the host table.
ip host hostname ip-address
no ip host hostname [ip-address]
Syntax Description
hostname The host name to be added or removed.
ip-address The host IP address in x.x.x.x format.
Defaults
This command has no default settings.
Command Modes
Global Configuration
Usage Guidelines
Authorization: admin
Examples
The following example adds a host to the host table.
SCE>enable 10
Password:<cisco>
SCE#config
SCE(config)#ip host PC85 10.1.1.1
SCE(config)#
Related Commands
Specifies the address of 1–3 servers to use for name and address resolution. The system maintains a list of up to 3 name servers. If the current list is not empty, this command adds the specified servers to the list. The no option of this command removes specified servers from the current list.
ip name-server server-address1 [server-address2] [server-address3]
no ip name-server
Syntax Description
server-address1 The IP address of the name server.
server-address2 The IP address of an additional name server.
server-address3 The IP address of an additional name server.
Defaults
This command has no default settings.
Command Modes
Global Configuration
Usage Guidelines
Authorization: admin
Examples
The following example adds the DNS 10.1.1.1 and 10.1.1.2 to the configured servers list.
SCE>enable 10
Password:<cisco>
SCE#config
SCE(config)#ip name-server 10.1.1.1 10.1.1.2
SCE(config)#
Related Commands
Configures the parameters for retransmitting unacknowledged messages.
ip radius-client retry limit times [timeout timeout]
Syntax Description
times The maximum number of times the RADIUS client can try unsuccessfully to send a message.
timeout Timeout interval for retransmitting a message, in seconds
Defaults
times = 3
timeout = 5 second
Command Modes
Global Configuration
Usage Guidelines
Due to the unreliable nature of UDP, the RADIUS client retransmits requests to the SCMP peer device if they were not acknowledged within the configured number of seconds. Messages that were not acknowledged can be retransmitted up to the configured maximum number of retries.
The optional timeout parameter limits the time interval for retransmitting a message.
Authorization: admin
Examples
The following example illustrates how to configure the retransmission parameters.
SCE>enable 10
Password:<cisco>
SCE#config
SCE(config)# ip radius-client retry limit 5 timeout 5
SCE(config)#
Related Commands
Adds an IP routing entry to the routing table. Use the no option to remove an IP routing entry from the routing table.
ip route ip-address mask [next-hop]
no ip route prefix mask [next-hop]
no ip route all
Syntax Description
ip-address The IP address of the new entry.
mask The relevant subnet mask.
next-hop The next hop in the route.
Defaults
This command has no default settings.
Command Modes
Global Configuration
Usage Guidelines
All addresses must be in dotted notation.
The next-hop must be within the Management FastEthernet Interface subnet.
Use the all keyword with the no form of the command to remove all IP routing entries from the routing table.
Authorization: admin
Examples
The following examples illustrate the use of the ip route command:
Example 1:
The following example sets the next-hop to 10.1.1.2 for IP addresses in the range 244.50.4.0 to 244.50.4.255.
SCE>enable 10
Password:<cisco>
SCE#config
SCE(config)#ip route 244.50.4.0 255.255.255.0 10.1.1.2
SCE(config)#
Example 2:
The following example removes the entry added in the previous example.
SCE>enable 10
Password:<cisco>
SCE#config
SCE(config)#no ip route 244.50.4.0 255.255.255.0
SCE(config)#
Related Commands
Enables the RPC adapter. Use the no option of this command to disable the RPC adapter.
ip rpc-adapter
no ip rpc-adapter
Syntax Description
This command has no arguments or keywords
Defaults
This command has no default settings.
Command Modes
Global Configuration
Usage Guidelines
Authorization: admin
Examples
The following examples illustrate the use of the ip rpc-adapter command:
Example 1:
The following example enables the RPC adapter.
SCE>enable 10
Password:<cisco>
SCE#config
SCE(config)#ip rpc-adapter
SCE(config)#
Example 2:
The following example disables the RPC adapter.
SCE>enable 10
Password:<cisco>
SCE#config
SCE(config)#no ip rpc-adapter
SCE(config)#
Related Commands
Defines the RPC adapter port. Use the default option to reset the RPC adapter port assignment to the default port of 14374.
ip rpc-adapter port port-number
default ip rpc-adapter port
Syntax Description
port-number The number of the port assigned to the RPC adapter.
Defaults
port number = 14374
Command Modes
Global Configuration
Usage Guidelines
Authorization: admin
Examples
The following examples illustrate the use of the ip rpc-adapter port command:
Example 1:
The following example shows how to configure the RPC interface, specifying 1444 as the RPC adapter port.
SCE>enable 10
Password:<cisco>
SCE#config
SCE(config)#ip rpc-adapter
SCE(config)#ip rpc-adapter port 1444
Example 2:
The following example shows how reset the RPC adapter port.
SCE>enable 10
Password:<cisco>
SCE#config
SCE(config)#default ip rpc-adapter port
Related Commands
Sets the PRPC server security level.
ip rpc-adaptor security-level {full|semi|none}
Syntax Description
full|semi|none
Defaults
default = semi
Command Modes
Global Configuration
Usage Guidelines
Specify the desired PRPC server security level:
full: all PRPC connections require authentication
semi: PRPC connections that supply a user-name and password during connection establishment are authenticated. Connections that do not supply a user-name and password are accepted with no authentication
none: no authentication is performed
Authorization: admin
Examples
The following example illustrates how to set the PRPC server security level.
SCE>enable 10
Password:<cisco>
SCE#configure
SCE(config)#ip rpc-adaptor security-level full
SCE>
Related Commands
Enables the SSH server.
Use the no option to disable the SSH server.
ip ssh
no ip ssh
Syntax Description
This command has no arguments or keywords.
Defaults
This command has no default settings.
Command Modes
Global Configuration
Usage Guidelines
When using an SSH server, you should also do the following:
Generate an SSH key set (ip ssh key). A set of keys must be generated at least once before enabling the SSH server
Assign an ACL to the SSH server (ip ssh access-class)
Authorization: admin
Examples
The following examples illustrate the use of the ip ssh command:
Example 1:
The following example enables the SSH server.
SCE>enable 10
Password:<cisco>
SCE#config
SCE(config)#ip ssh
SCE(config)#
Example 2:
The following example disables the SSH server.
SCE>enable 10
Password:<cisco>
SCE#config
SCE(config)#no ip ssh
SCE(config)#
Related Commands
Assigns an access class list (ACL) to the SSH server, so that access to the SSH server is limited to the IP addresses defined in the ACL. (See access-list.)
Use the no keyword to remove the ACL assignment from the SSH server.
ip ssh access-class access-list-number
no ip ssh access-class
Syntax Description
access-list-number The access list number of an ACL
Defaults
This command has no default settings.
Command Modes
Global Configuration
Usage Guidelines
When using an SSH server, you should also do the following:
Enable the SSH server (ip ssh )
Generate an SSH key set (ip ssh key)
Authorization: admin
Examples
The following examples illustrate how to use this command.
Example 1:
The following example assigns an existing ACL to the SSH server.
SCE>enable 10
Password:<cisco>
SCE#config
SCE(config)#ip ssh access-class 4
SCE(config)#
Example 2:
The following example removes the ACL assignment from the SSH server.
SCE>enable 10
Password:<cisco>
SCE#config
SCE(config)#no ip ssh access-class
SCE(config)#
Related Commands
Generates or removes the SSH key set. A set of keys must be generated at least once before enabling the SSH server.
ip ssh key [generate|remove]
Syntax Description
generate generates a new SSH key set and saves it to non-volatile memory. Key size is always 2048 bits.
remove removes the existing key set.
Defaults
This command has no default settings.
Command Modes
Global Configuration
Usage Guidelines
Each SSH server should define a set of keys (DSA2, RSA2 and RSA1) to be used when communicating with various clients. The key sets are pairs of public and private keys. The server publishes the public key while keeping the private key in non-volatile memory, never transmitting it to SSH clients.
Note that the keys are kept on the tffs0 file system, which means that a person with knowledge of the ‘enable’ password can access both the private and public keys. The SSH server implementation provides protection against eavesdroppers who can monitor the management communication channels of the SCE platform, but it does not provide protection against a user with knowledge of the ‘enable’ password.
When using an SSH server, you should also do the following:
Enable the SSH server (ip ssh )
Assign an ACL to the SSH server (ip ssh access-class)
Authorization: admin
Examples
The following examples illustrate how to use this command.
Example 1:
The following example generates a new SSH key set.
SCE>enable 10
Password:<cisco>
SCE#config
SCE(config)#ip ssh key generate
SCE(config)#
Example 2:
The following example removes the SSH key set,
SCE>enable 10
Password:<cisco>
SCE#config
SCE(config)#ip ssh key remove
SCE(config)#
Related Commands
Configures the recognition of L2TP tunnels and skipping into the internal IP packet. Use the no form of this command to disable tunnel recognition and classify traffic by the external IP address.
ip tunnel L2TP skip
no ip tunnel
Syntax Description
This command has no arguments or keywords
Defaults
By default, IP tunnel recognition is disabled (no ip tunnel).
Command Modes
Linecard Interface Configuration
Usage Guidelines
L2TP is an IP-based tunneling protocol, therefore the system must be specifically configured to recognize the L2TP flows, given the UDP port used for L2TP. The SCE platform can then skip the external IP, UDP, and L2TP headers, reaching the internal IP, which is the actual subscriber traffic. If L2TP is not configured, the system treats the external IP header as the subscriber traffic, thus all the flows in the tunnel are seen as a single flow.
An IP tunnel is mutually exclusive with other tunnel-based classification.
Use the L2TP identify-by command to configure the port number that the LNS and LAC use for L2TP tunnels.
Authorization: admin
Examples
The following example enables recognition of L2TP tunnels.
SCE>enable 10
Password:<cisco>
SCE#config
SCE(config)#interface linecard 0
SCE(config if)#ip tunnel L2TP skip
SCE(config if)#
Related Commands
Configures the port number that the LNS and LAC use for L2TP tunnels.
l2tp identify-by port-number port-number
l2tp identify-by default port
Syntax Description
port-number The port number to be configured for L2TP tunnels.
Defaults
port-number = 1701
Command Modes
Linecard Interface Configuration
Usage Guidelines
Use the default port keyword to replace the user-configured port number with the default port.
Note that if external fragmentation exists in the L2TP environment, it is required to configure a Traffic Rule (see the section "Configuring Traffic Rules and Counters" in the Cisco SCE Software Configuration Guide) that bypasses all IP traffic targeted to either the LNS or LAC IP address. This will make sure that any packets not having the L2TP port indication (i.e. non-first fragments) will not require handling by the traffic processors.
Authorization: admin
Examples
The following example configures port# 1000 as the L2TP port.
SCE>enable 10
Password:<cisco>
SCE#config
SCE(config)#interface linecard 0
SCE(config if)#l2tp identify-by port-number 1000
SCE(config if)#
Related Commands
Enters Line Configuration Mode for Telnet lines, configuring all Telnet lines.
line vty start-number [end-number]
Syntax Description
start-number A number in the range 0-4. The actual number supplied does not matter. All telnet lines will be configured by this command.
end-number A number in the range 0-4. The actual number supplied does not matter. All telnet lines will be configured by this command.
Defaults
This command has no default settings.
Command Modes
Global Configuration
Usage Guidelines
The system prompt changes to reflect the Line Configuration mode. To return to Global Configuration Mode, type exit.
Authorization: admin
Examples
The following example enters the Line Configuration Mode for all lines.
SCE>enable 10
Password:<cisco>
SCE#config
SCE(config)#line vty 0
SCE(config-line)#
Related Commands
Enables/disables the link failure reflection.
link failure-reflection [on-all-ports] [linecard-aware]
no link failure-reflection [linecard-aware-mode]
Syntax Description
on-all-ports Enables reflection of a link failure to all ports
linecard-aware Prevents link failure reflection if the indications are that the failure is in the line card (SCE 2000 4xGBE platforms only)
Defaults
By default, link failure reflection is disabled
Command Modes
Linecard Interface Configuration
Usage Guidelines
Use the on-all-ports keyword to enable reflection of a link failure to all ports
Use the linecard-aware keyword when each link of the SCE 2000 platform (Subscriber-side interface and the corresponding Network-side interface) is connected to a different linecard.
This mode reflects a failure of one port to the other three ports of the SCE 2000, differently, depending on whether the failure appears to be in the SCE platform itself or not, as follows:
One interface of the SCE 2000 is down, indicating a problem with the SCE platform: Link failure is reflected to the other three SCE platform ports.
Two reciprocal ports of the SCE 2000 are down, indicating a problem in the linecard to which the SCE platform is connected and not the interface: No action is taken. This allows the second link in the SCE platform to continue functioning without interruption
Use the no form of this command to disable failure reflection. The on-all-ports keyword is not used in the no form of the command.
Use the no form of this command with the linecard-aware-mode keyword to disable the linecard aware mode, without disabling link failure reflection itself.
Authorization: admin
Example
The following example enables the reflection of a link failure to all ports:
SCE>enable 10
Password:<cisco>
SCE#config
SCE(config)#interface linecard 0
SCE(config if)#link failure-reflection on-all-ports
SCE(config if)#
Related Commands
Configures the link mode. The link mode allows the user to enforce the specified behavior on the link. This may be useful during installation and for debugging the network.
link mode link mode
Syntax Description
link Use this parameter for SCE 2000 platforms only
GBE: GBE1-GBE2
GBE3-GBE4
FE: LINK1
LINK2
all-links
mode Forwarding
Bypass
Cutoff
Sniffing
Defaults
Command Modes
Linecard Interface Configuration
Usage Guidelines
Use the link parameter for the SCE 2000 4xGBE and the SCE 2000 4/8xFE platforms only. Since the SCE 1000 platform has only one link, it is not necessary to specify the link.
Use the all-links keyword to configure the link mode for all links (SCE 2000 platforms only).
The sniffing mode can be configured only for all links (use the all-links keyword).
Authorization: admin
Examples
The following examples illustrate the use of the link mode command:
Example 1:
The following example configures "bypass" as the link mode on the first link for the SCE 2000 GBE platform.
SCE2000GBE>enable 10
Password:<cisco>
SCE2000GBE#config
SCE2000GBE(config)#interface linecard 0
SCE2000GBE(config if)#link mode GBE1-GBE2 bypass
SCE2000GBE(config if)#
Example 2:
The following example configures "forwarding" as the link mode for the SCE 1000 GBE platform.
SCE1000GBE>enable 10
Password:<cisco>
SCE1000GBE#config
SCE1000GBE(config)#interface linecard 0
SCE1000GBE(config if)#link mode forwarding
SCE1000GBE(config if)#
Example 3:
The following example configures "sniffing" as the link mode on all links for the SCE 2000 GBE platform.
SCE2000GBE>enable 10
Password:<cisco>
SCE2000GBE#config
SCE2000GBE(config)#interface linecard 0
SCE2000GBE(config if)#link mode all-links sniffing
SCE2000GBE(config if)#
Related Commands
Adds a message string to the user log files.
logger add-user-message message-text
Syntax Description
message-text The message string you wish to add.
Defaults
This command has no default settings.
Command Modes
Privileged EXEC
Usage Guidelines
Authorization: admin
Examples
The following example adds "testing 123" as the message to the user log files:
SCE>enable 10
Password:<cisco>
SCE#logger add-user-message testing 123
SCE#
Related Commands
Disables or enables the logger device. Available logger devices are:
Line-Attack-File-Log
Statistics-Archive-File-Log
User-File-Log
logger device {line-attack-file-log | statistics-file-log | user-file-log} status
Syntax Description
status enabled or disabled, indicating whether to turn on or off logging.
Defaults
By default,the log devices are enabled.
Command Modes
Global Configuration
Usage Guidelines
Authorization: admin
Examples
The following example disables the User-File-Log device.
SCE>enable 10
Password:<cisco>
SCE#config
SCE(config)#logger device user-file-log disabled
SCE(config)#
Related Commands
Sets the maximum log file size.
logger device user-file-log max-file-size
Syntax Description
size The maximum size for the user log (in bytes).
Defaults
1,000,000 bytes
Command Modes
Global Configuration
Usage Guidelines
Authorization: admin
Examples
The following example configures the maximum size of the User-File-Log device to 65000 bytes.
SCE>enable 10
Password:<cisco>
SCE#config
SCE(config)#logger device user-file-log max-file-size 65000
SCE(config)#
Related Commands
Generates a log file for technical support. Note that this operation may take some time.
logger get support-file filename
Syntax Description
filename Name of the generated log file.
Defaults
This command has no default settings.
Command Modes
Privileged EXEC
Usage Guidelines
Authorization: admin
Examples
The following example generates a log file named tech_sup for technical support.
SCE>enable 10
Password:<cisco>
SCE#logger get support-file tech_sup
SCE#
Related Commands
Outputs the current user log to a target file. The output file name can be a local path, full path, or full ftp path file name.
logger get user-log file-name target-file
Syntax Description
target-file The log file name where the system will write the log file information.
Defaults
This command has no default settings.
Command Modes
Privileged EXEC
Usage Guidelines
Authorization: admin
Examples
The following example retrieves the current user log files.
SCE>enable 10
Password:<cisco>
SCE#logger get user-log file-name ftp://myname:mypw@10.1.1.205/d:/log.txt
SCE#
Related Commands
Logs out of the Command-Line Interface of the SCE platform.
logout
Syntax Description
This command has no arguments or keywords
Defaults
This command has no default settings.
Command Modes
Exec
Usage Guidelines
The system prompts for confirmation of the logout command with 'N'. Type 'Y' to confirm the logout.
Authorization: User
Examples
The following example shows how the user logs out (and confirms the logout).
SCE>enable 10
Password:<cisco>
SCE#config
SCE(config)#exit
SCE>logout
Are you sure? Y
Related Commands
Adds a static IP entry to the MAC resolver database. Use the no form of the command to remove the static IP entry from the data base.
mac-resolver arp ip_address [vlan vlan_tag] mac_address
no mac-resolver arp ip_address [vlan vlan_tag] mac_address
Syntax Description
ip address IP address entry to be added to the database.
vlan tag VLAN tag that identifies the VLAN that carries this IP address (if applicable).
mac address MAC address assigned to the IP address, in xxxx.xxxx.xxxx format.
Defaults
This command has no default settings.
Command Modes
Interface Linecard Configuration
Usage Guidelines
When adding an entry, if a client has previously registered a dynamic entry with the same IP address and VLAN tag, the entry receives the MAC address specified in the CLI command, and the entry is changed to static.
When removing an entry, if an entry has been added both as a dynamic entry and a static entry, it exists in the database as a static entry only (see above). Removing the static configuration changes the entry from a static entry to a dynamic entry and deletes the corresponding user-configured MAC address.
Authorization: admin
Examples
The following example assigns the MAC address 1111.2222.3333 to the IP address 10.20.30.40.
SCE>enable 10
Password:<cisco>
SCE#config
SCE(config)#interface linecard 0
SCE(config if)#mac-resolver arp 10.20.30.40 1111.2222.3333
SCE(config if)#
Related Commands
Enables the SCE subscriber API trouble-shooting logging, which is written to the user-log.
Use the no form of this command to disable SCE subscriber API trouble-shooting logging.
management-agent sce-api logging
no management-agent sce-api logging
Syntax Description
This command has no arguments or keywords
Defaults
By default, the SCE subscriber API trouble-shooting logging is disabled.
Command Modes
Global Configuration
Usage Guidelines
Authorization: admin
Examples
The following example enables SCE subscriber API trouble-shooting logging.
SCE>enable 10
Password:<cisco>
SCE#config
SCE(config)# management-agent sce-api logging
SCE(config)#
Related Commands
Defines the timeout interval for disconnection of an SCE subscriber API client, after which the resources allocated for this client would be released.
management-agent sce-api timeout timeout-interval
Syntax Description
timeout-interval default time in seconds that the client waits before timing out.
Defaults
Default = 300 seconds
Command Modes
Global Configuration
Usage Guidelines
Authorization: admin
Examples
This example shows how to configure a timeout interval of 10 seconds.
SCE>enable 10
Password:<cisco>
SCE#config
product>(config)# management-agent sce-api timeout 10
Related Commands
Specifies a new package file to install for the management agent. The SCE platform extracts the actual image file(s) from the specified package file only during the copy running-config startup-config command.
When using the no version of this command, you do not have to specify the package-file-name.
management-agent system package-file-name
no management-agent system
Syntax Description
package-file-name The name of a package file that contains the new management agent software. The filename should end with the .pkg extension.
Defaults
This command has no default settings.
Command Modes
Global Configuration
Usage Guidelines
Use this command to upgrade the SCE platform management agent. The package file is verified for the system and checked that it is not corrupted. The actual upgrade takes place only after executing the copy running-config startup-config command and rebooting the SCE platform.
Authorization: admin
Examples
The following example upgrades the system with the mng45.pkg package.
SCE>enable 10
Password:<cisco>
SCE#config
SCE(config)#management-agent system mng45.pkg
Verifying package file…
Package file verified OK.
SCE(config)#do copy running-config startup-config
Backing –up configuration file…
Writing configuration file…
Extracting new management agent…

Extracted OK.
Related Commands
Creates a new directory.
mkdir directory-name
Syntax Description
directory-name The name of the directory to be created.
Defaults
This command has no default settings.
Command Modes
Privileged EXEC
Usage Guidelines
Authorization: admin
Examples
The following example creates a new directory named mydir.
SCE>enable 10
Password:<cisco>
SCE#mkdir mydir
SCE#
Related Commands
Displays the contents of a file.
more {file-name | running-config [all-data] | startup-config}
Syntax Description
file-name The name of the file to be displayed.
all data Displays defaults as well as non-default settings (running-config option only)
Defaults
This command has no default settings.
Command Modes
Privileged EXEC
Usage Guidelines
The running-config option displays the running configuration file. You can use the all data switch with this option to see sample usage for many CLI configuration commands.
The startup-config option displays the startup configuration file.
Authorization: admin
Examples
The following sample output displays the contents of the running configuration file.
SCE>enable 10
Password:<cisco>
SCE#more running-config
#This is a general configuration file (running-config).
#Created on 16:48:11  UTC  WED  June  13  2001

cli-type 1
#version 1

service logger


no service password-encryption
enable password level 10 0 “cisco”
enable password level 15 0 “cisco”
service RDR-formatter
no RDR-formatter destination all
RDR-formatter history-size 0
clock timezone UTC 0
ip domain-lookup
no ip domain-name
no ip name-server
service telnetd
FastEthernet 0/0
ip address 10.1.5.120 255.255.0.0
speed auto
duplex auto


exit
ip default-gateway 10.1.1.1
no ip route all

line vty 0 4
no access-class in
timeout 30
exit
SCE#Related Commands
Displays the user log on the CLI console screen.
more user-log
Syntax Description
This command has no arguments or keywords.
Defaults
This command has no default settings.
Command Modes
Privileged EXEC
Usage Guidelines
Authorization: admin
Examples
The following example displays the user log on the CLI console screen.
SCE>enable 10
Password:<cisco>
SCE#more user-log
 <INFO>    | 01/28/97  22:29:22 | CPU #000 | Logger: Task Initialized successfully
Related Commands
Configures the MPLS environment. MPLS labels are supported up to a maximum of 15 labels per packet.
mpls traffic-engineering skip (ignore tunnel, inject unlabeled)
mpls vpn skip (ignore tunnel, inject labeled)
mpls vpn auto-learn (MPLS L3 VPN as subscriber)
default mpls
(When the tunneling information is ignored, the subscriber identification is the subscriber IP of the IP packet carried inside the tunnel.)
Syntax Description
See "Usage Guidelines".
Defaults
By default, Traffic-Engineering skip is enabled.
Command Modes
Linecard Interface Configuration
Usage Guidelines
Use the Traffic-Engineering skip form of the command when all IP addresses are unique, and the MPLS labels may be omitted (a non-MPLS/VPN environment).
Use the VPN skip form of the command when all IP addresses are unique, but MPLS labels are used (an MPLS non-VPN environment).
Use the VPN auto-learn form of the command when the MPLS labels must be read and matched (an MPLS/VPN environment).
Use the default keyword to set the MPLS configuration to the default value.
Authorization: admin
Examples
The following examples illustrate the use of this command.
Example 1
The following example illustrates the use of this command in a non MPLS/VPN environment.
SCE>enable 10
Password:<cisco>
SCE#config
SCE(config)#interface linecard 0
SCE(config if)#mpls traffic-engineering skip
SCE(config if)#
Example 2
The following example illustrates the use of this command in an MPLS/VPN environment.
SCE>enable 10
Password:<cisco>
SCE#config
SCE(config)#interface linecard 0
SCE(config if)#mpls vpn auto-learn
SCE(config if)#
Related Commands
Defines a PE router, with the interface IP address of that PE router. Use the no form of the command to remove a router definition.
mpls vpn pe-id pe-id-ip interface-ip if-ip [vlan vlan-id] [interface-ip if-ip [vlan vlan-id]]
no mpls vpn pe-id pe-id-ip interface-ip if-ip
no mpls vpn pe-id pe-id-ip
Syntax Description
pe-id-ip IP address that identifies the PE router
if-ip Interface IP address for the PE router. This is used for MAC resolution. See "Usage Guidelines" for more information.
vlan-id A VLAN tag can optionally be provided for each interface IP .
Defaults
By default, no PE routers are defined.
Command Modes
Linecard Interface Configuration
Usage Guidelines
Refer to the following guidelines when defining the PE router and its interfaces.
At least one interface IP address must be defined per PE router.
Multiple interface IP addresses may be defined for one PE router.
Only one MAC address is configured per PE router. Therefore, if the PE router has multiple interfaces, some or all of which have the same MAC address, only one interface IP address is configured.
Two interfaces cannot be defined with the same IP address, even if they have different VLAN tags. If such a configuration is attempted, it will simply update the VLAN tag information for the existing PE interface.
Refer to the following guidelines when removing a PE router or its interfaces.
You cannot remove a PE if it retains any MPLS mappings. You must logout the VPN before removing the router it uses.
Removing the last interface of a PE router removes the router as well. Therefore, you must logout the relevant VPN in order to remove the last interface.
Use the no MPLS VPN PE-ID pe-id-ip interface-IP if-ip form of the command to remove an interface from the PE router.
Use the no MPLS VPN PE-ID pe-id-ip form of the command to remove a PE router.
Authorization: admin
Examples
The following examples illustrate the use of this command.
Example 1
The following example illustrates how to define a PE router with two interfaces.
SCE>enable 10
Password:<cisco>
SCE#config
SCE(config)#interface linecard 0
SCE(config if)#mpls vpn pe-id 10.10.10.10 interface-ip 10.10.10.20 interface-ip 10.10.10.30
SCE(config if)#
Example 2
The following example illustrates how to remove the above PE router.
SCE>enable 10
Password:<cisco>
SCE#config
SCE(config)#interface linecard 0
SCE(config if)#no mpls vpn pe-id 10.10.10.10
SCE(config if)#
Related Commands
no mpls vpn pe-database (removes all PE router entries)
Removes all configured PE router enties.
no mpls vpn pe-database
Syntax Description
This command has no arguments or keywords.
Defaults
This command has no default settings.
Command Modes
Linecard Interface Configuration
Usage Guidelines
All MPLS VPNs must be logged out before using this command, since it removes all PE routers.
Authorization: admin
Examples
The following example illustrates the use of this command.
SCE>enable 10
Password:<cisco>
SCE#config
SCE(config)#interface linecard 0
SCE(config if)#no mpls vpn pe-database
SCE(config if)#
Related Commands
Removes a specified subscriber from the system. Use the all form to remove all introduced subscribers.
no subscriber name subscriber-name [mapping upstream-mpls all] no subscriber scmp name scmp-name al no subscriber sm all no subscriber all [with-tunnel-mappings]
Syntax Description
subscriber-name The specific subscriber name to be removed from the system.
scmp-name Name of an SCMP peer device.
Defaults
This command has no default settings.
Command Modes
Linecard Interface Configuration
Usage Guidelines
Use the all with-tunnel-mappings keywords to remove all the subscribers that have VLAN or MPLS/VPN mappings from the SCE platform.
This option allows you to switch out of MPLS/VPN mode when the SM is down.
Note
Usethe with-tunnel-mappings option ONLY when the SCE platform is disconnected from the SM.
Use the mapping upstream-mpls all option to clear the upstream labels learnt for the specified subscriber.
Use the scmp name all option to remove all subscribers managed by the specified SCMP peer device.
Use the sm all option to remove all subscribers managed by the SM.
Authorization: admin
Examples
The following example removes all subscribers.
SCE>enable 10
Password:<cisco>
SCE#config
SCE(config)#interface linecard 0
SCE(config if)# no subscriber all
SCE(config if)#
Related Commands
Removes a specified anonymous subscriber group from the system. Use the ‘all’ form to remove all anonymous subscriber groups.
no subscriber anonymous-group name group-name
no subscriber anonymous-group all
Syntax Description
group-name The anonymous subscriber group to be removed from the system.
Defaults
This command has no default settings.
Command Modes
Linecard Interface Configuration
Usage Guidelines
Authorization: admin
Examples
The following example removes all anonymous subscriber groups.
SCE>enable 10
Password:<cisco>
SCE#config
SCE(config)#interface linecard 0
SCE(config if)# no subscriber anonymous-group all
SCE(config if)
Related Commands
Use this command to remove all existing subscriber mappings from a specified TIR or IP range.
no subscriber mappings included-in tp-ip-range name TP-IP-range-name
no subscriber mappings included-in ip-range IP-range
Syntax Description
TP-IP-range-name Meaningful name assigned to this traffic processor IP range
IP-range IP address and mask length defining the IP range
Defaults
This command has no default settings.
Command Modes
Linecard Interface Configuration
Usage Guidelines
Use the TP-IP-range name parameter to remove all existing subscriber mappings from a specified TIR.
Use the IP-range parameter to remove all existing subscriber mappings from a specified IP range.
Authorization: admin
Examples
The following example removes any existing subscriber mappings from the CTMS1 TIR.
SCE>enable 10
Password:<cisco>
SCE#config
SCE(config)#interface linecard 0
SCE(config if)# no subscriber mappings included-in TP-IP-range name CMTS1
Related Commands
show interface linecard subscriber mapping included-in tp-ip-range
Pings the given host to test for connectivity. The ping program sends a test message (packet) to an address and then awaits a reply. Ping output can help you evaluate path-to-host reliability, delays over the path, and whether the host can be reached or is functioning.
ping host
Syntax Description
host The host name or IP address of a remote station to ping.
Defaults
This command has no default settings.
Command Modes
Privileged EXEC
Usage Guidelines
Authorization: admin
Examples
The following example pings the host 10.1.1.201.
SCE>enable 10
Password:<cisco>
SCE#ping 10.1.1.201
pinging 10.1.1.201 ...
PING 10.1.1.201: 56 data bytes
64 bytes from host (10.1.1.201): icmp_seq=0. time=0. ms
64 bytes from host (10.1.1.201): icmp_seq=1. time=0. ms
64 bytes from host (10.1.1.201): icmp_seq=2. time=0. ms
64 bytes from host (10.1.1.201): icmp_seq=3. time=0. ms
----10.1.1.201 PING Statistics----
4 packets transmitted, 4 packets received, 0% packet loss
round-trip (ms)  min/avg/max = 0/0/0
SCE#
Related Commands
Installs the specified pqi file using the installation options specified (if any). This may take up to 5 minutes.
pqi install file filename [options options]
Syntax Description
filename The filename of the pqi application file to be installed.
options The desired installation options. Use the show pqi file command to display the available installation options.
Defaults
This command has no default settings.
Command Modes
Linecard Interface Configuration
Usage Guidelines
Always run the pqi uninstall file command before installing a new pqi file to prevent accumulation of old files on the disk.
Authorization: admin
Examples
The following example installs the Subscriber Manager anr10015.pqi file. No options are specified.
SCE>enable 10
Password:<cisco>
SCE#config
SCE(config)#interface linecard 0
SCE(config if)#pqi install file anr10015.pqi
SCE(config if)#
Related Commands
Reverses an upgrade of the specified pqi file. This may take up to 5 minutes.
pqi rollback file filename
Syntax Description
filename The filename of the pqi application file to be rolled-back. It must be the pqi file that was last upgraded.
Defaults
This command has no default settings.
Command Modes
Linecard Interface Configuration
Usage Guidelines
Always specify the last pqi file that was upgraded. Use the show pqi last-installed command.
Authorization: admin
Examples
The following example reverses the upgrade for the Subscriber Manager using the anr100155.pqi file.
SCE>enable 10
Password:<cisco>
SCE#config
SCE(config)#interface linecard 0
SCE(config if)#pqi rollback file anr100155.pqi
SCE(config if)#
Related Commands
Uninstalls the specified pqi file. This may take up to 5 minutes.
pqi uninstall file filename
Syntax Description
filename The filename of the pqi application file to be uninstalled. It must be the pqi file that was installed last.
Defaults
This command has no default settings.
Command Modes
Linecard Interface Configuration
Usage Guidelines
Always specify the last pqi file that was installed. Use the show pqi last-installed.
Always run the pqi uninstall command before installing a new pqi file to prevent accumulation of old files on the disk.
Authorization: admin
Examples
The following example uninstalls the Subscriber Manager anr10015.pqi file.
SCE>enable 10
Password:<cisco>
SCE#config
SCE(config)#interface linecard 0
SCE(config if)#pqi uninstall file anr10015.pqi
SCE(config if)#
Related Commands
Upgrades the application using the specified pqi file and the upgrade options specified (if any). This may take up to 5 minutes.
pqi upgrade file filename [options options]
Syntax Description
filename The filename of the pqi application file to be used for the upgrade.
options The desired upgrade options. Use the show pqi file command to display the available options.
Defaults
This command has no default settings.
Command Modes
Linecard Interface Configuration
Usage Guidelines
A given pqi upgrade file is suitable for upgrading only from specific previously installed pqi files. The upgrade procedure checks that an upgrade is possible from the currently installed pqi file. The upgrade procedure will be stopped with an error message if the upgrade is not possible.
When upgrading the application in a cascaded system, use the force failure-condition (SCE 2000 only) command to force failure in the active SCE 2000 platform (see 'System Upgrades' in the Chapter "Redundancy and Fail-Over" in the Cisco Service Control Engine Software Configuration Guide).
Authorization: admin
Examples
The following example upgrades the Subscriber Manager using the anr100155.pqi file. No options are specified.
SCE>enable 10
Password:<cisco>
SCE#config
SCE(config)#interface linecard 0
SCE(config if)#pqi upgrade file anr100155.pqi
SCE(config if)#
Related Commands
Displays the current working directory.
pwd
Syntax Description
This command has no arguments or keywords.
Defaults
This command has no default settings.
Command Modes
Privileged EXEC
Usage Guidelines
Authorization: admin
Examples
The following example shows the current working directory as tffs0.
SCE>enable 10
Password:<cisco>
SCE#pwd
tffs0:
SCE#
Related Commands
Sets the queue shaping.
queue queue-number bandwidth bandwidth burst-size burstsize
Syntax Description
queue-number Queue-number from 1–4, where 4 is the highest priority (fastest). 1=BE, 2, 3=AF, and 4=EF. BE is the best effort queue, that is the lowest priority. EF is the Expedited Forwarding queue, that is the highest priority forwarding. The AF (Assured Forwarding) queues are middle-priority, with 3 being a higher priority queue, that is, packets from queue 3 are transferred faster than those in queue 2.
bandwidth Bandwidth measured in kbps. 0 disables packet transmission from the queue. The maximum bandwidth is determined by the line rate. Bandwidth is set in resolutions of ~140Kbps, that is rounded to the nearest multiple of approximately 140 Kbps.
burstsize Burst size in bytes, from 0–16000000.
Defaults
Bandwidth = 100000K (100 Mbps)
Burst size = 8000 (8K bytes)
Command Modes
FastEthernet Interface Configuration
GigabitEthernet Interface Configuration
Usage Guidelines
This command is valid for a specified FastEthernet or GigabitEthernet line interface only. It must be executed explicitly for each interface.
Use the interface fastethernet or interface gigabitethernet command to access the configuration mode for the desired interface.
Authorization: admin
Examples
The following examples illustrate the use of this command.
Example 1
The following example configures queue shaping for queue 1 for GBE port #4.
SCE>enable 10
Password:<cisco>
SCE#config
SCE(config)#interface GigabitEthernet 0/4
SCE(config if)#queue 1 bandwidth 20000 burstsize 1000
SCE(config if)#
Example 2
The following example configures queue shaping for queue 1 for FE port #2 (SCE 2000 4/8xFE platform only).
SCE2000FE>enable 10
Password:<cisco>
SCE2000FE#config
SCE2000FE(config)#interface fastethernet 0/2
SCE2000FE(config if)#queue 1 bandwidth 20000 burstsize 1000
SCE2000FE(config if)#
Related Commands
Assigns a meaningful name to a category. This category name can then be used in any rdr-formatter command instead of the category number. It also defines the buffer size.
Use the no option of this command to disassociate the name from the category. The name will then not be recognized by any CLI commands.
Use the default form of this command to remove all configuration (name and buffer size).
rdr-formatter category-number [1-4] name category name
no rdr-formatter category-number [1-4] name category name
rdr-formatter category-number [1-4] buffer-size size
default rdr-formatter category-number [1-4] buffer-size
Syntax Description
category name The user-defined name to be assigned to the category.
size Buffer size
Defaults
This command has no default settings.
Command Modes
Global Configuration
Usage Guidelines
Authorization: admin
Examples
The following example assigns the name “prepaid” to Category 1.
SCE>enable 10
Password:<cisco>
SCE#config
SCE(config)#rdr-formatter category-number 1 name prepaid
SCE(config)#
Related Commands
Configures an RDR destination entry. Up to four entries can be configured. Each entry must have a different priority. The entry with the highest priority is used by the RDR formatter, provided that a connection with this destination can be established. This is where the RDR–formatter sends the RDRs it produces.
Use the no form of the command to remove the mappings of an RDR formatter destination to categories. When all categories for a destination are removed, the entire destination is removed.
rdr-formatter destination ip-address port port-number [category {name category name }| {number [1-4]}] [priority priority-value]
no rdr-formatter destination ip-address port port-number [category {name category name}| {number [1-4]}]
no rdr-formatter destination all
Syntax Description
ip-address The destination IP address.
port-number The destination port number.
category (Optional) Use this parameter to assign a priority to a particular category for this destination.
category name (Optional) User-defined name that identifies the category
number (Optional) Use this parameter to identify the category by number (1 to 4).
priority-value The priority of the destination. The priority value may be any number between 1 (lowest) to 100 (highest).
Defaults
This command has no default settings.
Command Modes
Global Configuration
Usage Guidelines
The category may be identified by either name or number.
Assign a high priority to send RDRs from the specified category to this destination. Assign a low priority if RDRs from the specified category should not be sent to this destination.
For the first entry, if no priority is set, the highest priority is automatically assigned.
For all subsequent entries, the priority must be explicitly defined.
It is also possible to assign a different priority to each category for each destination. If no category is specified, the same priority is assigned to all categories for that destination.
Use the all keyword with the no form of the command to remove all of the configured RDR-formatter categories from the specified destination, thus removing the destination itself.
Authorization: admin
Examples
The following examples illustrate the use of the RDR-formatter destination command:
Example 1:
The following example configures an RDR-formatter destination with the default priority (highest) to be used by all categories.
SCE>enable 10
Password:<cisco>
SCE#config
SCE(config)#rdr-formatter destination 10.1.1.205 port 33000
SCE(config)#
Example 2:
The following example configures an RDR-formatter destination for two categories with a different priority for each category. This configuration will send RDRs from category 2 to this destination, but generally not RDRs from category 1.
SCE>enable 10
Password:<cisco>
SCE#config
SCE(config)#rdr-formatter destination 10.1.1.206 port 34000 category number 1 priority 10 category number 2 priority 90
SCE(config)#
Related Commands
Defines the mode in which the RDR formatter will send the RDRs to the destinations.
rdr-formatter forwarding-mode mode
Syntax Description
mode Settings: redundancy, multicast, simple-load-balancing as described in the Valid Mode Settings table in the Usage Guidelines.
Defaults
Default mode = redundancy
Command Modes
Global Configuration
Usage Guidelines
Table 2.3. Valid Mode Settings
|
|
All RDRs are sent only to the primary (active) connection. |
|
|
All RDRs are sent to all destinations. |
|
|
Not currently supported |
Authorization: admin
Examples
The following example sets the RDR formatter mode to “redundancy”.
SCE>enable 10
Password:<cisco>
SCE#config
SCE(config)#rdr-formatter forwarding-mode redundancy
SCE(config)#
Related Commands
Configures the size of the history buffer.
This command is currently not supported.
rdr-formatter history-size size
Syntax Description
size Size of the history buffer in bytes. Must be = 0 only (default)
Defaults
Default size = 0
Command Modes
Global Configuration
Usage Guidelines
Do not change the size of the history buffer from the default value.
Since currently only RDRv1 is supported, the size of the history buffer must be zero bytes, even though the system will accept a command specifying a larger size
Authorization: admin
Examples
Related Commands
Defines the protocol (RDR formatter version) of the RDR formatter.
This command is currently not supported.
rdr-formatter protocol protocol-version
Syntax Description
protocol-version Must be RDRv1
Defaults
Default protocol-version = RDRv1
Command Modes
Global Configuration
Usage Guidelines
Do not change the RDR-formatter protocol version.
Only the default value, RDRv1, is supported.
Authorization: admin
Examples
Related Commands
Configures the amount of time after which an inactive RDR formatter connection will timeout.
This command is currently not supported.
rdr-formatter protocol rdrv2 connection-timeout time
Syntax Description
time Timeout value in seconds.
Defaults
Default time = 10
Command Modes
Global Configuration
Usage Guidelines
This command is currently not supported.
Authorization: admin
Examples
Related Commands
Adds a dynamic RDR mapping to a category or removes one from a category.
Use the no form of this command to remove an existing mapping.
rdr-formatter rdr-mapping (tag-id tag number category-number category number)
no rdr-formatter rdr-mapping (tag-id tag number category-number category number)
Syntax Description
tag number The complete 32 bit value given as an hexadecimal number. The RDR tag must be already configured in the Formatter by the application.
category number Number of the category (1-4) to which to map the RDR tag
Defaults
This command has no default settings.
Command Modes
Global Configuration
Usage Guidelines
The configuration of categories to RDR tags is done by adding and removing mappings. You can add a mapping of RDR tag to a category and remove a mapping, including the default mapping. If the table already contains a mapping with the same tag and category number, an error is issued and nothing is done.
If only one category is left configured for a certain tag, it cannot be removed.
Authorization: admin
Examples
The following examples illustrate how to add and remove mappings, and how to restore default mapping
Example 1
This example shows how to add a mapping to a category.
SCE>enable 10
Password:<cisco>
SCE#config
SCE(config)#rdr-formatter rdr-mapping tag-id 0xf0f0f000 category-number 1
SCE(config)#
Example 2
This example shows how to to restore the default mapping for a specified RDR tag.
SCE>enable 10
Password:<cisco>
SCE#config
SCE(config)#default rdr-formatter rdr-mapping tag-id 0xf0f0f000
SCE(config)#
Related Commands
Reboots the SCE platform.
reload
Warning
In order not to lose the current configuration, use the copy running-config-all startup-config-all command before using the reload command.
Syntax Description
This command has no arguments or keywords.
Defaults
This command has no default settings.
Command Modes
Privileged EXEC
Usage Guidelines
Authorization: admin
Examples
The following example shows backing up of the configuration and performing a system reboot.
SCE>enable 10
Password:<cisco>
SCE#copy running-config-all startup-config-all
SCE#reload
Are you sure? Y
The system is about to reboot, this will end your CLI session
Related Commands
Shuts down the SCE platform, preparing it for being turned off.
reload shutdown
Syntax Description
This command has no arguments or keywords.
Defaults
This command has no default settings.
Command Modes
Privileged EXEC
Usage Guidelines
Use this command to shut down the SCE platform in an orderly manner, before turning it off. After issuing this command, the only way to revive the SCE platform from its power-down state is to turn it off, then back on.
This command can only be issued from the serial CLI console port. When issued during a telnet CLI session, an error message is returned and the command is ignored. This is done to prevent the possibility of shutting it down from a remote location, from which it is not possible to power back up.
Authorization: admin
Examples
The following example shows the shutdown process.
SCE>enable 10
Password:<cisco>
SCE#reload shutdown
You are about to shut down the system.
The only way to resume system operation after this
is to cycle the power off, and then back on.
Continue?
Y
IT IS NOW SAFE TO TURN THE POWER OFF.
Related Commands
Changes the file name to the specified name.
rename existing-file-name new-file-name
Syntax Description
existing-file-name The original name of the file.
new-file-name The new name of the file.
Defaults
This command has no default settings.
Command Modes
Privileged EXEC
Usage Guidelines
Authorization: admin
Examples
The following example changes the name of file test1.pkg to test3.pkg.
SCE>enable 10
Password:<cisco>
SCE#rename test1.pkg test3.pkg
SCE#
Related Commands
Removes an empty directory.
To remove a directory that is not empty, use the delete command with the recursive switch.
rmdir directory-name
Syntax Description
directory-name The name of the directory to be removed.
Defaults
This command has no default settings.
Command Modes
Privileged EXEC
Usage Guidelines
You can only remove an empty directory. Use the dir command to verify that no files are listed in this directory.
Authorization: admin
Examples
The following example deletes the code directory.
SCE>enable 10
Password:<cisco>
SCE#rmdir code
SCE#
Related Commands
Enables the Service Control Management Protocol functionality.
Use the no form of the command to disable the SCMP.
scmp
no scmp
Syntax Description
This command has no arguments or keywords
Defaults
By default, SCMP is disabled.
Command Modes
Global Configuration
Usage Guidelines
SCMP is a protocol by which an SCE platform communicates with peers such as Cisco routers running ISG to manage subscriber sessions.
SCMP performs the following functions:
Manages the connection status to all SCMP peer devices
Encodes and decodes the SCMP messages
Order northbound messages per subscriber
When the SCMP is disabled, all subscribers provisioned via this interface are removed.
Authorization: admin
Examples
The following example illustrates how to disable the SCMP.
SCE>enable 10
Password:<cisco>
SCE#config
SCE(config)#no scmp
SCE(config)#
Related Commands
scmp subscriber force-single-sce
scmp subscriber id append-to-guid
scmp subscriber send-session-start
no subscriber (use the scmp name scmp-name all option to remove subscribers managed by a specified SCMP peer device)
Defines interval between keep-alive messages to the SCMP peer device.
scmp keepalive-interval interval
Syntax Description
interval Interval between keep-alive messages from the SCE platform to the SCMP peer device.
Defaults
interval = 5 seconds
Command Modes
Global Configuration
Usage Guidelines
The SCE platform sends keep-alive messages to all connected SCMP peer device at the defined interval.
If a response is received within the defined interval, the keep-alive time-stamp is updated.
If a response is not received within the defined interval, the connection is assumed to be down; the connection state is changed to not-connected, and the SCMP begins attempts to reconnect.
Authorization: admin
Examples
The following example illustrates how to define the SCMP keepalive message interval.
SCE>enable 10
Password:<cisco>
SCE#configure
SCE(config)#scmp keepalive-interval 10
SCE(config)#
Related Commands
Defines the loss of sync timeout interval; that is the amount of time between loss of connection between the SCE platform and an SCMP peer device and the loss-of-sync event.
scmp loss-of-sync-timeout interval
Syntax Description
interval Loss of sync timeout interval in seconds
Defaults
interval = 90 seconds
Command Modes
Global Configuration
Usage Guidelines
If the connection between an SCE platform and an SCMP peer device fails, a timer starts. If the configured loss of sync timeout interval is exceeded, the connection is assumed to be not-in-sync, a loss-of-sync event occurs, and the following actions are performed:
connection status is set to not-in-sync
all messages are removed from the SCMP buffers
all subscribers associated with the SCMP peer device are removed
Authorization: admin
Examples
The following example illustrates how to define loss of sync timeout interval.
SCE>enable 10
Password:<cisco>
SCE#config
SCE(config)# scmp loss-of-sync-timeout 120
SCE(config)#
Related Commands
Adds an SCMP peer device.
Use the no form of the command to delete the specified SCMP peer device.
scmp name name radius host-name secret secret [auth-port auth-port# acct-port acct-port#]
no scmp name name
Syntax Description
name Name of the SCMP peer device
host-name IP address or name of the RADIUS host
secret RADIUS shared secret
auth-port# authorization port number
acct-port# accounting port number
Defaults
Default: Ports configuration as specified in RFC #2865 and RFC #2866
Authentication port = 1812
Accounting port = 1813
Command Modes
Global Configuration
Usage Guidelines
After defining an SCMP peer device, you must associate it with one or more unmapped anonymous groups (see subscriber anonymous-group name scmp name). This provides the ability to query the SCMP peer regarding unmapped IP addresses in cases where the SCE platform is not updated when the subscriber session has started (see scmp subscriber send-session-start) or in recovery scenarios.
You cannot delete an SCMP device that has anonymous groups assigned to it. Use the no form of the subscriber anonymous-group name scmp name to remove all associated anonymous groups before deleting the device.
Authorization: admin
Examples
The following example illustrates how to define an SCMP peer device.
SCE>enable 10
Password:<cisco>
SCE#config
SCE(config)# scmp name peer_device1 radius radius1 secret abcdef
SCE(config)#
Related Commands
subscriber anonymous-group name scmp name
no subscriber (use the scmp name scmp-name all option to remove subscribers managed by a specified SCMP peer device)
Defines the SCMP reconnect interval; that is the amount of time between attempts by the SCE platform to reconnect with an SCMP peer.
scmp reconnect-interval interval
Syntax Description
interval Interval between attempts by the SCE platform to reconnect with an SCMP peer, in seconds
Defaults
interval = 30 seconds
Command Modes
Global Configuration
Usage Guidelines
The SCE platform attempts to reconnect to the SCMP peer device at the defined intervals by sending an establish peering request message. If a valid reply is received, the SCMP connection state for the SCMP peer is changed, and the SCMP performs the required reconnection operations, such as the following:
Re-querying the peer regarding all subscribers provisioned by this device
Querying the peer regarding all anonymous subscribers created using the anonymous group assigned to this peer
Authorization: admin
Examples
The following example illustrates how to define the SCMP reconnect interval.
SCE>enable 10
Password:<cisco>
SCE#configure
SCE(config)#scmp reconnect-interval 60
SCE(config)#>
Related Commands
Configures the SCMP to make the SCMP peer device verify that each subscriber is only provisioned for one SCE platform. This configuration must be enabled in MGSCP deployments.
Use the no form of the command to disable verifying each subscriber is only provisioned for one SCE platform.
scmp subscriber force-single-sce
no scmp subscriber force-single-sce
Syntax Description
This command has no arguments or keywords
Defaults
Default is disabled.
Command Modes
Global Configuration
Usage Guidelines
This command takes effect only if it is set before the connection with the SCMP peers is established. Use the no scmp and scmp commands to stop and then restart the SCMP if active connections exist.
Authorization: admin
Examples
The following example illustrates how to use this command.
SCE>enable 10
Password:<cisco>
SCE#config
SCE(config)#scmp subscriber force-single-sce
SCE(config)#
Related Commands
Defines the subscriber ID structure for subscribers provisioned via the SCMP interface.
Use the no form of the command to clear the subscriber ID structure setting.
scmp subscriber id append-to-guid radius-attributes Calling-Station-Id | NAS-Port-Id | User-Name [Calling-Station-Id | NAS-Port-Id | User-Name] [Calling-Station-Id | NAS-Port-Id | User-Name]
no scmp subscriber id append-to-guid
Syntax Description
This command has no arguments or keywords
Defaults
By default, all settings are cleared.
Command Modes
Global Configuration
Usage Guidelines
The GUID is a global unique ID assigned to each subscriber session by the SCMP peer device.
The user can define the structure of the subscriber ID via this command by specifying which of the following RADIUS attributes to include and in which order:
Calling-Station-Id
NAS-port
User-Name
The GUID is always appended at the end of the subscriber ID as defined by this command.
The no form of the command clears the subscriber ID structure setting, resulting in no other elements being used with the GUID to form the subscriber ID.
You must disable the SCMP interface before executing this command. (Use the command no scmp.)
Authorization: admin
Examples
The following example illustrates how to use this command.
SCE>enable 10
Password:<cisco>
SCE#config
SCE(config)#no scmp
SCE(config)#scmp subscriber id append-to-guid radius-attributes User-Name Calling-Station-Id NAS-Port-Id
SCE(config)#scmp
SCE(config)#
Related Commands
scmp (use the no form of the command to disable the SCMP)
Configures the SCMP to make the SCMP peer device push sessions to the SCE platform immediately when the session is created on the peer device.
Use the no form of the command to disable pushing of sessions from the SCMP peer device to the SCE platform.
scmp subscriber send-session-start
no scmp subscriber send-session-start
Defaults
Default is disabled.
Command Modes
Global Configuration
Usage Guidelines
This command takes effect only if it is set before the connection with the SCMP peers is established. Use the no scmp and scmp commands to stop and then restart the SCMP if active connections exist.
This feature must be disabled in MGSCP deployments.
Authorization: admin
Examples
The following example illustrates how to use this command.
SCE>enable 10
Password:<cisco>
SCE#config
SCE(config)#scmp subscriber send-session-start
SCE(config)#
Related Commands
Begins the recording of a script. It tracks all commands typed until the script stop command is used.
Use this command to capture a sequence of repeated commands into a file for the purpose of executing the commands again.
Use the script stop command to stop capturing the script.
script capture script-file-name
Syntax Description
script-file-name The name of the output file where the script is stored.
Defaults
This command has no default settings.
Command Modes
Privileged EXEC
Usage Guidelines
Authorization: admin
Examples
The following example shows the script capture for the script1.txt.
SCE>enable 10
Password:<cisco>
SCE#script capture script1.txt
SCE#cd log
SCE#cd ..
SCE#pwd
SCE#script stop
Related Commands
Displays a script file.
script print script-file-name
Syntax Description
script-file-name The name of the file containing the script.
Defaults
This command has no default settings.
Command Modes
Privileged EXEC
Usage Guidelines
Authorization: admin
Examples
The following example prints the commands captured in script1.txt.
SCE>enable 10
Password:<cisco>
SCE#script print script1.txt
cd log
cd ..
pwd
script stop
SCE#
Related Commands
Runs a script. The script may be created using the script capture command, or it may be created as a text file containing the appropriate commands.
script run script-file-name [halt]
Syntax Description
script-file-name The name of the file containing the script.
Defaults
This command has no default settings.
Command Modes
Privileged EXEC
Usage Guidelines
Use this command to run a script that you have previously created using the script capture command.
Use the halt keyword to break script on errors.
Authorization: admin
Examples
The following example runs the script named monitor.txt, which contains the following commands to enable the generation of the real-time subscriber usage RDRs for the specified subscribers:
configure interface linecard 0 subscriber name Jerry property monitor value 1 subscriber name George property monitor value 1 subscriber name Elaine property monitor value 1 subscriber name Kramer property monitor value 1
SCE>enable 10
Password:<cisco>
SCE#script run monitor.txt
SCE#configure
SCE(config)#interface linecard 0
SCE(config if)#subscriber name Jerry property monitor value 1
SCE(config if)#subscriber name George property monitor value 1
SCE(config if)#subscriber name Elaine property monitor value 1
SCE(config if)#subscriber name Kramer property monitor value 1
SCE(config if)#
Related Commands
Stops script capture. Used in conjunction with the script capture command, it marks the end of a script being recorded.
script stop
Syntax Description
This command has no arguments or keywords.
Defaults
This command has no default settings.
Command Modes
Privileged EXEC
Usage Guidelines
Authorization: admin
Examples
The following example stops the capturing of a script.
SCE>enable 10
Password:<cisco>
SCE#script capture script1.txt
SCE#cd log
SCE#cd ..
SCE#pwd
SCE#script stopSCE#Related Commands
Defines the service bandwidth prioritization mode.
This parameter configures how bandwidth controllers compete for bandwidth by specifying which assurance level (AL) value is used when allocating bandwidth between bandwidth controllers. The AL can either be taken from either of the following:
The bandwidth controller AL value (global)
The party (“total”) bandwidth-controller Relative-Priority value (subscriber-internal)
service-bandwidth-prioritization-mode {global | subscriber-internal}
Syntax Description
This command has no arguments.
Defaults
default = subscriber-internal
Command Modes
Interface Linecard Configuration
Usage Guidelines
Select the desired prioritization mode:
subscriber-internal prioritization mode — the global controller AL of each bandwidth controller is taken from the Primary BWC Relative Priority.
global prioritization mode — the global controller AL is taken from current bandwidth controller Assurance Level.
Authorization: admin
Examples
The following example shows how to use this command.
SCE>enable 10 Password:<cisco> SCE#configure SCE(config)#interface linecard 0 SCE(config if)#service-bandwidth-prioritization-modeglobalSCE(config if)#Related Commands
show interface linecard service-bandwidth-prioritization-mode
Enables password encryption, so that the password remains secret when the configuration file is displayed. Use the no form of this command to disable password encryption.
service password-encryption
no service password-encryption
Syntax Description
This command has no arguments or keywords.
Defaults
Disabled (no encryption)
Command Modes
Global Configuration
Usage Guidelines
Passwords that were configured in an encrypted format are not deciphered when password encryption is disabled.
Authorization: admin
Examples
The following example shows the effect of enabling password encryption.
SCE>enable 10
Password:<cisco>
SCE#config
SCE(config)#enable password abcd
SCE(config)#do more running-config
#This is a general configuration file (running-config).
#Created on 10:20:57  ISR  TUE  July  3  2001
…
enable password level 10 0 “abcd”
…
SCE(config)#service password-encryption
SCE(config)#do more running-config
#This is a general configuration file (running-config).
#Created on 10:21:12  ISR  TUE  July  3  2001
…
service password-encryption
enable password level 10 0 “e2fc714c4727ee9395f324cd2e7f331f”
…
SCE(config)#
Related Commands
Enables/disables the RDR-formatter. The RDR-formatter is the element that formats the reports of events produced by the linecard and sends them to an external data collector.
Use the no keyword of this command to disable the RDR-formatter.
service rdr-formatter
no service rdr-formatter
Syntax Description
This command has no arguments or keywords
Defaults
Enabled
Command Modes
Global Configuration
Usage Guidelines
Authorization: admin
Examples
The following examples illustrate the use of the service rdr-formatter command:
Example 1:
The following example enables the RDR-formatter.
SCE>enable 10
Password:<cisco>
SCE#config
SCE(config)#service rdr-formatter
SCE(config)#
Example 2:
The following example disables the RDR-formatter.
SCE(config)#no service rdr-formatter
SCE(config)#
Related Commands
Enables/disables Telnet daemon. Use the no form of this command to disable the daemon preventing new users from accessing the SCE platform via Telnet.
service telnetd
no service telnetd
Syntax Description
This command has no arguments or keywords,
Defaults
Telnet daemon enabled
Command Modes
Global Configuration
Usage Guidelines
Authorization: admin
Examples
The following examples illustrate the use of the service telnetd command:
Example 1:
The following example enables the Telnet daemon.
SCE>enable 10
Password:<cisco>
SCE#config
SCE(config)#service telnetd
SCE(config)#
Example 2:
The following example disables the Telnet daemon.
SCE>enable 10
Password:<cisco>
SCE#config
SCE(config)#no service telnetd
SCE(config)#
Related Commands
Invokes the setup utility, which is a dialog, or series of questions, that guides the user through the basic configuration process. This utility runs automatically upon initial connection to the local terminal. The utility may also be invoked explicitly to make changes to the system configuration.
setup
Following is a brief list of the parameters configured via the setup command:
Host ID parameters: IP address, subnet mask, and hostname
Passwords: admin password, password encryption
The root password can be configured upon initial system configuration and when accessed from the root user.
Time settings: time zone, offset from UTC, local time and date
SNTP configuration: multicast client, unicast server, unicast query interval
Domain Name Server configuration: default domain name and IP address (up to 3)
RDR-formatter destination: IP address and TCP port number
Access Control Lists: up to 100 lists, with 20 IP addresses in each list, each entry can be designated as permitted or denied.
Create ACLs for IP access, Telnet access, SNMP GET community access, and SNMP SET community access as needed:
SNMP configuration:
Define the following:
GET community names (up to 20)
SET community names (up to 20)
trap managers (up to 20): IP address, community string, version
name of system manager
Topology configuration:
Define the following:
connection mode
administrative status after abnormal reboot
SCE 1000 Platform:
link-bypass mode when operational
redundancy
link-bypass mode when not operational
SCE 2000 Platform:
deployment type
physically-connected-link index
priority
on-failure link behavior
For a complete description of the command, see the Cisco SCE (Platform) Installation and Configuration Guide.
Syntax Description
The setup command does not include parameters in the usual sense of the word. However, the setup utility questions prompt for many global configuration parameters. Following is a table listing all parameters for which values may be requested by the setup dialog.
The table in the Usage Guidelines lists all the parameter values that are necessary to complete the initial configuration. It is recommended that you obtain all these values before beginning the setup.
Defaults
Command Modes
Privileged EXEC
Usage Guidelines
Table 2.4. Setup Command Parameters
|
Parameter |
Definition |
|---|---|
|
IP address |
IP address of the SCE platform. |
|
subnet mask |
Subnet mask of the SCE platform. |
|
default gateway |
Default gateway. |
|
hostname |
Character string used to identify the SCE platform. Maximum length is 20 characters. |
|
admin password |
Admin level password. Character string from 4-100 characters beginning with an alpha character. |
|
root password |
Root level password. Character string from 4-100 characters beginning with an alpha character. |
|
password encryption status |
Enable or disable password encryption? |
|
Time Settings |
|
|
time zone name and offset |
Standard time zone abbreviation and minutes offset from UTC. |
|
local time and date |
Current local time and date. Use the format: 00:00:00 1 January 2002 |
|
SNTP Configuration |
|
|
broadcast client status |
Set the status of the SNTP broadcast client. If enabled, the SCE will synchronize its local time with updates received from SNTP broadcast servers. |
|
unicast query interval |
Interval in seconds between unicast requests for update (64 – 1024) |
|
unicast server IP address |
IP address of the SNTP unicast server. |
|
DNS Configuration |
|
|
DNS lookup status |
Enable or disable IP DNS-based hostname translation. |
|
default domain name |
Default domain name to be used for completing unqualified host names |
|
IP address |
IP address of domain name server. ( maximum of 3 servers) |
|
RDR Formatter Destination Configuration | |
|
IP address |
IP address of the RDR-formatter destination |
|
TCP port number |
TCP port number of the RDR-formatter destination |
|
Access Control Lists |
|
|
Access Control List number |
How many ACLs will be necessary? What IP addresses will be permitted/denied access for each management interface? You may want ACLs for the following:
|
|
list entries (maximum 20 per list) |
IP address, and whether permitted or denied access. |
|
IP access ACL |
ID number of the ACL controlling IP access. |
|
telnet ACL |
ID number of the ACL controlling telnet access. |
|
SNMP Configuration |
|
|
SNMP agent status |
Enable or disable SNMP management. |
|
GET community names |
Community strings to allow GET access and associated ACLs (maximum 20). |
|
SET community names |
Community strings to allow SET access and associated ACLs (maximum 20). |
|
trap managers (maximum 20) |
Trap manager IP address, community string, and SNMP version. |
|
Authentication Failure trap status |
Sets the status of the Authentication Failure traps. |
|
enterprise traps status |
Sets the status of the enterprise traps. |
|
system administrator |
Name of the system administrator. |
|
Topology Configuration (Both Platforms) | |
|
connection mode |
Is the SCE platform installed in bump-in-the-wire topology (inline) or out of line using splitter or switch (receive-only)? |
|
Admin status of the SCE platform after abnormal boot |
After a reboot due to a failure, should the SCE platform remain in a Failure status or move to operational status provided no other problem was detected? |
|
Topology Configuration (SCE 1000) | |
|
link bypass mode on operational status |
When the SCE 1000 is operational, should it bypass trafific or not? |
|
redundant SCE 1000 platform? |
Is there a redundant SCE 1000 installed as a backup? |
|
link bypass mode on non-operational status |
When the SCE 1000 is not operational, should it bypass traffic or cut it off? |
|
Topology Configuration (SCE 2000) | |
|
type of deployment |
Is this a cascade topology, with two SCE platforms connected via the cascade ports? Or is this a single platform topology? |
|
physically connected link (cascade topology only) |
In a cascade deployment this parameter sets the index for the link that this SCE 2000 is deployed on. The options for the SCE 2000 are link-0 or link-1. In a single-SCE 2000 Platform deployment this parameter is not relevant since one SCE 2000 is deployed on both links. In this case the link connected to port1-port2 is by default link-0 and the link connected to port3-port4 is by default link-1. |
|
priority (cascade topology only) |
If this is a cascaded topology, is this SCE 2000 the primary or secondary SCE 2000? |
|
on-failure behavior (inline connection mode only) |
If this SCE 2000 is deployed inline, should the failure behavior be bypass or cutoff of the link? |
Authorization: admin
Examples
The following example runs the setup utility.
SCE>enable 10
Password:<cisco>
SCE#setup
--- System Configuration Dialog ---
At any point you may enter a question mark ‘?’ followed by ‘Enter’ for help.
Use ctrl-C to abort configuration dialog at any prompt.
Use ctrl-Z to jump to the end of the configuration dialog at any prompt.
Default settings are in square brackets ‘[]’.
Would you like to continue with the System Configuration Dialog? [yes/no]: y
Related Commands
Shows all access-lists or a specific access list.
show access-lists [number]
Syntax Description
number Number of the access list to show
Defaults
Default access list number = 1.
Command Modes
Privileged EXEC
Usage Guidelines
Authorization: admin
Examples
The following example displays the configuration of access-list 5.
SCE>enable 5
Password:<cisco>
SCE#show access-lists 5
Standard IP access list 5
Permit 10.1.1.0, wildcard bits 0.0.0.255
deny any
SCE#Related Commands
access-list
Displays the blinking status of a slot. A slot blinks after it receives a blink command.
show blink slot slot-number
Syntax Description
slot-number The number of the identified slot. Enter a value of 0.
Defaults
This command has no default settings.
Command Modes
User Exec
Usage Guidelines
Authorization: viewer
Examples
The following example shows the blink status of slot 0.
SCE>enable 5
Password:<cisco>
SCE>show blink slot 0
Slot 0 blink status: off
SCE>Related Commands
Displays the time maintained by the real-time system calendar clock.
show calendar
Syntax Description
This command has no arguments or keywords.
Defaults
This command has no default settings.
Command Modes
User Exec
Usage Guidelines
Authorization: viewer
Examples
The following example shows the current system calendar.
SCE>enable 5
Password:<cisco>
SCE>show calendar
12:50:03 GMT MON November 13 2005
SCE>Related Commands
Displays the time maintained by the system clock.
show clock
Syntax Description
This command has no arguments or keywords.
Defaults
This command has no default settings.
Command Modes
User Exec
Usage Guidelines
Authorization: viewer
Examples
The following example shows the current system clock.
SCE>enable 5
Password:<cisco>
SCE>show clock
12:50:03 GMT MON November 13 2005
SCE>Related Commands
Displays the operation mode to apply after boot resulted from failure.
show failure-recovery operation-mode
Syntax Description
This command has no arguments or keywords.
Defaults
This command has no default settings.
Command Modes
User Exec
Usage Guidelines
Authorization: viewer
Examples
The following example displays the failure recovery operation mode:
SCE>enable 5
Password:<cisco>
SCE>show failure-recovery operation-mode
System Operation mode on failure recovery is: operational
SCE>Related Commands
Displays the currently configured hostname.
show hostname
Syntax Description
This command has no arguments or keywords.
Defaults
This command has no default settings.
Command Modes
User Exec
Usage Guidelines
Authorization: viewer
Examples
The following example shows that SCE2000 is the current hostname.
SCE>enable 5
Password:<cisco>
SCE>show hostname
SCE2000
SCE>Related Commands
Displays the default domain name, the address of the name server, and the content of the host table.
show hosts
Syntax Description
This command has no arguments or keywords.
Defaults
This command has no default settings.
Command Modes
User Exec
Usage Guidelines
Authorization: viewer
Examples
The following example shows the domain and hosts configured.
SCE>enable 5
Password:<cisco>
SCE>show hosts
Default domain is cisco.com
Name/address lookup uses domain service
Name servers are 10.1.1.60, 10.1.1.61
Host Address
---- -------
PC85 10.1.1.61
SCE>Related Commands
Displays the details of a FastEthernet Interface.
show interface fastethernet slot-number/interface-number [counters [direction]|duplex|speed|queue queue-number]
Syntax Description
slot-number The number of the identified slot. Enter a value of 0.
interface-number The FastEthernet interface number.
Enter a value from 1to4for a line interface of a SCE 2000 4/8xFE platform only.
direction Optional direction specification, to show only counters of a specific direction. Use in or out.
queue-number Number of queue, in the range 0-3.
Defaults
This command has no default settings.
Command Modes
User Exec
Usage Guidelines
The following keywords are relevant to the line interfaces (1 - 4) of the SCE 2000 4/8xFE platform only:
The duplex keyword displays the configured and actual duplex mode of the specified interface.
The speed keyword displays the configured and actual speed of the specified interface.
The counters keyword displays the values of counters for the specified line interface.
The queue keyword displays the bandwidth and burst size of the specified queue in the specified line interface.
Authorization: viewer
Counter Definitions
Following are definitions of the counters displayed in the output of this command.
In total octets: Total number ofinbound octets
In good unicast packets: Total number good inboundunicast packets
In good multicast packets: Total number ofgood inboundmulticast packets
In good broadcast packets: Total number ofgood inboundbroadcast packets
In packets discarded: Total number ofinbound discarded packets
In packets with CRC/Alignment error: Total number ofinboundpackets with CRC or alignment errors
In undersized packets: Total number ofinboundundersized packets
In oversized packets: Total number ofinboundoversized packets
Out unicast packets: Total number ofoutbound unicast packets
Out non unicast packets: Total number ofoutbound non-unicast packets
Out packets discarded: Total number ofoutbound discarded packets
Examples
The following examples illustrate the use of the show interface FastEthernet command:
Example 1:
The following example shows the FastEthernet details for a line interface.
SCE>enable 5
Password:<cisco>
SCE>show interface fastethernet 0/1
Configured speed: auto, configured duplex: auto
AutoNegotiation is On, link is Up, actual speed: 100Mb/s, actual duplex: full
Bandwidth: 100000 Kbps, Burst-size: 5000 bytes
SCE>Example 2:
The following example shows the FastEthernet interface counters.
SCE>show interface fastethernet 0/1 counters
In total octets: 191520
In good unicast packets: 560
In good multicast packets: 0
In good broadcast packets: 0
In packets discarded: 0
In packets with CRC/Alignment error: 0
In undersized packets: 0
In oversized packets: 0
Out total octets: 0
Out unicast packets: 0
Out non unicast packets: 0
Out packets discarded: 0
SCE>Example 3:
The following example shows the FastEthernet interface duplex mode configuration and status.
SCE>enable 5
Password:<cisco>
SCE>show interface fastethernet 0/1 duplex
Configured duplex: auto
AutoNegotiation is On, link is Up, actual duplex: half
SCE>Example 4:
The following example shows the FastEthernet interface speed configuration and status.
SCE>enable 5
Password:<cisco>
SCE>show interface fastethernet 0/3 speed
Configured speed: auto
AutoNegotiation is On, link is Up, actual speed: 100
SCE>Example 5:
The following example shows the FastEthernet interface queue number 3.
SCE>enable 5
Password:<cisco>
SCE>show interface fastethernet 0/4 queue 3
Bandwidth: 100000 Kbps, Burst-size: 8000 bytes
SCE>Related Commands
Displays the details of a GigabitEthernet Interface.
show interface gigabitethernet slot-number/interface-number [counters [direction]|queue queue-number]
Syntax Description
slot-number The number of the identified slot. Enter a value of 0.
interface-number GigabitEthernet interface number 1 - 2, or 1 - 4.
direction Optional direction specification, to show only counters of a specific direction. Use in or out.
queue-number Number of queue, in the range 0-3
Defaults
This command has no default settings.
Command Modes
User Exec
Usage Guidelines
Enter a value of 1 - 2 for the interface-number parameter for line ports 1 - 2 to show information on the line interfaces for the SCE 1000 2xGBE platform.
Enter a value of 1 - 4 for the interface-number parameter for line ports 1 - 4 to show information on the line interfaces for the SCE 2000 4xGBE platform.
The counters keyword displays the values of counters of a line GigabitEthernet interface.
The queue keyword displays the bandwidth and burst size of a queue in a line GigabitEthernet interface.
Authorization: viewer
Examples
The following example shows the GigabitEthernet details.
SCE>enable 5
Password:<cisco>
SCE>show interface gigabitethernet 0/1
SCE>Related Commands
Displays information for a specific linecard Interface.
show interface linecard slot-number
Syntax Description
slot-number The number of the identified slot. Enter a value of 0.
Defaults
This command has no default settings.
Command Modes
User Exec
Usage Guidelines
Authorization: viewer
Examples
The following example shows how to use this command.
SCE>enable 5
Password:<cisco>
SCE>show interface linecard 0
The application assigned to slot 0 is /tffs0/app/eng30102.sli
Silent is off
Configured shutdown is off
Shutdown due to sm-connection-failure is off
Resulting current shutdown state is off
WAP handling is disabled
SCE>Related Commands
Displays the currently configured hardware packet drop mode.
show interface linecard slot-number accelerate-packet-drops
Syntax Description
slot-number The number of the identified slot. Enter a value of 0.
Defaults
This command has no default settings.
Command Modes
User Exec
Usage Guidelines
Authorization: viewer
Example
The following example illustrates the use of the show interface linecard accelerate-packet-drops command:
SCE>enable 5
Password:<cisco>
SCE>show interface linecard 0 accelerate-packet-drops
Accelerated packet drops mode is enabled
SCE>Related Commands
Displays the name of the application loaded on the Linecard Interface.
show interface linecard slot-number application
Syntax Description
slot-number The number of the identified slot. Enter a value of 0.
Defaults
This command has no default settings.
Command Modes
User Exec
Usage Guidelines
Authorization: viewer
Examples
The following example shows the currently loaded application.
SCE>enable 5
Password:<cisco>
SCE>show interface linecard 0 application
/tffs0/app/eng30102.sli
SCE>Related Commands
Displays the configuration of the specified attack detector.
The following information is displayed:
Protocol
Side — Whether the attack detector applies to attacks originating at the subscriber or network side.
Direction — Whether the attack detector applies to single sided or dual sided attacks.
Action to take if an attack is detected.
Thresholds:
open-flows-rate — Default threshold for rate of open flows (new open flows per second).
suspected-flows-rate — Default threshold for rate of suspected DDoS flows (new suspected flows per second).
suspected-flows-ratio — Default threshold for ratio of suspected flow rate to open flow rate.
Subscriber notification — enabled or disabled.
Alarm: sending an SNMP trap enabled or disabled.
show interface linecard slot-number attack-detector [default|all]
show interface linecard slot-number attack-detector attack-detector
Syntax Description
slot-number The number of the identified slot. Enter a value of 0.
attack-detector The number of the specific attack detector to be displayed.
all Displays the configuration of all existing attack detectors
default Displays the default attack detector configuration.
Defaults
This command has no default settings.
Command Modes
User Exec
Usage Guidelines
Use the all keyword to display the configuration of all existing attack detectors.
Use the default keyword to display default attack detector configuration.
Authorization: viewer
Examples
The following examples illustrate the show interface linecard attack-detector command:
Example 1:
The following example displays the configuration of attack detector number 3.
SCE>enable 5
Password:<cisco>
SCE>show interface linecard 0 attack-detector 3
Detector #3:
Comment: 'Sample'
Access-list: 1
Effective only for TCP port(s) 21,23,80
Effective for all UDP ports
Protocol|Side|Direction ||Action| Thresholds |Sub- |Alarm
| | || |Open flows|Ddos-Suspected flows|notif|
| | || |rate |rate |ratio | |
--------|----|-----------||------|----------|------------|-------|-----|-----
TCP |net.|source-only|| | | | | |
TCP |net.|dest-only || | | | | |
TCP |sub.|source-only|| | | | | |
TCP |sub.|dest-only || | | | | |
TCP |net.|source+dest|| | | | | |
TCP |sub.|source+dest|| | | | | |
TCP+port|net.|source-only||Block | | | | |Yes
TCP+port|net.|dest-only || | | | | |
TCP+port|sub.|source-only||Block | | | | |Yes
TCP+port|sub.|dest-only || | | | | |
TCP+port|net.|source+dest|| | | | | |
TCP+port|sub.|source+dest|| | | | | |UDP |net.|source-only|| | | | | |
UDP |net.|dest-only || | | | | |
UDP |sub.|source-only|| | | | | |
UDP |sub.|dest-only || | | | | |
UDP |net.|source+dest|| | | | | |
UDP |sub.|source+dest|| | | | | |
UDP+port|net.|source-only|| | | | | |
UDP+port|net.|dest-only || | | | | |
UDP+port|sub.|source-only|| | | | | |
UDP+port|sub.|dest-only || | | | | |
UDP+port|net.|source+dest|| | | | | |
UDP+port|sub.|source+dest|| | | | | |
ICMP |net.|source-only|| | | | | |
ICMP |net.|dest-only || | | | | |
ICMP |sub.|source-only|| | | | |Yes |
ICMP |sub.|dest-only || | | | | |
other |net.|source-only|| | | | | |
other |net.|dest-only || | | | | |
other |sub.|source-only|| | | | | |
other |sub.|dest-only || | | | | |
Empty fields indicate that no value is set and configuration from
the default attack detector is used.
SCE>Example 2:
The following example displays the configuration of the default attack detector.
SCE>enable 5
Password:<cisco>
SCE>show interface linecard 0 attack-detector default
Protocol|Side|Direction ||Action| Thresholds |Sub- |Alarm
| | || |Open flows|Ddos-Suspected Flows|notif|
| | || |rate |rate |ratio | |
--------|----|-----------||------|----------|------------|-------|-----|-----
TCP |net.|source-only||Report| 1000| 500|50 |No |No
TCP |net.|dest.-only ||Report| 1000| 500|50 |No |No
TCP |sub.|source-only||Report| 1000| 500|50 |No |No
TCP |sub.|dest.-only ||Report| 1000| 500|50 |No |No
TCP |net.|source+dest||Report| 100| 50|50 |No |No
TCP |sub.|source+dest||Report| 100| 50|50 |No |No
TCP+port|net.|source-only||Report| 1000| 500|50 |No |No
TCP+port|net.|dest.-only ||Report| 1000| 500|50 |No |No
TCP+port|sub.|source-only||Report| 1000| 500|50 |No |No
TCP+port|sub.|dest.-only ||Report| 1000| 500|50 |No |No
TCP+port|net.|source+dest||Report| 100| 50|50 |No |No
TCP+port|sub.|source+dest||Report| 100| 50|50 |No |No
UDP |net.|source-only||Report| 1000| 500|50 |No |No
UDP |net.|dest.-only ||Report| 1000| 500|50 |No |No
UDP |sub.|source-only||Report| 1000| 500|50 |No |No
UDP |sub.|dest.-only ||Report| 1000| 500|50 |No |No
UDP |net.|source+dest||Report| 100| 50|50 |No |No
UDP |sub.|source+dest||Report| 100| 50|50 |No |No UDP+port|net.|source-only||Report| 1000| 500|50 |No |No
UDP+port|net.|dest.-only ||Report| 1000| 500|50 |No |No
UDP+port|sub.|source-only||Report| 1000| 500|50 |No |No
UDP+port|sub.|dest.-only ||Report| 1000| 500|50 |No |No
UDP+port|net.|source+dest||Report| 100| 50|50 |No |No
UDP+port|sub.|source+dest||Report| 100| 50|50 |No |No
ICMP |net.|source-only||Report| 500| 250|50 |No |No
ICMP |net.|dest.-only ||Report| 500| 250|50 |No |No
ICMP |sub.|source-only||Report| 500| 250|50 |No |No
ICMP |sub.|dest.-only ||Report| 500| 250|50 |No |No
other |net.|source-only||Report| 500| 250|50 |No |No
other |net.|dest.-only ||Report| 500| 250|50 |No |No
other |sub.|source-only||Report| 500| 250|50 |No |No
other |sub.|dest.-only ||Report| 500| 250|50 |No |No
SCE>Related Commands
Displays the attack filtering configuration.
show interface linecard slot-number attack-filter [option]
Syntax Description
slot-number The number of the identified slot. Enter a value of 0.
option See Usage Guidelines for the list of options.
Defaults
This command has no default settings.
Command Modes
User Exec
Usage Guidelines
Following is a list of options that may be displayed:
query IP configured: displays the configured threshold values and action as follows:
query single-sided IP
ip-addressconfigured: displays the configured threshold values and action for attack detection for a specified IP address (single-sided detection)query dual-sided source-IP
ip-address1destip-address2configured: displays the configured threshold values and action for attack detection between two specified IP addresses (dual-sided detection)dest-port port#: displays the configured threshold values and action for the specified port. You can include this argument with both single-sided and dual-sided queries.
query IP current: displays the current counters for a specified attack detector for all protocols and attack directions as follows:
query single-sided IP
ip-addresscurrent: displays the current counters for attack detection for a specified IP address (single-sided detection)query dual-sided source-IP
ip-address1destip-address2current: displays the current counters for attack detection between two specified IP addresses (dual-sided detection)dest-port port#: displays the configured threshold values and action for the specified port. You can include this argument with both single-sided and dual-sided queries.
current-attacks: displays all currently handled attacks
counters: displays all attack detection counterd
dont-filter: displays all existing stopped attack filters
force-filter: displays all existing forced attack filters
subscriber-notification ports: displays the list of subscriber-notification ports
subscriber-notification redirect: displays the configuration of subscriber-notification redirection, such as the configured destination and dismissal URLs, and allowed hosts.
Authorization: viewer
Examples
The following examples illustrate the use of the show interface linecard attack-filter command.
Example 1:
The following example displays the configuration of attack detection between two specified IP addresses (dual-sided) for destination port 101.
SCE>enable 5
Password:<cisco>
SCE>show interface linecard 0 attack-filter query dual-sided source-IP 10.10.10.10 dest 10.10.10.145 dest-port 101 configured
SCE>Example 2:
The following example displays all existing forced attack filters.
SCE>enable 5
Password:<cisco>
SCE>show interface linecard 0 attack-filter force-filter
No force-filter commands are set for slot 0
SCE>Example 3:
The following example displays the subscriber notification ports.
SCE>enable 5
Password:<cisco>
SCE>show interface linecard 0 attack-filter subscriber-notification ports
Configured Subscriber notification ports: 100
SCE>Related Commands
Shows the current configuration of the SCE platform link connection.
show interface linecard slot-number connection-mode
Syntax Description
slot-number The number of the identified slot. Enter a value of 0.
Defaults
This command has no default settings.
Command Modes
User Exec
Usage Guidelines
Authorization: viewer
Example
The following example shows how to use this command.
SCE>enable 5
Password:<cisco>
SCE>show interface linecard 0 connection-mode
Connection mode is inline
slot failure mode is bypass
Redundancy status is standalone
SCE>Related Commands
Displays the Linecard Interface hardware counters.
show interface linecard slot-number counters [bandwidth] [cpu-utilization]
show interface linecard slot-number counters VAS-traffic-bandwidth (SCE 2000 platform only)
Syntax Description
slot-number The number of the identified slot. Enter a value of 0.
Defaults
This command has no default settings.
Command Modes
User Exec
Usage Guidelines
Specify any of the optional keywords to display only the desired counters.
The VAS-traffic-bandwidth option is supported by the SCE 2000 platform only.
Authorization: viewer
Example
The following example shows the hardware counters for the Linecard Interface.
SCE>enable 5
Password:<cisco>
SCE>show interface linecard 0 counters
DP packets in: 100
DP packets out: 100
DP IP packets in: 90
DP Non-IP packets: 10
DP IP packets with CRC error: 0
DP IP packets with length error: 0
DP IP broadcast packets: 10
DP IP fragmented packets: 0
DP IP packets with TTL=0 error: 0
DP Non TCP/UDP packets: 10
DP TCP/UDP packets with CRC error: 0
FF counter #0: 0
FF counter #1: 0
FF counter #2: 0
FF counter #3: 0
...
SCE>Related Commands
Displays the currently configured duplicate packets mode.
show interface linecard slot-number duplicate-packets-mode
Syntax Description
slot-number The number of the identified slot. Enter a value of 0.
Defaults
This command has no default settings.
Command Modes
User Exec
Usage Guidelines
Authorization: viewer
Example
The following example illustrates the use of the show interface linecard duplicate-packets-mode command:
SCE>enable 5
Password:<cisco>
SCE>show interface linecard 0 duplicate-packets-mode
Packet duplication of flows due to Delay Sensitive <bundles> is enabled
Packet duplication of flows due to No-Online-Control <set-flow> is enabled
Packet duplication of flows due to No-Online-Control <set-flow> ratio percent is 70
Packet duplication in case of shortage is enabled
SCE>Related Commands
Displays the currently configured flow open mode.
show interface linecard slot-number flow-open-mode
Syntax Description
slot-number The number of the identified slot. Enter a value of 0.
Defaults
This command has no default settings.
Command Modes
User Exec
Usage Guidelines
Authorization: viewer
Example
The following example illustrates the use of the show interface linecard flow-open-mode command:
SCE>enable 5
Password:<cisco>
SCE>show interface linecard 0 flow-open-mode
Enhanced flow open mode is disabled
SCE>Related Commands
flow-open-mode
Displays the current IP tunnel configuration.
show interface linecard slot-number ip-tunnel
Syntax Description
slot-number The number of the identified slot. Enter a value of 0.
Defaults
This command has no default settings.
Command Modes
User Exec
Usage Guidelines
Authorization: viewer
Example
The following example illustrates the use of the show interface linecard ip-tunnel command:
SCE>enable 5
Password:<cisco>
SCE>show interface linecard 0 ip-tunnel
no IP tunnel
SCE>Related Commands
Displays the currently configured L2TP support parameters.
show interface linecard slot-number l2tp
Syntax Description
slot-number The number of the identified slot. Enter a value of 0.
Defaults
This command has no default settings.
Command Modes
User Exec
Usage Guidelines
Authorization: viewer
Example
The following example illustrates the use of the show interface linecard L2TP command:
SCE>enable 5
Password:<cisco>
SCE>show interface linecard 0 l2tp
L2TP identify-by port-number 1701
SCE>Related Commands
Displays the configured Linecard Interface link mode.
show interface linecard slot-number link mode
Syntax Description
slot-number The number of the identified slot. Enter a value of 0.
Defaults
This command has no default settings.
Command Modes
User Exec
Usage Guidelines
Authorization: viewer
Examples
The following example shows the configured link mode for the Linecard Interface.
SCE>enable 5
Password:<cisco>
SCE>show interface linecard 0 link mode
Link mode on port1-port2
Current link mode is :forwarding
Actual link mode on active is :forwarding
Actual link mode on failure is :monopath-bypass
SCE>Related Commands
Displays the link ID to port ID mappings.
show interface linecard slot-number link-to-port-mappings
Syntax Description
slot-number The number of the identified slot. Enter a value of 0.
Defaults
This command has no default settings.
Command Modes
User Exec
Usage Guidelines
Authorization: viewer
Example
The following example shows the link ID to port ID mapping for the Linecard Interface.
SCE>enable 5
Password:<cisco>
SCE>show interface linecard 0 link-to-port-mappings
Link Id | Upstream Port <Out> | Downstream Port <Out>
-----------------------------------------------------------
0 | 0/2 | 0/1
SCE>Related Commands
Displays the linecard MAC mapping information.
show interface LineCard slot-number mac-mapping
Syntax Description
slot-number The number of the identified slot. Enter a value of 0.
Defaults
This command has no default settings.
Command Modes
User Exec
Usage Guidelines
Authorization: viewer
Example
The following example shows the MAC mapping information.
SCE>enable 5
Password:<cisco>
SCE>show interface LineCard 0 mac-mapping
MAC mapping status is: disabled
MAC mapping default mapping is: none set
MAC mapping dynamic insertion to table is enabled
SCE>Related Commands
Displays a listing of all IP addresses and corresponding MAC addresses currently registered in the MAC resolver database.
show interface linecard 0 mac-resolver arp
Syntax Description
slot-number The number of the identified slot. Enter a value of 0.
Defaults
This command has no default settings.
Command Modes
User Exec
Usage Guidelines
Authorization: viewer
Examples
The following example shows how to display the entries in the MAC-resolver ARP database.
SCE>enable 5
Password:<cisco>
SCE>show interface linecard 0 mac-resolver arp
There are no entries in the mac-resolver arp database
SCE>Related Commands
Displays information about MPLS configuration and current VPN mappings. The following information can be displayed:
OS counters (current number of subscribers and various types of mappings)
bypassed VPNs
non-VPN-mappings
PE router configuration
show interface linecard slot-number mpls vpn [bypassed-vpns][non-vpn-mappings][pe-database [pe-id pe-ip]]
Syntax Description
slot-number The number of the identified slot. Enter a value of 0.
bypassed-VPNs Displays all currently bypassed VPNs, grouped by downstream label
non-VPN-mappings Displays the mappings of upstream labels that belong to non-VPN flows
PE-database Displays the configured PE routers and their interfaces. If a PE-ID is specified, only that PE is displayed.
pe-ip IP address of the specified PE router.
Defaults
This command has no default settings.
Command Modes
User Exec
Usage Guidelines
If no keyword is used, the OS counters are displayed (current number of subscribers and various types of mappings).
Use the PE-database keyword to display information about all currently configured PE routers. Include the PE-ID argument to specify a particular PE router to display.
Authorization: viewer
Examples
The following example illustrates the use of the show interface linecard MPLS command:
SCE>enable 5
Password:<cisco>
SCE>show interface linecard 0 mpls
MPLS/VPN auto-learn mode is enabled.
MPLS/VPN subscribers: 0 used out of 2015 max
Total HW MPLS/VPN mappings utilization: 0 used out of 57344 max
MPLS/VPN mappings are divided as follows:
downstream VPN subscriber mappings: 0
upstream VPN subscriber mappings: 0
non-vpn upstream mappings: 0
downstream bypassed VPN mappings: 0
upstream bypassed VPN mappings: 0
SCE>Related Commands
Displays the link mapping for the Linecard Interface.
show interface linecard slot-number physically-connected-links
Syntax Description
slot-number The number of the identified slot. Enter a value of 0.
Defaults
This command has no default settings.
Command Modes
User Exec
Usage Guidelines
Authorization: viewer
Examples
The following example shows the link mapping for the Linecard Interface.
SCE>enable 5
Password:<cisco>
SCE>show interface linecard 0 physically-connected-links
slot 0 is connected to link-0 and link-1
SCE>Related Commands
Displays the currently configured service bandwidth prioritization mode.
show interface linecard slot-number service-bandwidth-prioritization-mode
Syntax Description
slot-number The number of the identified slot. Enter a value of 0.
Defaults
This command has no default settings.
Command Modes
User Exec
Usage Guidelines
Authorization: viewer
Example
The following example illustrates the use of the this command:
SCE>enable 5
Password:<cisco>
SCE>show interface linecard 0 service-bandwidth-prioritization-mode
Service bandwidth prioritization mode is: Subscriber Internal
SCE>Related Commands
Displays the current shutdown state.
show interface linecard slot-number shutdown
Syntax Description
slot-number The number of the identified slot. Enter a value of 0.
Defaults
This command has no default settings.
Command Modes
User Exec
Usage Guidelines
Authorization: viewer
Examples
The following example shows the linecard Interface silent mode.
SCE>enable 5
Password:<cisco>
SCE>show interface linecard 0 shutdown
SCE>Related Commands
Displays the current Linecard Interface silent state. When the silent state is Off, the linecard events reporting function is enabled.
show interface linecard slot-number silent
Syntax Description
slot-number The number of the identified slot. Enter a value of 0.
Defaults
This command has no default settings.
Command Modes
User Exec
Usage Guidelines
Authorization: viewer
Examples
The following example shows the Linecard Interface silent mode.
SCE>enable 5
Password:<cisco>
SCE>show interface linecard 0 silent
off
SCE>Related Commands
Displays names of subscribers or the number of subscribers meeting one of the following specified criteria:
Having a value of a subscriber property that is equal to, larger than, or smaller than a specified value
Having a subscriber name that matches a specific prefix
Having a subscriber name that matches a specific suffix
show interface linecard slot-number subscriber [amount] [prefix prefix] [suffix suffix] [property propertyname equals|bigger-than|less-than property-val] [all-names]
Syntax Description
slot-number The number of the identified slot. Enter a value of 0.
prefix The desired subscriber name prefix to match.
suffix The desired subscriber name suffix to match.
propertyname The name of the subscriber property to match.
property-val The value of the specified subscriber property. Specify whether to search for values equal to, greater than, or less than this value.
Defaults
This command has no default settings.
Command Modes
User Exec
Usage Guidelines
Use the amount keyword to display the number of subscribers meeting the criteria rather than listing actual subscriber names.
Use the all-names keyword to display the names of all subscribers currently in the SCE platform subscriber database.
Authorization: viewer
Examples
The following examples illustrate the use of this command.
Example 1
Following is an example that lists the number of subscribers with the prefix ‘gold’ in the subscriber name
SCE>enable 5
Password:<cisco>
SCE>show interface linecard 0 subscriber amount prefix gold
There are 40 subscribers with name prefix 'gold'.
SCE>Example 2
Following is an example that lists all subscribers currently in the SCE platform subscribers database.
SCE>enable 5
Password:<cisco>
SCE>show interface linecard 0 subscriber all-names
There are 8 subscribers in the database.
john_doe
mary_smith
david_jones
betty_peters
bill_jackson
jane_doe
bob_white
andy_black
SCE>Related Commands
Displays the subscriber aging configuration for the specified type of subscriber (anonymous or introduced).
show interface linecard slot-number subscriber aging [anonymous|introduced]
Syntax Description
slot-number The number of the identified slot. Enter a value of 0.
Defaults
This command has no default settings.
Command Modes
User Exec
Usage Guidelines
Use the anonymous keyword to display the subscriber aging configuration for anonymous subscribers.
Use the introduced keyword to display the subscriber aging configuration for introduced subscribers.
Authorization: viewer
Examples
The following is an example of how to display the aging of introduced subscribers.
SCE>enable 5
Password:<cisco>
SCE>show interface linecard 0 subscriber aging introduced
Introduced subscriber aging is enabled.
Introduced subscriber aging time is 30 minutes.
SCE>Related Commands
Displays the subscribers in a specified anonymous subscriber group.
Use the “amount” form to display the number of subscribers in the group rather than a complete listing of members.
show interface linecard slot-number subscriber anonymous [amount] [name group-name]
Syntax Description
slot-number The number of the identified slot. Enter a value of 0.
group-name The anonymous subscriber group.
Defaults
This command has no default settings.
Command Modes
User Exec
Usage Guidelines
If no group-name is specified, all anonymous subscribers in all groups are displayed.
Authorization: viewer
Examples
The following is an example of how to display the number of subscribers in the anonymous subscriber group anon1.
SCE>enable 5
Password:<cisco>
SCE>show interface linecard 0 subscriber anonymous amount name anon1
SCE>Related Commands
Displays the configuration of the specified anonymous subscriber group.
Use the “all” form with no group name to display all existing anonymous subscriber groups.
show interface linecard slot-number subscriber anonymous-group [name group-name] [all]
Syntax Description
slot-number The number of the identified slot. Enter a value of 0.
group-name The anonymous subscriber group.
Defaults
This command has no default settings.
Command Modes
User Exec
Usage Guidelines
Authorization: viewer
Examples
The following is an example of how to display the anonymous subscriber groups.
SCE>enable 5
Password:<cisco>
SCE>show interface linecard 0 subscriber anonymous-group all
name IP range Template #
---- -------- ----------
Group1 10.10.10.10/99 0
1 anonymous groups are configured
SCE>Related Commands
Displays the subscriber database counters.
show interface linecard slot-number subscriber db counters
Syntax Description
slot-number The number of the identified slot. Enter a value of 0.
Defaults
This command has no default settings.
Command Modes
User Exec
Usage Guidelines
Authorization: viewer
Counter Definitions
Following are definitions of the counters displayed in the output of this command.
Current values:
Subscribers: Number of currently existing subscribers (excluding subscribers waiting to be removed)
Introduced subscribers: Number of introduced subscribers.
Anonymous subscribers: Number of anonymous subscribers.
Subscribers with mappings: Number of subscribers with mappings.
IP mappings: Number total of IP mappings over all subscribers including allocated ranges
VLAN Entries: Number of VLAN mappings over all subscribers
Subscribers with open sessions: Number of subscribers with open flows (sessions)
Subscribers with TIR mappings: Number of subscribers with mapping to a TP-IP range
Sessions mapped to the default subscriber: Number of open flows (sessions) related to the default party
Peak values:
Peak number of subscribers with mappings:
Peak number occurred at:
Peak number cleared at:
Event counters:
Subscriber introduced: Number of login calls resulting in adding a subscriber.
Subscriber pulled: Number of pullResponse calls.
Subscriber aged: Number of aged subscribers.
Pull-request notifications sent: Number of pull request notifications sent.
State notifications sent: Number of state change notifications sent to peers.
Logout notifications sent: Number of logout events.
Subscriber mapping TIR contradictions: Number of contradicting configured TIRs that are invalid.
Examples
The following example shows how to display the subscriber database counters:
SCE>enable 5
Password:<cisco>
SCE>show interface linecard 0 subscriber db counters
Current values:
===============
Subscribers: 555 used out of 99999 max.
Introduced subscribers: 555.
Anonymous subscribers: 0.
Subscribers with mappings: 555 used out of 79999 max.
IP mappings: 555 used.
VLAN Entries: 0 used.
Subscribers with open sessions: 0.
Subscribers with TIR mappings: 0.
Sessions mapped to the default subscriber: 0.
Peak values:
============
Peak number of subscribers with mappings: 555
Peak number occurred at: 17:55:20 UTC THU December 15 2005
Peak number cleared at: 13:28:49 UTC THU December 15 2005
Event counters:
===============
Subscriber introduced: 555.
Subscriber pulled: 0.
Subscriber aged: 0.
Pull-request notifications sent: 0.
State notifications sent: 0.
Logout notifications sent: 0.
Subscriber mapping TIR contradictions: 0.
SCE>Related Commands
Displays subscribers whose mapping meets one of the following specified criteria:
Is within a specified range of IP addresses
Intersects a specified IP range
Matches a specified VLAN tag
Matches a specified MPLS/VPN mapping
Has no mapping
Use the “amount” form to display the number of subscribers meeting the criteria rather than listing actual subscriber names.
show interface linecard slot-number subscriber mapping [amount] [IP iprange] [included-in iprange] [IP ipadress/range] [MPLS-VPN PE-ID PE-id BGP-label BGP-label] [VLANid vlanid] [none]
Syntax Description
slot-number The number of the identified slot. Enter a value of 0.
iprange Specified range of IP addresses.
vlanid Specified VLAN tag.
PE-id loopback IP address of the relevant PE router (must also specify the BGP-label)
BGP-label label of the relevant BGP LEG (must also specify the MPLS-VPN PE-ID)
Defaults
This command has no default settings.
Command Modes
User Exec
Usage Guidelines
When specifying an MPLS/VPN mapping, you must specify both the MPLS-VPN PE-ID and the BGP-label.
Authorization: viewer
Examples
The following is an example that lists the number of subscribers with no mapping.
SCE>enable 5
Password:<cisco>
SCE>show interface linecard 0 subscriber mapping amount none
Subscribers with no mappings:
DefaultParty
Total 1 subscribers listed.
SCE>Related Commands
Displays information about a specified subscriber. The following information can be displayed:
Mappings
OS counters (bandwidth and current number of flows)
All values of subscriber properties
VAS servers used per VAS Server Group
All of the above
If no category is specified, a complete listing of property values, mappings and counters is displayed.
show interface linecard slot-number subscriber name name [mappings] [counters] [properties] [VAS-servers]
Syntax Description
slot-number The number of the identified slot. Enter a value of 0.
name The subscriber name.
mappings Display subscriber mappings.
counters Display OS counters.
properties Display values of all subscriber properties
vas-servers Display the VAS servers used by the specified subscriber (SCE 2000 platform only)
Defaults
This command has no default settings.
Command Modes
User Exec
Usage Guidelines
Authorization: viewer
Examples
The following is an example of how to list the mappings for the specified subscriber.
SCE>enable 5
Password:<cisco>
SCE>show interface linecard 0 subscriber name gold123 mappings
Subscriber 'gold123' mappings:
IP 10.0.0.0 - Expiration (sec): Unlimited
SCE>Related Commands
Displays all existing subscriber properties.
show interface linecard slot-number subscriber properties
Syntax Description
slot-number The number of the identified slot. Enter a value of 0.
Defaults
This command has no default settings.
Command Mode
User Exec
Usage Guidelines
Authorization: viewer
Examples
The following is an example of how to display the subscriber properties.
SCE>enable 5
Password:<cisco>
SCE>show interface linecard 0 subscriber properties
Subscriber properties:
"monitor" : int16, minValue=0, maxValue=1.
"new_classification_policy" : Uint16.
"packageId : Uint16, minValue=0, maxValue=4999.
"QpLimit" : int32[18].
"QpSet" : Uint8[18].
Subscriber read-only properties:
"concurrentAttacksNumber" : Uint8.
"PU_QP_QuotaSetCounter" : Uint8[18].
"PU_QP_QuotaUsageCounter" : int32[18].
"PU_REP_nonReportedSessionsInTUR" : int32.
"P_aggPeriodType" :Uint8.
"P_blockReportCounter : int32
"P_endOfAggPeriodTimestamp : Uint32.
"P_firstTimeParty" : bool.
"P_localEndOfAggPeriodTimestamp : Uint32.
"P_mibSubCounters16" : Uint16[36][2].
"P_mibSubCounters32" : Uint32[36][2].
"P_newParty" : bool.
"P_numOfRedirections : Uint8.
"P_partyCurrentPackage : Uint16
"P_partyGoOnlineTime : Uint32
"P_partyMonth : Uint16
SCE>Related Commands
Displays the current state of the SM-SCE platform connection, as well as the configured action to take in case of failure of that connection.
show interface linecard slot-number subscriber sm-connection-failure [timeout]
Syntax Description
slot-number The number of the identified slot. Enter a value of 0.
Defaults
This command has no default settings.
Command Modes
User Exec
Usage Guidelines
Use the timeout keyword to display the configured SM-SCE platform link failure timeout value.
Authorization: viewer
Examples
The following examples illustrate the use of this command.
Example 1
The following is an example of how to display the state of the SM-SCE platform connection.
SCE>enable 5
Password:<cisco>
SCE>show interface linecard 0 subscriber subscriber sm-connection-failure
Current SM link state: down.
Please note that this refers to the logical connection,
which means the synchronization with the SM i.e.
There might be cases where the connection at the SM will be up
and down at the SE since synchronization hasn't been completed yet.
Configured action to take when SM link is down: No action
SCE>Example 2
The following is an example of how to display the configured timeout value for the SM-SCE platform connection.
SCE>enable 5
Password:<cisco>
SCE>show interface linecard 0 subscriber subscriber sm-connection-failure timeout
SM SCE link failure timeout is: 90
SCE>Related Commands
Displays a specified subscriber template.
show interface linecard slot-number subscriber templates [all|index template-number]
Syntax Description
slot-number The number of the identified slot. Enter a value of 0.
template-number The index number of the template to be displayed.
Defaults
This command has no default settings.
Command Mode
User Exec
Usage Guidelines
Use the all keyword to display all existing subscriber templates.
Authorization: viewer
Examples
The following is an example of how to display a specified subscriber template.
SCE>enable 5
Password:<cisco>
SCE>show interface linecard 0 subscriber templates index 3
Subscriber template 3 properties
monitor=0
new_classification_policy=0
packageId=0
QpLimit[0..17]=0*17,8
QpSet[0..17]=0*17,1
SCE>Related Commands
Displays the traffic processor mappings statistics.
show interface linecard slot-number subscriber tp-mappings statistics
Syntax Description
slot-number The number of the identified slot. Enter a value of 0.
Defaults
This command has no default settings.
Command Modes
User Exec
Usage Guidelines
Authorization: viewer
Examples
The following is an example of how to display the traffic processor mapping statistics.
SCE>enable 5
Password:<cisco>
SCE>show interface linecard 0 subscriber tp-mappings statistics
SCE>Related Commands
Displays the configuration of a specified TIR.
show interface linecard slot-number subscriber tp-ip-range TP-IP-range-name [all]
Syntax Description
slot-number The number of the identified slot. Enter a value of 0.
TP-IP-range-name Name of the TIR to be displayed.
Defaults
This command has no default settings.
Command Modes
User Exec
Usage Guidelines
Use the all keyword to display all existing TIR configurations.
Authorization: viewer
Examples
Following is an example of how to display all existing TIR configurations.
SCE>enable 5
Password:<cisco>
SCE>show interface linecard 0 subscriber tp-ip-range all
SCE>Related Commands
Displays the existing subscriber mappings for a specified TIR or IP range.
show interface linecard slot-number subscriber [amount] mapping included-in tp-ip-range [TP-IP-range-name | IP]
Syntax Description
slot-number The number of the identified slot. Enter a value of 0.
TP-IP-range-name Name of the TIR for which mappings should be displayed.
IP IP range for which mappings should be displayed.
Defaults
This command has no default settings.
Command Modes
User Exec
Usage Guidelines
Use the amount keyword to display the number of existing mappings only, rather than the mappings themselves.
Authorization: viewer
Examples
The following examples illustrate how to use this command:
Example 1:
Following is an example of how to display all existing mappings for TIR CMTS1.
SCE>enable 5
Password:<cisco>
SCE>show interface linecard 0 subscriber mapping included-in tp-ip-range CMTS1
SCE>Example 2:
Following is an example of how to display the number of existing mappings for TIR CMTS1.
SCE>enable 5
Password:<cisco>
SCE>show interface linecard 0 subscriber amount mapping included-in tp-ip-range CMTS1
SCE>Related Commands
Displays the current linecard TOS marking status.
show interface linecard slot-number tos-marking mode
Syntax Description
slot-number The number of the identified slot. Enter a value of 0.
Defaults
This command has no default settings.
Command Modes
User Exec
Usage Guidelines
Authorization: viewer
Examples
The following example shows that the tos marking mode is enabled:
SCE>enable 5
Password:<cisco>
SCE>show interface linecard 0 tos-marking mode
ToS marking mode on slot 0 is enabled
SCE>Related Commands
Displays the current linecard TOS marking table.
show interface linecard slot-number tos-marking table
Syntax Description
slot-number The number of the identified slot. Enter a value of 0.
Defaults
This command has no default settings.
Command Modes
User Exec
Usage Guidelines
Authorization: viewer
Examples
The following example shows the ToS marking table:
SCE>enable 5
Password:<cisco>
SCE>show interface linecard 0 tos-marking table
BE AF1 AF2 AF3 AF4 FE
green 0x0 0xa 0x12 0x1a 0x22 0x2e
yellow 0x0 0xc 0x14 0x1c 0x24 0x2e
red 0x0 0xe 0x16 0x1e 0x24 0x2e
SCE>Related Commands
Displays the specified traffic counter.
show interface linecard slot-number traffic-counter name [all]
Syntax Description
slot-number The number of the identified slot. Enter a value of 0.
name Name of the traffic counter to be displayed.
Defaults
This command has no default settings.
Command Modes
User Exec
Usage Guidelines
Use the all keyword to display all traffic counters.
Authorization: viewer
Examples
The following example displays information for all existing traffic counters.
SCE>enable 5
Password:<cisco>
SCE>show interface linecard 0 traffic-counter all
Counter 'cnt' value: 0 packets. Rules using it: None.
Counter 'cnt2' value: 1284 packets. Rules using it: Rule2.
2 counters listed out of 32 available.
SCE>Related Commands
Displays the specified traffic rule configuration.
show interface linecard slot-number traffic-rule name name|tunnel-id-mode|all
Syntax Description
slot-number The number of the identified slot. Enter a value of 0.
name Name of the traffic rule to be displayed.
Defaults
This command has no default settings.s
Command Modes
User Exec
Usage Guidelines
Use the all keyword to display all traffic counter rules.
Use the tunnel-id-mode to display all rules defined in tunnel-id-mode.
Authorization: viewer
Examples
The following example displays traffic rule information.
SCE>enable 5
Password:<cisco>
SCE>show interface linecard 0 traffic-rule name Rule1
0 rules listed out of 127 available.
SCE>Related Commands
Displays the following information for VAS configuration and operational status summary.
Global VAS status summary — VAS mode, the traffic link used
VAS Server Groups information summary — operational status, number of configured servers, number of current active servers.
This information may be displayed for a specific server group or all server groups
VAS servers information summary — operational status, Health Check operational status, number of subscribers mapped to this server.
This information may be displayed for a specific server or all servers
VAS health check counters
show interface linecard slot-number vas-traffic-forwarding
show interface linecard slot-number vas-traffic-forwarding health-check
show interface linecard slot-number vas-traffic-forwarding vas server-group number
show interface linecard slot-number vas-traffic-forwarding vas server-group all
show interface linecard slot-number vas-traffic-forwarding vas server-id number
show interface linecard slot-number vas-traffic-forwarding vas server-id all
show interface linecard slot-number vas-traffic-forwarding vas server-id number counters health-check
show interface linecard slot-number vas-traffic-forwarding vas server-id all counters health-check
Syntax Description
slot-number The number of the identified slot. Enter a value of 0.
number ID number of either the specified VAS server or VAS server group for which to display information
Defaults
This command has no default settings.
Command Modes
User Exec
Usage Guidelines
Use the basic command with no parameters to display global VAS traffic forwarding information.
Use the VAS server-group parameter to display information relating to VAS server groups.
Use the VAS server-id parameter to display information relating to individual VAS servers.
Use the counters health-check parameter with the VAS server-id parameter to display information relating to VAS health check.
Use the all keyword with the VAS server-group parameter or the VAS server-id parameter to display information for all servers or server groups.
Authorization: viewer
Examples
The following examples illustrate how to display VAS traffic forwarding information and provide sample outputs.
Example 1
This example shows how to display global VAS status and configuration.
SCE>enable 5
Password:<cisco>
SCE>show interface linecard 0 vas-traffic-forwarding
VAS traffic forwarding is enabled
VAS traffic link configured: Link-1 actual: Link-1
SCE>Example 2
This example shows how to display operational and configuration information for a specific VAS Server Group.
SCE>enable 5
Password:<cisco>
SCE>show interface linecard 0 vas-traffic-forwarding VAS server-group 0
VAS server group 0:
State: Failure configured servers: 0 active servers: 0
minimum active servers required for Active state: 1 failure action: Pass
SCE>Example 3
This example shows how to display operational and configuration information for a specific VAS server.
SCE>enable 5
Password:<cisco>
SCE>show interface linecard 0 vas-traffic-forwarding VAS server-id 0
VAS server 0:
configured mode: enable actual mode: enable VLAN: 520 server group: 3
State: UP
Health Check configured mode: enable status: running
Health Check source port: 63140 destination port: 63141
Number of subscribers: 0
SCE>Example 4
This example shows how to display health check counters for a specific server. (To clear these counters, see clear interface linecard vas-traffic-forwarding vas counters health-check.)
SCE>enable 5
Password:<cisco>
SCE>show interface linecard 0 vas-traffic-forwarding VAS server-id 0 counters health-check
Health Checks statistics for VAS server '0' Upstream Downstream
-----------------------------------------------------------------------
Flow Index '0'
-----------------
Total packets sent : 31028 : 31027 :
Total packets received : 31028 : 31027 :
Good packets received : 31028 : 31027 :
Error packets received : 0 : 0 :
Not handled packets : 0 : 0 :
Average roundtrip (in millisecond) : 0 : 0 :
Error packets details
---------------------------
Reordered packets : 0 : 0 :
Bad Length packets : 0 : 0 :
IP Checksum error packets : 0 : 0 :
L4 Checksum error packets : 0 : 0 :
L7 Checksum error packets : 0 : 0 :
Bad VLAN tag packets : 0 : 0 :
Bad Device ID packets : 0 : 0 :
Bad Server ID packets : 0 : 0 :
SCE>Related Commands
vas-traffic-forwarding vas server-id health-check
vas-traffic-forwarding vas server-group
vas-traffic-forwarding vas server-group failure
vas-traffic-forwarding vas server-id
vas-traffic-forwarding server-id vlan
vas-traffic-forwarding vas traffic-link
show interface linecard subscriber name (To display VAS server used by specified subscriber)
show interface linecard counters (To display VAS bandwidth and VAS dropped bytes)
clear interface linecard vas-traffic-forwarding vas counters health-check
Displays the VLAN tunnel configuration.
show interface linecard slot-number vlan
Syntax Description
slot-number The number of the identified slot. Enter a value of 0.
Defaults
This command has no default settings.
Command Modes
User Exec
Usage Guidelines
Authorization: viewer
Examples
The following example shows the VLAN configuration.
SCE>enable 5
Password:<cisco>
SCE>show interface linecard 0 vlan
VLAN symmetric skip
SCE>Related Commands
Displays the VLAN translation configuration.
show interface linecard slot-number vlan translation
Syntax Description
slot-number The number of the identified slot. Enter a value of 0.
Defaults
This command has no default settings.
Command Modes
User Exec
Usage Guidelines
Authorization: Viewer
Examples
The following example shows the vlan translation configuration.
SCE>enable 5
Password:<cisco>
SCE>show interface linecard 0 vlan translation
vlan translation constant: increment 20
SCE>Related Commands
Displays the current WAP handling state.
show interface linecard slot-number wap
Syntax Description
slot-number The number of the identified slot. Enter a value of 0.
Defaults
This command has no default settings.
Command Modes
User Exec
Usage Guidelines
Authorization: viewer
Example
The following example illustrates how to use this command:
SCE>enable 5
Password:<cisco>
SCE>show interface linecard 0 wap
WAP handling is disabled
SCE>Related Commands
Displays the following information for the specified management interface.
speed
duplex
IP address
auto-fail-over (SCE 2000 platform only)
show interface mng {0/1 | 0/2} [auto-fail-over|duplex|ip address|speed]
Syntax Description
slot-number The number of the identified slot. Enter a value of 0.
interface-number Management interface number: 1 or 2.
Defaults
This command has no default settings.
Command Modes
User Exec
Usage Guidelines
Speed and duplex parameters are specific to the selected interface (port), while other parameters apply to both ports and are displayed by a command to either interface.
If no keyword is specified, all information is displayed.
Authorization: viewer
Examples
This example shows how to display all information for Management port 1.
SCE>enable 5
Password:<cisco>
SCE> show interface mng 0/1
ip address: 10.1.6.145
subnet mask: 255.255.0.0
Configured speed: auto, configured duplex: auto
AutoNegotiation is On, link is Up, actual speed: 100, actual duplex: half
SCE>Related Commands
Displays the following UDI information for the SCE platform:
Device name
Description
Product identifier
Version identifier
Serial number
show inventory
Syntax Description
This command has no arguments or keywords.
Defaults
This command has no default settings.
Command Modes
User Exec
Usage Guidelines
Authorization: viewer
Examples
The following example displays the UDI information for the SCE platform.
SCE>enable 5
Password:<cisco>
SCE>show inventory
NAME: "Chassis", DESCR: "Cisco SCE 2020 Service Control Engine, Multi Mode, 4-port GE"
PID: SCE2020-4XGBE-MM , VID: V01, SN: CAT093604K3
SCE>Related Commands
Shows the access list defined for global IP access to the SCE platform. Only IP addresses permitted access according to this access list are allowed access to the system.
show ip access-class
Syntax Description
This command has no arguments or keywords.
Defaults
This command has no default settings.
Command Modes
User Exec
Usage Guidelines
Authorization: viewer
Examples
The following example shows the IP access class mapping.
SCE>enable 5
Password:<cisco>
SCE>show ip access-class
IP layer is using access-list # 1.
SCE>Related Commands
Shows the status of IP advertising, the configured destination and the configured interval.
Use the [destination] and [interval] versions of the command to display only the configured destination or interval, respectively.
show ip advertising [destination|interval]
Syntax Description
destination Displays IP advertising destination.
interval Displays the interval between ping commands
Defaults
This command has no default settings.
Command Modes
User Exec
Usage Guidelines
Use the form show ip advertising destination to display the IP advertising destination.
Use the form show ip advertising interval to display the interval between ping commands.
Authorization: viewer
Examples
The following example shows the IP advertising status and configuration.
SCE>enable 5
Password:<cisco>
SCE>show ip advertising
IP advertising is disabled
IP advertising destination is 10.10.10.10
IP advertising interval is 853 seconds
SCE>Related Commands
Shows configured default gateway.
show ip default-gateway
Syntax Description
This command has no arguments or keywords.
Defaults
This command has no default settings.
Command Modes
User Exec
Usage Guidelines
Authorization: viewer
Examples
The following example displays the default gateway.
SCE>enable 5
Password:<cisco>
SCE>show ip default-gateway
Default gateway: 10.1.1.1
SCE>Related Commands
Displays the following information for management interface IP filtering.
IP fragment filter enabled or disabled
configured attack threshold (permitted and not-permitted IP addresses)
configured end of attack threshold (permitted and not-permitted IP addresses)
burst size in seconds (permitted and not-permitted IP addresses)
show ip filter
Syntax Description
This command has no arguments or keywords.
Defaults
This command has no default settings.
Command Modes
User Exec
Usage Guidelines
Authorization: viewer
Examples
The following command shows how to display information for management interface IP filtering
SCE>enable 5
Password:<cisco>
SCE> show ip filter
is fragment filtered : 0
Input Bandwidth : 0 Kb/sec
Input packets rate : 2 Pkt/sec
Input bandwidth policer : CIR: 20000.00 Kb/sec BTime: 200 msec LP: 100 %
Input packet rate policer : CIR: 5000.00 Pkt/sec BTime: 200 msec LP: 100 %
Permit monitor :state : no_attack BW: 0
High : CIR: 20000.00 Kb/sec BTime: 10000 msec LP: 100 %
Low : CIR: 20000.00 Kb/sec BTime: 10000 msec LP: 100 %
Denied monitor :state : no_attack BW: 0
High : CIR: 20000.00 Kb/sec BTime: 10000 msec LP: 100 %
Low : CIR: 20000.00 Kb/sec BTime: 10000 msec LP: 100 %
in_bytes : 85115466
in_pkt : 371598
in_pkt_accept : 371598
in_pkt_denied : 0
drop_fragment_cnt : 0
action_delay_due_bw : 0
action_delay_due_pkt : 0
PERMIT events
meStartAttack : 0
meStopAttack : 0
DENIED events
meStartAttack : 0
SCE>Related Commands
Displays the RADIUS client general configuration.
show ip radius-client
Syntax Description
This command has no arguments or keywords.
Defaults
This command has no default settings.
Command Modes
Privileged Exec
Usage Guidelines
Authorization: admin
Examples
The following example illustrates how to use this command.
SCE>enable 10
Password:<cisco>
SCE#show ip radius-client
SCE>Related Commands
Shows the entire routing table and the destination of last resort (default-gateway). When using the prefix and mask parameters, it shows the routing entries from the subnet specified by the prefix and mask pair.
show ip route [prefix mask]
Syntax Description
prefix The prefix of the routing entries to be included.
mask Used to limit the search of routing entries.
Defaults
This command has no default settings.
Command Modes
User Exec
Usage Guidelines
Authorization: viewer
Examples
The following examples illustrate the use of the show ip route command:
Example 1:
The following example shows the default gateway.
SCE>enable 5
Password:<cisco>
SCE>show ip route
gateway of last resort is 10.1.1.1
SCE>Example 2:
The following example shows retrieval of the ip route.
SCE>enable 5
Password:<cisco>
SCE>show ip route 10.1.60.0 255.255.255.0
| prefix | mask | next hop |
|-----------------|-----------------|-----------------|
| 10.1.60.0 | 255.255.255.0 | 10.1.1.5 |
SCE>Related Commands
Displays the status of the RPC adapter (enabled or disabled) and the configured port.
show ip rpc-adapter [sessions]
Syntax Description
sessions Display information regarding RPC adapter sessions.
Defaults
This command has no default settings.
Command Modes
User Exec
Usage Guidelines
Authorization: viewer
Examples
The following example shows the configuration of the RPC adapter.
SCE>enable 5
Password:<cisco>
SCE>show ip rpc-adapter
RPC Server is OFFLINE
RPC Server port is 14374
SCE>Related Commands
Shows the status of the SSH sever, including current SSH sessions.
show ip ssh
Syntax Description
This command has no arguments or keywords.
Defaults
This command has no default settings.
Command Modes
User Exec
Usage Guidelines
Authorization: viewer
Examples
The following example shows how to retrieve the current SSH status.
SCE>enable 5
Password:<cisco>
SCE>show ip ssh
SSH server is disabled.
SSH server does not use any access-list.
There are no active SSH sessions.
SCE>Related Commands
Displays the Telnet configuration.
show line vty timeout|access-class in
Syntax Description
timeout Shows the timeout configured to the Telnet sessions.
access-class in Shows the access list configured to the Telnet server that contains the list of addresses that have access to the system.
Defaults
This command has no default settings.
Command Modes
User Exec
Usage Guidelines
Authorization: viewer
Examples
The following example shows the access list configured for telnet lines.
SCE>enable 5
Password:<cisco>
SCE>show line vty access-class in
Telnet server is using access-list # 1.
SCE>Related Commands
Displays the contents of the user log file.
show log
Syntax Description
This command has no arguments or keywords.
Defaults
This command has no default settings.
Command Modes
User Exec
Usage Guidelines
Authorization: viewer
Examples
The following example illustrates the use of this command.
SCE>enable 5
Password:<cisco>
SCE>show log
2006-01-25 00:14:46 | INFO | CPU #000 | User message files were successfully cleared, new files were opened
2006-01-25 00:23:07 | INFO | CPU #000 | A new password was set for level 10
2006-01-25 00:49:41 | INFO | CPU #000 | System hostname changed to :ecco"
2006-01-25 01:02:41 | INFO | CPU #000 | Time zone set to GMT
2006-01-25 01:06:33 | INFO | CPU #000 | A new password was set for level 15
2006-01-25 01:08:07 | INFO | CPU #000 | A new password was set for level 5
2006-01-25 01:23:07 | INFO | CPU #000 | IP address of slot 0, port 0 set to 10.10.10
2006-01-25 01:56:44 | INFO | CPU #000 | Configuration file '/tffs0/system/config.txt' was saved - file size 1200
2006-01-25 05:34:45 | INFO | CPU #000 | A telnet session from 20.20.20.20 was established
SCE>Related Commands
Displays the configuration of the specified SCE platform logger file.
Also displays the current user log counters.
show logger device {line-attack-file-log | user-file-log[counters|max-file-size|status|nv-counters]}
Syntax Description
See "Usage Guidelines".
Defaults
This command has no default settings.
Command Modes
User Exec
Usage Guidelines
Specify the desired logger device:
Line-Attack-File-Log: displays the following information:
Status
Maximum file size
User-File-Log: displays the following information:
Status
Maximum file size
If you specify User-File-Log, you can specify one of the following options:
counters: Displays the User-File-Log counters
max-file-size: Displays the currently configures maximum file size for the User-File-Log
nv-counters: Displays the User-File-Log non-volatile counters
status: Displays the current status of the User-File-Log
Authorization: viewer
Examples
The following examples illustrate the use of this command.
Example 1
The following example shows the SCE platform Line-Attack-File-Log status and configuration.
SCE>enable 5
Password:<cisco>
SCE>show logger device line-attack-file-log
Line-Attack-File-Log status: Enabled
Line-Attack-File-Log file size: 1000000
SCE>Example 2
The following example shows the SCE platform User-File-Log counters.
SCE>enable 5
Password:<cisco>
SCE>show logger device line-attack-file-log counters
Logger device User-File-Log counters
Total info messages: 62
Total warning messages: 4
Total error messages: 0
Total fatal messages: 0
Last time these counters were cleared: 02:23:27 GMT TUES January 17 2006
SCE>Related Commands
Displays the following information for the management agent:
status (enabled or disabled)
access control list number assigned
show management-agent
Syntax Description
This command has no arguments or keywords.
Defaults
This command has no default settings.
Command Modes
User Exec
Usage Guidelines
Authorization: viewer
Examples
The following example shows how to display the information for the management-agent.
SCE>enable 5
Password:<cisco>
SCE>show management-agent
management agent is enabled.
management agent is active, version: SCE Agent 3.0.3 Build 15
management agent does not use any access-list.
SCE>Related Commands
Displays information, such as installation options, about the specified application file.
show pqi file filename info
Syntax Description
filename The filename of the desired application file.
Defaults
This command has no default settings.
Command Modes
User Exec
Usage Guidelines
Authorization: viewer
Examples
The following example shows how to display application file information.
SCE>enable 5
Password:<cisco>
SCE>show pqi file myfile.txt info
application: sm
description: SCE 1000 sm
target SCE: SCE 1000
module names: sm20001.pm0
SCE>Related Commands
Displays the name of the last pqi file that was installed.
show pqi last-installed
Syntax Description
This command has no arguments or keywords.
Defaults
This command has no default settings.
Command Modes
User Exec
Usage Guidelines
Authorization: viewer
Examples
The following example shows how to find out what pqi file is installed.
SCE>enable 5
Password:<cisco>
SCE>show pqi last-installed
package name: SACS BB
package version 3.0.1. build 02
package date: Tue Jun 10 17:27:55 GMT+00:00 2006
operation: Upgrade
SCE>Related Commands
Displays the RDR formatter configuration.
show rdr-formatter
Syntax Description
This command has no arguments or keywords.
Defaults
This command has no default settings.
Command Modes
User Exec
Usage Guidelines
Authorization: viewer
Examples
The following example shows the configuration of the RDR formatter.
SCE>enable 5
Password:<cisco>
SCE>show rdr-formatter
Status: enabled
Connection is: down
Forwarding mode: redundancy
Connection table:
----------------------------------------------------------
Collector | Port | Status | Priority per Category: |
IP Address / | | |--------------------------|
Host-Name | | | Category1 | Category2 |
----------------------------------------------------------
10.1.1.205 |33000 | Down | 100 | 100 |
10.1.1.206 |33000 | Down | 60 | 60 |
10.12.12.12 |33000 | Down | 40 | 40 |
----------------------------------------------------------
RDR: read: 0 ,sent: 0, thrown: 0
UM: read: 0 ,sent: 0, thrown: 0
Logger: read: 0 ,sent: 0, thrown: 0
Errors: thrown: 0
Last time these counters were cleared: 14:05:57 UTC SUN February 23 2003
SCE>Related Commands
Shows the current RDR formatter connection table and status (main connection status: up\down, forwarding mode, and connection/activity information for each destination).
show rdr-formatter connection-status
Syntax Description
This command has no arguments or keywords.
Defaults
This command has no default settings.
Command Modes
User Exec
Usage Guidelines
Authorization: viewer
Examples
The following example shows the RDR-formatter connection status.
SCE>enable 5
Password:<cisco>
SCE>show rdr-formatter connection-status
Connection is: up
Forwarding mode: redundancy
Connection table:
----------------------------------------------------------
Collector | Port | Status | Priority per Category: |
IP Address / | | |--------------------------|
Host-Name | | | Category1 | Category2 |
----------------------------------------------------------
10.1.1.205 |33000 | Up | 100 primary | 100 primary|
10.1.1.206 |33000 | Down | 60 | 60 |
10.12.12.12 |33000 | Up | 40 | 40 |
----------------------------------------------------------
SCE>Related Commands
show rdr-formatter destination
show rdr-formatter forwarding-mode
show rdr-formatter history-size
Shows the RDR-formatter counters.
show rdr-formatter counters
Syntax Description
This command has no arguments or keywords.
Defaults
This command has no default settings.
Command Modes
User Exec
Usage Guidelines
Authorization: viewer
Examples
The following example shows the RDR-formatter counters.
SCE>enable 5
Password:<cisco>
SCE>show rdr-formatter counters
RDR: read: 0 ,sent: 0, thrown: 0
UM: read: 0 ,sent: 0, thrown: 0
Logger: read: 0 ,sent: 0, thrown: 0
Errors: thrown: 0
Last time these counters were cleared: 14:05:57 GMT SUN January 23 2006
SCE>Related Commands
show rdr-formatter connection-status
show rdr-formatter destination
show rdr-formatter forwarding-mode
show rdr-formatter history-size
Shows the RDR-formatter destinations.
show rdr-formatter destination
Syntax Description
This command has no arguments or keywords.
Defaults
This command has no default settings.
Command Modes
User Exec
Usage Guidelines
Authorization: viewer
Examples
The following example shows the RDR-formatter configured destinations.
SCE>enable 5
Password:<cisco>
SCE>show rdr-formatter destination
Destination: 10.1.1.205
Port: 33000
Destination: 10.1.1.206
Port: 33000
Destination: 10.10.12.10
Port: 33000
SCE>Related Commands
show rdr-formatter connection-status
show rdr-formatter forwarding-mode
show rdr-formatter history-size
Shows the RDR-formatter status (enabled/disabled).
show rdr-formatter enabled
Syntax Description
This command has no arguments or keywords.
Defaults
This command has no default settings.
Command Modes
User Exec
Usage Guidelines
Authorization: viewer
Examples
The following example shows that the RDR formatter is enabled.
SCE>enable 5
Password:<cisco>
SCE>show rdr-formatter enabled
Status: enabled
SCE>Related Commands
show rdr-formatter connection-status
show rdr-formatter destination
show rdr-formatter forwarding-mode
show rdr-formatter history-size
Shows the configured RDR-formatter forwarding-mode (redundancy/multicast/simple load balancing).
show rdr-formatter forwarding-mode
Syntax Description
This command has no arguments or keywords.
Defaults
This command has no default settings.
Command Modes
User Exec
Usage Guidelines
Authorization: viewer
Examples
The following example shows the RDR formatter forwarding-mode.
SCE>enable 5
Password:<cisco>
SCE>show rdr-formatter forwarding-mode
Forwarding mode: redundancy
SCE>Related Commands
show rdr-formatter connection-status
show rdr-formatter destination
show rdr-formatter history-size
Shows the configured size of the RDR formatter history buffer.
show rdr-formatter history-size
Syntax Description
This command has no arguments or keywords.
Defaults
This command has no default settings.
Command Modes
User Exec
Usage Guidelines
Authorization: viewer
Examples
The following example shows the size of the RDR formatter history buffer.
SCE>enable 5
Password:<cisco>
SCE>show rdr-formatter history-size
History buffer size: 16000 bytes
SCE>Related Commands
show rdr-formatter connection-status
show rdr-formatter destination
show rdr-formatter forwarding-mode
Shows the RDR protocol version of the RDR formatter.
show rdr-formatter protocol
Syntax Description
This command has no arguments or keywords.
Defaults
This command has no default settings.
Command Modes
User Exec
Usage Guidelines
The only version of the RDR formatter protocol that is currently supported is RDRv1.
Authorization: viewer
Examples
The following example illustrates the use of this command:
SCE>enable 5
Password:<cisco>
SCE>show rdr-formatter protocol
RDR protocol: RDRv1
SCE>Related Commands
show rdr-formatter connection-status
show rdr-formatter destination
show rdr-formatter forwarding-mode
show rdr-formatter history-size
Shows to which RDR formatter category a specified RDR tag is mapped.
show rdr-formatter rdr-mapping all|tag-ID
Syntax Description
tag-ID The RDR tag to be displayed (in HEX).
Defaults
This command has no default settings.
Command Modes
User Exec
Usage Guidelines
Use the all keyword to display all current RDR-category mappings.
Authorization: viewer
Examples
The following example illustrates the use of this command, showing partial output:
SCE>enable 5
Password:<cisco>
SCE>show rdr-formatter rdr-mapping all
Tag Categories
--- ----------
0xb2d05e01 1
0xb2d05e02 1
0xb2d05e04 1
0xb2d05e05 1
0xf0f0f000 1
0xf0f0f002 1
0xf0f0f004 1
0xf0f0f005 1
0xf0f0f010 1
0xf0f0f016 1
0xf0f0f017 1
0xf0f0f018 1
---More---
SCE>Related Commands
show rdr-formatter connection-status
show rdr-formatter destination
show rdr-formatter forwarding-mode
Shows the current RDR formatter statistics.
show rdr-formatter statistics
Syntax Description
This command has no arguments or keywords.
Defaults
This command has no default settings.
Command Modes
User Exec
Usage Guidelines
Authorization: viewer
Examples
The following example shows the current RDR statistics.
SCE>enable 5
Password:<cisco>
SCE>show rdr-formatter statistics
RDR-formatter statistics
=========================
Category 1
sent: 0
in-queue: 0
thrown: 0
rate: 0 RDRs per second
max rate: 0 RDRs per second
Category 2
sent: 0
in-queue: 0
thrown: 0
rate: 0 RDRs per second
max rate: 0 RDRs per second
Category 3
sent: 0
in-queue: 0
thrown: 0
rate: 0 RDRs per second
max rate: 0 RDRs per second
Category 4
sent: 0
in-queue: 0
thrown: 0
rate: 0 RDRs per second
max rate: 0 RDRs per secondDestination: 10.1.1.205 Port: 33000 Status: down
Sent: 0
Rate: 0 Max: 0
Last connection establishment: 2 days, 10 hours, 25 minutes, 40 seconds
Destination: 10.1.1.206 Port: 33000 Status: down
Sent: 0
Rate: 0 Max: 0
Last connection establishment: 13 hours, 32 minutes, 58 seconds
Destination: 10.10.12.10 Port: 33000 Status: down
Sent: 0
Rate: 0 Max: 0
Last connection establishment: 2 days, 8 hours, 34 minutes, 14 seconds
SCE>Related Commands
show rdr-formatter connection-status
show rdr-formatter destination
show rdr-formatter forwarding-mode
Shows the current configuration.
show running-config [all-data]
Syntax Description
all data Displays defaults as well as non-default settings.
Defaults
This command has no default settings.
Command Modes
Privileged EXEC
Usage Guidelines
Use the all data switch to see sample usage for many CLI configuration commands.
Authorization: admin
Examples
The following example shows the partial output of the show running-config command.
SCE>enable 10
Password:<cisco>
SCE#>show running-config all-data
#This is a general configuration file (running-config).
#Created on 16:48:11 UTC WED May 13 2006
cli-type 1
#version 1
service logger
no service password-encryption
enable password level 10 0 “cisco”
enable password level 15 0 “cisco”
service RDR-formatter
no RDR-formatter destination all
RDR-formatter history-size 0
clock timezone UTC 0
ip domain-lookup
no ip domain-name
no ip name-server
service telnetd
FastEthernet 0/0
ip address 10.1.5.120 255.255.0.0
speed auto
duplex auto
exit
ip default-gateway 10.1.1.1
no ip route all
line vty 0 4no access-class in
timeout 30
exit
SCE#Related Commands
Displays the SCMP (ISG) general configuration and status.
show scmp [all | name name] [counters]
Syntax Description
name Display configuration or counters for the specified destination (SCMP peer device).
Defaults
This command has no default settings.
Command Modes
Privileged Exec
Usage Guidelines
You can display configuration for a specified destination by using the name argument. Use the all keyword to display configuration for all destinations.
Use the counters keyword to display the statistics per destination. For this option, you must either specify the desired destination, using the name argument, or use the all keyword to display statistics for all destinations.
Authorization: admin
Examples
The following example illustrates how to display the SCMP counters for a specified destination.
SCE>enable 10
Password:<cisco>
SCE#show scmp name scmp_peer1 counters
SCMP Connection 'scmp_peer1' counters:
Total messages sent: 72
Total messages received: 72
Establish requests sent: 1
Establish replies received: 1
Accounting requests sent: 20
Accounting replies received: 20
Subscriber queries sent: 0
Subscriber query response recv: 0
Request retry exceeded: 0
Requests replied with errors: 0
Subscriber requests received: 50
Subscriber responses sent: 50
Failed Requests: 0
Keep-alive sent: 1
Keep-alive received: 1
SCE>Related Commands
Displays the SNMP configuration and counters.
show snmp
Syntax Description
This command has no arguments or keywords.
Defaults
This command has no default settings.
Command Modes
User Exec
Usage Guidelines
Authorization: viewer
Counter Definitions
Following are definitions of the counters displayed in the output of this command.
SNMP packets input - Total number of messages delivered to the SNMP entity from the transport service.
Bad SNMP version errors - Total number of SNMP messages delivered to the SNMP protocol entity that were for an unsupported SNMP version.
Unknown community name - Total number of SNMP messages delivered to the SNMP protocol entity that used a SNMP community name not known to said entity.
Illegal operation for community name supplied - Total number of SNMP messages delivered to the SNMP protocol entity that represented an SNMP operation not allowed by the SNMP community named in the message.
Encoding errors - Total number of ASN.1 or BER errors encountered by the SNMP protocol entity when decoding received SNMP messages.
Number of requested variables - Total number of MIB objects successfully retrieved by the SNMP protocol entity as the result of receiving valid SNMP Get-Request and Get-Next PDUs.
Number of altered variables - Total number of MIB objects that have been successfully altered by the SNMP protocol entity as the result of receiving valid SNMP Set-Request PDUs.
Get-request PDUs - Total number of SNMP Get-Request PDUs accepted and processed by the SNMP protocol entity.
Get-next PDUs - Total number of SNMP Get-Next PDUs accepted and processed by the SNMP protocol entity.
Set-request PDUs - Total number of SNMP Set-Request PDUs accepted and processed by the SNMP protocol entity.
SNMP packets output - Total number of SNMP Messages passed from the SNMP protocol entity to the transport service.
Too big errors - Total number of SNMP PDUs generated by the SNMP protocol entity for which the value of the error-status field is `tooBig.'
No such name errors - Total number of SNMP PDUs generated by the SNMP protocol entity for which the value of the error-status is `noSuchName'
Bad values errors - Total number of SNMP PDUs generated by the SNMP protocol entity for which the value of the error-status field is `badValue'.
General errors - Total number of SNMP PDUs generated by the SNMP protocol entity for which the value of the error-status field is `genErr'.
Response PDUs - Total number of SNMP Get-Response PDUs generated by the SNMP protocol entity.
Trap PDUs - Total number of SNMP Trap PDUs generated by the SNMP protocol entity.
Examples
The following example shows the SNMP server configuration and statistics.
SCE>enable 5
Password:<cisco>
SCE>show snmp
SNMP server status: Enabled
Location: London_Office
Contact: Brenda
Authentication Trap Status: Enabled
Communities:
------------
Community: public, Access Authorization: RO, Access List Index: 1
Trap managers:
------------
Trap host: 10.1.1.205, community: public, version: SNMPv2c
SNMP stats:
29 SNMP packets input
0 Bad SNMP version errors
29 Unknown community name
0 Illegal operation for community name supplied
0 Encoding errors
0 Number of requested variables
0 Number of altered variables
0 Get-request PDUs
0 Get-next PDUs
0 Set-request PDUs
29 SNMP packets output
0 Too big errors
0 No such name errors
0 Bad values errors
0 General errors
0 Response PDUs
29 Trap PDUs
SCE>Related Commands
Displays configured communities.
show snmp community
Syntax Description
This command has no arguments or keywords.
Defaults
This command has no default settings.
Command Modes
User Exec
Usage Guidelines
Authorization: viewer
Examples
The following example shows the SNMP manager communities.
SCE>enable 5
Password:<cisco>
SCE>show snmp community
Community: public, Access Authorization: RO,
Access List Index: 1
SCE>Related Commands
Displays the configured MIB-2 variable sysContact.
show snmp contact
Syntax Description
This command has no arguments or keywords.
Defaults
This command has no default settings.
Command Modes
User Exec
Usage Guidelines
Authorization: viewer
Examples
The following example shows the system contact.
SCE>enable 5
Password:<cisco>
SCE>show snmp contact
Contact: Brenda@mycompany.com
SCE>Related Commands
Displays the SNMP agent status (enabled/disabled).
show snmp enabled
Syntax Description
This command has no arguments or keywords.
Defaults
This command has no default settings.
Command Modes
User Exec
Usage Guidelines
Authorization: viewer
Examples
The following example shows the SNMP server enabled status.
SCE>enable 5
Password:<cisco>
SCE>show snmp enabled
SNMP server status: Enabled
SCE>Related Commands
Displays the destination hosts for SNMP traps.
show snmp host
Syntax Description
This command has no arguments or keywords.
Defaults
This command has no default settings.
Command Modes
User Exec
Usage Guidelines
Authorization: viewer
Examples
The following example shows the destination hosts for SNMP traps.
SCE>enable 5
Password:<cisco>
SCE>show snmp host
Trap host: 10.1.1.205, community: public, version: SNMPv2c
SCE>Related Commands
Displays the configured MIB-2 variable sysLocation.
show snmp location
Syntax Description
This command has no arguments or keywords.
Defaults
This command has no default settings.
Command Modes
User Exec
Usage Guidelines
Authorization: viewer
Examples
The following example shows the system location.
SCE>enable 5
Password:<cisco>
SCE>show snmp location
Location: London_Office
SCE>Related Commands
Displays MIB variables.
show snmp mib mib variables
Syntax Description
mib Name of MIB to display.
MIB-II
pcube-SE-MIB
variables Name of group to display.
MIB-II: Use one of the following values: AT, ICMP, interfaces, IP, SNMP, system, TCP or UDP.
pcube-SE-MIB: Use one of the following values: application, chassis, disk, global-controller, link, logger, module, port, rdr-formatter, subscriber, system, traffic-counters, tx-queue, vas-traffic-forwarding
Defaults
This command has no default settings.
Command Modes
User Exec
Usage Guidelines
Authorization: viewer
Examples
The following example shows the MIB-2 system group.
SCE>enable 5
Password:<cisco>
SCE>show snmp mib MIB-II system
sysDescr.0 = CiSco Service Engineering,
SW version: Control Card Version 1.30 build 29,
HW version: SCE GE “RevE”
sysObjectID.0 = 1.3.6.1.4.1.5655.1.2
sysUpTime.0 = 14 hours, 25 minutes, 59 seconds
sysContact.0 = Brenda@mycompany.com
sysName.0 = SCE
sysLocation.0 = London_Office
sysServices.0 = 2
SCE>Related Commands
Displays the SNMP traps generation status (enabled/disabled).
show snmp traps
Syntax Description
This command has no arguments or keywords.
Defaults
This command has no default settings.
Command Modes
User Exec
Usage Guidelines
Authorization: viewer
Examples
The following example shows the SNMP server traps status.
SCE>enable 5
Password:<cisco>
SCE>show snmp traps
Authentication-failure trap status: Disabled
operational-status traps status: Enabled
system-reset trap status: Enabled
chassis traps status: Enabled
RDR-formatter traps status: Enabled
Telnet traps status: Enabled
logger traps status: Enabled
SNTP traps status: Enabled
link-bypass traps status: Enabled
subscriber traps status: Enabled
pull-request-failure traps status: Disabled
attack traps status: Enabled
vas-traffic-forwarding traps status: Enabled
port-operational-status traps status: Enable
SCE>Related Commands
Displays the SNTP configuration and update statistics.
show sntp
Syntax Description
This command has no arguments or keywords.
Defaults
This command has no default settings.
Command Modes
User Exec
Usage Guidelines
Authorization: viewer
Examples
The following example shows statistics from the SNTP clients.
SCE>enable 5
Password:<cisco>
SCE>show sntp
SNTP broadcast client: disabled
last update time: not available
SNTP uni-cast client: enabled
there is one server:
1: 128.182.58.100
last update time: Feb 10 2002, 14:06:41
update interval: 100 seconds
SCE>Related Commands
Shows the startup configuration file. Use this command to review the configuration used by the SCE platform at boot time in comparison with the current configuration to make sure that you approve of all the differences before saving the configuration by using copy running-config startup-config command.
show startup-config
Syntax Description
This command has no arguments or keywords.
Defaults
This command has no default settings.
Command Modes
Privileged EXEC
Usage Guidelines
Authorization: admin
Examples
The following example shows a sample output.
SCE>enable 10
Password:<cisco>
SCE#show startup-config
#Created on 20:17:46 UTC THU January 1 2001
#cli-type 1
#version 1
logger SCE User-File-Log max-file-size 20000
ip domain-name *<cisco>*
ip name-server 10.1.1.1
interface FastEthernet 0/0
ip address 10.1.4.202 255.0.0.0
interface linecard 0
silent
SCE#Related Commands
Displays the operation status of the system.
show system operation-status
Syntax Description
This command has no arguments or keywords.
Defaults
This command has no default settings.
Command Modes
User Exec
Usage Guidelines
Authorization: viewer
Examples
The following example shows the system operation status:
SCE>enable 5
Password:<cisco>
SCE>show system operation-status
System Operation status is Operational
Port status is:
Link on port #1 is down
Link on port #2 is down
SCE>Related Commands
Displays the length of time the system has been running since the last reboot..
show system-uptime
Syntax Description
This command has no arguments or keywords.
Defaults
This command has no default settings.
Command Modes
User Exec
Usage Guidelines
Authorization: viewer
Examples
The following example shows the system uptime for the SCE platform.
SCE>enable 5
Password:<cisco>
SCE>show system-uptime
SCE uptime is 4 days, 13 hours, 21 minutes, 37 seconds
SCE>Related Commands
Displays statistics for the TACACS+ servers.
show tacacs
Syntax Description
This command has no arguments or keywords.
Defaults
This command has no default settings.
Command Modes
User Exec
The 'all' option is available only at the Privileged Exec level.
Usage Guidelines
Use the all keyword to display keys and timeouts as well as other statistics.
Note that, although most show commands are accessible to viewer level users, the 'all' option is available only at the admin level. Use the command 'enable 10' to access the admin level.
Authorization: viewer
The 'all' option is at the admin authorization level.
Examples
The following examples illustrate how to use this command.
Example 1
This example shows how to display statistics for all TACACS+ servers.
SCE>enable 5
Password:<cisco>
SCE> show tacacs
Server: 100.10.10.10./49: opens=0 closes=0 error=0
messages in=0 messages out=0
SCE> Example 2
This example shows how to display statistics, including keys and timeouts, for all TACACS+ servers.
SCE>enable 10
Password:<cisco>
SCE# show tacacs all
Server: 100.10.10.10./49: opens=0 closes=0 error=0
messages in=0 messages out=0
timeout=20
uses default timeout= yes
key= a
uses default key= no
SCE# Related Commands
Displays any active Telnet sessions.
show telnet sessions
Syntax Description
This command has no arguments or keywords.
Defaults
This command has no default settings.
Command Modes
User Exec
Usage Guidelines
Authorization: viewer
Examples
The following example shows that there is one active Telnet session.
SCE>enable 5
Password:<cisco>
SCE>show telnet sessions
There is 1 active telnet session:
Index | Source
================
0 | 10.1.1.201
SCE>Related Commands
Displays the status of the telnet server daemon.
show telnet status
Syntax Description
This command has no arguments or keywords.
Defaults
This command has no default settings.
Command Modes
User Exec
Usage Guidelines
Authorization: viewer
Examples
The following example shows that the telnet daemon is currently enabled.
SCE>enable 5
Password:<cisco>
SCE>show telnet status
Telnet daemon is enabled.
SCE>Related Commands
Displays the current time zone and daylight saving time configuration as configured by the user.
show timezone
Syntax Description
This command has no arguments or keywords.
Defaults
This command has no default settings.
Command Modes
User Exec
Usage Guidelines
Authorization: viewer
Examples
The following example shows the time zone configured by the user.
SCE>enable 5
Password:<cisco>
SCE>show timezone
Time zone: ISR minutes offset from UTC: 120
SCE>Related Commands
Displays the users in the local database, including passwords.
show users
Syntax Description
This command has no arguments or keywords.
Defaults
This command has no default settings.
Command Modes
Privilege Exec
Usage Guidelines
Note that, although most show commands are accessible to viewer level users, this command is available only at the admin level. Use the command 'enable 10' to access the admin level.
Authorization: admin
Examples
This example shows how to display the users in the local database.
SCE>enable 10
Password:<cisco>
SCE# show users
User: name = Joe
privilege level = 10
password = joespwd
is password encrypted = no
SCE#Related Commands
Displays the configuration information for the system including the hardware version, the software version, the application used, and other configuration information.
show version
Syntax Description
This command has no arguments or keywords.
Defaults
This command has no default settings.
Command Modes
User Exec
Usage Guidelines
Authorization: viewer
Examples
The following example shows the current version information of the SCE platform.
SCE>enable 5
Password:<cisco>
SCE>show version
System version: Version 3.0.0 Build 240
Build time: Dec 11 2005, 07:34:47
Software version is: Version 3.0.0 Build 240
Hardware information is:
rx : 0x0075
dp : 0x1808
tx : 0x1708
ff : 0x0077
cls : 0x1721
cpld : 0x0025
Lic : 0x0176
rev : G001
Bootrom : 2.1.0
L2 cache : Samsung 0.5
lic type : MFEoptic mode :
optic mode : MM
Product S/N : CAT093604K3
Product ID : SCE2020-4XGBE-MM
Version ID : V01
Deviation :
Part number : 800-26601-01
Revision : B0
Software revision: G001
LineCard S/ : CAT09370L1Q
Power Supply type: AC
SML Application information is:
Application file: /tffs0/temp.sli
Application name:
Application help:
Original source file: H:\work\Emb\jrt\V2.5\sml\actions\drop\drop_basic_anyflow.san
Compilation date: Wed, September 22, 2006 at 21:25:21
Compiler version: SANc v3.0.5 Build 32 gcc_codelets=true built on: Tue November 12 2006 09:51:57 AM.;SME plugin v1.1
Default capacity option used.
Logger status: Enabled
Platform: SCE 2000 - 4xGBE
Management agent interface version: SCE Agent 3.0.0 Build 18
Software package file: ftp://vk:vk@10.1.8.22/P:/EMB/LatestVersion/3.0.5/se1000.pkg
SCE2000 uptime is 21 minutes, 37 seconds
SCE>Related Commands
Displays the complete version information as well as the running configuration for all components.
show version all
Syntax Description
This command has no arguments or keywords.
Defaults
This command has no default settings.
Command Modes
User Exec
Usage Guidelines
Authorization: viewer
Examples
The following example shows version and configuration information for all the system components.
SCE>enable 5
Password:<cisco>
SCE>show version all
System version: Version 3.0.0 Build 240
Build time: Dec 11 2005, 07:34:47
Software version is: Version 3.0.0 Build 240
Hardware information is:
rx : 0x0075
dp : 0x1808
tx : 0x1708
ff : 0x0077
cls : 0x1721
cpld : 0x0025
Lic : 0x0176
rev : G001
Bootrom : 2.1.0
L2 cache : Samsung 0.5
lic type : MFE
optic mode : MM
Product S/N : CAT093604K3
Product ID : SCE2020-4XGBE-MM
Version ID : V01
Deviation :
Part number : 800-26601-01
Revision : B0
Software revision : G001
LineCard S/N : CAT09370L1Q
Power Supply type : AC
SML Application information is:
Application file: /tffs0/temp.sli
Application name:
Application help:
Original source file:
H:\work\Emb\jrt\V2.5\sml\actions\drop\drop_basic_anyflow.san
Compilation date: Wed, September 22, 2006 at 21:25:21
Compiler version: SANc v3.0.5 Build 32 gcc_codelets=true built on: Tue November 12 2006 09:51:57 AM.;SME plugin v1.1
Default capacity option used.
Logger status: Enabled
Platform: SCE2000 - 4xGBE
Management agent interface version: SCE Agent 3.0.5 Build 18
Software package file: ftp://vk:vk@10.1.8.22/P:/EMB/LatestVersion/3.0.5/se1000.pkg
SCE2000 uptime is 21 minutes, 37 seconds
Current configuration:
======================
#This is a general configuration file (running-config).
#Created on 10:14:59 UTC TUE November 12 2006
.
interface LineCard 0
connection-mode active
no silent
.
.
Software package file: Not available
Unified management package file: /tffs0/images/um13012.pkg
SCE>Related Commands
Displays version information for the current software.
show version software
Syntax Description
This command has no arguments or keywords.
Defaults
This command has no default settings.
Command Modes
User Exec
Usage Guidelines
Authorization: viewer
Examples
The following example shows the current software version.
SCE>enable 5
Password:<cisco>
SCE>show version software
Software version is: Version 3.0.5 Build 240
SCE>Related Commands
Disables the linecard from reporting events. Use the [no] form of this command if you want the linecard to send reports.
silent
no silent
Syntax Description
This command has no arguments or keywords.
Defaults
No silent
Command Modes
Linecard Interface Configuration
Usage Guidelines
Authorization: admin
Examples
The following example changes the linecard state to silent.
SCE>enable 10
Password:<cisco>
SCE#config
SCE(config)#interface linecard 0
SCE(config if)#silent
SCE(config if)#Related Commands
Enables the SNMP agent. You can use any of the other SNMP-server commands to enable the SNMP agent.
Use the no form to disable the SNMP agent from responding to SNMP managers. All SNMP settings are saved and are restored when the SNMP agent is re-enabled.
snmp-server enable
no snmp-server
Syntax Description
This command has no arguments or keywords
Defaults
disabled
Command Modes
Global Configuration
Usage Guidelines
You must define at least one community string in order to allow SNMP access. For complete information on community strings.
Authorization: admin
Examples
The following example disables the SNMP server.
SCE>enable 10
Password:<cisco>
SCE#config
SCE(config)#no snmp-server
SCE(config)#Related Commands
Sets a community string. Use the no form of the command to remove a community string.
The optional acl-number parameter states the access list number to restrict the managers that can use this community.
snmp-server community community-string [read-option] [acl-number]
no snmp-server community community-string [read-option] [acl-number]
no snmp-server community all
Syntax Description
community-string The SNMPv1 and SNMPv2c security string that identifies a community of managers that can access the SNMP server.
read-option Legal values are ro and rw. The default ro (read-only) option allows managers to view MIB variables. rw sets the variable to read-write.
acl-number Number of the access list that lists the managers who may access the SCE platform via SNMP.
Defaults
no SNMP access
Command Modes
Global Configuration
Usage Guidelines
Use the all keyword with the no form of the command to remove all configured communities.
Authorization: admin
Examples
The following example configures an SNMP managers community that has read-only permissions for the SCE platform MIB. Only SNMP managers in access list 1 can access the SCE platform.
SCE>enable 10
Password:<cisco>
SCE#config
SCE(config)#snmp-server community public ro 1
SCE(config)#Related Commands
access-list
Sets the MIB-2 variable system contact. Use the no form of this command to remove the contact setting.
snmp-server contact contact
no snmp-server contact
Syntax Description
contact A string that identifies the system contact.
Defaults
This command has no default settings.
Command Modes
Global Configuration
Usage Guidelines
Authorization: admin
Examples
The following example configures the system contact.
SCE>enable 10
Password:<cisco>
SCE#config
SCE(config)#snmp-server contact Brenda@MyCompany.com
SCE(config)#Related Commands
Enables/disables SNMP traps (only authentication-failure traps and enterprise traps can be controlled using this command). Use the [default] form of this command to reset SNMP traps to the default status.
snmp-server enable traps [snmp [snmp trap name]] [enterprise [enterprise trap name]]
no snmp-server enable traps [snmp [snmp trap name]] [enterprise [enterprise trap name]]
default snmp-server enable traps [snmp [snmp trap name]] [enterprise [enterprise trap name]]
Syntax Description
snmp trap name Optional parameter used with the snmp parameter to control a specific snmp trap.
Setting = Authentication
enterprise trap name Optional parameter used with the enterprise parameter to control a specific enterprise trap.
Settings = attack, chassis, link-bypass, logger, operational-status, port-operational-status, pull-request-failure, RDR-formatter, session, SNTP, subscriber, system-reset, telnet, vas-traffic-forwarding
Defaults
snmp traps: disabled
enterprise traps: enabled
Command Modes
Global Configuration
Usage Guidelines
There are two classes of SNMP traps that are controlled by this command
snmp traps
enterprise traps
The options snmp and enterprise are parameters specifying the class of traps that are to be enabled/disabled by this command. Each class, or type, is composed of specific traps. Use these parameters as follows:
To enable/disable all traps of one type: Specify only
snmporenterprise.To enable/disable only one specific trap: Specify
snmporenterprisewith the additional trap name parameter naming the desired trap.To enable/disable all traps: Do not specify either
snmporenterprise.
Since, at this time, the only snmp type trap is the authentication trap, the snmp and authentication parameters are currently redundant.
Authorization: admin
Examples
The following example configures the SNMP server to send traps.
SCE>enable 10
Password:<cisco>
SCE#config
SCE(config)#snmp-server enable traps
SCE(config)#Related Commands
Sets destination hosts for SNMP traps.
snmp-server host address [traps] [version version] community-string
no snmp-server host address [traps] [version version] community-string
no snmp-server host all
Syntax Description
address The IP address of the SNMP server host.
traps Optional switch, does not influence command functionality.
version Version of the SCE platform software running in the system. Can be set to 1 or 2c.
community-string The SNMPv1 and SNMPv2c security string that identifies a community of managers that are able to access the SNMP server.
Defaults
No hosts
Command Modes
Global Configuration
Usage Guidelines
If no communities are specified by the snmp-server community command, the community string specified by this command is used by the SCE platform, as if an snmp-server community community-string ro was given.
Use the all keyword with the no form of the command to remove all configured hosts.
Authorization: admin
Examples
The following example adds a host destination for SNMP traps.
SCE>enable 10
Password:<cisco>
SCE#config
SCE(config)#snmp-server host 10.1.1.205 version 2c public
SCE(config)#Related Commands
Gives a name to the SCE platform location, setting the MIB-2 variable sysLocation. Use the no form of this command to remove the location setting.
snmp-server location location
no snmp-server location
Syntax Description
location A string that specifies the system location.
Defaults
no location
Command Modes
Global Configuration
Usage Guidelines
Authorization: admin
Examples
The following example configures the system location.
SCE>enable 10
Password:<cisco>
SCE#config
SCE(config)#snmp-server location London_Office
SCE(config)#Related Commands
Enables the SNTP multicast client to accept SNTP broadcasts from any SNTP server.
Use the no form of this command to disable the SNTP multicast client.
sntp broadcast client
no sntp broadcast client
Syntax Description
This command has no arguments or keywords.
Defaults
By default, the SNTP multicast client is disabled.
Command Modes
Global Configuration
Usage Guidelines
Authorization: admin
Examples
The following example enables the SNTP multicast client.
SCE>enable 10
Password:<cisco>
SCE#config
SCE(config)#sntp broadcast client
SCE(config)#Related Commands
Enables the SNTP uni-cast client to query the specified SNTP server. Use the no form of this command to disable the SNTP uni-cast server.
sntp server {address|hostname}
no sntp server hostname
no sntp server all
Syntax Description
address The IP address of the SNTP server.
hostname The hostname of the SNTP server.
Defaults
SNTP uni-cast server is disabled
Command Modes
Global Configuration
Usage Guidelines
Use the all keyword with the no form of this command to disable all SNTP uni-cast servers.
Authorization: admin
Examples
The following example enables an SNTP server at a specified IP address.
SCE>enable 10
Password:<cisco>
SCE#config
SCE(config)#sntp server 128.182.58.100
SCE(config)#Related Commands
Defines the interval (in seconds) between SNTP uni-cast update queries.
sntp update-interval interval
Syntax Description
interval The interval between queries in seconds.
Defaults
interval = 900 seconds
Command Modes
Global Configuration
Usage Guidelines
Authorization: admin
Examples
The following example sets the SNTP update interval for 100 seconds.
SCE>enable 10
Password:<cisco>
SCE#config
SCE(config)#sntp update-interval 100
SCE(config)#Related Commands
Configures the speed of the FastEthernet Interface (may be either line or management interface) to either 10 Mbps or 100 Mbps. Auto means auto-negotiation (do not force speed on the link).
speed speed
no speed
Syntax Description
speed The speed in Mbps or auto-negotiation. Can be set to 10, 100 or auto.
Defaults
speed = auto
Command Modes
FastEthernet Interface Configuration
Mng Interface Configuration
Usage Guidelines
Use this command to configure the speed of any Fast Ethernet interface. There are two types of Fast Ethernet interfaces:
Fast Ethernet management interface: The management interfaces on all SCE platforms are Fast Ethernet interfaces.
command mode = Mng Interface Configuration
interface designation = 0/1 or 0/2
Fast Ethernet line interface: Only the SCE 2000 4/8xFE platform has Fast Ethernet line interfaces.
command mode = FastEthernet Interface Configuration
interface designation = 0/1, 0/2, 0/3, or 0/4
If the duplex mode (see duplex) of the relevant interface is configured to auto, changing this configuration has no effect.
Authorization: admin
Examples
The following examples illustrate how to use this command.
Example 1
The following example configures the speed of line FastEthernet port #3 to auto.
SCE2000>enable 10
Password:<cisco>
SCE2000FE#config
SCE2000FE(config)#interface FastEthernet 0/3
SCE2000FE(config if)#speed 100
SCE2000FE(config if)#Example 2
The following example configures the speed of management port #1 to auto.
SCE>enable 10
Password:<cisco>
SCE#config
SCE(config)#interface mng 0/1
SCE(config if)#speed auto
SCE(config if)#Related Commands
Exports anonymous groups to the specified csv file.
subscriber anonymous-group export csv-file filename
Syntax Description
filename Name of the csv file to which the anonymous groups information is to be exported.
Defaults
This command has no default settings.
Command Modes
Linecard Interface Configuration
Usage Guidelines
Authorization: admin
Examples
The following example exports anonymous groups information to the specified file
SCE>enable 10
Password:<cisco>
SCE#config
SCE(config)#interface linecard 0
SCE(config if)# subscriber anonymous-group export csv-file s_g_0507.csv
SCE(config if)#Related Commands
Creates anonymous groups by importing anonymous subscribers from the specified csv file.
subscriber anonymous-group import csv-file filename
Syntax Description
filename Name of the csv file containing the anonymous groups information.
Defaults
This command has no default settings.
Command Modes
Linecard Interface Configuration
Usage Guidelines
Anonymous Group csv files have a fixed format. All lines have the same structure, as described below:
Anonymous-group-name, IP-range [, subscriber-template-number].
If no subscriber-template-number is specified, then the anonymous subscribers of that group will use the default template (#0), which cannot be changed by template import operations.
Following is an example of an anonymous group csv file:
group1, 10.1.0.0/16, 2
group2, 176.23.34.0/24, 3
group3, 10.2.0.0/16
Authorization: admin
Examples
The following example imports subscriber from the file subscribers_groups.csv.
SCE>enable 10
Password:<cisco>
SCE#config
SCE(config)#interface linecard 0
SCE(config if)# subscriber anonymous-group import csv-file subscribers_groups.csv
SCE(config if)#Related Commands
Assigns the anonymous group to the specified SCMP destination.
Use the no form of the command to remove the anonymous group from the specified SCMP destination.
subscriber anonymous-group name group-name [IP-range range template template] scmp name name
no subscriber anonymous-group name group-name [IP-range range template template] scmp name name
Syntax Description
group-name Name of the anonymous group
range IP range of the anonymous group (optional)
template Group template for the anonymous group (optional)
name Name of the SCMP peer device
Defaults
This command has no default settings.
Command Modes
Linecard Interface Configuration
Usage Guidelines
An anonymous group is a specified IP range, possibly assigned a subscriber template. This command defines the specified anonymous group to be the IP range managed by the SCMP peer device.
Subscribers for this anonymous group are generated when subscriber traffic from the SCMP peer device is detected. If a subscriber template has been assigned to the group, the anonymous subscribers generated have properties as defined by that template. If no subscriber template has been assigned, the default template is used.
You must define the specified SCMP peer device before assigning the anonymous group (see scmp name).
Authorization: admin
Examples
The following example illustrates how to assign an anonymous group to an SCMP device.
SCE>enable 10
Password:<cisco>
SCE#config
SCE(config)#scmp name peer_device1 radius radius1 secret abcdef
SCE(config)#interface linecard 0
SCE(config if)#subscriber anonymous-group name anon_group IP-range 192.54.65.0/8 template 2 scmp name peer_device1
SCE(config if)#Related Commands
Exports subscribers to the specified csv file. Subscriber csv files are application-specific. Refer to the relevant application documentation for the definition of the file format.
subscriber export csv-file filename
Syntax Description
filename Name of the csv file to which the subscriber information is to be exported.
Defaults
This command has no default settings.
Command Modes
Linecard Interface Configuration
Usage Guidelines
Subscriber csv files are application-specific. Refer to the relevant application documentation for the definition of the file format.
Authorization: admin
Examples
The following example exports subscribers to the specified file.
SCE>enable 10
Password:<cisco>
SCE#config
SCE(config)#interface linecard 0
SCE(config if)# subscriber export csv-file gold_subscribers_04072003.csv
SCE(config if)#Related Commands
Imports subscribers from the specified csv file.
subscriber import csv-file filename
Syntax Description
filename Name of the csv file containing the subscriber information.
Defaults
This command has no default settings.
Command Modes
Linecard Interface Configuration
Usage Guidelines
Subscriber csv files are application-specific. Refer to the relevant application documentation for the definition of the file format.
Authorization: admin
Examples
The following example imports subscriber from the file gold_subscribers.csv.
SCE>enable 10
Password:<cisco>
SCE#config
SCE(config)#interface linecard 0
SCE(config if)# subscriber import csv-file gold_subscribers.csv
SCE(config if)#Related Commands
Assigns a value to the specified property of the specified subscriber.
subscriber name subs-name property propertyname value property-val
Syntax Description
subs-name Name of the subscriber.
propertyname The subscriber property for which the value is to be assigned
property-val The value to be assigned
Defaults
This command has no default settings.
Command Modes
Linecard Interface Configuration
Usage Guidelines
This command can be used to enable or disable the generation of the real-time subscriber usage RDRs (see example below).
To enable RDR generation, set propertyname = monitor and property-val = 1
To disable RDR generation, set propertyname = monitor and property-val = 0
To enable subscriber monitoring for a group of subscribers, create a text file containing the sequence of CLI commands, including the commands to access the appropriate CLI mode. The file would look something like this:
configure
interface linecard 0
subscriber name Jerry property monitor value 1
subscriber name George property monitor value 1
subscriber name Elaine property monitor value 1
subscriber name Kramer property monitor value 1
subscriber name Newman property monitor value 1Use the script run command to run the script.
Authorization: admin
Examples
The following example disables the generation of the real-time subscriber usage RDRs for subscriber jane_smith.
SCE>enable 10
Password:<cisco>
SCE#config
SCE(config)#interface linecard 0
SCE(config if)#subscriber name jane_smith property monitor value 0
SCE(config if)#Related Commands
Configures the behavior of the system in case of communication failure between the SM and the SCE platform.
subscriber sm-connection-failure action [force-failure|none|remove-mappings|shut]
subscriber sm-connection-failure action timeout timeout
default subscriber sm-connection-failure
Syntax Description
timeout The timeout interval in seconds.
force-failure Force failure of the SCE platform in the event of any loss of connection with the SM
The SCE platform then acts according to the behavior configured for the failure state.
none No action needs to be taken in the event of any loss of connection between the SCE platform and the SM
remove-mappings Remove all current subscriber mappings n the event of any loss of connection between the SCE platform and the SM
shut The SCE platform shuts down and quits providing service.
Defaults
Default action = none
Command Modes
Linecard Interface Configuration
Usage Guidelines
If SM functionality is not critical to the operation of the system: no action needs to be configured.
If SM functionality is critical to the operation of the system: configure forced failure of the SCE platform in the event of any loss of connection with the SM.
Use the timeout parameter to configure the time interval after which a failure condition is detected and the specified action will be taken by the system.
Authorization: admin
Examples
The following example configures forced failure of the SCE platform in case of failure of the SM.
SCE>enable 10
Password:<cisco>
SCE#config
SCE(config)#interface linecard 0
SCE (config if)#subscriber sm-connection-failure action force-failure
SCE (config if)#Related Commands
Exports a subscriber template to the specified csv file, according to the party template.
subscriber template export csv-file filename
Syntax Description
filename Name of the csv file to which the subscriber template is to be exported.
Defaults
This command has no default settings.
Command Modes
Linecard Interface Configuration
Usage Guidelines
Authorization: admin
Examples
The following example exports the subscriber template to the specified file.
SCE>enable 10
Password:<cisco>
SCE#config
SCE(config)#interface linecard 0
SCE(config if)# subscriber template export csv-file gold0507.csv
SCE(config if)#Related Commands
Imports a subscriber template from the specified csv file, creating a party template.
subscriber template import csv-file filename
Syntax Description
filename Name of the csv file containing the subscriber template.
Defaults
This command has no default settings.
Command Modes
Linecard Interface Configuration
Usage Guidelines
Authorization: admin
Examples
The following example imports the subscriber template from the file gold0507.csv.
SCE>enable 10
Password:<cisco>
SCE#config
SCE(config)#interface linecard 0
SCE(config if)# subscriber template import csv-file gold0507.csv
SCE(config if)#Related Commands
Use this command to create or update a TIR. Use the no form of this command to delete a specified TIR.
subscriber tp-ip-range name tp-ip-range-name ip-range ip-range target-tp target-tp [remove-subscriber-mapping]
no subscriber tp-ip-range [name name | all] [remove-subscriber-mapping]
Syntax Description
TP-IP-range name Meaningful name assigned to this traffic processor IP range
IP-range IP address and mask length defining the IP range
target-TP number of the traffic processor to which this TIR is to be assigned
Defaults
This command has no default settings.
Command Modes
Linecard Interface Configuration
Usage Guidelines
Use the remove-subscriber-mappings keyword when editing or deleting a TIR to remove any existing subscriber mappings. If mappings exist, and this keyword is not used, the command will not execute.
When deleting a TIR, only the range name is required.
To delete all existing TIRs, use the [no] form of the command with the all keyword instead of the range name.
Authorization: admin
Examples
The following example creates a TIR named CMTS1 and assigns it to traffic processor# 5. The remove-subscriber-mappings keyword is used to remove any existing subscriber mappings.
SCE>enable 10
Password:<cisco>
SCE#config
SCE(config)#interface linecard 0
SCE(config if)#subscriber tp-ip-range name CMTS1 ip-range 10.10.10.0/128 target-tp 5 remove-subscriber-mappings
SCE(config if)#Related Commands
show interface linecard subscriber tp-ip-range
Reserves a specified number of subscriber rules for TIRs.
subscriber tp-mappings max-tp-ip-ranges max-tp-ip-ranges
default subscriber tp-mappings
Syntax Description
max-TP-IP-ranges Number of rules to allocate for TIRs
Defaults
This command has no default settings.
Command Modes
Linecard Interface Configuration
Usage Guidelines
The maximum number of allowed reserved rules is 4096.
By default 0 (zero) rules are reserved for TIRs.
Updating this configuration is a major system event and can only be performed when no subscriber mappings or TIRs are configured.
Use the default version of this command to restore default subscriber rule allocation.
Authorization: admin
Examples
The following example reserves 500 subscriber rules for TIRs.
SCE>enable 10
Password:<cisco>
SCE#config
SCE(config)#interface linecard 0
SCE(config if)#subscriber tp-mappings max-tp-ip-ranges 500
SCE(config if)#Related Commands
show interface linecard subscriber mapping included-in tp-ip-range
show interface linecard subscriber tp-mappings statistics
Use this command to import TIR definitions from a csv file and to export TIR definitions to a csv file.
subscriber TP-IP-range {import | export} csv-file filename [remove-subscriber-mapping]
Following is the format of the csv file:
range name, ip-address/mask-length, target-TP
Syntax Description
csv-filename csv file to be imported or exported to
import Import from the specified csv file.
export Export to the specified csv file.
Defaults
This command has no default settings.
Command Modes
Linecard Interface Configuration
Usage Guidelines
Use the remove-subscriber-mappings keyword when importing TIR definitions to remove any existing subscriber mappings for specified IP ranges. If mappings exist, and this keyword is not used, the import command will not execute.
The remove-subscriber-mappings keyword is not applicable when exporting to a csv file.
Authorization: admin
Examples
The following example imports TIR information from the csv file TIR_definitions. The remove-subscriber-mappings keyword is used to remove any subscriber mappings that currently exist in the system on any of the IP ranges specified in the file.
SCE>enable 10
Password:<cisco>
SCE#config
SCE(config)#interface linecard 0
SCE(config if)#SCE(config if)#subscriber TP-IP-range import csv-file TIR_definitions remove-subscriber-mappingsRelated Commands
show interface linecard subscriber TP-IP-range
Enables/disables subscriber aging for the specified type of subscribers (anonymous or introduced).
The aging period may also be defined when aging is enabled.
subscriber aging anonymous|introduced [timeout aging-time]
no subscriber aging anonymous|introduced
Syntax Description
aging-time In minutes.
anonymous Anonymous groups subscribers
introduced Introduced subscribers
Defaults
This command has no default settings.
Command Modes
Linecard Interface Configuration
Usage Guidelines
The most common usage for aging is for anonymous subscribers, since this is the easiest way to ensure that anonymous subscribers who have logged-out of the network are removed from the SCE platform and are no longer occupying resources. Aging time can be configured individually for introduced subscribers and for anonymous subscribers.
Authorization: admin
Examples
The following example enables subscriber aging for anonymous subscribers with a timeout period of 10 minutes.
SCE>enable 10
Password:<cisco>
SCE#config
SCE(config)#interface linecard 0
SCE(config if)#subscriber aging anonymous timeout 10
SCE(config if)#Related Commands
Defines a new TACACS+ server host that is available to the SCE platform TACACS+ client.
Use the no form of the command to remove a TACACS+ server host.
The Service Control solution supports a maximum of three TACACS+ server hosts.
tacacs-server host host-name [port port#] [timeout timeout-interval] [key key-string]
no tacacs-server host host-name
Syntax Description
host-name name of the server
port # TACACS+ port number
timeout-interval time in seconds that the server waits for a reply from the server host before timing out
key-string encryption key that the server and client will use when communicating with each other. Make sure that the specified key is actually configured on the TACACS+ server host.
Defaults
Default port# = 49
Default timeout-interval = 5 seconds or user-configured global default timeout interval
Default key-string = no key or user-configured global default key
Command Modes
Global Configuration
Usage Guidelines
The user can configure a global default timeout interval that will be applied as the timeout to all TACACS+ server hosts. The timeout interval then does not need to be configured explicitly for each server. (See tacacs-server timeout)
Similarly, the user can configure a global default key that will be applied to all TACACS+ server hosts. (See tacacs-server key)
If the global default timeout interval and key string are configured, an explicitly configured value for a specific TACAS+ server overrides the global default for that server.
Authorization: admin
Examples
The following example shows how to configure a TACACS+ server host using the default port and no key.
SCE>enable 10
Password:<cisco>
SCE#config
SCE(config)#tacacs-server host server1 timeout 8
SCE(config)#Related Commands
Defines the global default encryption key for the TACACS+ server hosts.
Use the no form of the command to clear the TACACS+ key.
tacacs-server key key-string
no tacacs-server key
Syntax Description
key-string default encryption key that all TACACS servers and clients will use when communicating with each other. Make sure that the specified key is actually configured on the TACACS+ server hosts.
Defaults
Default is no encryption
Command Modes
Global Configuration
Usage Guidelines
This default key can be overridden for a specific TACACS+ server host by explicitly configuring a different key for that TACACS+ server host.
If no global default key is defined, each TACACS+ server host may still have a specific key defined. However, any server host that does not have a key explicitly defined (uses the global default key) is now configured to use no key.
Authorization: admin
Examples
The following example show how to configure the keystring.
SCE>enable 10
Password:<cisco>
SCE#config
SCE(config)#tacacs-server key ABCDE
SCE(config)#Related Commands
Defines the global default timeout interval for the TACACS+ server hosts.
Use the no form of the command to clear the global default timeout interval.
tacacs-server timeout timeout-interval
no tacacs-server timeout
Syntax Description
timeout-interval default time in seconds that the server waits for a reply from the server host before timing out.
Defaults
Default = 5 seconds
Command Modes
Global Configuration
Usage Guidelines
This default timeout interval can be overridden for a specific TACACS+ server host by explicitly configuring a different timeout interval for that TACACS+ server host.
If no global default timeout interval is defined, each TACACS+ server host may still have a specific timeout interval defined. However, any server host that does not have a timeout interval explicitly defined (uses the global default timeout interval) is now configured to a five second timeout interval.
Authorization: admin
Examples
This example shows how to configure a default timeout interval of 10 seconds.
SCE>enable 10
Password:<cisco>
SCE#config
product>(config)#tacacs-server timeout 10
product>(config)#Related Commands
Starts a Telnet session.
telnet address [ports]
Syntax Description
address Telnet access address.
ports Optional port number.
Defaults
Default port is 23.
Command Modes
Privileged EXEC
Usage Guidelines
Authorization: admin
Examples
The following example starts a telnet session:
SCE>enable 10
Password:<cisco>
SCE#telnet 10.1.5.120
connecting to 10.1.5.120:23...Related Commands
Configures the timeout for the Telnet session when the Telnet session is idle. After this time, the Telnet session is disconnected.
Use the no form of the command to configure the Telnet server to work with no timeout. No matter how long there is no activity on the Telnet session, the system does not automatically disconnect the Telnet session.
timeout time
no timeout
Syntax Description
time Timeout length in minutes.
Defaults
time = 30 minutes
Command Modes
Line Configuration Mode
Usage Guidelines
Authorization: admin
Examples
The following example sets the timeout to 45 minutes.
SCE>enable 10
Password:<cisco>
SCE#config
SCE(config)#interface linecard 0
SCE(config-line)#timeout 45
SCE(config-line)#Related Commands
Enables TOS marking. The SCE platform can mark the IP ToS field of transmitted packets, according to the Diffserv scheme standard code points.
Use the no form of the command to disable the TOS marking.
The platform supports the association of services to the following Diffserv classes: BE (Best effort), EF (Expedited forwarding), AF1, AF2, AF3 and AF4 (Assured forwarding 1-4, respectively). When packets exceed the bandwidth limit they are configured with, they are internally marked in RED color and dropped by the SCE platform itself. Packets that are below their limit are marked with either green or yellow drop precedence depending on their actual relative rate.
Note
When TOS marking is enabled, the first few TCP packets are associated and marked with a default AF4 class that is mapped to the AF-4 queue. This occurs because the SCE platform transmits the first few packets before classifying the flow and identifying the application or service
tos-marking mode mode
no tos-marking mode mode
Syntax Description
mode Mode for TOS marking. Currently the system supports only Diffserv.
Defaults
By default, TOS marking is disabled.
Command Modes
Linecard Interface Configuration
Usage Guidelines
Authorization: admin
Examples
The following example enables TOS marking:
SCE>enable 10
Password:<cisco>
SCE#config
SCE(config)#interface linecard 0
SCE(config if)#tos-marking mode Diffserv
SCE(config if)#Related Commands
Resets TOS settings to the Diffserv defaults.
tos-marking reset-table
Syntax Description
This command has no arguments or keywords.
Defaults
This command has no default settings.
Command Modes
Linecard Interface Configuration
Usage Guidelines
Authorization: admin
Examples
The following example resets the TOS marking.
SCE>enable 10
Password:<cisco>
SCE#config
SCE(config)#interface linecard 0
SCE(config if)#tos-marking reset-table
SCE(config if)#Related Commands
The SCE platform supports configuration via CLI of the mapping between the class and coloring and the exposed DSCP (Diffserv Code Points) values. The default of this table is direct mapping of the Diffserv standard code points.
The TOS table reads the class and color of the packet being transmitted, and assigns the value set in the table according to the color and class.
tos-marking set-table-entry class class color color value value
Syntax Description
class Internal class of service assigned to the packet. Legal values are BE, AF1, AF2, AF3, AF4 and EF.
color Internal color assigned to the packet. Legal values are green, yellow, red and any.
value Value of the TOS marking, assigned to the packet IP header, as transmitted by the SCE platform. This is a 6-bit value, expressed as a hex number in the range 0x0 to 0x3f.
Defaults
Diffserv defaults
Command Modes
Linecard Interface Configuration
Usage Guidelines
Authorization: admin
Examples
The following example sets a TOS marking table entry.
SCE>enable 10
Password:<cisco>
SCE#config
SCE(config)#interface linecard 0
SCE(config if)# tos-marking set-table-entry class AF4 color yellow value 0x24
SCE(config if)#Related Commands
Determines the route packets take to reach a specified host.
tracert [hostname|IP-address]
Syntax Description
hostname Destination hostname
IP-address Destination IP address
Defaults
This command has no default settings.
Command Modes
Linecard Interface Configuration
Usage Guidelines
The destination of the traceroute function can be specified as either a known hostname or an IP address.
Authorization: admin
Examples
Following is a tracert command with sample output.
SCE>enable 10
Password:<cisco>
SCE#config
SCE(config)#interface linecard 0
SCE(config if)#tracert 64.103.125.118
traceroute to 10.56.217.103, 30 hops max, 40 byte packets
1 10.56.217.1 ( 10.56.217.1) 0 ms 1 ms 0 ms
2 10.56.223.9 ( 10.56.223.9) 1 ms 0 ms 1 ms
3 64.103.115.209 ( 64.103.115.209) 0 ms 1 ms 0 ms
4 64.103.125.118 ( 64.103.125.118) 0 ms 0 ms 0 ms
Trace complete.
SCE(config if)#Related Commands
Defines a new traffic counter. Use the no form of the command to delete an existing traffic counter.
traffic-counter name name {count-bytes | count-packets}
no traffic-counter {name name |all}
Syntax Description
name Name to be assigned to this traffic counter.
Defaults
This command has no default settings.
Command Modes
Linecard Interface Configuration
Usage Guidelines
The following are usage guidelines for the traffic-counter command:
Use the count-bytes keyword to enable counting the bytes in each packet.
The counter will increment by the number of bytes in each packet.
Use the count-packets keyword to enable counting whole packets.
The counter will increment by one for each packet.
Use the all keyword with the no form to delete all existing traffic counters.
Authorization: admin
Examples
The following are examples of the traffic-counter command:
Example 1:
Following is an example of creating a traffic counter that will count bytes.
SCE>enable 10
Password:<cisco>
SCE#config
SCE(config)#interface linecard 0
SCE(config if)#traffic-counter name counter1 count-bytes
SCE(config if)#Example 2:
The following example demonstrates how to delete all traffic counters.
SCE>enable 10
Password:<cisco>
SCE#config
SCE(config)#interface linecard 0
SCE(config if)#no traffic-counter all
SCE(config if)#Related Commands
Defines a new traffic rule. Use the no form of the command to delete an existing traffic rule.
traffic-rule name name ip addresses ip-addresses protocol protocol [tunnel-id tunnel-id] direction direction traffic-counter name traffic-counter action action
traffic-rule tunnel-id-mode
no traffic-rule {name name |all|tunnel-id-mode}
Syntax Description
name name to be assigned to this traffic rule.
IP-addresses subscriber-side and network-side <IP specification> (see below)
protocol Any one of the following protocols:
TCP/UCP/ICMP/IGRP/EIGRP/IS-IS/OSPF/Other
tunnel-id Tunnel ID, <tunnel Id specification> (see below).
direction upstream/downstream/both
traffic-counter name of traffic counter/none
action action to be performed on flows that meet the rule criteria (see below)
Defaults
This command has no default settings.
Command Modes
Linecard Interface Configuration
Usage Guidelines
The following are the usage guidelines for the traffic-rule command:
IP specification:
all|([all-but] (<ip-address>|<ip-range>))
<ip-address> is a single IP address in dotted-decimal notation, such as 10.1.2.3
<ip-range> is an IP subnet range, in the dotted-decimal notation followed by the number of significant bits, such as 10.1.2.0/24.
tunnel id specification:
all|([all-but] tunnel id)
tunnel id is a Hex Tunnel id range, in the format '(HEX)Tunnel-id' or '(HEX)MinTunnelId:(HEX)MaxTunnelId'
traffic-counter name:
Either of the following:
Name of an existing traffic counter:Packets meeting the criteria of the rule are to be counted in the specified counter. If a counter name is defined, the “count” action is also defined implicitly.none:Ifnoneis specified, then an action must be explicitly defined via theactionoption.
Use the all keyword with the no form to delete all existing traffic rules.
Use the tunnel-id-mode keyword to enable or disable defining the traffic rule according to the tunnel ID.
action:
One of the following:
block — Block the specified traffic;
ignore — Bypass the specified traffic; traffic receives no service
quick-forwarding — Quick forwarding (duplication) of delay-sensitive packets with service.
quick-forwarding-ignore — Quick forwarding (duplication) of delay-sensitive packets with no service.
Authorization: admin
Examples
The following examples illustrate how to use this command.
Example 1:
This example creates the following traffic rule:
Name = rule2
IP addresses: subscriber side = all IP addresses, network side = all IP addresses EXCEPT the subnet 10.10.10.0/24
Protocol = TCP
Direction = downstream
Traffic counter = counter2
Action = Block
The actions performed will be counting and blocking
SCE>enable 10
Password:<cisco>
SCE#config
SCE(config)#interface linecard 0
SCE (config if)# traffic-rule name rule2 ip-addresses subscriber-side all network-side all-but 10.10.10.0/24 protocol tcp direction downstream traffic-counter name counter2 action block
SCE(config if)Example 2:
This example creates the following traffic rule:
Name = rule3
IP addresses: all
Protocol = IS-IS
Direction = upstream
Traffic counter = none
Action = ignore (required since traffic-counter = none)
The only action performed will be Ignore.
SCE>enable 10
Password:<cisco>
SCE#config
SCE(config)#interface linecard 0
SCE (config if)# traffic-rule name rule3 ip-addresses all protocol is-is direction upstream traffic-counter name none action ignore
SCE(config if)Example 3:
The following example demonstrates how to delete all traffic rules.
SCE>enable 10
Password:<cisco>
SCE#config
SCE(config)#interface linecard 0
SCE(config if)#no traffic-rule all
SCE(config if)Related Commands
Extracts a zip file to the current directory.
unzip filename
Syntax Description
filename Zip file to be extracted.
Defaults
This command has no default settings.
Command Modes
Privileged EXEC
Usage Guidelines
Authorization: admin
Examples
The following example extracts the zipfile.zip:
SCE>enable 10
Password:<cisco>
SCE#unzip zipfile.zip
Unzipping '/tffs0/zipfile.zip'...
Zip file has 3 entries:
1.sli, 13429 bytes extracted
preflut.sli, 12558 bytes extracted
temp/SLI/x/IpraeLut.sli, 12929 bytes extracted
Finished, Extracted 3 files.Related Commands
Adds a new user to the local database
Use the no form of the command to remove a user from the database.
username name {password password | nopassword | secret {0 password | 5 password}}
no username name
Syntax Description
name name of the user to be added
password a clear text password.
secret the password is saved in MD5 encrypted form. The keywords 0 or 5 indicate the format of the password as entered in the command:
Defaults
Command Modes
Global Configuration
Usage Guidelines
Up to 100 users may be defined.
The password is defined with the username. There are several password options:
No password: use the nopassword keyword.
Password: Password is saved in clear text format in the local list.
Use the password parameter.
Encrypted password: Password is saved in encrypted (MD5) form in the local list. Use the secret keyword and either of the following options.
Password may be defined by either of the following methods:
Specify a clear text password, which is saved in MD5 encrypted form
Specify an MD5 encryption string, which is saved as the user MD5-encrypted secret password
The following keywords are available:
nopassword: There is no password associated with this user
secret: the password is saved in MD5 encrypted form. Use with either of the following keywords to indicate the format of the password as entered in the command:
0: the <password> parameter specifies a clear text password that will be saved in MD5 encrypted form
5: the <password> parameter specifies an MD5 encryption string that will be saved as the user MD5-encrypted secret password
Authorization: admin
Examples
The following examples illustrate how to use this command.
Example 1
This example shows how to add a new user to the local database with a clear text password.
SCE>enable 10
Password:<cisco>
SCE#config
product>(config)#username johndoe password mypassword
product>(config)#Example 2
This example shows how to add a new user to the local database with no password.
SCE>enable 10
Password:<cisco>
SCE#config
product>(config)#username johndoe nopassword
product>(config)#Example 3
This example shows how to add a new user to the local database with with an MD5 encrypted password entered in clear text.
SCE>enable 10
Password:<cisco>
SCE#config
product>(config)#username johndoe secret 0 mypassword
product>(config)#Related Commands
Sets the privilege level of the specified user.
username name privilege level
Syntax Description
name name of the user whose privilege level is set
level the privilege level permitted to the specified user. These levels correspond to the CLI authorization levels, which are entered via the enable command:
0: User
5: Viewer
10: Admin
15: Root
Defaults
Default level = 15
Command Modes
Global Configuration
Usage Guidelines
When a user requests an authorization for a specified privilege level, by using the "enable" command, the SCE platform sends an authentication request to the TACACS+ server specifying the requested privilege level. The SCE platform grants the requested privilege level only after the TACACS+ server authenticates the "enable" command password and verifies that the user has sufficient privileges the enter the requested privilege level.
Authorization: admin
Examples
The following level sets the privilege level for the user to "Viewer".
SCE>enable 10
Password:<cisco>
SCE#config
SCE(config)#username johndoe privilege 5
SCE(config)#Related Commands
Enables VAS traffic forwarding.
Use the no form of the command to disable VAS traffic forwarding. Refer to the example below for complete instructions on how to disable VAS traffic.
vas-traffic-forwarding
no vas-traffic-forwarding
Syntax Description
This command has no arguments or keywords.
Defaults
By default, VAS traffic forwarding is disabled.
Command Modes
Interface Linecard Configuration
Usage Guidelines
There are certain other SCE platform features that are incompatible with VAS traffic forwarding. Before enabling VAS traffic forwarding, it is the responsibility of the user to make sure that no incompatible features or modes are configured.
The features and modes listed below cannot coexist with VAS mode:
Line-card connection modes: receive-only, receive-only-cascade, inline-cascade
Link mode other than forwarding
All link encapsulation protocols, including VLAN, MPLS, L2TP
Authorization: admin
Examples
This example shows how to disable VAS traffic forwarding. You must first shutdown the linecard before disabling VAS forwarding, since there may still be some open flows that have already been forwarded to the VAS servers. If the VAS feature is stopped while there are still such flows open, their packets coming back from the VAS servers may be routed to their original destination with the VLAN tag of the VAS server on it.
Note that you must enter the ROOT authorization level (15) to shutdown the linecard.
SCE>enable 15
Password:<cisco>
SCE#>config
SCE(config if)#>interface linecard 0
SCE(config if)#>shutdown
SCE(config if)#>no vas-traffic-forwarding
SCE(config if)#>no shutdown
SCE(config if)#>Related Commands
vas-traffic-forwarding vas server-id
vas-traffic-forwarding vas traffic-link
vas-traffic-forwarding vas server-id health-check
vas-traffic-forwarding vas server-group
Configures the link on which to transmit VAS traffic (the link to which the VAS servers are connected).
Use the no form of the command to remove the VAS link configuration and revert to the VAS link defaults.
vas-traffic-forwarding traffic-link {link-0|link-1|auto-select}
no vas-traffic-forwarding traffic-link
Syntax Description
Enter the link number on which to transmit VAS traffic
Link-0
Link-1
auto-select: the active VAS link is selected by the system
Defaults
Default traffic link = Link-1
Command Modes
Interface Linecard Configuration
Usage Guidelines
Use the auto-select keyword with VAS over 10G. For VAS over 10G, the VAS link should always be set to auto-select, so that the system can switch to the backup link when necessary.
Note
The VAS traffic link should be in Forwarding mode.
Authorization: admin
Examples
This example shows how to configure link 0 for VAS traffic.
SCE>enable 10
Password:<cisco>
SCE#config
SCE(config)#interface linecard 0
SCE(config if)#vas-traffic-forwarding traffic-link link-0
SCE(config if)#Related Commands
vas-traffic-forwarding vas server-id
vas-traffic-forwarding vas server-group
Configures the VAS traffic link for VAS over 10G.
For VAS over 10G, since the link used for forwarding VAS traffic may change automatically due to a failover situation, the following options must be configured:
Set the VAS traffic link to auto-select, so that the system can select the link connected to the active 7600/VAS servers system.
Specify the minimum time allowed between two consecutive link switches.
Specify the link on which to transmit VAS traffic after a system reload and when in auto-select mode
vas-traffic-forwarding traffic-link auto-select [link-switch-delay switch-time | initial-selection {link-0|link-1}]
no vas-traffic-forwarding traffic-link auto-select [link-switch-delay|initial-selection]
default vas-traffic-forwarding traffic-link auto-select [link-switch-delay|initial-selection]
Syntax Description
switch-time The time in seconds to delay between two consecutive link switches on initial health check state.
initial-selection Enter the link number to be set as the active VAS link (the link on which to transmit VAS traffic after a system reload and when working in auto-select mode).
Link-0
Link-1
Defaults
Default switch-time = 30 seconds
Default traffic link = Link-1
Command Modes
Interface Linecard Configuration
Usage Guidelines
To set the VAS traffic link to auto-select, use the basic command with no options (the same as using the VAS-traffic-forwarding VAS traffic-link command and specifying autoselect).
To set the minimum time allowed between two consecutive link switches, use the link-switch-delay option. In 10G topology, the default delay between two consecutive link switches (30 seconds) is less than the time it takes for the health check to fail. This means that in cases where there is at least one failed VAS server group on both links, the SCE platform will flip continuously between the links. To avoid the constant flip between the links in such a case, it is recommended to configure a link-switch-delay time greater than 3 minutes.
To specify the link on which to transmit VAS traffic after a system reload and when in auto-select mode (the active VAS link), use the initial-selection option. Note that when executed, this command triggers an immediate link switch if the currently active VAS traffic link used is different from the one specified in the command.
Use the default form of the command to set either the link-switch-delay or the initial-selection to the default value. You can also use the no form of the command for the same purpose, since it removes the configured value, which results in the default value being restored.
Authorization: admin
Examples
The following examples show how to use this command.
Example 1
This example shows how to set the initial-selection to link-0.
SCE>enable 10
Password:<cisco>
SCE#config
SCE(config)#interface linecard 0
SCE(config if)#vas-traffic-forwarding traffic-link auto-select initial-selection link-0
SCE(config if)#Example 2
This example shows how to set the link-switch-delay to 60 seconds.
SCE>enable 10
Password:<cisco>
SCE#config
SCE(config)#interface linecard 0
SCE(config if)#vas-traffic-forwarding traffic-link auto-select link-switch-delay 60
SCE(config if)#Related Commands
Configures the health check for compatibility with VAS over 10G (multiple GBE platform) topology. It also defines the IP addresses to be used for the VAS health check in a VAS over 10G topology.
Use the ip-address keyword to define source and destination IP addresses to be used by the health check packets.
Use the no form of this command to disable health check compatibility for VAS over 10G.
Use either the no or default form of this command with the ip-address keyword to remove the IP address configuration.
vas-traffic-forwarding health-check topology mgscp
vas-traffic-forwarding health-check ip-address source source-ip destination dest-ip
no vas-traffic-forwarding health-check topology mgscp
default vas-traffic-forwarding health-check topology mgscp
no vas-traffic-forwarding health-check ip-address
default vas-traffic-forwarding health-check ip-address
Syntax Description
source-ip Health check source IP address. The source-ip must include a range indication (x.x.x.x/x).
dest-ip Health check destination IP address. The dest-ip does not include a range indication.
Defaults
By default, the compatibility with VAS over 10G (multiple GBE platforms) is disabled.
Command Modes
Interface Linecard Configuration
Usage Guidelines
Use the topology MGSCP keywords to enable or disable (use the no form of the command) health check compatibility for VAS over 10G.
Use the ip-address keyword to define source and destination IP addresses to be used by the health check packets.
A range of source IP addresses (at least eight) is required.
The configured IP addresses should not be in use in the network. They must be reserved for the VAS health check only.
The same IP address should be configured for all the SCE platforms under the same EtherChannel.
Authorization: admin
Examples
The following examples illustrate how to enable multiple GBE platform compatibility for the VAS health check, and how to define the IP addresses.
Example 1
This example shows how to enable multiple GBE platform compatibility for the VAS health check.
SCE>enable 10
Password:<cisco>
SCE#config
SCE(config)#interface LineCard 0
SCE(config if)#vas-traffic-forwarding health-check topology mgscp
SCE(config if)#Example 2
This example shows how to define the source and destination IP addresses.
SCE>enable 10
Password:<cisco>
SCE#config
SCE(config)#interface LineCard 0
SCE(config if)#vas-traffic-forwarding health-check ip-address source 20.20.20.20/28 destination 10.10.10.10
SCE(config if)#Example 3
This example shows how to remove the IP address configuration using the no keyword.
SCE>enable 10 Password:<cisco> SCE#config SCE(config)#interface LineCard 0 SCE(config if)#no vas-traffic-forwarding health-check ip-address SCE(config if)#
Example 4
This example shows how to remove the IP address configuration using the default keyword.
SCE>enable 10
Password:<cisco>
SCE#config
SCE(config)#interface LineCard 0
SCE(config if)#default vas-traffic-forwarding health-check ip-address
SCE(config if)#Related Commands
Enables or disables the VAS health check, and defines the ports it should used.
Use the UDP ports keyword to define source and destination UDP ports to be used by the health check packets.
Use the no form of this command to disable the health check.
Use either the no or default form of this command with the UDP ports keyword to remove the UDP port configuration.
vas-traffic-forwarding vas server-id number health-check
vas server-id number health-check udp ports source <port number> destination <port number>
no vas-traffic-forwarding vas server-id number health-check
no vas-traffic-forwarding vas server-id number health-check udp ports
default vas-traffic-forwarding vas server-id number health-check udp ports
Syntax Description
number ID number of the VAS server for which to enable or disable the health check
port-number source or destination port number (use with the source and destination options)
Defaults
By default, the health check is enabled.
Default port numbers = <63140,63141> used for server #0 through <63154,63155> used for server #7.
Command Modes
Interface Linecard Configuration
Usage Guidelines
Use the UDP ports keyword to define source and destination UDP ports to be used by the health check packets.
Note that the health check is activated only if all the following conditions are true. If the health check is enabled but one or more of the following conditions are not met, the server state will be Down:
VAS Traffic Forwarding mode is enabled
Pseudo IPs are configured for the SCE platform GBE ports on the VAS traffic link
VAS server is enabled
Server has a VLAN tag
Health check for the server is enabled
If the health check of the server is disabled, its operational status depends on the following (requirements for Up state are in parentheses):
admin status (enable)
VLAN tag configuration (VLAN tag defined)
group mapping (assigned to group)
Authorization: admin
Examples
The following examples illustrate how to disable the health check, and how to define the UDP ports.
Example 1
This example shows how to disable the health check for VAS server 5.
SCE>enable 10
Password:<cisco>
SCE#config
SCE(config)#interface linecard 0
SCE(config if)#no vas-traffic-forwarding vas server-id 5 health-check
SCE(config if)#Example 2
This example shows how to define the source and destination ports for VAS server 5 and enable the health check.
SCE>enable 10
Password:<cisco>
SCE#config
SCE(config)#interface linecard 0
SCE(config if)#vas-traffic-forwarding vas server-id 5 health-check udp ports source 63150 destination 63151
SCE(config if)#vas-traffic-forwarding vas server-id 5 health-check
SCE(config if)#Example 3
This example shows how to remove the UDP port configuration using the no keyword.
SCE>enable 10
Password:<cisco>
SCE#config
SCE(config)#interface linecard 0
SCE(config if)#no vas-traffic-forwarding vas server-id 5 health-check udp ports
SCE(config if)#Example 4
This example shows how to remove the UDP port configuration using the default keyword.
SCE>enable 10
Password:<cisco>
SCE#config
SCE(config)#interface linecard 0
SCE(config if)#default vas-traffic-forwarding vas server-id 5 health-check udp ports
SCE(config if)#Related Commands
vas-traffic-forwarding vas server-id
vas-traffic-forwarding vas traffic-link
vas-traffic-forwarding vas server-group
Adds servers to and removes them from a specified VAS server group.
Use the no form of this command to remove a specified server from the VAS server group.
vas-traffic-forwarding vas server-group group-number server-id server-number
no vas-traffic-forwarding vas server-group group-number server-id server-number
Syntax Description
group-number The ID number of the VAS server group
server-number The ID number of the VAS server
Defaults
This command has no default settings.
Command Modes
Interface Linecard Configuration
Usage Guidelines
The user may define up to eight VAS server groups. Each VAS server group has the following parameters:
Server Group ID
A list of VAS servers attached to this group.
Failure detection — minimum number of active servers required for this group so it will be considered to be Active. If the number of active servers goes below this minimum, the group will be in Failure state.
Failure action — action performed on all new data flows that should be mapped to this Server Group while it is in Failure state.
If no VAS server ID is specified in the no form of the command, all servers are removed from the server group and all group parameters (failure detection and action) are set to the default values (see VAS-traffic-forwarding VAS server-group failure).
Authorization: admin
Examples
The following examples illustrate how to add servers to and remove servers from a specified VAS server group.
Example 1
This example shows how to add VAS server 5 to VAS server group 1.
SCE>enable 10
Password:<cisco>
SCE#config
SCE(config)#interface linecard 0
SCE(config if)#vas-traffic-forwarding vas server-group 1 vas server-id 5
SCE(config if)#Example 2
This example shows how to remove VAS server 5 from VAS server group 1.
SCE>enable 10
Password:<cisco>
SCE#config
SCE(config)#interface linecard 0
SCE(config if)#no vas-traffic-forwarding vas server-group 1 vas server-id 5
SCE(config if)#Example 3
This example shows how to remove all VAS servers from VAS server group 1 and set all group parameters (failure detection and action) to the default values.
SCE>enable 10
Password:<cisco>
SCE#config
SCE(config)#interface linecard 0
SCE(config if)#no vas-traffic-forwarding vas server-group 1
SCE(config if)#Related Commands
vas-traffic-forwarding vas server-id
vas-traffic-forwarding vas traffic-link
vas-traffic-forwarding vas server-id health-check
Configures the failure parameters for the specified VAS server group.
Use either the no form or the default form of the command to set the specified failure parameter to the default value.
vas-traffic-forwarding vas server-group group-number failure minimum-active-servers min-number
vas-traffic-forwarding vas server-group group-number failure action {block | pass}
default vas-traffic-forwarding vas server-group group-number failure minimum-active-servers
no vas-traffic-forwarding vas server-group group-number failure minimum-active-servers
default vas-traffic-forwarding vas server-group group-number failure action
no vas-traffic-forwarding vas server-group group-number failure action
Syntax Description
group-number The ID number of the VAS server group
min-number The minimum number of active servers required for the specified server group.
failure action The action to be applied to all new flows mapped to this server group while it is Failure state
block — all new flows assigned to the failed VAS server group will be blocked by the SCE platform
pass — all new flows assigned to the failed VAS server group will be considered as regular non-VAS flows, and will be processed without VAS service.
Defaults
Default failure minimum-active-servers min-number = 1
Default failure action = pass
Command Modes
Interface Linecard Configuration
Usage Guidelines
To set both group parameters (failure detection and action) to the default values, use the no form of the command without specifying any parameter (see VAS-traffic-forwarding VAS server-group.)
Authorization: admin
Examples
The following examples illustrate how to set the failure parameters to specified values or to the default value.
Example 1
The following example shows how to configure the minimum number of active servers for VAS server group 5.
SCE>enable 10
Password:<cisco>
SCE#config
SCE(config)#interface linecard 0
SCE(config if)#SCE(config-if)#vas-traffic-forwarding vas server-group 5 failure minimum-active-servers 3
SCE(config if)#Example 2
The following example shows how to reset the minimum number of active servers for VAS server group 5 to the default value.
SCE>enable 10
Password:<cisco>
SCE#config
SCE(config)#interface linecard 0
SCE(config if)#SCE(config-if)#default vas-traffic-forwarding vas server-group 5 failure minimum-active-servers
SCE(config if)#Related Commands
vas-traffic-forwarding vas server-id
vas-traffic-forwarding vas traffic-link
vas-traffic-forwarding vas server-id health-check
Enables or disables a VAS server. Use the enable keyword to enable a new or existing VAS server.
Use the disable keyword to disable an existing VAS server (server properties are not deleted).
Use the no form or the default form of this command to delete all server properties from a specified VAS server.
vas-traffic-forwarding vas server-id number enable
vas-traffic-forwarding vas server-id number disable
no vas-traffic-forwarding vas server-id number
default vas-traffic-forwarding vas server-id number
Syntax Description
number The ID number of the VAS server
Defaults
By default, a defined VAS server is enabled.
Command Modes
Linecard Interface Configuration
Usage Guidelines
The VAS server is not operational until the VLAN tag is defined (vas-traffic-forwarding server-id vlan).
Authorization: admin
Examples
The following examples illustrate how to create, enable, and disable a VAS server:
Example 1:
The following example defines a VAS server, server ID number = 4, that is not yet operational.
SCE>enable 10
Password:<cisco>
SCE#config
SCE(config)#interface linecard 0
SCE(config if)# vas-traffic-forwarding vas server-id 4 enable
SCE(config if)#Example 2:
The following example disables the VAS server, but does not delete the server definition or the associated VLAN tag.
SCE>enable 10
Password:<cisco>
SCE#config
SCE(config)#interface linecard 0
SCE(config if)# vas-traffic-forwarding vas server-id 4 disable
SCE(config if)#Related Commands
vas-traffic-forwarding server-id vlan
vas-traffic-forwarding vas traffic-link
vas-traffic-forwarding vas server-id health-check
vas-traffic-forwarding vas server-group
Assigns the VLAN ID to a specified VAS server.
Use the no form or the default form of this command to delete the VLAN tag assignment from a specified VAS server.
vas-traffic-forwarding vas server-id number vlan vlan-number
no vas-traffic-forwarding vas server-id number vlan
default vas-traffic-forwarding vas server-id number vlan
Syntax Description
number The ID number of the VAS server
vlan-number The VLAN tag to use for the specified VAS server
Defaults
Default vlan-number = No VLAN
Command Modes
Linecard Interface Configuration
Usage Guidelines
Note the following important points:
The VAS server is not operational until the VLAN tag is defined.
Disabling the server does not remove the VLAN tag number configured to the server.
The no form of the command (same as the default form of the command), removes the previously configured VLAN tag (no VLAN is the default configuration).
Authorization: admin
Examples
The following example assigns the vlan id = 10 to server ID number = 4.
SCE>enable 10
Password:<cisco>
SCE#config
SCE(config)#interface linecard 0
SCE(config if)#vas-traffic-forwarding vas server-id 4 vlan 10
SCE(config if)#Related Commands
vas-traffic-forwarding vas server-id
vas-traffic-forwarding vas server-group
vas-traffic-forwarding vas server-group failure
Configures the VLAN environment. A single VLAN tag is supported per packet (no QinQ support).
vlan symmetric skip (ignore tunnel)
vlan a-symmetric skip (ignore tunnel, asymmetric)
vlan symmetric classify (VLAN tag as subscriber)
default vlan
(When the tunneling information is ignored, the subscriber identification is the subscriber IP of the IP packet carried inside the tunnel.)
Syntax Description
See "Usage Guidelines"
Defaults
symmetric skip
Command Modes
Linecard Interface Configuration
Usage Guidelines
Use the symmetric skip form of the command to skip the VLAN header when subscriber and flow classification do not use the VLAN tag. VLAN tags are symmetric.
Use the a-symmetric skip form of the command to skip the VLAN header when subscriber and flow classification do not use the VLAN tag. VLAN tags are asymmetric. Note that this form of the command incurs a performance penalty.
Use the symmetric classify form of the command when subscriber and flow classification use the VLAN tag. VLAN tags are symmetric. Using VLAN classification is mutually exclusive with any other tunnel-based classification.
Use the default keyword to set the VLAN configuration to the default value.
A symmetric environment is one in which the same VLAN tags are used for carrying a transaction in the upstream and downstream directions.
An asymmetric environment is one in which the upstream and downstream VLAN tags might not be the same.
The SCE platform is configured by default to work in symmetric environments. A specific command (a-symmetric skip) is necessary in order to allow correct operation of the SCE platform in an asymmetric environments, and instruct it to take into consideration that the upstream and downstream of each flow has potentially different VLAN tags.
Authorization: admin
Examples
The following example configures the VLAN environment:.
SCE>enable 10
Password:<cisco>
SCE#config
SCE(config)#interface linecard 0
SCE(config if)#vlan symmetric skip
SCE(config if)#Related Commands
Sets the VLAN translation constant for the network port side, and specifies whether to increment or decrement the received VLAN tag. The subscriber port side automatically performs the reverse operation.
Use the no form of this command to disable vlan translation for this port (sets the value to zero).
vlan translation {increment | decrement} value value
no vlan translation
Syntax Description
value Integer value by which the VLAN tag is to incremented or decremented at the network port side.
Defaults
value = 0
Command Modes
Linecard Interface Configuration
Usage Guidelines
The configured translation is applied to the network port side. The reverse operation is automatically performed at the subscriber side.
For example, if "increment 5" is defined, at the network port the VLAN is incremented by 5, and at the subscriber port the VLAN is decremented by 5.
In this case, the network side VLAN tags might be 105, 205, 305, and the subscriber side the VLAN tags would then be 100, 200, 300.
Make sure that the same VLAN translation constant is configured for all SCE platforms in the system.
Note the following limitations when VLAN translation is enabled:
LIC Bypass not supported – In general, installations using the VLAN translation feature should rely on cutoff on failure and at upgrade (use redundant SCE platform).
STP hazard – VLAN translation may interfere with Spanning Tree Protocol. This should be taken in consideration when deploying the solution.
Authorization: admin
Examples
The following example specifies a VLAN translation constant of 20 for the network port side.
SCE>enable 10
Password:<cisco>
SCE#config
SCE(config)#interface linecard 0
SCE(config if)#vlan translation increment value 20
SCE(config if)#Related Commands
Enables or disables operating in a WAP-based environment.
Use the no form of the command to disable operating in a WAP-based environment
wap
no wap
Syntax Description
This command has no arguments or keywords
Defaults
By default, operating in a WAP environment is disabled.
Command Modes
Linecard Interface Configuration
Usage Guidelines
Authorization: admin
Examples
The following example iliustrates how to enable operating in a WAP-based environment
SCE>enable 10
Password:<cisco>
SCE#config
SCE(config)#interface linecard 0
SCE(config if)#wap
SCE(config if)#