|
|

Product Numbers: AP-10BTR=, AP-2511-TX=, AP-FE-TX=
This document provides procedures for installing transceivers in the Cisco AccessPath Integrated Access System. When the AccessPath system was originally shipped, it had all the required transceivers preinstalled. This document is for users who need to replace one or more of their AccessPath system transceivers.
This document contains the following sections:
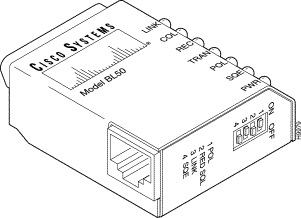
Each of the Access Server Shelves uses a Model BL50 10BaseT IEEE 802.3 transceiver to connect from its Ethernet LAN port to the Router Shelf. These transceivers should already have been installed before the AccessPath system was shipped. See Figure 1.
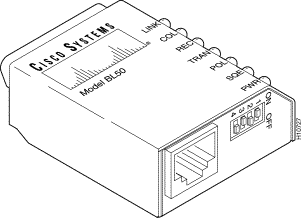
The Failsafe/Console Management Shelf uses a Model BL50R 10BaseT IEEE 802.3 transceiver. This transceiver should already have been installed before the AccessPath system was shipped. See Figure 2.
To remove and install 10BaseT transceivers on an Access Server Shelf or a Failsafe/Console Management Shelf, follow these steps:
Step 1 Make sure the shelf is powered down.
Step 2 Use a screwdriver to push the metal slide latch, located between the transceiver and the shelf, to the unlocked position. On the Access Server Shelf, slide left to unlock. On the Failsafe/Console Management Shelf, slide right to unlock.
Step 3 Carefully remove the old transceiver.
Step 4 Carefully align the new transceiver's 15-pin connector with the mating connector on the shelf, and slowly and firmly insert it.
Step 5 Push the slide latch back into the locked position, using the screwdriver.
The 10BaseT transceivers (both models BL50 and BL50R) have four switch settings and seven diagnostic lights. The switches should be kept at the factory settings (shown in Figure 1 and Figure 2), unless changes to the switch settings are recommended by Cisco-certified maintenance personnel.
For information on the factory switch settings, refer to Table 1.
For information on the diagnostic lights, refer to Table 2.
For information on pinouts, refer to Table 3.
| Switch | Function | Setting |
|---|---|---|
1. POL | Automatically corrects reversed polarity. | ON |
2. RED SQL | Allows a connection to be used on a Shielded Twisted Pair (STP) network by reducing STP squelch. | OFF |
3. LINK | Disables the transceiver from working with older equipment that does not conform to 10BaseT specifications. | ON |
4. SQE | Enables the 10BaseT SQE test. | OFF |
| Light | Function |
|---|---|
LINK (Green) | Indicates that the transceiver is connected to the Router Shelf, and that the twisted pair circuit between them is complete. |
COL (Yellow) | This light will flash if there is a collision detected on the network. If the light stays on, the MAU is jabber protected. |
REC (Green) | This light flashes when an Ethernet packet is received from the network. The speed of the flashing reflects the density of the Ethernet traffic. |
TRAN (Green) | This light flashes when Ethernet packets are transmitted to the network. |
POL (Yellow) | Indicates that packets of reversed polarity are being received when the reverse polarity slide switch POL is set to the ON position. |
SQE (Yellow) | Indicates that squelch reduction is on. The connection can be used on a Shielded Twisted Pair (STP) network. See RED SQL in Table 1. |
PWR (Green) | This light will be on continuously while power is being supplied to the transceiver from |
| RJ-45 Pin | Signal | Description |
|---|---|---|
1 | TD+ | Transmit Data |
2 | TD- | Transmit Data |
3 | RD+ | Receive Data |
4 | - | No connection |
5 | - | No connection |
6 | RD- | Receive Data |
7 | - | No connection |
8 | - | No connection |
Each of the Router Shelves in a dual Router Shelf configuration uses a Model CTX-1170 100BaseTX IEEE 802.3u transceiver to connect from its Fast Ethernet MII port on the Input/Output (I/O) controller to the corresponding port on the other Router Shelf. These transceivers should already have been installed before the AccessPath system was shipped. See Figure 3.

To install a 100BaseTX transceiver on a Router Shelf, follow these steps:
Step 1 Carefully align the transceiver's 40-pin MII connector with the mating connector on the Router Shelf, and slowly and firmly insert it.
Step 2 Turn the thumb wheels to tighten the threaded screws to secure the transceiver connection.
Step 3 Carefully align the RJ-45 connector attached to the twisted pair cable with the mating connector on the transceiver.
Step 4 Slowly insert the RJ-45 connector into the transceiver until it clicks into place.
The 100BaseTX transceiver has one switch setting and seven diagnostic lights. Make sure that the switch is in UP ("Up and Running") mode (shown in Figure 3). In this case, the transceiver is free to transmit and receive data. The ISO ("Isolation") mode applies only if the transceiver is configurable by the host's software, and thus does not apply here.
For information on the diagnostic lights, refer to Table 4.
For information on pinouts, refer to Table 5.
| Light | Function |
|---|---|
PWR (Green) | This light will be on continuously while power is being supplied to the transceiver from the DTE. |
LNK (Yellow) | Indicates that a fiber-optic link is made on the receive connector. |
TX (Green) | This light flashes when Ethernet packets are transmitted to the network. The speed of the flashing reflects the density of the Ethernet traffic. |
RX (Yellow) | This light flashes when an Ethernet packet is received from the network. The speed of the flashing reflects the density of the Ethernet traffic. |
COL (Red) | This light will flash if there is a collision detected on the network. |
FD/AP (Green) | This light will flash when the unit is in full duplex (FD) mode. |
100 (Yellow) | This light will flash to indicate that the unit is operating at 100 Mbps. |
| Pin1 | In | Out | I/O | Signal | Description |
|---|---|---|---|---|---|
14-17 | - | Yes | - | TxD | Transmit Data |
12 | Yes | - | - | Tx_CLK2 | Transmit Clock |
11 | - | Yes | - | Tx_ER | Transmit Error |
13 | - | Yes | - | Tx_EN | Transmit Enable |
3 | - | Yes | - | MDC | MII Data Clock |
4-7 | Yes | - | - | RxD | Receive Data |
9 | Yes | - | - | Rx_CLK | Receive Clock |
10 | Yes | - | - | Rx_ER | Receive Error |
8 | Yes | - | - | Rx_DV | Receive Data Valid |
18 | Yes | - | - | COL | Collision |
19 | Yes | - | - | CRS | Carrier Sense |
2 | - | - | Yes | MDIO | MII Data Input/Output |
22-39 | - | - | - | COMMON | Common (ground) |
1, 20, 21, 40 | - | - | - | +5.0V | - |
| 1Any pins not indicated are not used. 2Tx_CLK and Rx_CLK are provided by the external transceiver. |
The following guidelines will help to ensure your safety and protect the equipment:
Cisco Connection Online (CCO) is Cisco Systems' primary, real-time support channel. Maintenance customers and partners can self-register on CCO to obtain additional information and services.
Available 24 hours a day, 7 days a week, CCO provides a wealth of standard and value-added services to Cisco's customers and business partners. CCO services include product information, product documentation, software updates, release notes, technical tips, the Bug Navigator, configuration notes, brochures, descriptions of service offerings, and download access to public and authorized files.
CCO serves a wide variety of users through two interfaces that are updated and enhanced simultaneously: a character-based version and a multimedia version that resides on the World Wide Web (WWW). The character-based CCO supports Zmodem, Kermit, Xmodem, FTP, and Internet e-mail, and it is excellent for quick access to information over lower bandwidths. The WWW version of CCO provides richly formatted documents with photographs, figures, graphics, and video, as well as hyperlinks to related information.
You can access CCO in the following ways:
For a copy of CCO's Frequently Asked Questions (FAQ), contact cco-help@cisco.com. For additional information, contact cco-team@cisco.com.
![]()
![]()
![]()
![]()
![]()
![]()
![]()
![]()
Posted: Fri Sep 6 13:33:50 PDT 2002
All contents are Copyright © 1992--2002 Cisco Systems, Inc. All rights reserved.
Important Notices and Privacy Statement.
