|
|

The Cisco AccessPath Integrated Access System is scalable, which means you can expand the number of Access Server Shelves in the stack as your network needs grow, or remove Access Server Shelves (for use elsewhere) as you shift traffic to other network segments. For example, you might want to use a fully populated AccessPath system for single channel calls only, and remove the second Router Shelf, replacing it with two Access Server Shelves. Or you might want to swap out two Access Server Shelves for a second Router Shelf to accommodate a heavy ISDN load.
This chapter describes how to scale your AccessPath system to meet changing needs or newly assigned priorities, and includes the following sections:
If your AccessPath system includes the optional AccessPath Manager, you should use it to carry out the procedures described in this chapter. Refer to Installing Cisco AccessPath Manager and the online help that is part of that software.
When adding shelves to the AccessPath system, make sure the new shelf is running a compatible Cisco IOS software image; if it is not, install that software image before proceeding. For information on the correct Cisco IOS software images for each shelf, refer to the document Release Notes for the Cisco AccessPath Integrated Access System. For instructions on installing Cisco IOS software, refer to the appropriate software configuration guide on the CD or on CCO.
This section describes how to add an Access Server Shelf to the Cisco AccessPath Integrated Access System. Before proceeding with this section, install the Access Server Shelf as described in the Cisco AccessPath Integrated Access System Hardware Installation and Configuration Guide.
Topics in this section include the following:
The preferred way to add shelves to the AccessPath system is by using the optional AccessPath Manager. If your AccessPath system includes the AccessPath Manager, refer to Installing Cisco AccessPath Manager.
If your AccessPath system does not include the AccessPath Manager, or if you prefer to configure the AccessPath system via the command line interface, follow the instructions in this section.
Note Access to shelves in the AccessPath system via the Failsafe/Console Management Shelf is intended for initial configuration and emergency recovery. During normal operation, this method of access can adversely impact the performance of the AccessPath system.
When adding shelves to the AccessPath system, make sure the new shelf is running a compatible Cisco IOS software image; if it is not, install that software image before proceeding. For information on the correct Cisco IOS software images for each shelf, refer to the document Release Notes for the Cisco AccessPath Integrated Access System. For instructions on installing Cisco IOS software, refer to the appropriate software configuration guide on the CD or on CCO.
The best way to ensure that the new Access Server Shelf is configured correctly is to copy a configuration file from an existing Access Server Shelf in the stack. You can do this in a number of ways.
This section describes how to copy a configuration file from an existing Access Server Shelf to a local TFTP server, modify it, and download it to the new Access Server Shelf.
To add a new Access Server Shelf, complete the following steps:
In this example, the configuration file from nas06 is copied to a local TFTP host (user input in boldface).
Step 2 On the TFTP server system, rename the saved configuration file.
In this example, nas06-confg is renamed nas08-confg because the new Access Server Shelf will be the eighth after it is added to the current stack of seven. (We will use nas06-confg for comparison in a moment, so leave it in the directory for now.)
Step 3 Using a text editor, edit the nas08-confg file as follows:
(a). Change the hostname from nas06 to nas08.
(b). Change the sgbp source address (in this example, from 172.16.1.46 to 172.16.1.48).
(c). Change the loopback0 address (in this example, from 172.16.1.46 to 172.16.1.48).
(d). Change the loopback1 address (in this example, from 192.168.1.240 to 192.168.164.68).
(e). Change Ethernet0 address (in this example, from 192.168.1.240 to 192.168.164.18)
(f). Modify network summary statements (for example, the line ip summary-address eigrp 4242 172.16.3.8 255.255.255.248 for nas06 is changed to ip summary-address eigrp 4242 172.16.3.104 255.255.255.248 for nas08).
(g). Change the address of the address pool. In this example, the line ip local pool default 172.16.3.8 172.16.3.55" for nas06 is changed to ip local pool default 172.16.3.104 172.16.3.151 for nas08).
Sample output from the diff command on the local TFTP server shows how the configuration file for nas06 has been altered for nas08. (This sample was derived from the standard configuration for T1 PRIs using Multilink Ponit-to-Point Protocol (MP, also known as MLP) and having two Router Shelves.
This section describes changes you need to make on the Router Shelf to include the new Access Server Shelf.
To modify the Router Shelf to include the new Access Server Shelf, complete the following steps:
How you do this depends on the method you use to control configuration files. If the configuration file is maintained on a central TFTP server, then you would edit it there and download the updated file to the Router Shelf.
In this example, the change is made directly on the Router Shelf, and the new Access Server Shelf (nas08) is added.
Step 2 Turn on the appropriate serial interface. That is, make sure there is a physical port on the Router Shelf for the serial line coming from the Access Server Shelf, and that it is the next one in the sequence.
Odd numbered Access Server Shelves are connected to the first Router Shelf (offload01); even numbered Access Server Shelves are connected to the second Router Shelf (offload02). Each of these sequences begins with port 2/0. For example, in a dual Router Shelf configuration, nas01 is wired to offload01 port 2/0; nas02 is wired to offload02 port 2/0; nas03 wired to offload01 port 2/1.
For more information on Access Server Shelf connections to Router Shelves, see the section "Access Server Shelf Cabling" in Appendix C of the Cisco AccessPath Integrated Access System Hardware Installation and Configuration Guide.
In this example, we will use the no shut command to turn on interface 2/3 (for nad08).
In order to download the configuration file (modified in the section, "Creating the Configuration File"), you must enable the new Access Server Shelf to communicate with the TFTP server.
This section describes how to set up the Ethernet interface and enable Enhanced Interior Gateway Routing Protocol (EIGRP) routing on the new Access Server Shelf.
Step 2 Connect to the new Access Server Shelf and set up the Ethernet interface and enable EIGRP routing.
You can use Telnet to connect to the new Access Server Shelf via the modem attached to the Failsafe/Console Management Shelf, or by attaching a terminal (or a PC running terminal emulation software) to the console port. Refer to the section "Connecting to the Failsafe/Console Management Shelf" in Chapter 1.
Step 3 Enter enable mode and then configuration mode, answering no when prompted for autoconfiguration. (Refer to Chapter 2 if you are unfamiliar with the command line interface.)
Because the Access Server Shelf is unconfigured, the default Router> prompt is displayed and no password is required to enter enable mode.
Step 4 Configure the Access Server Shelf to use IP subnet zero.
Because of the way addressing is set up on the AccessPath system, you must enter ip subnet-zero before you can enter interface Ethernet0 and enter the particular IP address for that mask.
Step 5 Configure an IP address for interface Ethernet0, and turn on the interface.
Step 6 Turn on the EIGRP routing process with the necessary autonomous system number to get it to fit in with the rest of the stack.
Step 7 Configure the new Access Server Shelf to participate in routing on this network, and exit router configuration mode.
Step 8 Ping the TFTP server from the new Access Server Shelf to verify connectivity.
Output from a successful ping to the TFTP server looks similar to this:
Step 9 Download the new configuration file from the TFTP server to the new Access Server Shelf.
The new Access Server Shelf is now fully configured and integrated into the AccessPath system.
This section describes how to remove an Access Server Shelf from the Cisco AccessPath Integrated Access System software configuration.
Removal of an Access Server Shelf from the AccessPath system entails removal of the physical device and modifications to the configuration files on the Router Shelf (or shelves).
Remove the Router Shelf device before proceeding with the tasks described in this section. Refer to the Cisco AccessPath Integrated Access System Hardware Installation and Configuration Guide for instructions.
To remove an Access Server Shelf from the AccessPath system configuration files, follow these steps:
In this example, the seventh Access Server Shelf (nas07) is removed from the first Router Shelf (offload01).
Step 2 Shut down the interface the Access Server Shelf was connected to.
In this example, serial interface 2/3 is shut down on Router Shelf number 1 (offload01), and the user exits interface configuration mode.
In a dual Router Shelf configuration, repeat this process on the second Router Shelf.
This section describes how to add a second Router Shelf to an Cisco AccessPath Integrated Access System.
The addition of a second Router Shelf entails installation of the physical device, creation of a configuration file for the new Router Shelf, and modifications to the configuration files of the existing Router Shelf and of all Access Server Shelves in the AccessPath system.
Before proceeding with the tasks described in this section, install the second Router Shelf device in the rack. Refer to the Cisco AccessPath Integrated Access System Hardware Installation and Configuration Guide for instructions.
Topics in this section include the following:
The preferred way to add shelves to the AccessPath system is by using the optional AccessPath Manager. If your AccessPath system includes the AccessPath Manager, refer to Installing Cisco AccessPath Manager and the online help that is part of that software.
If your AccessPath system does not include the AccessPath Manager, or if you prefer to configure the AccessPath system via the command line interface, follow the instructions in this section.
Note Access to shelves in the AccessPath system via the Failsafe/Console Management Shelf is intended for initial configuration and emergency recovery. During normal operation, this method of access can adversely impact the performance of the AccessPath system.
When adding shelves to the AccessPath system, make sure the new shelf is running a compatible Cisco IOS software image; if it is not, install that software image before proceeding. For information on the correct Cisco IOS software images for each shelf, refer to the document Release Notes for the Cisco AccessPath Integrated Access System. For instructions on installing Cisco IOS software, refer to the appropriate software configuration guide on the CD or on CCO.
This section describes how to copy the configuration file from the existing Router Shelf to a local TFTP server, make a duplicate of it for the second Router Shelf, modify both configurations to support a dual Router Shelf configuration, and download the configurations to the AccessPath system.
To modify the AccessPath system software configuration to support a second Router Shelf, follow this procedure:
In this example, the configuration file from the Router Shelf (offload01-confg) is copied to a local TFTP host (user input in boldface).
Step 2 Using a text editor, delete the configuration information for serial interfaces 4/0 through 5/3.
For example, remove the following lines from offload01-confg:
Step 3 Make a copy of the configuration file. In this example, offload01-confg is copied to offload02-confg, so that you now have two identical configuration files.
This section describes the changes you need to make to the two Router Shelf configuration files (created in the "Creating the Router Shelf Configuration Files" section) to support a dual Router Shelf configuration.
To prepare the Router Shelf configuration files for a dual Router Shelf AccessPath system configuration, follow these steps:
That is, interleave the serial interface configurations to reflect the fact that odd numbered Access Server Shelves are connected to the first Router Shelf (offload01) and even numbered Access Server Shelves to the second Router Shelf (offload02).
Table 3-1 shows the new association of Access Server Shelf to serial interface for the offload01-confg file.
| Access Server Shelf | Serial Interface |
Table 3-2 shows the new association of Access Server Shelf to serial interface for the offload02-confg file.
| Access Server Shelf | Serial Interface |
Step 2 In the offload01-confg file, undefine serial 4/0 through 5/3. These ports were physically moved to the second Router Shelf during the installation of the second Router Shelf device.
Edit the following serial interface lines in the offload01-confg file as follows:
Step 3 In the offload02-confg file, change all of the IP addresses for interfaces to correspond to those assigned to the second Router Shelf (increment by one).
Step 4 In the offload02-confg file, change the address pool and route summarization commands on each interface to correspond to the block of addresses assigned to the pool for the second Router Shelf.
Step 5 In the offload01-confg file, synchronize the system clock between the two Router Shelves by adding the ntp peer address line, where address is the IP address is the FastEthernet 0/0 interface on the second Router Shelf.
This is typically the last line in the configuration file (except for end). Add it below the two ntp server lines.
Step 6 In offload02-confg, add the ntp peer address line, where address is the IP address is the FastEthernet 0/0 interface on the first Router Shelf.
Step 7 Load the modified configuration files from the TFTP server into the Router Shelves.
In this example, the configuration file offload01-confg is downloaded to the first Router Shelf as follows:
Step 8 Repeat Step 7 for the second Router Shelf configuration file.
Step 9 On each Access Server Shelf, synchronize the system clock with the new Router Shelf.
In this example, ntp is configured on Access Server Shelf number 2 (nas02). The address is that of the loopback 1 (management) interface on the new Router Shelf.
Note If the new Router Shelf is to be used to provide a redundant backhaul, configure its backhaul interfaces now.
In order to make the Access Server Shelves aware of the second Router Shelf, you need to modify the SGBP configuration on each Access Server Shelf in the AccessPath system.
In this example, the second Access Server Shelf (nas02) is made aware of the new Router Shelf (offload02):
Do this for each of the Access Server Shelves in the AccessPath system.
This section describes how to remove a second Router Shelf from the Cisco AccessPath Integrated Access System.
Removal of the second Router Shelf entails removal of the physical device, and modifications to the configuration files on all Access Server Shelves in the stack and to the remaining Router Shelf.
This procedure requires that you make modifications to the Access Server Shelves before you physically remove the second Router Shelf from the stack. After the Router Shelf device is physically removed, you will modify the configuration of the remaining Router Shelf to accommodate the Access Server Shelves that were connected to it.
Topics in this section include the following:
You need the following tools and parts to install the Router Shelf:
To remove the second Router Shelf from the AccessPath system, use the following procedure. This procedure includes the following steps:
Before physically removing the second Router Shelf device, you need to modify the AccessPath system's Stack Group Bidding Protocol (SGBP) configuration, and the system clock synchronization configuration on all Access Server shelves.
Before physically removing the second Router Shelf device, Telnet to each Access Server Shelf in the AccessPath system and perform the following tasks:
In this example, the user enters configuration mode on Access Server Shelf number 6 (nas06), removes the SGBP configuration for the second Router Shelf (offload02), and exits configuration mode.
Step 2 Disable the ntp server configuration on each of the Access Server Shelves.
In the following example, the user enters configuration mode on Access Server Shelf number 6 (nas06), removes the ntp server configuration, and exits configuration mode.
Note If the second Router Shelf was used to provide a redundant backhaul connection, that backhaul connection should be removed from service at this time. It will also be necessary to change routing configurations on other routers to accommodate this change.
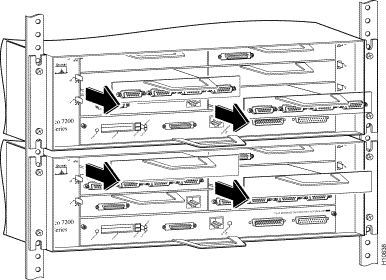
Step 2 Remove the Serial Port Adapters from slots 2 and 3 on the second (top) Router Shelf and the blank Port Adapter guards from slots 4 and 5 on the first (bottom) Router Shelf. See Figure 3-1.
Step 3 Swap the Serial Port Adapters into slots 4 and 5 on the first Router Shelf and the blank Port Adapter guards into slots 2 and 3 on the second Router Shelf. See Figure 3-2.
The steps in this section describe the procedure for moving all of the serial lines to the proper port for a single Router Shelf configuration.
You will move all of the connections to the Access Server Shelves to serial ports on the remaining Router Shelf.
| Take the cable that was connected to | And connect it to |
|---|---|
Step 2 Remove the cable that is connected to the Switch Shelf at port 1/2.
Step 3 Remove the cable and transceivers that connect the Router Shelves to each other.
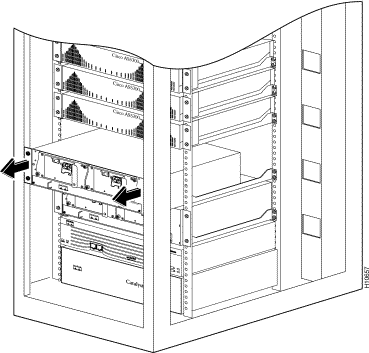
Step 2 From the front of the AccessPath system, uncable the Router Shelf. Remove all data connection and power cables where they enter the Router Shelf. Secure the loose data cables to the cable housing.
Step 3 From the back of the system, unbolt the Router Shelf from the rack.
Step 4 Remove the Router Shelf. See Figure 3-3.
After recabling the Router Shelf, you must initialize its serial ports 4/0 through 5/3 to accommodate the Access Server Shelves that you have switched over from the removed Router Shelf.
In this example, the user enters configuration mode on Router Shelf number 1 (offload01) and turns on serial interface 4/0.
Change the comments on each serial line to reflect the assignments used with a single-offload AccessPath system, where, for example, nas01 is connected to Serial 2/0, nas02 to 2/1, nas03 to 2/2, nas04 to 2/3, nas05 to 3/0.
You have completed the removal of the second Router Shelf on the AccessPath system. If you have questions or need assistance, see the section "Cisco Connection Online" in the chapter "About This Guide."
![]()
![]()
![]()
![]()
![]()
![]()
![]()
![]()
Posted: Mon Jan 20 21:18:34 PST 2003
All contents are Copyright © 1992--2002 Cisco Systems, Inc. All rights reserved.
Important Notices and Privacy Statement.