|
|

This chapter describes how to install and configure the Cisco 200 software using INSTALL.EXE, Cisco's DOS-based installation program.
This chapter contains the following sections:
Before you run INSTALL.EXE, you should complete the following:
The Cisco 200 Software Installation Worksheet is provided for the system administrator to complete and send to the operator(s) who will be installing and configuring the Cisco 200 at the remote sites. The worksheet indicates the selections you should make when running the INSTALL.EXE utility, and provides space for instructions on modifying the ISDN200.CFG or NET.CFG file if necessary.
The Cisco 200 Software Installation Worksheet (see Table 2-1) lists the information you should have available before you install and configure the Cisco 200 software. Make a copy of the worksheet and have your system administrator fill it out for your network configuration. Place the completed worksheet in your Site Log.


The INSTALL.EXE utility installs the Cisco 200 software. INSTALL.EXE simplifies the process of installing and configuring the Cisco 200 within the DOS environment.
To install the Cisco 200 software, complete the following tasks:
To install the Cisco 200 software for the first time, follow the steps in this section.
Step 1 Insert the working copy of the Cisco 200 disk containing INSTALL.EXE into the disk drive of your PC.
Step 2 Change to the drive where the disk is inserted and enter the following command at the prompt:
INSTALL
The Welcome dialog box appears.
Step 3 Press any key to continue. The Installation Option dialog box appears. See Figure 2-1. Highlight the "Install Cisco 200" option and press Enter.

The Select Installation Drive dialog box appears. See Figure 2-2.

Step 1 Select the drive where you want to install the Cisco 200 files and press Enter. INSTALL.EXE detects how much space is currently available on your hard drive(s) and displays this information.
The Select Installation Directory dialog box appears. See Figure 2-3.

INSTALL.EXE will select C:\NWCLIENT as the default directory, whether or not you have installed the NetWare Client files in the standard NetWare directory.
Step 2 Either accept the default, or enter a different directory name and press Enter.
If the directory you enter does not exist, you are prompted to create a new directory. The Create Installation Directory dialog box displays. See Figure 2-4.

Step 3 To create a new directory, select Yes.
If you select No, the dialog box in Figure 2-3 will redisplay, allowing you to change the directory name.
Step 4 After you enter the name of the correct installation directory, press Y to create the new directory.
The Create NET.CFG dialog box appears. See Figure 2-5.

Step 1 The Create NET.CFG dialog box indicates that INSTALL.EXE has not detected a NET.CFG file in the Cisco 200 directory. Press any key to create a NET.CFG file.
The node Media Access Control (MAC) Address dialog box appears. See Figure 2-6.

Step 2 Enter a node MAC address. The MAC address consists of 12 hexadecimal characters (0 through 9 and A through F). In this chapter, 000123456789 is the example node MAC address.
If you enter an invalid character, the invalid node MAC address dialog box appears (see Figure 2-7). Reenter the node MAC address.

If the node MAC address is valid, the Installation Selections Confirmation dialog box appears. See Figure 2-8.

Step 3 If the selections are correct, enter Y to accept. Enter N to return to the previous display and enter the correct information.
If you enter Y, the NET.CFG Created dialog box displays (see Figure 2-9). Press any key to continue.

The ISDN200.CFG Creation dialog box displays. See Figure 2-10. This indicates that INSTALL.EXE has not detected an existing ISDN200.CFG file in the selected directory.
Step 1 Press any key to continue.

The Local System Name dialog box appears. See Figure 2-11.

Step 2 Enter the local system name assigned by your system administrator. Follow these guidelines:
Step 3 Press Enter. If you entered any invalid characters, an error message will appear and you must enter the local system name again.
The ISDN D-Channel Protocol Dialog Box appears. See Figure 2-12.

Step 1 Select the type of ISDN D-channel protocol used by your ISDN carrier. Verify your ISDN switch protocol on the Cisco 200 Software Installation Worksheet.
Step 2 Press Enter. Based on the protocol you selected, proceed to the appropriate section in the text that follows:
North American ISDN Protocols:
European ISDN Protocols:
Step 1 If you selected NI1, the NI1: SPID and Directory Entry dialog box appears. See Figure 2-13.

Enter the SPID and directory numbers listed on your Cisco 200 Software Installation Worksheet. Use the Enter key to move through the data entry lines. Press Ctrl+Enter when you finish entering SPID information.
Step 2 The Local Computer Configuration Confirmation dialog box appears. See Figure 2-14. Enter Y to accept the local computer configuration as shown; enter N to reject this configuration and make changes to it.

The ISDN200.CFG Local Configuration dialog box displays. See Figure 2-15.

Step 3 Press any key to continue. Proceed to the section "Configuring the Connecting Router" later in this chapter.
If you selected 5ESS (Point-to-Point or Multipoint), the 5ESS: SPID Entry dialog box appears. See Figure 2-16.

Step 1 Enter the SPID number listed on your Cisco 200 Software Installation Worksheet.
Step 2 Press Ctrl+Enter. The ISDN200.CFG Local Configuration Dialog Box displays. See Figure 2-17. Press any key to continue.
Proceed with the next section, "Configuring the Connecting Router."
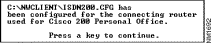
You are now prompted for the parameters for the connecting routers. The Connecting Router Name dialog box displays. See Figure 2-18.

Step 1 Enter the name of the connecting router as provided by your system administrator.
The connecting router is the router or PC to which you will be sending data. Follow these guidelines:
In this document, Headquarters is the example connecting router name. Press Enter when you have entered the connecting router name. If you enter an invalid name, an error message will appear and you must enter the connecting router name again.
The Connecting Router Telephone Number dialog box displays. See Figure 2-19.

Step 2 Enter the telephone number of the connecting router and press Ctrl+Enter. The number should include in a single string all numbers necessary to dial the remote router, including:
The ISDN Line Speed dialog box displays. See Figure 2-20.

Step 3 Select the speed of the connecting router's ISDN line. The default is 64 or 128 kbps.
The Protocol Selection dialog box displays. See Figure 2-21.

Step 4 Select the network protocol(s) you use and press Ctrl+Enter.
If you selected IP as one of the protocol types, the TCP/IP dialog box displays. See Figure 2-22.

Step 5 Read the dialog box, then press any key to continue. The Authentication (CHAP) dialog box displays. See Figure 2-23.

Step 6 If you will be using the Challenge Handshake Authentication Protocol (CHAP), enter Y. The Authentication (CHAP) Password dialog box displays. See Figure 2-24.
If you will not be using CHAP, enter N and proceed with the next section, "Completing the Installation."

Step 7 Enter the CHAP password provided by your system administrator.
The CHAP password is case-sensitive and must match exactly the password on the connecting router.
If you answered Y in Step 6 but do not enter a valid password, the Reenter (CHAP) Password dialog box displays. See Figure 2-25.

Step 8 Reenter the CHAP password and press Enter.
The Do You Want to Use PPP Multilink dialog box appears. See Figure 2-26.
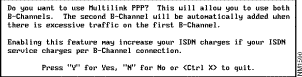
Step 9 Read the information in the Do You Want to Use PPP Multilink dialog box. If you want to use PPP multilink, press Y; otherwise, press N.
The Do You Want to Use PPP Callback dialog box appears. See Figure 2-27.

Step 10 If you want to use PPP callback, which allows for centralized billing and increased security, press Y; otherwise, press N.
The Connecting Router Selections Confirmation dialog box displays. See Figure 2-28.

Step 11 Enter Y to confirm your choices for this connecting router, or enter N to reenter the connecting router information.
If you entered Y, the Configure Another Connecting Router dialog box displays. See Figure 2-29.

Step 12 Enter Y to configure another connecting router, or enter N if you have configured all connecting routers for this ISDN line.
Step 13 If you entered Y, repeat Step 2 through Step 12 to enter all the connecting routers or PCs you will be dialing using this ISDN line.
After you finish configuring connecting routers, enter N.
Step 14 When you finish configuring all connecting routers, a message similar to that in Figure 2-30 will display. Press any key to continue.
Step 1 The Installing Files Progress dialog box displays, as shown in Figure 2-31, while INSTALL.EXE copies all necessary files into the designated directory.

When all files have been copied, the Installation Complete dialog box displays. See Figure 2-32.

Step 2 Press any key. The NetWare Client Files Reminder dialog box displays. See Figure 2-33.

Step 3 Press any key to continue. The Installation Complete dialog box displays. See Figure 2-34.
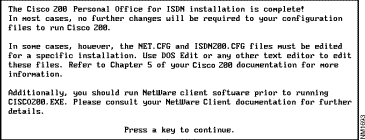
Step 4 Press any key to continue. The Thank You dialog box displays. See Figure 2-35.

Step 5 Press any key to continue. INSTALL.EXE will take you to the directory in which you installed the Cisco 200 software.
You have now completed installation of the Cisco 200 software.
For information on configuring the Cisco 200 software in Windows 3.1 or Windows for Workgroups 3.11, refer to the chapter "Configuring the Cisco 200 Software for Use in Windows."
If you need to modify your Cisco 200 configuration—to add another connecting router for example—see the appendix "Modifying the Cisco 200 Configuration Files."
If you must reinstall the Cisco 200 software using INSTALL.EXE—for example, if you want to install an updated version of the software—follow the procedure described below in "Reinstalling the Cisco 200 Software."
For information on running the Cisco 200, see the chapter "Using the Cisco 200."
If you must reinstall the Cisco 200 software using INSTALL.EXE—for example, if you want to install an updated version of the software—use one of the following procedures:
NET.CFG

ISDN200.CFG

ISDN200.EXE

README.TXT

ISDNEXP1.EXP

ISDNEXP2.EXP

CAPI200.EXE

CISCO200.EXE

NETCFG.EXP

CONNECT.BAT

DCONNECT.BAT
![]()
![]()
![]()
![]()
![]()
![]()
![]()
![]()
Posted: Tue Dec 17 18:49:27 PST 2002
All contents are Copyright © 1992--2002 Cisco Systems, Inc. All rights reserved.
Important Notices and Privacy Statement.