6.2. WAR Files and Deployment
In the servlet model, Web Application Archive (WAR) files are the unit of deployment. WAR files enable portability across a wide range of servlet containers regardless of the vendor. The good news is that WAR files are very easy to create and require only that you carefully follow the guidelines for file and directory names. If you are careful to avoid spelling errors and misplaced files, you should not have any problem with WAR files.
6.2.1. WAR Files
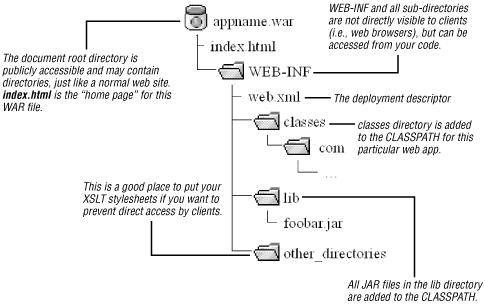
Figure 6-2 shows the standard structure of a WAR file. Since a WAR file is really just a JAR file with a .war extension, you can utilize the jar command to create your WAR files.

Figure 6-2. WAR file structure
To create a WAR file, simply arrange your files into the directory structure shown in Figure 6-2 and issue the following command from the directory that contains index.html:[23]
[23] index.html is the "home page" for a web application.
jar -cvfM ../appname.war
This command assumes that the WAR file will be placed in the parent of your current working directory; the forward slash (/ ) works on Windows as well as Unix clients. Once the WAR file has been created, you can view its contents by changing to its directory and issuing the following command:
jar -tvf appname.war .
This shows the table of contents for the WAR file, which must match the structure shown in Figure 6-2.
The topmost directory in the WAR file is publicly accessible to web browsers and should contain your JSP and HTML files. You can also create subdirectories, which will also be visible to the client. A common practice is to create an images directory for storing your graphic files.
The WEB-INF directory is always hidden from clients that access your web application. The deployment descriptor, web.xml, is located here, as are the classes and lib directories. As Figure 6-2 indicates, the classes directory becomes available to your application's ClassLoader. Any JAR files contained in the lib directory are also available to your code, making it very easy to deploy third-party libraries along with a web application. The folder other_directories can be anything you want and will also be hidden from clients since it resides under the WEB-INF directory. Although clients cannot see any of these directories and files directly, your servlet can access these resources programmatically and then deliver that content.
6.2.2. Deployment Descriptor
The deployment descriptor is always called web.xml and must be placed directly in the WEB-INF directory of your web application. The job of the deployment descriptor is to provide the servlet container with complete configuration information about a web application. This may include security attributes, aliases for servlets and other resources, initialization parameters, and even graphical icons for Integrated Development Environments (IDEs) to utilize. For our needs, a very small subset of this functionality will be sufficient. For SplashScreenServlet, we need to list the Java class of the servlet, an alias for that servlet, and a URL mapping. The complete deployment descriptor for SplashScreenServlet is listed in Example 6-2.
Example 6-2. web.xml for SplashScreenServlet.java
<?xml version="1.0" encoding="UTF-8"?>
<!DOCTYPE web-app
  PUBLIC "-//Sun Microsystems, Inc.//DTD Web Application 2.2//EN"
  "http://java.sun.com/j2ee/dtds/web-app_2.2.dtd">
<web-app>
  <servlet>
    <!-- define an alias for the Servlet -->
    <servlet-name>splashScreen</servlet-name>
    <servlet-class>chap6.SplashScreenServlet</servlet-class>
  </servlet>

  <servlet-mapping>
    <!-- associate the Servlet with a URL pattern -->
    <servlet-name>splashScreen</servlet-name>
    <url-pattern>/splash/*</url-pattern>
  </servlet-mapping>
</web-app>
The DOCTYPE is a required element of a deployment descriptor and must match what is shown in Example 6-2. The only caveat is that newer versions of the servlet specification, such as Version 2.3, use a different version number in the deployment descriptor. Unless you are using 2.3 features, however, you should stick with 2.2 to remain compatible with as many servlet containers as possible.
A servlet definition lists the fully qualified package and class name of the servlet class, as well a name for that servlet. Whenever another section in the deployment descriptor wishes to reference this particular servlet, it uses the name specified here:
<servlet>
  <servlet-name>splashScreen</servlet-name>
  <servlet-class>chap6.SplashScreenServlet</servlet-class>
</servlet>
As you can see in Example 6-2, the servlet mapping uses this name in order to associate a URL pattern with this particular servlet. This pattern will show up in the address that users type into their web browsers when they access this servlet. In this case, the URL to SplashScreenServlet is:
http://hostname:port/chap6/splash
This is the form that Tomcat defaults to, having the following components:
- hostname:port
- Typically localhost:8080, although Tomcat can be configured to run on any port number
- chap6
- The name of your web application, which is deployed in chap6.war for this example
- splash
- Part of the URL pattern for the servlet
Wildcards in the URL pattern indicate that any text will match. Since the deployment descriptor listed /splash/* as the pattern, any of the following URLs also invoke SplashScreenServlet:
-
http://localhost:8080/chap6/splash/
-
http://localhost:8080/chap6/splash/whatever.html
-
http://localhost:8080/chap6/splash/a/b/c
6.2.3. Deploying SplashScreenServlet to Tomcat
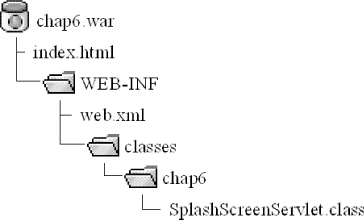
The simple steps for getting SplashScreenServlet up and running are to compile the code, create the deployment descriptor listed in Example 6-2, and create the WAR file using the jar utility. The WAR file contents for this servlet are shown in Figure 6-3.

Figure 6-3. SplashScreenServlet WAR file
Once you have created chap6.war, be sure to execute jar -tvf chap6.war to confirm that the contents are structured properly. The final step is to simply copy the entire JAR file to Tomcat's webapps directory.
NOTE: If a WAR file is copied into the webapps directory while Tomcat is running, it will not be recognized. Simply restart Tomcat to begin using the web application.
Once the WAR file has been copied, you can execute startup.bat or startup.sh in Tomcat's bin directory and then enter http://localhost:8080/chap6/splash into your favorite web browser. If you see error messages, check to see that the JAVA_HOME and TOMCAT_HOME environment variables are properly set. You can also look in Tomcat's webapps directory to see if the WAR file is properly expanded. When a web application is first invoked, Tomcat expands the WAR file into its actual directory structure. When you look in the webapps directory, you should see chap6.war as well as the chap6 directory.
If all else fails, check the documentation for Tomcat, double check your deployment descriptor, and try the example servlets that come with Tomcat. To see the Tomcat home page, start Tomcat and visit http://localhost:8080. If this does not work, then something more fundamental is wrong with your Tomcat installation.
6.2.4. Servlet API Highlights
We will see more complex servlets throughout this book, but a recurring theme is to minimize dependence on obscure servlet tricks and focus instead on using XML and XSLT to generate a majority of the content in your web application. To make this happen, it is necessary to look at a few of the commonly used classes that are part of the servlet package.
The javax.servlet.ServletConfig class provides initialization parameters to a servlet at startup time. Each servlet has the following method, which is called once when the servlet is first initialized:
public void init(ServletConfig config) throws ServletException
The ServletConfig object provides name/value String pairs used to configure servlets without hardcoding values into the application code. For example, you might write code that looks like this:
String xmlLocation = config.getInitParameter("xmlLocation");Since xmlLocation is an initialization parameter that is part of the XML deployment descriptor, its value does not have to be hardcoded into your application. For additional examples, see Section 6.3.6, "Locating Stylesheets with Initialization Parameters" later in this chapter.
Another important class is javax.servlet.ServletContext . This class does a lot more than ServletConfig, and its instance is shared among a group of servlets. Use ServletConfig to obtain a reference to the ServletContext:
// config is an instance of ServletConfig
ServletContext ctx = config.getServletContext( );
Later in this book, we will focus on ServletContext's ability to locate resources in a portable way. You may be familiar with the getResource( ) and getResourceAsStream( ) methods on java.lang.Class. These methods allow you to locate files and directories based on the system CLASSPATH.
ServletContext provides its own getResource( ) and getResourceAsStream( ) methods, but they are not based on CLASSPATH. Instead, the directory locations are based on the location of the current web application. For example, you can write something such as:
context.getResource("/WEB-INF/stylesheets/home.xslt")to load a stylesheet from the current WAR file. Regardless of where Tomcat was installed, this approach will always locate the stylesheet without hardcoding a path name such as C:\path\....

Copyright © 2002 O'Reilly & Associates. All rights reserved.


