
 |  |
Chapter 18. LAMP
Contents:
Just writing a couple of lines of HTML code is not enough for most web sites; dynamic content is what people want today. Well, web-site visitors don't usually want as much as web designers are eager give them, but the designers are in control, so dynamic content is what we are going to talk about in this chapter.
Linux is — you guessed it — an excellent platform for serving dynamic content. A bazillion web sites serving dynamic content are already running on Linux today; this is one of the foremost application areas where Linux excels.
Dynamic content can be achieved by two entirely different ways of programming: server-side programming and client-side programming. JavaScript and Java applets are the most common ways of getting interactive HTML pages with client-side programming.
But because of the limitations of JavaScript and Java, most people use server-side programs. You can use server-side programs in many different flavors with many different software packages, but one combination has become ubiquitous for implementing these techniques. This combination is so common nowadays that it even has received a phony acronym: LAMP, which is short for Linux-Apache-MySQL-PHP. We have been talking about the Apache web server already, and this whole book is about Linux, so what we have left to talk about here are the latter two packages — MySQL and PHP — as well as how the four go together.
In order to get a working LAMP installation, you will need to have Apache set up as described in Section 16.1.2, as well as install MySQL and PHP. We will cover how to get the latter two running in this chapter.
Before we get into the technical details, however, we should review why you might want to bother setting up and learning how to use a LAMP system.
LAMP makes it easy to provide a large amount of content and navigate your web-site users through it easily.
Let's say you have a site with lots of JPEGs of photographs you've taken on numerous occasions. Visitors may want to view photographs along a number of different dimensions. That is, some visitors want to see photographs of historic buildings, whenever you took them. Others might want to see photographs taken on your latest trip, whenever that was.
To make navigation and retrieval easy, you start by inserting your JPEGs into a MySQL database, which provides a datatype specifically for binary large objects (BLOBs) such as JPEGs. You organize them any way you want (by subject matter, by trip, and so on) and store all this information in tables within the database.
Now you provide a form on your web site that visitors can fill out to indicate the dimension along which they want to view photographs. The form could be as simple as that shown in Figure 18-1.
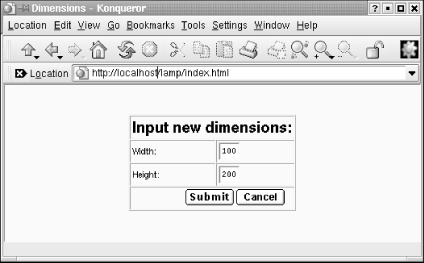
Figure 18-1. A simple input form
Your next page is a dynamic one, along the lines of that which we are describing in this chapter. A bit of PHP code retrieves the visitor's request and determines what is displayed in the page. This could look like Figure 18-2.
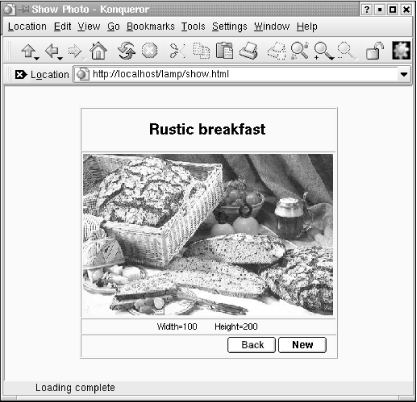
Figure 18-2. A dynamic web page generated by PHP
Where is the MySQL in all this? It's not immediately visible, but it plays a crucial role behind the scenes because it is queried by the PHP code. The combination of inline PHP code and a fast database makes the whole experience fairly pleasant for the visitor.
18.1. MySQL
MySQL is an open-source database that is very fast and comparatively easy to administer. If you need the most advanced database features like reduplication or distributed databases, or if you plan to store gigabytes of data, the big iron databases, such as Oracle might be a better choice, but for most intents and purposes, MySQL is an excellent database choice.
On the Choice of Databases
We should probably point out that MySQL is not the only choice you have when selecting a database as the back end for dynamic web sites. For example, Postgres, which is installed by default on Red Hat systems, is a very good open source database as well. So, if you want to deploy a "LAPP" system and use Postgres instead, you can very well do that. Most of the information in this chapter will still apply. However, MySQL can be considered the standard database for dynamic web sites on Linux systems. This is due to its ease of use, speed, and versatility. Also, if you are looking for additional documentation on deploying dynamic web sites on Linux (which we strongly recommend you to do), you are more likely to find this information (e.g., in the form of dedicated books on this topic) about MySQL than about Postgres.
It is very likely that your distribution contains an installable MySQL system, but if you'd rather have the latest and greatest, you can go to http://www.mysql.com/downloads/ and download the package yourself. At the time of this writing, the latest stable version is 3.23.47. Please note that some MySQL users have reported database table corruptions with 2.2.14 kernels under heavy load, so if you plan to use MySQL for real-life applications, you might want to upgrade your kernel to something more current.
A problem that can occur with MySQL versions compiled with gcc 2.96 is random crashes. This gcc version is not an official stable version, but at least one distributor (Red Hat) unfortunately shipped it as the default compiler. So if you experience strange crashes in the database server, and are using gcc 2.96, try using one of the precompiled binaries or install a more stable compiler version, such as 2.95.3.
If you want to build MySQL on your own, you need to download the source package, unpack it, and install with:
owl$ ./configure --prefix=/usr/local/mysql
owl$ make
owl# make install
Note that depending on your system, you might select a different installation path. You will also probably need to be root for the third step. You need to remember the installation path because you will need it for the PHP configuration later on.
For the next step, we recommend that you create a user and a group called mysql as described in Section 5.7.5. Change to this user with su - mysql and execute:
owl$ scripts/mysql_install_db
For security reasons, it might be a good idea to disable logins by the mysql user. You can simply do this as root by putting a star in the second (password) column in /etc/password and/or /etc/shadow.
After this step, you need to perform just one more command before returning from root to your normal user account. The following command starts the MySQL server:
owl# /usr/local/mysql/bin/safe_mysqld &
You might also want to add either the option -- log or the option -- log-long-format in order to get a log file about what is going on in the database server.
To check whether your server was started correctly, you can try (as normal user again) the following command (you need to change the path, of course, if you have installed MySQL in a different location):
owl$ /usr/local/mysql/bin/mysqladmin version
mysqladmin  Ver 8.19 Distrib 3.23.37, for suse-linux on i686
Copyright (C) 2000 MySQL AB & MySQL Finland AB & TCX DataKonsult AB
This software comes with ABSOLUTELY NO WARRANTY. This is free software,
and you are welcome to modify and redistribute it under the GPL license.

Server version                3.23.37-log
Protocol version        10
Connection                Localhost via UNIX socket
UNIX socket                /var/lib/mysql/mysql.sock
Uptime:                        43 days 11 hours 39 min 17 sec

Threads: 1  Questions: 142  Slow queries: 0  Opens: 160  Flush tables: 1  Open
tables: 13 Queries per second avg: 0.000
This should work without entering a password. We would like to point out, though, that it is not a good idea to have a database without a password because that increases the odds for a possible intruder to get at your potentially valuable data in the database. You might perhaps want to leave the database without a password for testing, but then you should make sure that you do not forget to set a password after you are done with your tests and retest to see whether everything works with the password in place. If you have created a password for the root database user (or if your distribution has done so for you; check your documentation in case of any problems), you must specify the -p option which makes mysqladmin ask you for your password.
We should add here that most distributions include a startup script for the MySQL server that you can use instead of starting the server manually (especially if you have installed MySQL from your installation media). Often, this script is in /etc/init.d/mysql.
With the database server started and working, we can start to define database users and create new databases. We would like to point out that a usable tutorial is included with the MySQL sources and you cancan find lots of documentation on http://www.mysql.com, so we will just cover the very basics here to get you started. If you really want to become a MySQL expert, we suggest you look into Managing & Using MySQL by Randy Jay Yarger, George Reese, and Tim King (O'Reilly).
There are two ways of communicating with the MySQL engine: you can either use a console-based database client, or write so-called SQL scripts and feed them to the database in order to execute many SQL commands at once. SQL stands for Structured Query Language and is the database language used with relational databases; we will cover its use later in this chapter. Both ways of executing SQL commands assume that you have the correct username/password combination.
An important thing you need to know about MySQL is that Linux user accounts are different from MySQL user accounts. In other words, MySQL has its own account management. Most people give their MySQL user accounts the same names as their Linux user accounts in order to avoid confusion, though.
By default, there is one MySQL account called root which has no password (talk about "security by default"...). This means that you can access the database server with the interactive command-line tool mysql as follows:
owl$ mysql -u root

Welcome to the MySQL monitor.  Commands end with ; or \g.
Your MySQL connection id is 13 to server version: 3.23.39.

Type 'help;' or '\h' for help. Type '\c' to clear the buffer.

mysql:
The -u option specifies the database user to use. If this does not work, maybe your MySQL installation has a password set for the root user. Try to find this password in the documentation and start the mysql program with:
owl$ mysql -u root -p
which will prompt you for the password.
Assuming that you have been able to log into the database server, let's try to issue a command:[64]
[64]This is not a real SQL command, but rather a MySQL administration command.
mysql> show databases;
+-------------+
| Database    |
+-------------+
| mysql       |
| test        |
+-------------+
2 rows in set (0.11 sec)
This tells you that two databases are managed by this database server. One is called mysql and contains MySQL's internal configuration information including the usernames, and the other one is called test and can be used by you for your experiments. It's also no problem at all to create additional databases; we'll show you how in a minute. As you can see, all SQL commands need to be terminated with a semicolon — probably in order to make the C programmers happy.
Now you should give the root account a password (in case it does not have one already). This is done with two SQL commands:
mysql> SET PASSWORD FOR root=PASSWORD('new_topsecret_passwd');
mysql> FLUSH PRIVILEGES;
Notice again the semicolon at the end of these commands; if you forget to type them before pressing the Enter key, MySQL will just stare at you, waiting for you to enter more.
By the way, SQL commands are case-insensitive; we have written them in uppercase here because that makes it a bit easier to see in an SQL script where the command keywords and the variable parameters are.
Also note the use of the FLUSH PRIVILEGES command. This is important because only after this command has been executed will MySQL update its user database.
Now we want to create a new user called olof, which has the same access rights as root, except that it cannot create new users. Apart from that, olof may use and manipulate all MySQL databases on this database server:
mysql> GRANT ALL PRIVILEGES ON *.* TO olof@localhost IDENTIFIED BY 'olof_passwd';
mysql> FLUSH PRIVILEGES;
The user olof can log into the database only from the local machine. This is a good idea since it leaves one less security issue to think about. We recommend that you only allow access from the local machine unless you have a very good reason not to do it this way. Even in the LAMP combo, local access is enough, because the web server process is running on the local machine, and this is the process that connects to the database, not the user's web browser process.
But if you really require access to the database over the network, you could use these commands instead:
mysql> GRANT ALL PRIVILEGES ON *.* TO username@"%"  IDENTIFIED BY 'user_passwd';
mysql> FLUSH PRIVILEGES;
If you think that having all access rights except creating new users is a bit too much, let's create another user that may execute the SELECT, INSERT, UPDATE, DELETE, and DROP operations, but only on the database called test (and only when connected from the local machine):
mysql> GRANT SELECT, INSERT, UPDATE, DELETE, DROP ON test.* TO gonzo@localhost
       IDENTIFIED BY 'gonzo_passwd';
mysql> FLUSH PRIVILEGES;
If you haven't worked with SQL databases before, these operations will probably not make much sense to you. Since you are going to need to use them anyway when setting up your LAMP system, we might just as well shortly describe them here:
- SELECT
- This is the most commonly used SQL command. It queries the database for data with certain properties — e.g., you could ask for all customers in a certain town. SELECT never changes anything in the database.
- INSERT
- This SQL command inserts new records into a database table. You use this (either interactively or, more likely, as part of a program) to insert a customer record into the customer table in your database, for example.
- UPDATE
- This SQL command changes existing records in a database. You could use this to, for example, increase the retail prices of all articles in the database by 15% (talk about inflation!).
- DELETE
- This SQL command deletes entire records from the database. Be careful with this command, as there is no way of restoring the data short of restoring from a (hopefully available!) backup tape.
There are even more SQL commands and corresponding privileges (like DROP, which lets you delete entire tables or even entire databases), but these are used less often than the "big four" listed here.
Now we want to create a new database which we can then fill with tables and data later. This is done with the SQL command CREATE DATABASE:
mysql> create database test_database;
Query OK; 1 row affected (0.03 sec)
The output from MySQL already indicates that everything went fine, but in order to be really sure, we can ask anew which databases the server manages:
mysql> show databases;
+-----------------+
| Database        |
+-----------------+
| mysql           |
| test            |
| test_database   |
+-----------------+
6 rows in set (0.00 sec)
Now we want to define a table in our new database, but the first thing we need to do is tell the MySQL server that we actually want to use this database:
mysql> use test_database
Database changed
As you can see, we didn't use a semicolon at the end here, since this is again not an SQL command, but rather a control statement for the MySQL console client. It wouldn't hurt to add a semicolon here, too.
You define a table, which is ultimately where your data will be stored, by means of the SQL command CREATE TABLE. Here is an example:
mysql> CREATE TABLE comment_table(
    ->   id INT NOT NULL auto_increment,
    ->   comment TEXT,
    ->   PRIMARY KEY(id));
Query OK, 0 rows affected (0.10 sec)
Here we defined a table called comment_table with two columns — i.e., there are two data fields in each record. One is called id. This one serves as a unique identifier for each record that cannot occur twice in different records and is therefore marked as the primary key, which is just a fancy term in database-speak for "unique identifier." The other column is a variable of type TEXT which can store up to 65,535 characters.
Now we can check which tables we have within our database test_database:
mysql> show tables;
+-------------------------+
| Tables_in_test_database |
+-------------------------+
| comment_table           |
+-------------------------+
1 row in set (0.00 sec)
Now we know that everything is alright and can start to add data records to our table. This is done with the SQL command INSERT:
mysql> INSERT INTO comment_table VALUES ('0','comment');
Query OK, 1 row affected (0.06 sec)
Finally, we can check which data our table contains:
mysql> SELECT * FROM comment_table;
+----+---------+
| id | comment |
+----+---------+
|  1 | comment |
+----+---------+
1 row in set (0.01 sec)
Here we ask for all (*) columns in the table comment_table. But you might have noticed something odd here: we have asked MySQL to insert a 0 in the first column, but instead there is a 1 now. That's because we have defined this column to be of the type INT NOT NULL auto_increment, which means that the column value cannot be NULL and that MySQL will automatically choose the next available value. This is nice because we can insert new records into the table without having to ensure that we pick unique values for the first column:
mysql>  INSERT INTO comment_table VALUES ('0','comment1');
Query OK, 1 row affected (0.00 sec)

mysql> SELECT * FROM comment_table;
+----+----------+
| id | comment  |
+----+----------+
|  1 | comment  |
|  2 | comment1 |
+----+----------+
2 rows in set (0.00 sec)
As you can see, we have specified 0 as the value for the first column again, but MySQL has automatically selected the next available valid value.
At this point, you know already enough about MySQL in order to experiment yourself or start reading another book about databases and dream about building the next hugely successful e-commerce web site.[65]
[65]Or the first successful e-commerce web site, as some people would like to rectify.
But instead of dreaming, you can also read on here and learn about SQL scripts.
You do not necessarily need to type in all commands at MySQL's own command-line prompt, you can also execute batch files with SQL commands by piping them to the mysql program. For example, if you save the following SQL code as create_db.sql:
DROP DATABASE IF EXISTS test_database;
CREATE DATABASE test_database;
USE test_database;
CREATE TABLE comment_table( id INT NOT NULL auto_increment,\
 comment TEXT,PRIMARY KEY(id));

INSERT INTO comment_table VALUES ('0','comment');
INSERT INTO comment_table VALUES ('0','comment1');
you can execute this script from the ordinary Linux command line with:
mysql -u root -p < create_db.sql
The line:
DROP DATABASE IF EXISTS test_database;
is of course pretty dangerous; you should use it only if you don't have important data in your database.
To tell the truth, it is not absolutely necessary (albeit strongly recommended) to create a new database for each project. In theory, you could lump all your data into the test database that is preinstalled with MySQL as long as you make sure the table names are all different. In practice, this would be a maintenance nightmare if you have more than a handful of tables.
|  | |
| 17.4. Firewalls: Filtering IP Packets |  | 18.2. PHP |

Copyright © 2003 O'Reilly & Associates. All rights reserved.