
 |  |
9.3. Text and Document Processing
Now that most of the world uses WYSIWYG word processors, and several good ones are available even for Linux, why use the anachronistic-looking text processors described in this section? Actually, text processing (especially in the form of XML) is the wave of the future. People will desire WYSIWYG interfaces, but they will demand a simple, standard, text format underneath to make their documents portable while allowing an unlimited range of automated tools to manipulate the documents.
Because the tools described here are open source and widely available, you can use one of their formats without guilt and reasonably expect your readers to have access to formatters. You can also use an impressive range of tools developed over the years to handle these formats and do sophisticated processing for you, such as to develop a bibliography in TEX. Finally, filters have been developed (although they don't always work perfectly) to convert documents between each of these formats and other popular formats, including the formats used by commercial word processors. So you're not totally locked in, although you will probably have to exert some manual effort to accomplish an accurate conversion.
In the first chapter, we briefly mentioned various text processing systems available for Linux and how they differ from word processing systems that you may be familiar with. While most word processors allow the user to enter text in a WYSIWYG environment, text processing systems have the user enter source text using a text-formatting language, which can be modified with any text editor. (In fact, Emacs provides special modes for editing various types of text-formatting languages.) Then, the source is processed into a printable (or viewable) document using the text processor itself. Finally, you process the output and send it to a file or to a viewer application for display, or you hand it off to a printer daemon to queue for printing to a local or remote device.
In this section, we'll talk first about WYSIMWYG (what-you-see-is-maybe-what-you-get) word processors like those that predominate on Windows and the Macintosh. After that, we'll discuss some of the most popular text processing systems for Linux: TEX, SGML, groff, and Texinfo.
9.3.1. Word Processors
One obvious sign that Linux has come of age is that many popular WYSIWYG word processing systems are available for it today. For some time, it had even been rumored that Microsoft was going to port its office suite to Linux, but this is not likely to happen. A Microsoft suite is not really needed any longer anyway because you can get other quite good word processors.
Another option is to use Anyware Office by VistaSource, Inc. Anyware Office is an office suite that is commercially made but inexpensive for Linux. It includes not only a word processor, but also a spreadsheet, a drawing program, a mail program, and other smaller tools. In some respects, Anyware Office behaves differently from word processors like Microsoft Word or WordPerfect, but once you get used to it, it can be quite useful and handy. Especially noteworthy is its support for importing and exporting FrameMaker documents. The development seems to have stopped somewhat, though, and it is uncertain what will become of this product.
Sun Microsystems provides its office productivity suite StarOffice on a number of platforms, including Linux. It was open sourced a while ago and is now maintained in two branches: the commercial StarOffice one which you can purchase from Sun, and the freely available OpenOffice one which you can download from http://www.openoffice.org. Both are supposed to be mostly functionally identical, but OpenOffice may not have all the bells and whistles (like templates, clipart, etc.) that StarOffice has. OpenOffice is released under the GPL, so if you fancy reading through the 3 million lines of source code making up an office productivity suite, this would be an opportunity for you.
OpenOffice is huge, so if you have a slow connection to the Net, check first whether your distribution doesn't already contain it.
In addition, there is KWord, the word processor of the office productivity suite of the KDE desktop environment, KOffice. KWord has made a lot of progress lately. It sports an interesting frame concept that makes it suitable even for some desktop publishing tasks. Of course, you can also write your letter to grandma with it. You can find more information about it at http://www.kde.org.
Finally, a good and lightweight alternative is AbiWord, more information about which you can find at http://www.abiword.org.
All those programs have one feature in common that many consider a key requirement for doing office-type work on Linux: they can import Microsoft Word documents quite well. While you may well decide, as a new Linux enthusiast, that you won't accept documents sent to you in proprietary formats, sometimes they come from your boss, and you can't refuse to read them just because you are running Linux. In this case, it is good to know that Linux-based solutions are available.
The LyX package (also available as KLyX with a more modern user interface) is another alternative. It provides a decent WYSIWYG X user interface that works with window managers from standard Linux distributions and uses the LATEX and TEX packages in order to format the text for printing. If you can live with the formatting limits of the package (most of us can), you may find that LyX/KLyX is an excellent solution. LyX/KLyX does not know how to display some of the powerful formatting features that TEX provides, so if you are a power TEX user, this isn't for you. LyX/KLyX isn't part of most Linux distributions; to try it you will have to get it from a Linux archive.
9.3.2. TEX and LATEX
TEX is a professional text processing system for all kinds of documents, articles, and books — especially those that contain a great deal of mathematics. It is a somewhat "low-level" text processing language because it describes to the system how to lay out text on the page, how it should be spaced, and so on. TEX doesn't concern itself directly with higher-level elements of text such as chapters, sections, footnotes, and so forth (those things that you, the writer, care about the most). For this reason, TEX is known as a functional text-formatting language (referring to the actual physical layout of text on a page) rather than a logical one (referring to logical elements, such as chapters and sections). TEX was designed by Donald E. Knuth, one of the world's foremost experts in programming. One of Knuth's motives for developing TEX was to produce a typesetting system powerful enough to handle the mathematics formatting needed for his series of computer science textbooks. Knuth ended up taking an eight-year detour to finish TEX; most would agree the result was well worth the wait.
Of course, TEX is very extensible, and it is possible to write macros for TEX that allow writers to concern themselves primarily with the logical, rather than the physical, format of the document. In fact, a number of such macro packages have been developed — the most popular of which is LATEX, a set of extensions for TEX designed by Leslie Lamport. LATEX commands are concerned mostly with logical structure, but because LATEX is just a set of macros on top of TEX, you can use plain commands as well. LATEX greatly simplifies the use of TEX, hiding most of the low-level functional features from the writer.
In order to write well-structured documents using TEX, you would either have to decide on a prebuilt macro package, such as LATEX, or develop your own (or use a combination of the two). In The TEX Book (Addison Wesley), Knuth presents his own set of macros that he used for production of the book. As you might expect, they include commands for beginning new chapters, sections, and the like — somewhat similar to their LATEX counterparts. In the rest of this section, we'll concentrate on the use of LATEX, which provides support for many types of documents: technical articles, manuals, books, letters, and so on. As with plain TEX, LATEX is extensible as well.
9.3.2.1. Learning the ropes
If you've never used a text-formatting system before, there are a number of new concepts of which you should be aware. As we said, text processing systems start with a source document, which you enter with a plain-text editor, such as Emacs. The source is written in a text-formatting language, which includes the text you wish to appear in your document, as well as commands that tell the text processor how to format it. In the first chapter we gave a simple example of what the LATEX language looks like and what kind of output it produces.
So, without further ado, let's dive in and see how to write a simple document and format it, from start to finish. As a demonstration, we'll show how to use LATEX to write a short business letter. Sit down at your favorite text editor, and enter the following text into a file (without the line numbers, of course). Call it letter.tex:
1  \documentclass{letter}
2  \address{755 Chmod Way \\ Apt 0x7F \\
3           Pipeline, N.M. 09915}
4  \signature{Boomer Petway}
5
6  \begin{document}
7  \begin{letter}{O'Reilly and Associates, Inc. \\
8                 1005 Gravenstein Highway North \\
9                 Sebastopol, C.A. 95472}
10
11 \opening{Dear Mr. O'Reilly,}
12
13 I would like to comment on the \LaTeX\ example as presented in
14 Chapter~9 of {\em Running Linux}. Although it was a valiant effort,
15 I find that the example falls somewhat short of what
16 one might expect in a discussion of text-formatting systems.
17 In a future edition of the book, I suggest that you replace
18 the example with one that is more instructive.
19
20 \closing{Thank you,}
21
22 \end{letter}
23 \end{document}
This is a complete LATEX document for the business letter that we wish to send. As you can see, it contains the actual text of the letter, with a number of commands (using backslashes and braces) thrown in. Let's walk through it.
Line 1 uses the documentclass command to specify the class of document that we're producing (which is a letter). Commands in LATEX begin with a backslash and are followed by the actual command name, which in this case is documentclass. Following the command name are any arguments, enclosed in braces. LATEX supports several document classes, such as article, report, and book, and you can define your own. Specifying the document class defines global macros for use within the TEX document, such as the address and signature commands used on lines 2-4. As you might guess, the address and signature commands specify your own address and name in the letter. The double-backslashes (\\) that appear in the address generate line breaks in the resulting output of the address.
A word about how LATEX processes input: as with most text-formatting systems, whitespace, line breaks, and other such features in the input source are not passed literally into the output. Therefore, you can break lines more or less wherever you please; when formatting paragraphs, LATEX will fit the lines back together again. Of course, there are exceptions: blank lines in the input begin new paragraphs, and there are commands to force LATEX to treat the source text literally.
On line 6, the command \begin{document} signifies the beginning of the document as a whole. Everything enclosed within the \begin{document} and \end{document} on line 22 is considered part of the text to be formatted; anything before \begin{document} is called the preamble and defines formatting parameters before the actual body.
On lines 7-9, \begin{letter} begins the actual letter. This is required because you may have many letters within a single source file, and a \begin{letter} is needed for each. This command takes as an argument the address of the intended recipient; as with the address command, double-backslashes signify line breaks in the address.
Line 11 uses the opening command to open the letter. Following on lines 12-18 is the actual body of the letter. As straightforward as it may seem, there are a few tricks hidden in the body as well. On line 13 the LATEX command generates the logo. You'll notice that a backslash follows as well as precedes the LATEX command; the trailing backslash is used to force a space after the word "LATEX" This is because TEX ignores spaces after command invocations; the command must be followed by a backslash and a space. (Otherwise, "LATEX//" would appear as "LATEX is fun.")
There are two quirks of note on line 14. First of all, a tilde (~) is present between Chapter and 9, which causes a space to appear between the two words, but prevents a line break between them in the output (that is, to prevent Chapter from being on the end of a line, and 9 from being on the beginning of the next). You need only use the tilde to generate a space between two words that should be stuck together on the same line, as in Chapter~9 and Mr.~Jones. (In retrospect, we could have used the tilde in the \begin{letter} and opening commands, although it's doubtful TEX would break a line anywhere within the address or the opening.)
The second thing to take note of on line 14 is the use of \em to generate emphasized text in the output. TEX supports various other fonts, including boldface (\bf) and typewriter (\tt).
Line 20 uses the closing command to close off the letter. This also has the effect of appending the signature used on line 4 after the closing in the output. Lines 22-23 use the commands \end{letter} and \end{document} to end the letter and document environments begun on lines 6 and 7.
You'll notice that none of the commands in the LATEX source has anything to do with setting up margins, line spacing, or other functional issues of text formatting. That's all taken care of by the LATEX macros on top of the TEX engine. LATEX provides reasonable defaults for these parameters; if you wanted to change any of these formatting options, you could use other LATEX commands (or lower-level TEX commands) to modify them.
We don't expect you to understand all the intricacies of using LATEX from such a limited example, although this should give you an idea of how a living, breathing LATEX document looks. Now, let's format the document in order to print it out.
9.3.2.2. Formatting and printing
Believe it or not, the command used to format LATEX source files into something printable is latex. After editing and saving the previous example, letter.tex, you should be able to use the command:
eggplant$ latex letter
This is TeX, Version 3.14159 (Web2C 7.3.1)
(letter.tex
LaTeX2e <2000/06/01>
Babel <v3.7h> and hyphenation patterns for american, french, german, ngerman, no
hyphenation, loaded.
(/usr/share/texmf/tex/latex/base/letter.cls
Document Class: letter 1999/04/29 v1.2z Standard LaTeX document class
(/usr/share/texmf/tex/latex/base/size10.clo))
No file letter.aux.
[1] (letter.aux) )
Output written on letter.dvi (1 page, 1128 bytes).
Transcript written on letter.log.
eggplant$
latex assumes the extension .tex for source files. Here, LATEX has processed the source letter.tex and saved the results in the file letter.dvi. This is a "device-independent" file that generates printable output on a variety of printers. Various tools exist for converting .dvi files to PostScript, HP LaserJet, and other formats, as we'll see shortly.
Instead of immediately printing your letter, you may wish to preview it to be sure that everything looks right. If you're running the X Window System, you can use the xdvi command to preview .dvi files on your screen. If you are also using the KDE desktop environment, kdvi is a more user-friendly version of xdvi. What about printing the letter? First, you need to convert the .dvi to something your printer can handle. DVI drivers exist for many printer types. Almost all the program names begin with the three characters dvi, as in dvips, dvilj, and so forth. If your system doesn't have one you need, you have to get the appropriate driver from the archives if you have Internet access. See the FAQ for comp.text.tex for details.
If you're lucky enough to have a PostScript printer, you can use dvips to generate PostScript from the .dvi:
eggplant$ dvips -o letter.ps letter.dvi
You can then print the PostScript using lpr. Or, to do this in one step:
eggplant$ dvips letter.dvi | lpr
There are printer-specific DVI drivers like dvilj for HP LaserJets as well, but most of these are considered obsolete; use dvips instead and, if necessary, Ghostscript (see below) instead.
If you can't find a DVI driver for your printer, you might be able to use Ghostscript to convert PostScript (produced by dvips) into something you can print. Although some of Ghostscript's fonts are less than optimal, Ghostscript does allow you to use Adobe fonts (which you can obtain for Windows and use with Ghostscript under Linux). Ghostscript also provides an SVGA preview mode you can use if you're not running X. At any rate, after you manage to format and print the example letter, it should end up looking something like that in Figure 9-3.
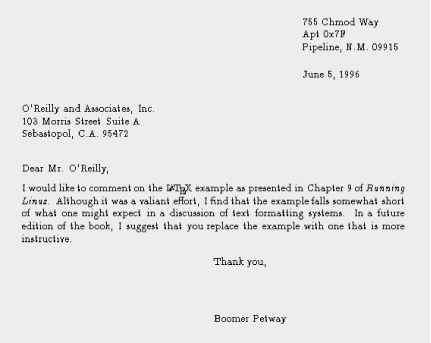
Figure 9-3. Sample output from a file
Finally, it should be mentioned that you can also use TEX to create PDF files, either using the dvipdf driver or using a special program called pdftex.
9.3.2.3. Further reading
If LATEX seems right for your document-processing needs, and you have been able to get at least this initial example working and printed out, we suggest checking into Leslie Lamport's LATEX User's Guide and Reference Manual (Addison Wesley), which includes everything you need to know about LATEX for formatting letters, articles, books, and more. If you're interested in hacking or want to know more about the underlying workings of TEX (which can be invaluable), Donald Knuth's The TEX book (Addison-Wesley) is the definitive guide to the system.
comp.text.tex is the Usenet newsgroup for questions and information about these systems, although information found there assumes you have access to TEX and LATEX documentation of some kind, such as the manuals mentioned earlier.
9.3.3. SGML, XML, and Docbook
SGML and XML go one step beyond the text markup languages we have discussed so far. They impose a structure on the text that shows the relation of each element to the containing elements. This makes it possible to convert the text to a number of output formats including PostScript and PDF (the Adobe Portable Document Format).
SGML itself is just a framework for defining the structure of a document. A so-called Document Type Description (DTD) or schema then defines what kind of markup you are allowed to use in a document.
While SGML is not widely known, its two descendants — HTML and XML — are famous and even overly hyped. Essentially, HTML is an implementation of SGML with a fixed set of tags that is useful for formatting web pages. XML is a general solution like SGML, but minus some of its difficult features. Both SGML and XML allow people to define any set of tags they like; the exact tags and their relationships are specified in the DTD or schema (which are optional in XML).
For each DTD or schema that you want to use, you need to have processing tools that convert the SGML or XML file to the desired output format. Historically, most free systems did this by means of a system called DSSSL. XSLT is now much more popular for converting XML to other formats. But this is nothing you need to be concerned with unless you want to change the way the output looks.
In the field of computer documentation, the most commonly used DTD is DocBook. Among many other things, most of the freely available Linux documentation is written with DocBook, as well as this book. DocBook users include a huge range of companies and well-known organizations, such as Sun Microsystems, Microsoft, IBM, Hewlett-Packard, Boeing, and the U.S. State Department.
To give you an example of how a DocBook text can look, here is a fragment of an article for a computer magazine:
<!DOCTYPE Article  PUBLIC "-//OASIS//DTD DocBook V4.1.2//EN">
<article>
  <artheader>
    <title>Looping the Froz with Foobar</title>
    <author>
      <firstname>Helmer B.</firstname>
      <surname>Technerd</surname>
      <affiliation>
        <orgname>Linux Hackers, Inc.</orgname>
      </affiliation>
    </author>
  </artheader>
  <abstract>
    <para>This article describes a technique that you can employ to
loop the Froz with the Foobar software package.</para>
  </abstract>
  <sect1>
    <title>Motivation</title>
    <para>Blah, blah, blah, ...
    </para>
  </sect1>
</article>
The first line specifies the DTD to be used and the root element; in this case we are creating an article using the DocBook DTD. The rest of the source contains the article itself. If you are familiar with HTML, the markup language used for the World Wide Web (see the O'Reilly book HTML & XHTML: The Definitive Guide, by Chuck Musciano and Bill Kennedy), this should look a bit familiar. Tags are used to mark up the text logically.
Describing the whole DocBook DTD is well beyond the scope of this book, but if you are interested, check out DocBook: The Definitive Guide by Norman Walsh and Leonard Muellner (O'Reilly).
Once you have your article, documentation, or book written, you will want to transform it, of course, into a format that you can print or view on the screen. In order to do this, you need a complete SGML setup, which, unfortunately, is not easy to achieve. In fact, you need so many pieces in place that we cannot describe this here. But there is hope: a number of distributions (including Red Hat, SuSE, and Debian) come with very good SGML setups out of the box; just install their respective SGML packages. If you have a working SGML system, you should be able to transform the above text to HTML (as one example) with a command like this:
owl$ db2html myarticle.sgml
input file was called  — output will be in myarticle
TMPDIR is db2html.GUBPgh
working on ../myarticle.sgml
about to copy cascading stylesheet and admon graphics to temp dir
about to rename temporary directory to "myarticle"
The file myarticle/t1.html will contain the generated HTML. If you would like to generate PDF instead, use the following command:
owl$ db2pdf myarticle.sgml
tex output file name is myarticle.tex
tex file name is myarticle.tex
pdf file name is myarticle.pdf
This is pdfTeX, Version 3.14159-13d (Web2C 7.3.1)
(myarticle.tex[/var/lib/texmf/pdftex/config/pdftex.cfg]
JadeTeX 2001/07/19: 3.11
(/usr/share/texmf/tex/latex/psnfss/t1ptm.fd)
Elements will be labelled
Jade begin document sequence at 20
No file myarticle.aux.
(/usr/share/texmf/tex/latex/cyrillic/t2acmr.fd)
(/usr/share/texmf/tex/latex/base/ts1cmr.fd)
(/usr/share/texmf/tex/latex/hyperref/nameref.sty)
(/usr/share/texmf/tex/latex/psnfss/t1phv.fd) [1.0.31[/var/lib/texmf/dvips/confi
g/pdftex.map]] (myarticle.aux) )<8r.enc>
Output written on myarticle.pdf (1 page, 4446 bytes).
Transcript written on myarticle.log.
As you can see, this command uses TEX in the background, or more specifically a special version called Jade which is specifically geared toward documents produced by DSSSL.
SGML opens a whole new world of tools and techniques. A good starting point for getting inspired and reading up on this is the web site of the Linux Documentation Project, which, as mentioned before, uses SGML/DocBook for all its documentation. You'll find the Linux Documentation Project at http://www.tlpd.org.
9.3.4. groff
Parallel to and independent to TEX, another major text processing system emerged in the form of troff and nroff. These were developed at Bell Labs for the original implementation of Unix (in fact, the development of Unix was spurred, in part, to support such a text processing system). The first version of this text processor was called roff (for "runoff"); later came nroff and troff, which generated output for a particular typesetter in use at the time (nroff was written for fixed-pitch printers such as dot matrix printers, troff for proportional space devices — initially typesetters). Later versions of nroff and troff became the standard text processor on Unix systems everywhere. groff is GNU's implementation of nroff and troff that is used on Linux systems. It includes several extended features and drivers for a number of printing devices.
groff is capable of producing documents, articles, and books, much in the same vein as TEX. However, groff (as well as the original nroff ) has one intrinsic feature that is absent from TEX and variants: the ability to produce plain-ASCII output. While TEX is great for producing documents to be printed, groff is able to produce plain ASCII to be viewed online (or printed directly as plain text on even the simplest of printers). If you're going to be producing documentation to be viewed online as well as in printed form, groff may be the way to go (although there are other alternatives as well — Texinfo, which is discussed later, is one).
groff also has the benefit of being much smaller than TEX; it requires fewer support files and executables than even a minimal TEX distribution.
One special application of groff is to format Unix manual pages. If you're a Unix programmer, you'll eventually need to write and produce manual pages of some kind. In this section, we'll introduce the use of groff through the writing of a short manual page.
As with TEX, groff uses a particular text-formatting language to describe how to process the text. This language is slightly more cryptic than TEX but is also less verbose. In addition, groff provides several macro packages that are used on top of the basic groff formatter; these macro packages are tailored to a particular type of document. For example, the mgs macros are an ideal choice for writing articles and papers, while the man macros are used for manual pages.
9.3.4.1. Writing a manual page
Writing manual pages with groff is actually quite simple. In order for your manual page to look like other manual pages, you need to follow several conventions in the source, which are presented in the following example. In this example, we'll write a manual page for a mythical command coffee, which controls your networked coffee machine in various ways.
Enter the following source with your text editor, and save the result as coffee.man:
1  .TH COFFEE 1 "23 March 94"
2  .SH NAME
3  coffee \- Control remote coffee machine
4  .SH SYNOPSIS
5  \fBcoffee\fP [ -h | -b ] [ -t \fItype\fP ] \fIamount\fP
6  .SH DESCRIPTION
7  \fIcoffee\fP queues a request to the remote coffee machine at the
8  device \fB/dev/cf0\fR. The required \fIamount\fP argument specifies
9  the number of cups, generally between 0 and 15 on ISO standard
10 coffee machines.
11 .SS Options
12 .TP
13 \fB-h\fP
14 Brew hot coffee. Cold is the default.
15 .TP
16 \fB-b\fP
17 Burn coffee. Especially useful when executing \fIcoffee\fP on behalf
18 of your boss.
19 .TP
20 \fB-t \fItype\fR
21 Specify the type of coffee to brew, where \fItype\fP is one of
22 \fBcolombian\fP, \fBregular\fP, or \fBdecaf\fP.
23 .SH FILES
24 .TP
25 \fI/dev/cf0\fR
26 The remote coffee machine device
27 .SH "SEE ALSO"
28 milk(5), sugar(5)
29 .SH BUGS
30 May require human intervention if coffee supply is exhausted.
Don't let the amount of obscurity in this source file frighten you. It helps to know that the character sequences \fB, \fI, and \fR are used to change the font to boldface, italics, and roman type, respectively. \fP resets the font to the one previously selected.
Other groff requests appear on lines beginning with a dot (.). On line 1, we see that the .TH request sets the title of the manual page to COFFEE and the manual section to 1. (Manual section 1 is used for user commands, section 2 for system calls, and so forth.) The .TH request also sets the date of the last manual page revision.
On line 2, the .SH request starts a section entitled NAME. Note that almost all Unix manual pages use the section progression NAME, SYNOPSIS, DESCRIPTION, FILES, SEE ALSO, NOTES, AUTHOR, and BUGS, with extra optional sections as needed. This is just a convention used when writing manual pages and isn't enforced by the software at all.
Line 3 gives the name of the command and a short description, after a dash (\-). You should use this format for the NAME section so that your manual page can be added to the whatis database used by the man -k and apropos commands.
On lines 4-5, we give the synopsis of the command syntax for coffee. Note that italic type \fI...\fP is used to denote parameters on the command line, and that optional arguments are enclosed in square brackets.
Lines 6-10 give a brief description of the command. Italic type generally denotes commands, filenames, and user options. On line 11, a subsection named Options is started with the .SS request. Following this on lines 11-22 is a list of options, presented using a tagged list. Each item in the tagged list is marked with the .TP request; the line after .TP is the tag, after which follows the item text itself. For example, the source on lines 12-14:
.TP
\fB-h\fP
Brew hot coffee. Cold is the default.
will appear as the following in the output:
-h Brew hot coffee. Cold is the default.
You should document each command-line option for your program in this way.
Lines 23-26 make up the FILES section of the manual page, which describes any files the command might use to do its work. A tagged list using the .TP request is used for this as well.
On lines 27-28, the SEE ALSO section is given, which provides cross references to other manual pages of note. Notice that the string "SEE ALSO" following the .SH request on line 27 is in quotation marks; this is because .SH uses the first whitespace-delimited argument as the section title. Therefore, any section titles that are composed of more than one word need to be enclosed in quotation marks to make up a single argument. Finally, on lines 29-30, the BUGS section is presented.
9.3.4.2. Formatting and installing the manual page
In order to format this manual page and view it on your screen, use the command:
eggplant$ groff -Tascii -man coffee.man | more
The -Tascii option tells groff to produce plain-ASCII output; -man tells groff to use the manual-page macro set. If all goes well, the manual page should be displayed as:
COFFEE(1)                                               COFFEE(1)


NAME
       coffee - Control remote coffee machine

SYNOPSIS
       coffee [ -h | -b ] [ -t type ] amount

DESCRIPTION
       coffee  queues  a  request to the remote coffee machine at
       the device /dev/cf0. The required amount  argument  speci-
       fies the number of cups, generally between 0 and 12 on ISO
       standard coffee machines.

   Options
       -h     Brew hot coffee. Cold is the default.

       -b     Burn coffee. Especially useful when executing  cof-
              fee on behalf of your boss.

       -t type
              Specify  the  type of coffee to brew, where type is
              one of colombian, regular, or decaf.

FILES
       /dev/cf0
              The remote coffee machine device

SEE ALSO
       milk(5), sugar(5)

BUGS
       May  require  human  intervention  if  coffee  supply   is
       exhausted.
As mentioned before, groff is capable of producing other types of output. Using the -Tps option in place of -Tascii produces PostScript output that you can save to a file, view with Ghostview, or print on a PostScript printer. -Tdvi produces device-independent .dvi output similar to that produced by TEX.
If you wish to make the manual page available for others to view on your system, you need to install the groff source in a directory that is present on the users' MANPATH. The location for standard manual pages is /usr/share/man, although some systems also use /usr/man or /usr/local/man. The source for section 1 manual pages should therefore go in /usr/man/man1. The command:
eggplant$ cp coffee.man /usr/man/man1/coffee.1
installs this manual page in /usr/man for all to use (note the use of the .1 filename extension, instead of .man). When man coffee is subsequently invoked, the manual page will be automatically reformatted, and the viewable text saved in /usr/man/cat1/coffee.1.gz.
If you can't copy manual page sources directly to /usr/man, you can create your own manual page directory tree and add it to your MANPATH. See the section Section 4.12 in Chapter 4.
9.3.5. Texinfo
Texinfo is a text-formatting system used by the GNU project to produce both online documentation in the form of hypertext Info pages, and printed manuals through TEX from a single-source file. By providing Texinfo source, users can convert the documentation to Info, HTML, DVI, PostScript, PDF, or plain text files.
Texinfo is documented completely through its own Info pages, which are readable within Emacs (using the C-h i command) or a separate Info reader, such as info. If the GNU Info pages are installed in your system, complete Texinfo documentation is contained therein. Just as you'll find yourself using groff to write a manual page, you'll use Texinfo to write an Info document.
9.3.5.1. Writing the Texinfo source
In this section, we're going to present a simple Texinfo source file — chunks at a time — and describe what each chunk does as we go along.
Our Texinfo source file will be called vacuum.texi. As usual, you can enter the source using a plain-text editor:
\input texinfo @c -*-texinfo-*-
@c %**start of header
@setfilename vacuum.info
@settitle The Empty Info File
@setchapternewpage odd
@c %**end of header
This is the header of the Texinfo source. The first line is a TEX command used to input the Texinfo macros when producing printed documentation. Commands in Texinfo begin with the "at" sign, @. The @c command begins a comment; here, the comment -*-texinfo-*- is a tag that tells Emacs this is a Texinfo source file so that Emacs can set the proper major mode. (Major modes were discussed earlier, in Section 9.2.8.)
The comments @c %**start of header and @c %**end of header are used to denote the Texinfo header. This is required if you wish to format just a portion of the Texinfo file. The @setfilename command specifies the filename to use for the resulting Info file, @settitle sets the title of the document, and @setchapternewpage odd tells Texinfo to start new chapters on an odd-numbered page. These are just cookbook routines that should be used for all Texinfo files.
The next section of the source file sets up the title page, which is used when formatting the document using TEX. These commands should be self-explanatory:
@titlepage
@title Vacuum
@subtitle The Empty Info File
@author by Tab U. Larasa
@end titlepage
Now we move on to the body of the Texinfo source. The Info file is divided into nodes, where each node is somewhat like a "page" in the document. Each node has links to the next, previous, and parent nodes, and can be linked to other nodes as cross-references. You can think of each node as a chapter or section within the document with a menu to nodes below it. For example, a chapter-level node has a menu that lists the sections within the chapter. Each section node points to the chapter-level node as its parent. Each section also points to the previous and next section, if they exist. This is a little complicated, but will become clear when you see it in action.
Each node is given a short name. The topmost node is called Top. The @node command is used to start a node; it takes as arguments the node name, as well as the names of the next, previous, and parent nodes. As noted earlier, the next and previous nodes should be on the same hierarchical level. The parent node is the node above the current one in the node tree (e.g., the parent of Section 2.1 in a document is Chapter 2). A sample node hierarchy is depicted in Figure 9-4.
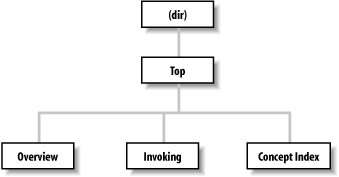
Figure 9-4. Hierarchy of nodes in Texinfo
Here is the source for the Top node:
@c    Node, Next, Previous, Up
@node Top ,     ,         , (dir)

@ifinfo
This Info file is a close approximation to a vacuum. It documents
absolutely nothing.
@end ifinfo

@menu
* Overview::              Overview of Vacuum
* Invoking::              How to use the Vacuum
* Concept Index::         Index of concepts
@end menu
The @node command is preceded by a comment to remind us of the order of the arguments to @node. Here, Top has no previous or next node, so they are left blank. The parent node for Top is (dir), which denotes the systemwide Info page directory. Supposedly your Info file will be linked into the system's Info page tree, so you want the Top node to have a link back to the overall directory.
Following the @node command is an abstract for the overall document, enclosed in an @ifinfo...@end ifinfo pair. These commands are used because the actual text of the Top node should appear only in the Info file, not the TEX-generated printed document.
The @menu...@end menu commands demarcate the node's menu. Each menu entry includes a node name followed by a short description of the node. In this case, the menu points to the nodes Overview, Invoking, and Concept Index, the source for which appears later in the file. These three nodes are the three "chapters" in our document.
We continue with the Overview node, which is the first "chapter":
@c    Node,     Next,    Previous, Up
@node Overview, Invoking,        , Top
@chapter Overview of @code{vacuum}

@cindex Nothingness
@cindex Overview
@cindex Vacuum cleaners

A @code{vacuum} is a space entirely devoid of all matter. That means no
air, no empty beer cans, no dust, no nothing. Vacuums are usually found

in outer space. A vacuum cleaner is a device used to clean a vacuum.
See @xref{Invoking} for information on running @code{vacuum}.
The next node for Overview is Invoking, which is the second "chapter" node and also the node to appear after Overview in the menu. Note that you can use just about any structure for your Texinfo documents; however, it is often useful to organize them so that nodes resemble chapters, sections, subsections, and so forth. It's up to you.
The @chapter command begins a chapter, which has an effect only when formatting the source with TEX. Similarly, the @section and @subsection commands begin (you guessed it) sections and subsections in the resulting TEX document. The chapter (or section or subsection) name can be more descriptive than the brief name used for the node itself.
You'll notice that the @code... command is used in the chapter name. This is just one way to specify text to be emphasized in some way. @code should be used for the names of commands, as well as source code that appears in a program. This causes the text within the @code... to be printed in constant-width type in the TEX output, and enclosed in single quotes (like 'this') in the Info file.
Following this are three @cindex commands, which produce entries in the concept index at the end of the document. Next is the actual text of the node. Again, @code marks the name of the vacuum "command."
The @xref command produces a cross-reference to another node, which the reader can follow with the f command in the Info reader. @xref can also make cross-references between other Texinfo documents. See the Texinfo documentation for a complete discussion.
Our next node is Invoking:
@node Invoking, Concept Index, Overview, Top
@chapter Running @code{vacuum}

@cindex Running @code{vacuum}
@code{vacuum} is executed as follows:

@example
vacuum @var{options} @dots{  }
@end example
Here, @example...@end example sets off an example. Within the example, @var denotes a metavariable, a placeholder for a string provided by the user (in this case, the options given to the vacuum command). @dots{ } produces ellipsis points. The example will appear as:
vacuum options ...
in the TEX-formatted document, and as:
vacuum OPTIONS ...
in the Info file. Commands, such as @code and @var, provide emphasis that can be represented in different ways in the TEX and Info outputs.
Continuing the Invoking node, we have:
@cindex Options
@cindex Arguments
The following options are supported:

@cindex Getting help
@table @samp
@item -help
Print a summary of options.

@item -version
Print the version number for @code{vacuum}.

@cindex Empty vacuums
@item -empty
Produce a particularly empty vacuum. This is the default.
@end table
Here, we have a table of the options that vacuum supposedly supports. The command @table @samp begins a two-column table (which ends up looking more like a tagged list), where each item is emphasized using the @samp command. @samp is similar to @code and @var, except that it's meant to be used for literal input, such as command-line options.
A normal Texinfo document would contain nodes for examples, information on reporting bugs, and much more, but for brevity we're going to wrap up this example with the final node, Concept Index. This is an index of concepts presented in the document and is produced automatically with the @printindex command:
@node Concept Index, , Invoking, Top
@unnumbered Concept Index

@printindex cp
Here, @printindex cp tells the formatter to include the concept index at this point. There are other types of indices as well, such as a function index, command index, and so forth. All are generated with variants on the @cindex and @printindex commands.
The final three lines of our Texinfo source are:
@shortcontents
@contents
@bye
This instructs the formatter to produce a "summary" table of contents (@shortcontents) and a full table of contents (@contents), and to end formatting (@bye). @shortcontents produces a brief table of contents that lists only chapters and appendices. In reality, only long manuals would require @shortcontents in addition to @contents.
9.3.5.2. Formatting Texinfo
To produce an Info file from the Texinfo source, use the makeinfo command. (This command, along with the other programs used to process Texinfo, are included in the Texinfo software distribution, which is sometimes bundled with Emacs.) The command:
eggplant$ makeinfo vacuum.texi
produces vacuum.info from vacuum.texi. makeinfo uses the output filename specified by the @setfilename in the source; you can change this using the -o option.
If the resulting Info file is large, makeinfo splits it into a series of files named vacuum.info-1, vacuum.info-2, and so on, where vacuum.info will be the top-level file that points to the various split files. As long as all the vacuum.info files are in the same directory, the Info reader should be able to find them.
You can also use the Emacs commands M-x makeinfo-region and M-x makeinfo-buffer to generate Info from the Texinfo source.
The Info file can now be viewed from within Emacs, using the C-h i command. Within the Emacs Info mode, you'll need to use the g command and specify the complete path to your Info file, as in:
Goto node: (/home/loomer/mdw/info/vacuum.info)Top
This is because Emacs usually looks for Info files only within its own Info directory (which may be /usr/local/emacs/info on your system).
Another alternative is to use the Emacs-independent Info reader, info. The command:
eggplant$ info -f vacuum.info
invokes info, reading your new Info file.
If you wish to install the new Info page for all users on your system, you must add a link to it in the dir file in the Emacs info directory. The Texinfo documentation describes how to do this in detail.
To produce a printed document from the source, you need to have TEX installed on your system. The Texinfo software comes with a TEX macro file, texinfo.tex, which includes all the macros used by Texinfo for formatting. If installed correctly, texinfo.tex should be in the inputs directory on your system. If not, you can copy texinfo.tex to the directory where your Texinfo files reside.
First, process the Texinfo file using:
eggplant$ tex vacuum.texi
This produces a slew of files in your directory, some of which pertain to processing and to the index. The texindex command (which is included in the Texinfo package) reformats the index into something the display systems can use. The next command to issue is therefore:
eggplant$ texindex vacuum.??
Using the ?? wildcard runs texindex on all files in the directory with two-letter extensions; these are the files produced by Texinfo for generating the index.
Finally, you need to reformat the Texinfo file using TEX, which clears up cross-references and includes the index:
eggplant$ tex vacuum.texi
This should leave you with vacuum.dvi, a device-independent file you can now view with xdvi or convert into something printable. See Section 9.3.2 earlier in the chapter for a discussion of how to print .dvi files.
As usual, there's much more to learn about this system. Texinfo has a complete set of Info pages of its own, which should be available in your Info reader. Or, now that you know the basics, you could format the Texinfo documentation sources yourself using TEX. The .texi sources for the Texinfo documentation are found in the Texinfo source distribution.
|  | |
| 9.2. The Emacs Editor |  | 9.4. Graphics |

Copyright © 2003 O'Reilly & Associates. All rights reserved.