
 |  |
1.3. Using the Terminal
The first order of business when exploring a new flavor of Unix is to find the command prompt. In Mac OS X, you won't find the command prompt in the Dock or on a Finder menu. The Terminal application is instead located in the /Applications/Utilities directory. Don't open it just yet, though. First, drag the Terminal's application icon to the Dock so you'll have quick access to it when you need to use the Terminal. To launch the Terminal, click its icon in the Dock once, or double-click on its icon in the Finder view.
TIP: The full path to the Terminal is /Applications/Utilities/Terminal.app, although the Finder hides the .app extension. Terminal.app is not a binary file. Instead, it's a Mac OS X package, which contains a collection of files, including the binary and support files. You can Control-click (or right-click) on the Terminal in the Finder and select Show Package Contents to see what's inside.
After the Terminal starts, you'll be greeted by the banner message from /etc/motd and a tcsh prompt, as shown in Figure 1-1.
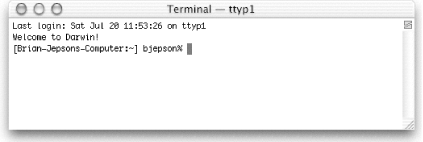
Figure 1-1. The Terminal window
1.3.1. Launching Terminals
One difference xterm users will notice is that there is no obvious way to launch a new Terminal window from the command line. For example, Mac OS X has no equivalent to the following commands:
xterm &
xterm -e -fg green -bg black -e pine -name pine -title pine &
Instead, you can create a new Terminal window by typing
 -N or selecting File
 New Shell from the menu bar.
TIP: To cycle between open Terminals, you can press
You can customize startup options for new Terminal windows by creating .term and .command files.
1.3.1.1. .term files
You can launch a
customized Terminal window from the command line by saving some
prototypical Terminal settings to a .term file,
then using the open command to launch the
.term file (see
"open" in Section 1.5.4, later in this chapter). You should save the
.term file someplace where you can find it
later, such as ~/bin or
~/Documents. If you save it in
~/Library/Application Support/Terminal, the
.term file will show up in
Terminal's File Library menu.
To create a .term file, open a new Terminal
window, and then open the Inspector (File Show
Info, or -I) and set the desired
attributes, such as window size, fonts, and colors. When the
Terminal's attributes have been set, save the
Terminal session (File Save, or
-S) to a .term
file (for example, ~/Documents/proto.term). Now,
any time you want to launch a Terminal window from the command line,
you can issue the following command:
open ~/Documents/proto.term
TIP: You can also double-click on proto.term in the Finder to launch a Terminal window. See "bindkey" under Section 1.5.4, later in this chapter, for an example of binding a key sequence to this command.
The .term file is an XML property list (plist) that you can edit by hand or with the Property List Editor application (/Developer/Applications).[2] By default, opening the .term file creates a new Terminal window. You can configure the window so it executes a command by adding an execution string to the .term file. When you launch the Terminal, this string is echoed to standard output before it is executed. Example 1-1 shows an execution string that connects to a remote host via ssh and exits when you log out.
[2]For more information on XML, see Learning XML (O'Reilly) or XML in a Nutshell (O'Reilly).
1.3.1.2. .command files
Adding the .command extension to any executable shell script will turn it into a double-clickable executable. The effect is similar to that of a .term file, except that you can't control the Terminal's characteristics in the same way. (A .command file will use the default Terminal settings.) However, you can stuff the shell script full of osascript commands to set the Terminal characteristics after it launches. An osascript is a shell command that lets you run AppleScript from the command line.[3] Example 1-2 is a shell script that sets the size and title of the Terminal, and then launches the pico editor.
[3]To learn more about AppleScript, see AppleScript in a Nutshell (O'Reilly).
Example 1-2. Launching the pico editor
#!/bin/sh
# Script RunPico.command
osascript  <<EOF
tell app "Terminal"
  set number of rows of first window to 34
  set number of columns of first window to 96
  set custom title of first window to "PICO Editor"
end tell
EOF
pico $@
If you don't want to give the shell a
.command extension, you could also use the
Finder's Get Info option (File
Get Info, or -I) to choose which
application will open with the executable. To do this, perform the
following steps:
-
Highlight the script's icon in the Finder.
-
Choose Get Info from the File menu.
-
In the Get Info dialog, choose Open with:.
-
Click the drop-down menu and choose Other.
-
In the Choose Other Application dialog, select All Applications rather than Recommended Applications.
-
Find and choose the Terminal (Applications/Utilities) application.
-
Click Add.
-
Close the Get Info window (
-W).
As with any double-clickable application, you can assign a custom-made icon to your shell scripts and place them in the Dock. To change an icon, use the following procedure.
-
Copy the desired icon to the clipboard.
-
Select your script in the Finder and open the Get Info window (
-I). The file's icon
appears in the upper-left corner.
-
Click the current icon, and use the Paste option (Edit
Paste, or -V) to
paste the new icon over it.
-
Close the Get Info window (
-W) to save
the icon to the application.
-
To add the shell script application to the Dock, locate the application in the Finder and drag its icon to the Dock.
Now you can click on the script's Dock icon to invoke the script.
1.3.2. Customizing the Terminal
To customize the shell used by the Terminal, start by changing the
Terminal's Preferences (Terminal
Preferences). On the preference pane, you can tell Terminal to
execute the default shell at startup or a specific command (such as
an alternative shell).[4]
[4]Although you can change the default shell in the Terminal preferences, this does not affect the login shell used for remote or console logins. See Chapter 3 for instructions on changing a user's default shell.
You can also adjust the Terminal's characteristics
using Terminal Window Settings (or
-I), which brings up the
Terminal
Inspector, shown in Figure 1-2. Table 1-1 lists the available window settings. Changing
these settings affects only the topmost Terminal window. If you want
to change the default settings for all future Terminal windows, click
the Use Settings As Defaults button at the bottom of the Terminal
Inspector window.
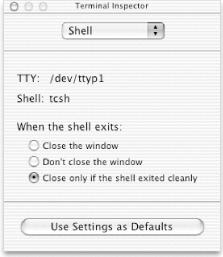
Figure 1-2. The Terminal Inspector
Table 1-1. Window settings
|
Pane |
Description |
|---|---|
|
Shell |
Displays the shell used by the Terminal and lets you choose whether to close the Terminal window when the shell exits. |
|
Processes |
Displays the processes running under the frontmost window. You can also control whether Terminal will warn you if you try to close the window while you are running a program. You can disable this by choosing Never under "Prompt before closing window". You can also supply a list of commands that should be ignored, so if you're running a program (such as vi or Emacs) that's not in the list, the Terminal will warn you before closing the window. |
|
Emulation |
Controls the Terminal emulation properties. |
|
Buffer |
Sets the size and properties of the scrollback buffer. |
|
Display |
Changes the character set encoding, cursor style, font, and other attributes. |
|
Color |
Changes colors and transparency of the Terminal window. |
|
Window |
Controls window dimensions, title, and other settings. |
One useful option available in the Emulation tab is "Option click to position cursor". If you enable this feature, you will be able to Option-click with the mouse to position the cursor in Terminal applications such as vi or Emacs (this could save you many keystrokes when you need to move the insertion point). This option also works over a remote login session, assuming that this is supported by the remote host's terminal capabilities.
1.3.3. Customizing the Terminal on the Fly
You can customize the Terminal in shell scripts using escape sequences or AppleScript commands. xterm users may be familiar with using the following to set the xterm's title:
echo '^[]2;My-Window-Title^G'
Mac OS X's Terminal accepts this sequence as well.
TIP: ^[ is the ASCII ESC character, and ^G is the ASCII BEL character. (The BEL character is used to ring the terminal bell, but in this context, it terminates an escape sequence.) The escape sequences described here are ANSI escape sequences, which differ from the shell escape sequences described earlier. ANSI escape sequences are used to manipulate a Terminal window (such as by moving the cursor or setting the title). Shell escape sequences are used to tell the shell to treat a metacharacter, such as |, as a literal character rather than an instruction to pipe standard output somewhere else.
To type the ^[ characters in tcsh, use the key sequence Control-V Escape (press Control-V and release, then press the Escape key). To type ^G, use Control-V Control-G. The vi editor supports the same key sequence; Emacs uses Control-Q instead of Control-V.
You can capture this escape sequence in a shell alias:
alias settitle 'echo -n "^[]2;\!*^G"'
Then you can change the title by issuing this command:
settitle your fancy title here
You may want to package this as a shell script and make it available to everyone who uses your system, as shown in Example 1-3.
Example 1-3. Setting the Terminal title in a shell script
#!/bin/sh
#
# Script settitle
# Usage:  settitle title
#
if [ $# == 0 ]; then
  echo "Usage:  settitle title"
else
  echo -n "^[]2;$1^G"
fi
You can also use osascript to execute AppleScript commands that accomplish the same thing:
osascript -e \
  'tell app "Terminal" to set custom title of first window to "Hello,
World"'
|  | |
| 1.2. The Terminal and xterm Compared |  | 1.4. The Services Menu |

Copyright © 2003 O'Reilly & Associates. All rights reserved.