
2.3. The place Geometry Manager
The place geometry manager is different than grid or pack. Rather than referencing against a cell location or a window's side, most of the time you'll be using a relative form of x and y coordinates. You can also use place to overlap portions of widgets, which isn't allowed in either grid or pack.
Invoking place is similar to calling the other geometry managers:
$widget->place( [ option => value, . . . ] );
The options specified when you call place affect how the widgets are put on the screen.
2.3.1. place Options
The following options can be used with place:
- -anchor => 'n' | 'ne' | 'e' | 'se' | 's' | 'sw' | 'w' | 'nw' | 'center'
- Sets the position in the widget that will be placed at the specified coordinates.
- -bordermode => 'inside' | 'outside' | 'ignore'
- Determines whether or not the border portion of the widget is included in the coordinate system.
- -height => amount
- Sets the absolute height of the widget.
- -in => $window
- Indicates that the child widget will be packed inside $window instead of in the parent that created it. Any relative coordinates or sizes will still refer to the parent.
- -relheight => ratio
- Indicates that the height of the widget relates to the parent widget's height by ratio.
- -relwidth => ratio
- Indicates that the width of the widget relates to the parent widget's width by ratio.
- -relx => xratio
- Indicates that the widget will be placed relative to its parent by xratio.
- -rely => yratio
- Indicates that the widget will be placed relative to its parent by yratio.
- -width => amount
- Indicates that the width of the widget will be amount.
- -x => x
- Indicates that the widget will be placed at x. x is any valid screen distance.
- -y => y
- Indicates that the widget will be placed at y. y is any valid screen distance.
2.3.2. Absolute Coordinates
The parent window (or Frame) has a standard coordinate system where (0, 0) is in the upper-left corner. The x values increase to the right, and the y values increase as you go down. See Figure 2-37.
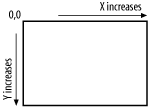
Figure 2-37. Coordinate system of parent window when absolute coordinates are used
To use absolute coordinates to specify where to place the widget, we would use options -x and -y:
-x => x, -y => y
Valid values for x and y are valid screen distances (e.g., 5, which is in pixels). The widget will have its anchor position (controlled by -anchor) placed at the x and y coordinates. The default anchor is "nw", the upper-left corner of the window.
Another major difference between place and the other geometry managers is that at least two arguments are required when place is invoked. There are no default values for the -x and -y options. You will get an error if you try to invoke place with no arguments (for example, $widget->place( )).
The simplest example of using -x and -y is to place a widget at (0, 0):
$mw->Button(-text => "Exit",
            -command => sub { exit })->place(-x => 0, -y => 0);
As you would expect, the widget ends up in the upper-left corner of the window as shown in Figure 2-38. No matter what size the window, our widget will remain positioned at (0, 0). Even when the window is resized to be as small as possible, the widget will not move.
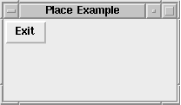
Figure 2-38. Button placed using -x => 0, -y => 0
Here is an example of using-x and -y to create some overlapping widgets:
$mw->Button(-text => "Exit",
            -command => sub { exit })->place(-x => 10, -y => 10);
$mw->Button(-text => "Exit",
            -command => sub { exit })->place(-x => 20, -y => 20);
Figure 2-39 shows the resulting window.

Figure 2-39. Overlapping Buttons using place
2.3.3. Relative Coordinates
There is an additional coordinate system defined in place for the parent widget that allows relative placement within it. This coordinate system is shown in Figure 2-40.
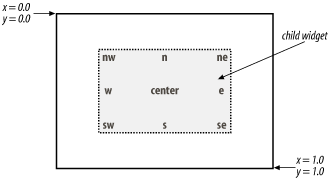
Figure 2-40. The relative coordinate system
The upper-left corner has the coordinates (0.0, 0.0). The lower-right corner's coordinates are (1.0, 1.0). The middle of the window would be (0.5, 0.5). The coordinates are specified in floating-point form to allow place to handle any size window. This allows the widget to remain at that position (in the center, for instance) no matter how the window is resized.
It is valid to specify coordinates both smaller than 0.0 and larger than 1.0; however, your widget might not be completely visible in the window when you use out-of-range coordinates.
This code snippet produces the Button shown in Figure 2-41:
$b = $mw->Button(-text => "Exit", -command => sub { exit });
$b->place(-relx => 0.5, -rely => 0.5);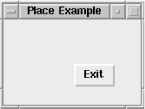
Figure 2-41. Using place with -relx => 0.5, -rely => 0.5
Although the Button in Figure 2-41 is placed in the middle of the screen, it looks off-center because the upper-left corner of the widget was placed in the middle of the window instead of the center. You can change this with the -anchor option, which we will discuss shortly. If we resize this window, the Button still stays in the middle of the window (see Figure 2-42).
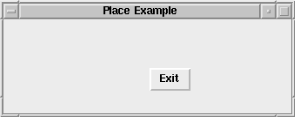
Figure 2-42. -relx => 0.5, -rely => 0.5 window resized to be larger
This next example creates two Buttons, both placed in the window with relative coordinates:
$mw->Button(-text => "Exit",
            -command => sub { exit })->place(-relx => 0.2,
                                             -rely => 0.2);
$mw->Button(-text => "Exit",
            -command => sub { exit })->place(-relx => 0.5,
                                             -rely => 0.5);
No matter what size the window is or where other widgets are in the screen, the two Buttons will stay in those relative locations (see Figure 2-43).
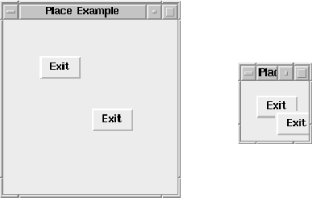
Figure 2-43. Two Buttons placed relative to the parent window
The left window in Figure 2-43 is the default size of the window when it was created. The right window is what it looks like after the window was resized to make it much smaller. Notice that the second Button placed in the window remains on top. It does so because we are still maintaining the ordered list of widgets in the window; the second Exit Button, placed at (0.5, 0.5), is drawn last, so it's drawn on top of the other Button.
You can also combine the absolute and relative coordinate systems simply by using both in the argument list. The relative coordinate system is considered first, then the x or y value is added to that position. The options -relx => 0.5, -x => -10 place the widget 10 pixels to the left of the middle of the window.
2.3.4. Anchoring the Widget
Think of the child widget as a piece of paper that you want to put on your bulletin board (the board is the parent widget). You have a tack that you are going to use to keep the paper up on the board. You can put the tack right through the center of the paper, in the upper-left corner ("nw"), or in the lower-right corner ("se"). The point where the tack is going to stick the paper to the board is the -anchor point. The -anchor point on the widget is "tacked" to the coordinates given by -x, -y, and/or -relx, -rely. The default -anchor is "nw". Figure 2-40 shows these -anchor points within the child widget.
It is important to know where the -anchor is, because it will affect how we see the widget within the parent.
In Figure 2-44, almost identical place commands were used to put the Exit Button in the window, but the -anchor value was changed. The left window's Button was created with this command:
$mw->Button(-text => "Exit",
            -command => sub { exit })->place(-relx => 0.5,
                                             -rely => 0.5);
The window on the right in Figure 2-44 used this command:
$mw->Button(-text => "Exit",
            -command => sub { exit })->place(-relx => 0.5,
                                             -anchor => "center",
                                             -rely => 0.5);
As with pack and grid, the possible values for -anchor are: 'n', 'e', 's', 'w', 'center', 'nw', 'sw', 'ne', and 'se'. However, the value now refers to the child widget instead of the position within the allocation rectangle.

Figure 2-44. Different -anchor values affect where the widget is placed in the window
2.3.5. Width and Height
When you use place, you can specify the width and height of the widget in one of three ways:
-
Allow the widget to determine its own size.
-
Specify width and/or height in absolute measurements.
-
Specify width and/or height in relative measurements (relative to the parent widget).
To let the widgets determine their own sizes, no options are specified. You can set the widgets' sizes with the following options: -width and -height, or-relwidth and -relheight, respectively.
The -width and -height options allow you to specify the exact width or height of the widget in a screen distance:
-width => amount, -height => amount
Each amount is a valid screen distance (discussed earlier in this chapter under pack). The widget will obey these options even if it has to cut off edges of the items displayed in it. Our Button looks quite silly on the screen when we use a -width of 40 pixels (see Figure 2-45).
$mw->Button(-text => "This Button Will Cause the Program to Exit",
            -command => sub { exit })->place(-x => 0, -y => 0,
                                             -width => 40);
Figure 2-45. Using -width with place
The other two options, -relwidth and -relheight, determine the widget in relation to the parent widget.
-relwidth => ratio, -relheight => ratio
The ratio is a floating-point number (similar to that specified by -relx or -rely). A value of 1.0 will make the widget as wide (or as tall) as the parent widget. A value of 0.5 will make the widget half as wide as the parent (see Figure 2-46).
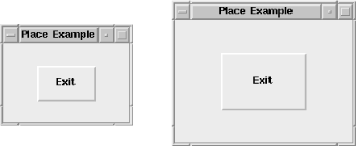
Figure 2-46. Example of the same window resized with -relwidth => 0.5, -relheight => 0.5
The options -width and -relwidth are additive when used together, and so are -height and -relheight.
2.3.6. Border Options
Normally the border of the widget is used as the edge of the possible space in the window, which means any widgets placed with either the absolute or relative coordinate system will be placed inside the border. This can be changed by using the -bordermode option:
-bordermode => 'inside' | 'outside' | 'ignore'
Using 'outside' will allow the coordinate system to use the space occupied by the border as well. A value of 'ignore' will have the coordinate system use the space designated as the official X area. Overall, this option is pretty useless, as you can see from the difference each makes in Figure 2-47.
Figure 2-47. -bordermode examples
If you look very closely (get out your magnifying glass), you can see that the 'outside' version is two pixels higher and two pixels farther to the left than the 'inside' version. This is because with one window manager ( fvwm), the border is defined as 2 pixels.
2.3.7. Methods Associated with place
The methods for place are simple and don't allow much manipulation of the widgets.
2.3.7.1. Removing the widget
As with pack and grid, there is a place version of the Forget method:
$widget->placeForget();
When you use this method, the widget is removed from view on the screen. It is also removed from the list maintained by the parent widget.
2.3.7.2. Place information
TheplaceInfo method returns a list of information related to the widget:
# For easier printing:
@info = $widget->placeInfo();
print "@info";
# Or for easier fetching of info
%info = $widget->placeInfo();

## Produced these results (there are blanks where there are no values)
-x 0 -relx 0 -y 0 -rely 0 -width   -relwidth  -height  -relheight  -anchor nw

Copyright © 2002 O'Reilly & Associates. All rights reserved.


