| United States-English |
|
|
|
Software Distributor Administration Guide: HP-UX 11i v1, 11i v2, and 11i v3 > Chapter 1 Introduction to Software DistributorUsing the GUI and TUI Commands |
|
The swinstall, swcopy, swlist, swremove commands each provide a Graphical User Interface and Terminal User Interface. Advantages of the GUI/TUI include:
(Additional GUI interfaces are available if you have enabled remote operations. See Chapter 7: “Remote Operations Overview”.) The terminal user interface lets you use the SD-UX GUI capabilities on systems with text-based terminals. With the TUI, you use the Arrow, Tab, Space, and Return keys to navigate.
To start the GUI or TUI for swinstall, swcopy, or swremove, enter:
The TUI starts by default if you have not set the DISPLAY variable. To invoke the GUI and specify other command-line arguments at the same time, you must include the -i option. For example: swinstall -i -s sw_server cc pascal To invoke the swlist GUI, you must use always use the swlist -i option.
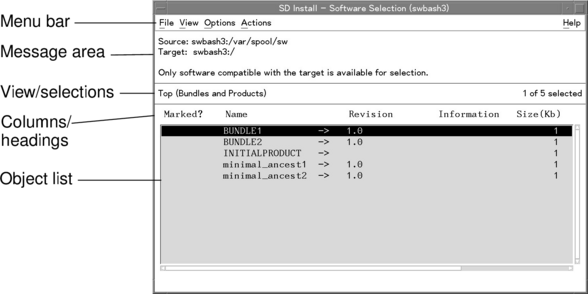
The main GUI/TUI windows (Figure 1-4: “GUI Window Components”,) contain the following components:
The Software Selection window object list is hierarchical: you can open each object in the list and show its contents. Objects in the list that contain other objects that can be opened have an arrow (→) after the name.
When a product is opened, subproducts and filesets may appear in the same list. Only products are listed together at the product level. Filesets are the lowest level of hierarchical objects managed by SD-UX. You can not view the contents of files, but you can view the list of files in each fileset and information about each file. There are two ways to mark an object in the object list: Flags (Yes, Partial or blank) show whether items in the list have been marked for an activity (see the Marked? column). (For the TUI, mark items by pressing Space when the cursor is on the item and then press the m key. Unmark items with the u key.) The defaults.hosts file contains lists of hosts that are used by the GUI/TUI programs. This lets you use preselected choices for source and target systems. These lists are stored in the $HOME/.swdefaults.hosts or /var/adm/defaults.hosts files. For each interactive command, target hosts containing roots or depots are specified in this file by separate lists (hosts, hosts_with_depots). The list of hosts are enclosed in {} braces and separated by white space (blank, tab and newline). For example:
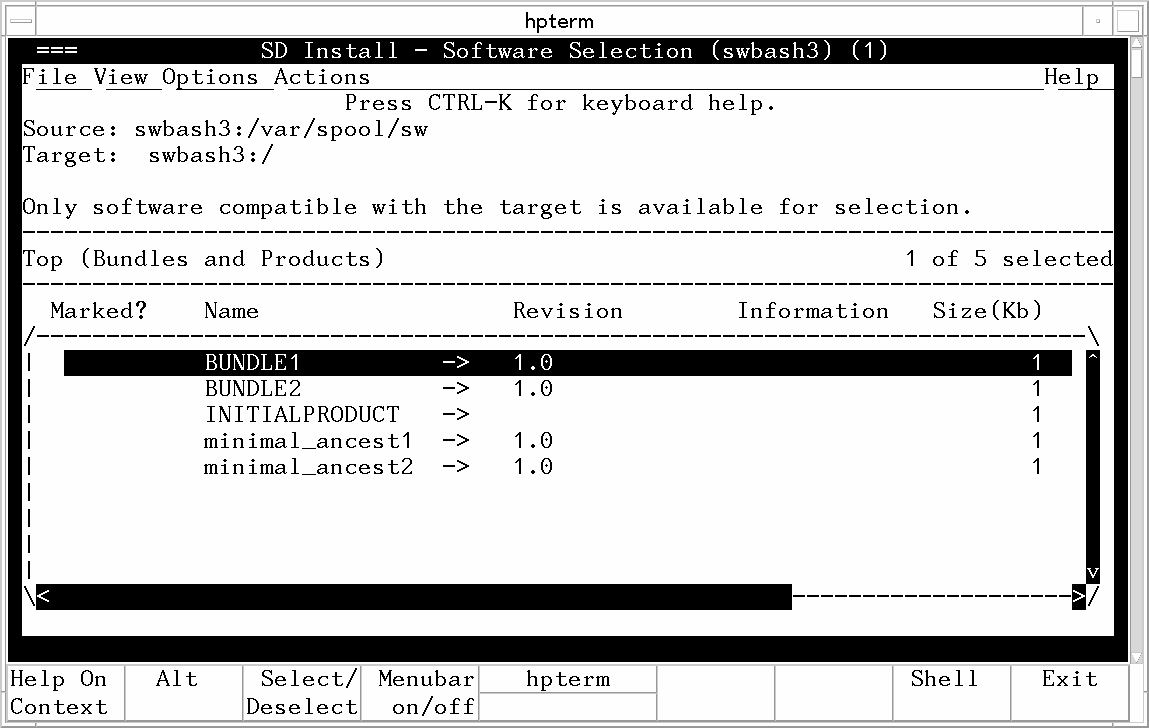
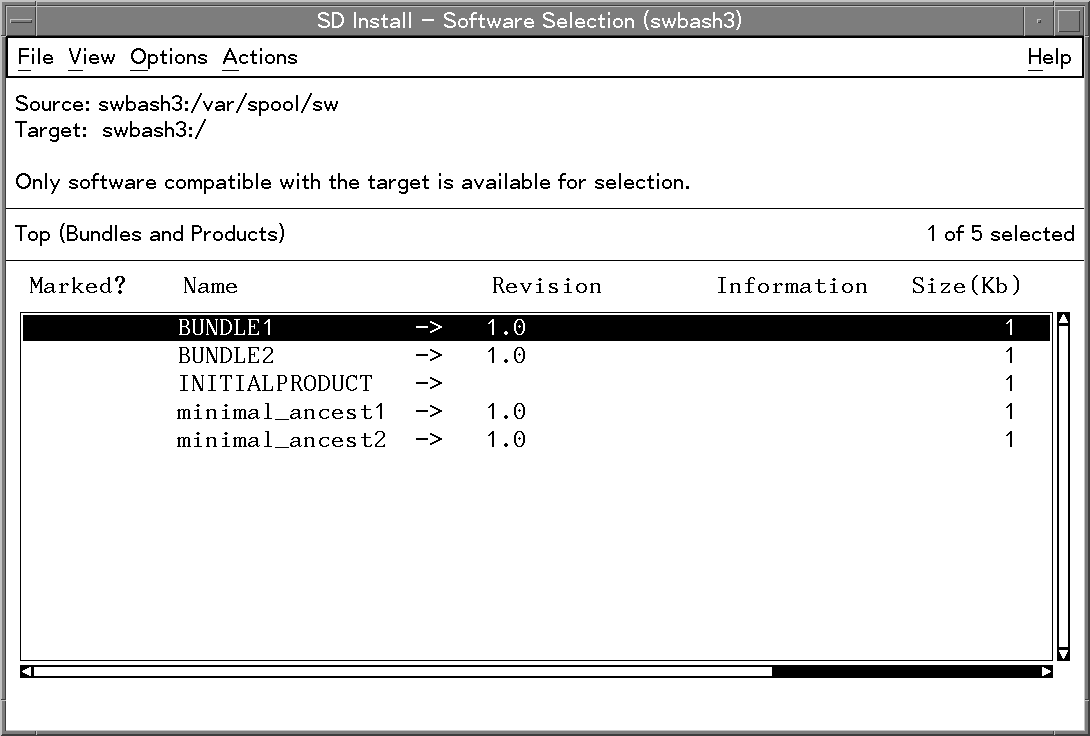
When you use the program, dialog boxes that let you choose a source system from a list will display all hosts specified in defaults.hosts or remembered from a previous session. Once a source is successfully accessed, that host is automatically added to the list in the defaults.hosts file and displayed in the dialog. If there are no hosts specified in defaults.hosts, only the local host and default source host appear in the lists. If a host system does not appear in the list, you can enter a new name from the GUI/TUI program. The Software Selection Window (Figure 1-5: “Software Selection Window”,) is the standard window for all SD-UX GUI programs. It features the standard menu bar, message area, and object list of software available for selection. Menu items are discussed in the following sections. The File menu is the primary tool for managing session files, searching, and printing. Each invocation of one of the GUI commands defines a session. All session information—including the options used to invoke the command, source specifications, software selections, and target hosts—are automatically saved. This lets you re-execute the command even if the session ends before proper completion. (See “Session Files”.) You can save session information into a file at any time by selecting the Save Session or Save Session As choice from the File menu. The Recall Session choice lets you import the settings from a previously saved session file. Clear Session resets all options and operands to their default values. Each session is saved to a file for that command. For example:
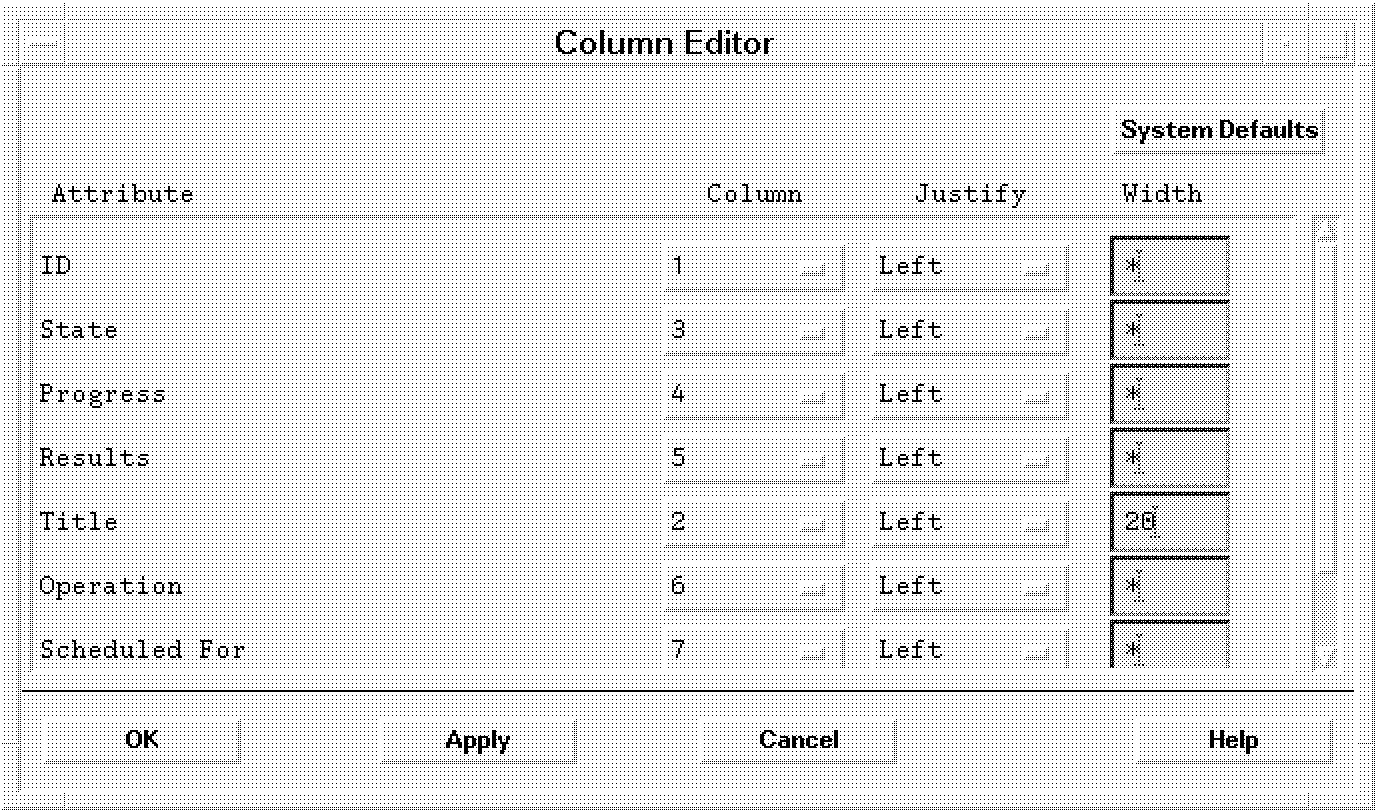
This file is overwritten by each time you start the GUI. The View menu manages your window view preferences. The View→Columns... choice brings up the Column Editor dialog (Figure 1-6: “Column Editor ”,), which lets you reformat the columns for the current object list. All viewable object attributes are listed. The editor displays values 1 through the total number of attributes, plus an Ignore option, which removes that attribute from display in the object list. You can specify an attribute’s justification by clicking on the Left or Right button in the Justify column. Set the column width by placing the cursor in the appropriate text field in the Width column, then entering the width (number of characters). Use an asterisk (*) to size the column automatically.
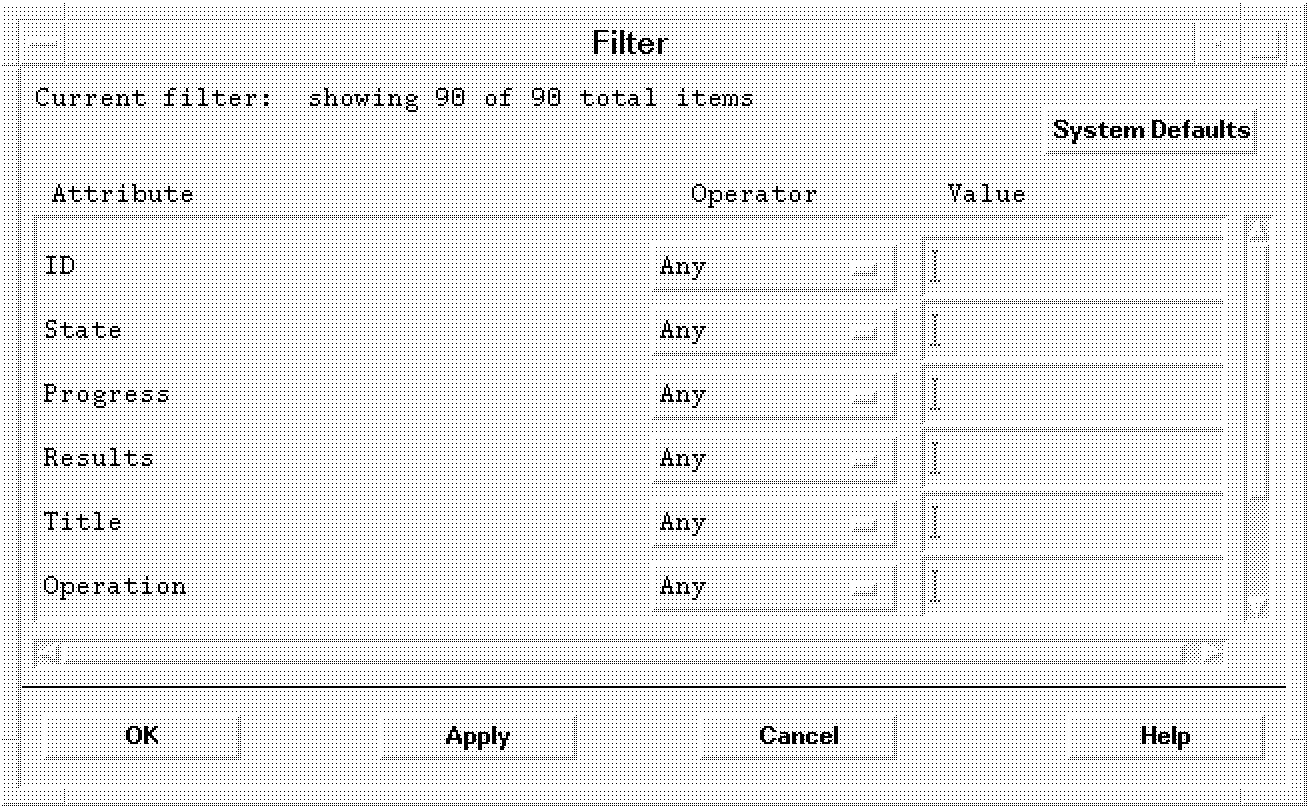
The View→Filter... choice displays the Filter dialog (Figure 1-7: “Filter Dialog”,), which lets you specify the type of filtering desired for each attribute. The Operator menu button lets you specify the operator for a given attribute. The following table presents the operator types: Table 1-3 Operator Types
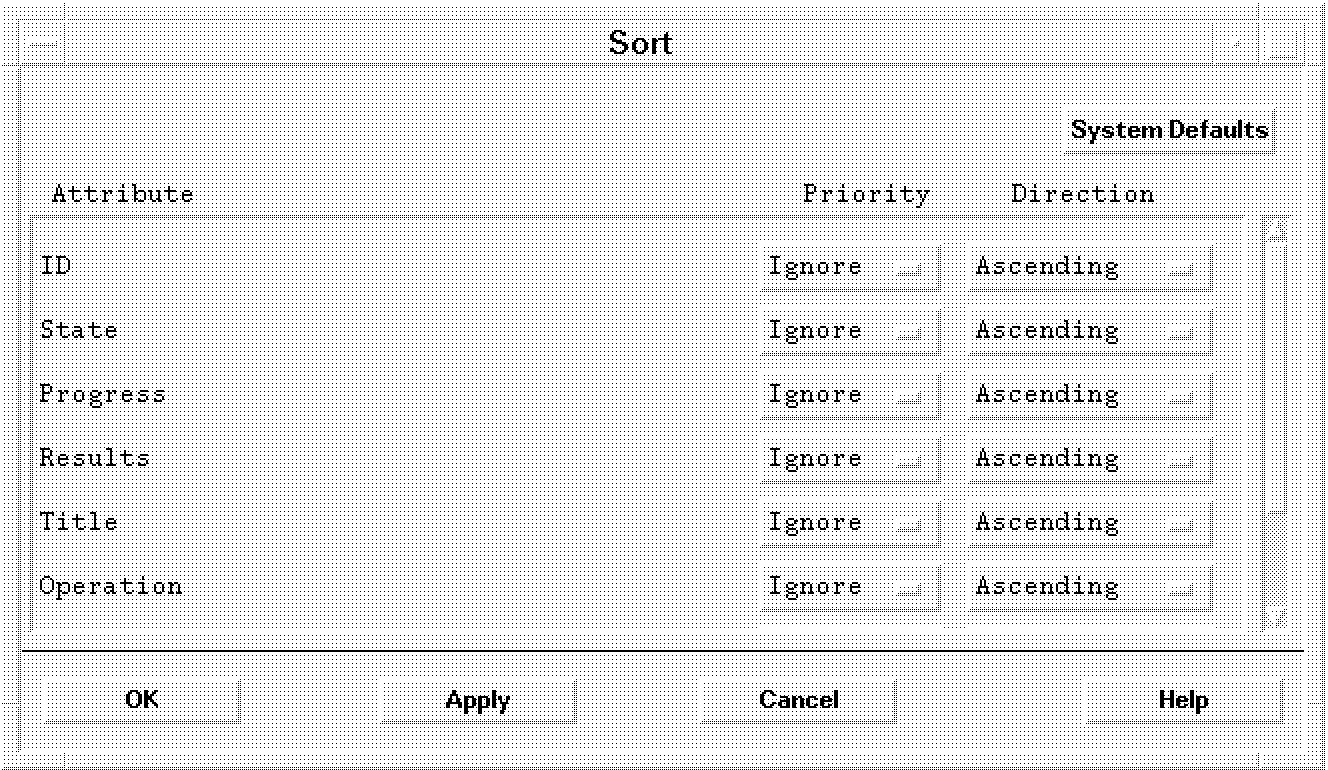
The View→Sort... choice displays the Sort dialog (Figure 1-8: “Sort Dialog”,), which lets you specify a sort method for the object list. All viewable object attributes are listed. For each attribute, you can specify the type of sort desired. The Priority column displays values 1 through the total number of attributes, plus an Ignore option, which excludes the attribute from the sort. A sort priority of 1 sorts the list first on that attribute.
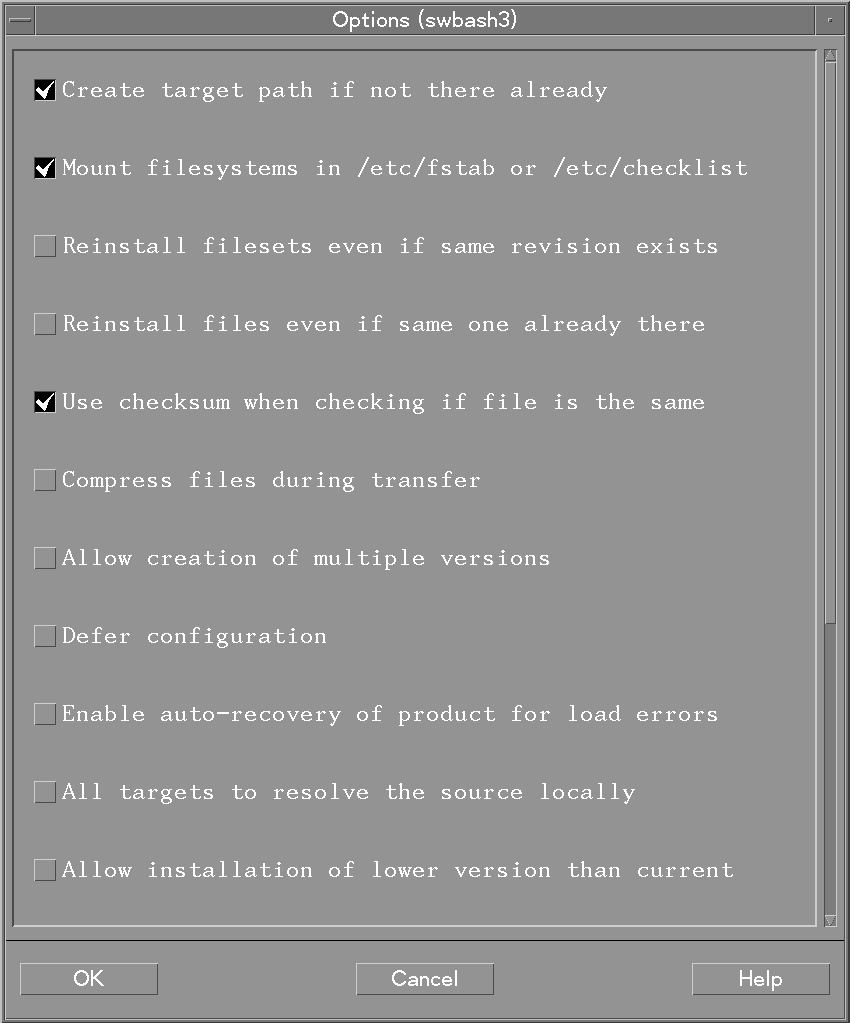
The Options menu lets you refresh the object list and change the default values of options that control command behaviors and policies. Selecting Options→Refresh List updates the object list to reflect any changes. Selecting Options→Change Options opens the Options dialog (Figure 1-9: “Options Dialog”,), which lets you change a limited set of options for the command. These options are changed only for the duration of the interactive session. To change options for subsequent sessions, you must save a session file (see “Session and File Management—The File Menu”) or edit one of the options files (see “Using Command Options”).
Each Action menu in the GUI/TUI programs has a series of actions for that command. These actions vary according to which command you invoke. (You may have to click on an item in the object list to enable some of the actions that are grayed out.) The following actions are common to swinstall, swcopy, swlist, and swremove. The Open Item or Close Level menu choices let you see the contents of a selected object or close it. Each object list is hierarchical. Objects that have an arrow (→) after the name can be opened to reveal other items. For example, to see the subproducts in a particular product, you can open that product by double clicking on the object or by selecting Actions ->Open Item. The object list then shows a listing of the subproducts for that product. If you want to open the subproduct, double click on it and its filesets are displayed. (In the TUI, move the cursor to the item you want to open and click Return.) When the product is opened, all of its subproducts (and filesets that are not part of a subproduct) are shown in the list. At the product level, only products are listed together. If the software view is Bundle and the bundle is opened, all HP-UX OS products that are wholly or partially contained in the bundle will be shown. When one of the products is opened, only subproducts and filesets in the open product and open bundle are shown. To close an object and return to the previous list, double click on the first item in the list (. .(go up)) or select Actions->Close Level. (In the TUI, you must use Close Level in the Actions menu or press Return while highlighting the (. .(go up)) item.) These choices let you save and re-use groups of marked software. The Save Software Group menu choice opens the Save Software Group dialog (Figure 1-10: “Save Software Group Dialog”,), which saves the current list of marked software as a group. SD stores the group definition in $HOME/.sw/software/ or a directory you specify. You can recall and re-use a previously saved group of software selections by using the Add Software Group menu choice.
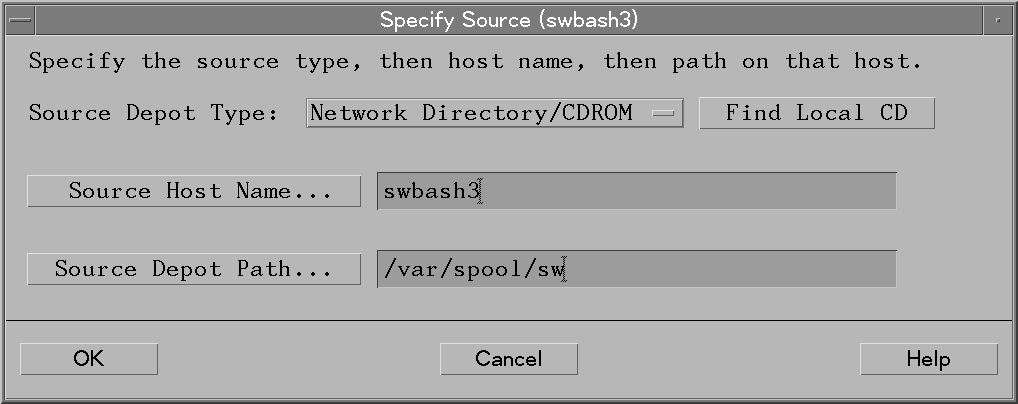
The Change Source... menu choice opens the Specify Source dialog (Figure 1-11: “Specify Source Dialog”,), which lets you change the source for the software to be used.
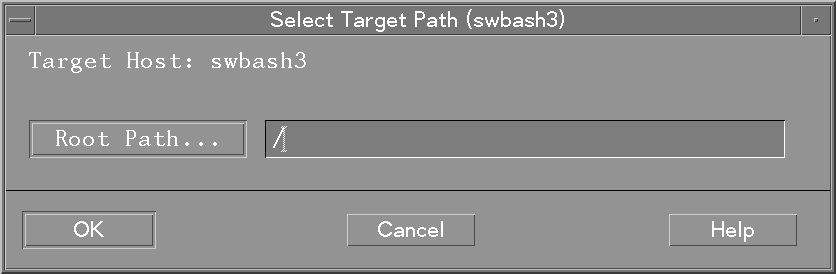
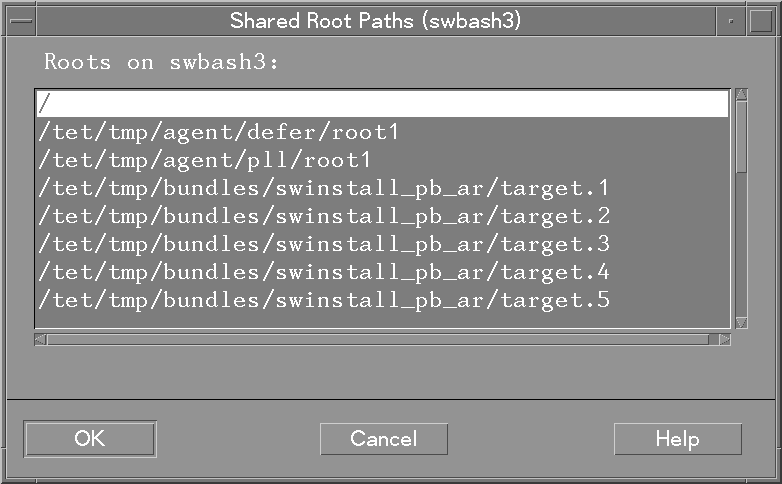
The Change Target... menu choice opens the Select Target Path dialog (Figure 1-12: “Select Target Path Dialog”,), which lets you change the targets of your software operation. The Root Path button opens a list of target paths from which to select (Figure 1-13: “Shared Root Paths Dialog”,). For SD-UX local operations, the target is always a directory on the local host. See Chapter 7: “Remote Operations Overview” for information about specifying remote targets. All the GUI and TUI programs have an on-line help system. Each screen, dialog, or menu choice has associated help instructions that explain the activity. To get “context-sensitive” help for individual menu choices, fields, options, or buttons on the various windows and menus, place the cursor on an item and press the F1 key on your keyboard (Ctrl-F in the TUI). This displays specific help for that item. To view overview information for each major screen, to get help on keyboard usage, or to view other product information, select the Help menu from in the menu bar. This menu item provides information about the currently active SD-UX screen. This includes a list of the tasks you can do in that screen and a short description of the different areas of the screen and links to related topics. The GUI commands support the following subset of the HP-UX XToolkit command line options: Note that the SD-UX commands do not support the XToolkit -fn or the -font option used to change display fonts. SD-UX commands do, however, recognize most Motif™ standard resources when running in the X11/Motif environment, plus the following additional resources:
Here is an example of how to change the size of your fixed width font from 8x13 to 6x13:
Here is how to change the variable width font style to 12 point HP Roman 8:
You can also modify the defaults file (in /usr/lib/X11/app-defaults) for each command with a Graphical User Interface so that a resource will be set each time you invoke a specific command. Here is an example of an app-defaults file for swremove:
|
|||||||||||||||||||||||||||||||||||||||||||||||||||||||||||||||||||||||||||||||||||||||||||||||||||||||||||||||||||||||||||||||||||||||||||||||
|
|||||||||||||||