
17.3 pic
pic is a graphics language program that facilitates the drawing of simple flowcharts and diagrams. pic offers dozens of ways to draw a picture, not only because of the many abbreviations it allows, but because pic tries to combine the language of geometry with English. For example, you can specify a line by its direction, magnitude, and starting point, yet you can often achieve the same effect by simply stating, "from there to there ."
pic has the following command-line syntax:
pic [files
]
Full descriptions of primitive objects in pic
can be ended by starting another line, or with the semicolon character (;). A single primitive description can be continued on the next line, however, by ending the first with a backslash character (\
). Comments may be placed on lines beginning with the pound sign (#
).
Solaris does not have pic .
The canonical reference for pic is Bell Labs Computing Science Technical Report #116 , by B.W. Kernighan. This paper may be downloaded from http://cm.bell-labs.com/cm/cs/cstr/116.ps.gz . That document describes a newer version of pic with more features than what is described here, but such features may not be universally available. You should read it if you plan to do any serious work in pic .
17.3.1 pic Macros
.PS
[h
[w
]] |
Start pic description. h and w , if specified, are the desired height and width of the picture; the full picture can expand or contract to fill this space. |
.PS <
file
|
Read contents of file in place of current line. |
.PE
|
End pic description. |
.PF
|
End pic
description and return to vertical position before matching |
troff requests or macros embedded in the body of a picture description are passed through unchanged. They are assumed to make sense at that point. Be careful not to use requests or macros that generate any horizontal or vertical motion.
17.3.2 Declarations
At the beginning of a pic description, you may declare a new scale, and declare any number of variables. pic assumes you want a 1-to-1 scale, where units are inches by default. You can declare a different scale, i.e., centimeters, by declaring:
scale = 2.54
You may use variables instead of numbers in a description; pic substitutes the variable's value. Instead of:
line right n
you may use a variable, for example, a
, by declaring at the top of the description:
a = n
You may then write:
line right a
Variable names must begin with a lowercase letter. The rest of the name may consist of uppercase or lowercase letters, digits, and underscores. Variables retain their values from picture to picture.
17.3.3 Primitives
pic recognizes several basic graphical objects, or primitives. These primitives are specified by the following keywords:
arc
|
circle
|
move
|
arrow
|
ellipse
|
spline
|
box
|
line
|
"
text
"
|
17.3.3.1 Syntax
Primitives may be followed by relevant options. Options are discussed later in this section.
arc
[cw
] [options
] |
A fraction of a circle (default is 1/4 of a circle). The |
arrow
[options
] |
Draw an arrow. Essentially the same as |
box
[options
] |
Draw a box. |
circle
[options
] |
Draw a circle. |
ellipse
[options
] |
Draw an ellipse. |
line
[options
] |
Draw a line. |
move
[options
] |
A change of position in the drawing. Essentially, an invisible line. |
spline
[options
] |
A smooth curve, with the feature that a |
"
text
"
|
Text centered at current point. |
17.3.4 Options
The options below are grouped by function. Note that at
, with
, and from
specify points. Points may be expressed as Cartesian coordinates or with respect to previous objects.
right
[n
] |
The direction of the primitive; default is the direction in which the previous description had been heading. Create diagonal motion by using two directions on the option line. Each direction can be followed by a specified length n . |
left
[n
] |
|
up
[n
] |
|
down
[n
] |
|
rad
n
|
Create the primitive using radius or diameter n . |
diam
n
|
|
ht
n
|
Create the primitive using height or width n . For an arrow, line, or spline, height and width refer to arrowhead size. |
wid
n
|
|
same
|
Create the primitive using the same dimensions specified for the most recent matching primitive. |
at
point
|
Center the primitive at point . |
with .
part
at
point
|
Designate the part
of the primitive to be at point
(e.g., |
from
point1
to
point2
|
Draw the primitive from point1 to point2 . |
->
|
Direct the arrowhead forward. |
<-
|
Direct the arrowhead backward. |
<->
|
Direct the arrowhead both ways. |
chop
n m
|
Chop n
from beginning of primitive and m
from end. With only one argument, the same value is chopped from both ends. With no arguments, chop a default amount (usually |
dotted
|
Draw the primitive using lines that are dotted, dashed, or invisible. (An invisible object still occupies space in the output.) Default is solid lines. |
dashed
|
|
invis
|
|
then
... |
Continue primitive in a new direction. Relevant only to lines, splines, moves, and arrows. Can be placed before or after any text. |
"
text
"
|
Center the text over the center point of the object. The options for text described in the next section may also be used. |
17.3.5 Text
Text must be placed within quotes. To break the line, break into two (or more) sets of quotes. Text always appears centered within the object, unless given one of the following arguments:
ljust
|
Text appears flush left, vertically centered. |
rjust
|
Text appears flush right, vertically centered. |
above
|
Text appears above the center. |
below
|
Text appears below the center. |
17.3.6 Object Blocks
Several primitives can be combined to make a complex object (for example, an octagon). This complex object can be treated as a single object by declaring it as a block:
Object: [
     description

      .
      .
      .
]
Brackets are used as delimiters. Note that the object is declared as the name of a place, and hence it must begin with a capital letter.
17.3.7 Macros
The same sequence of commands can be repeated by using macros. The syntax is:
define sequence
 %
      description

          .
          .
          .
      %
Here the percent sign (%
) is the delimiter, but you can use any character that isn't in the description.
Macros can take parameters, expressed in the definition as $1
through $9
. Invoke the macro with the syntax:
sequence
(value1
,value2
,...
)
17.3.8 Positioning
In a pic description, the first action begins at (0,0) unless otherwise specified with coordinates. Thus, as objects are placed above and left of the first object, the point (0,0) moves down and right on the drawing.
All points are ultimately translated by the formatter into x- and y-coordinates. You may therefore refer to a specific point in the picture by incrementing or decrementing the coordinates. For example:
2nd ellipse + (.5,0)
This refers to the position 1/2 inch to the right of the center of the second ellipse.
The x- and y-coordinates of an object are the point where the center of the object is placed. You may refer to the x- and y-coordinates of an object by placing .x
or .y
at the end. For example:
last box.x
refers to the x-coordinate of the most recent box drawn. You can refer to some of the object's physical attributes in a similar way:
.x
|
x-coordinate of object's center. |
.y
|
y-coordinate of object's center. |
.ht
|
Height of object. |
.wid
|
Width of object. |
.rad
|
Radius of object. |
.
corner
|
One of the object's corners. Corners are described below. |
Unless otherwise positioned, each object begins at the point where the last object left off. However, if a command (or sequence of commands) is set off by curly braces ({ }
), pic
then returns to the position before the first brace.
17.3.8.1 Positioning between objects
There are two ways to refer to a previous object.
Refer to it by order. For example:
1st box
3rd box
last box
2nd last box
Declare it with a name, in initial caps, on its declaration line. For example:
Line1: line 1.5 right from last box.sw
To refer to a point between two objects, or between two points on the same object, you may write:
fraction of the way between first.position and second.position
or (abbreviated):
fraction <first.position, second.position>
17.3.8.2 Corners
When you refer to a previous object, pic assumes you mean the object's center unless you specify a corner. To specify a corner, use either of these forms:
.cornerofobject object.corner
For example:
.sw of last box
last box.sw
Valid corners can be specified as any of the following:
n
|
North |
s
|
South |
e
|
East |
w
|
West |
ne
|
Northeast |
nw
|
Northwest |
se
|
Southeast |
sw
|
Southwest |
t
|
Top (same as n
) |
b
|
Bottom (same as s
) |
r
|
Right (same as e
) |
l
|
Left (same as w
) |
start
|
Point where drawing of object began |
end
|
Point where drawing of object ended |
You may also refer to the following parts of an object:
upper right
|
lower right
|
upper left
|
lower left
|
17.3.9 Expressions
Expressions may be used anywhere pic needs a numeric value (such as when specifying coordinates or amounts of motion). Expressions consist of numeric constants, variables, and operators.
pic recognizes the following operators.
+
|
Addition |
-
|
Subtraction |
*
|
Multiplication |
/
|
Division |
%
|
Modulus (remainder after division) |
^
|
Exponentiation |
17.3.10 Default Values
Various system variables control the default dimensions of objects. You can change these defaults by typing a description line of the form:
variable
 = value
| Variable | Default | Variable | Default |
|---|---|---|---|
arcrad
|
0.25 | ellipsewid
|
0.75 |
arrowwid
|
0.05 | linewid
|
0.5 |
arrowht
|
0.1 | lineht
|
0.5 |
boxwid
|
0.75 | movewid
|
0.5 |
boxht
|
0.5 | moveht
|
0.5 |
circlerad
|
0.25 | scale
|
1 |
dashwid
|
0.05 | textht
|
0 |
ellipseht
|
0.5 | textwid
|
0 |
17.3.11 pic Examples
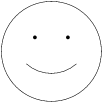
Input:
.PS
define smile %
a = $1
circle radius a at 0,0
arc cw radius a*.75 from a*.5,-a*.25 to -a*.5,-a*.25
"\(bu" at a*.33,a*.25
"\(bu" at a*-.33,a*.25
%
smile(.5)
.PE
Result:
Input (from CSTR #116):
.PS
ellipse "document"
arrow
box "PIC"
arrow
box "TBL/EQN" "(optional)" dashed
arrow
box "TROFF"
arrow
ellipse "typesetter"
.PE
Result:


|

|

|
| 17.2 eqn | 
|
17.4 refer |
