|
|
When you have created a new repository, you may want to import a project — a related collection of files stored under a single directory. It is possible to store a single file under CVS, but it will also be a project and you will need to store it under its own project directory. CVS needs to be able to create a subdirectory to store metadata about the project.
Before loading a project into CVS, consider the project's structure. If you move a file after it has been created and stored in CVS, CVS treats it as two files: the original in the original location and the new file in the new location. The history of the file is then split into two parts. Decide how you want to structure the source files for a project before you import it into CVS.
If you will eventually want to distribute your project's files across several unrelated directories, it is best to develop the project under a single root directory, then distribute the files as part of the installation script. Chapter 7 describes the issue of project structure in more detail.
|
Create your initial project directory structure, possibly in /tmp. Once the project is stored in CVS, this initial version can be removed. You won't be using it as a sandbox and the project is duplicated in CVS, so there's no reason to retain it.
Once you have your initial structure, add any initial files you want. Change into the root directory of the project. Then, from within that directory, import the project with the command:
cvs -d repository_path import name_of_project vendor_tag release_tag
If the repository is on the local machine, use the full path of the repository directory for the repository path. If the repository is on a remote server, see Section 2.4 for help on specifying the repository path.
For most cases, you will not need to know about vendor tags and release tags. CVS requires them to be present, but for now you can use the name of the project as the vendor tag and the current revision name as the release tag. These names must start with a letter and can contain only alphanumeric characters, underscores, and hyphens. See Example 2-6, which illustrates the process of creating a project structure and some project files, and then importing the project into CVS.
The vendor tag and release tag are explained in Chapter 8.
/tmp$ mkdir example
/tmp$ touch example/file1
/tmp$ touch example/file2
/tmp$ cd example
/tmp/example$ cvs -d /var/lib/cvsroot import example example_project ver_0-1
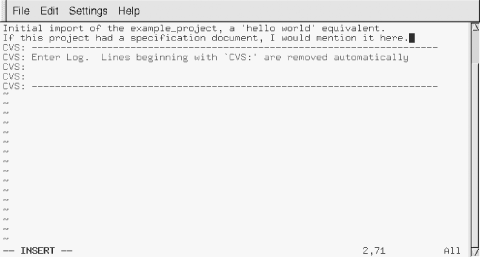
After you run the commands in Example 2-6, CVS opens an editor window, shown in Figure 2-4. Enter a message to remind you what you intend this project to be.

The lines in the editor window that start with "CVS:" will not be included in the project's history. The text displayed in the editor is configurable through the rcsinfo file described in Chapter 7.
The default editor is vi. You need to type an i before inserting text; type ESC to return to the mode in which you can move the cursor around. The movement keys are h, j, k, and l. To save and exit, use ESC followed by :wq RETURN. Chapter 3 explains how to change the editor to something other than vi.
After exiting from the editor, CVS completes the import, as shown in Example 2-7.
N example/file2" 5L, 241C written
N example/file1

No conflicts created by this import
In the repository, the imported project is stored as a collection of RCS files. Example 2-8 shows the files for the project imported in Example 2-7.
$ ls -la /var/lib/cvsroot
total 16
drwxrwsr-x    4 root     anthill      4096 Jun 28 17:06 .
drwxrwsr-x   10 root     staff        4096 Jun 28 16:35 ..
drwxrwsr-x    3 root     anthill      4096 Jun 28 16:56 CVSROOT
drwxrwsr-x    2 jenn     anthill      4096 Jun 28 17:09 example
$ ls -la /var/lib/cvsroot/example
total 16
drwxrwsr-x    2 jenn     anthill      4096 Jun 28 17:09 .
drwxrwsr-x    4 root     anthill      4096 Jun 28 17:06 ..
-r--r--r--    1 jenn     anthill       387 Jun 28 17:06 file1,v
-r--r--r--    1 jenn     anthill       387 Jun 28 17:06 file2,v
Once you've created your project, back up your CVS repository. You should continue to back up the repository periodically during your project's lifetime. Once the repository has been backed up and the project verified, you can remove the original files. You need sole use of the repository when you do a backup.
|
Before you do any work on the project, verify that the project is in CVS by checking out a sandbox (see Section 2.5 later in this chapter). Don't try to use your original files as a sandbox. You must do any new work in files that you check out to a sandbox. You may want to remove the original files to prevent yourself from accidentally modifying them.
|
|
| Top |