9.1 Configuring Red Hat Linux by Using the System Settings MenuThe GNOME and KDE System Settings menu provides access to 15 utilities that help you configure your system. Chapter 8 explained one of these, the package management tool. The tools available are:
In addition, the Extras menu contains a System Settings submenu, on which you can find two more tools: Desktop Switching Tool and Printer System Switcher. The Desktop Switching Tool lets you choose between the GNOME and KDE desktop. The Printer System Switcher lets you choose between the LPRng and CUPS printing system. Neither tool will let you choose a facility that's not installed. So, for example, unless you've installed both LPRng and CUPS, the Printer System Switcher tool won't actually function. Most of the System Settings tools function like similar steps in the Red Hat Linux installation procedure. This section focuses on tools that do not resemble installation procedure steps, namely:
The Network Configuration tool provides many settings and functions. Explanation of the Network Configuration tool is deferred to Chapter 10 and Chapter 11. Similarly, explanation of the redhat-switchmail tool is deferred to Chapter 12 9.1.1 Setting Up X LoginsThe GDM Setup tool, accessible via System
Settings Figure 9-1. The GDM Setup tool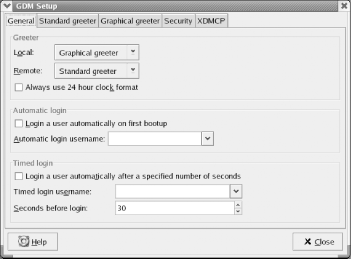 By default, the XDMCP tab disables XDMCP, the facility that provides remote X terminals and sessions the ability to login to your system. If you have X terminals or additional Linux or Unix hosts, you may find it convenient to be able to remotely log in to your Red Hat Linux system. To provide this capability, enable the Enable XDMCP checkbox. The change takes effect when you close the GDM Setup tool. Thereafter, X terminals and X sessions on your local network should be able to remotely log in to your Red Hat Linux system. If you enable XDMCP, you should generally make a second configuration change. By default, the Security tab enables the setting Allow root to login remotely with GDM. Most users do not need to remotely login as root and therefore don't require this setting to be enabled. By disabling the setting, you can prevent unauthorized persons from successfully logging in as root from remote X terminals or sessions. Therefore, you should generally disable this setting. 9.1.2 Configuring a PrinterBefore you can print from Red Hat Linux, you must configure a printer. Red Hat Linux supports local printers attached to your system's parallel port and remote printers that your system accesses via the network. Before you can configure a remote printer, you must first configure networking, as explained in Chapter 11. To configure a local printer, launch the printer configuration tool
by selecting System Tools Figure 9-2. The printer configuration tool First, create a new printer by clicking the New icon. The Add a New Print Queue wizard appears. Click Forward to proceed. The Set the Print Queue Name and Type dialog box, as shown in Figure 9-3, appears. Figure 9-3. The Set the Print Queue Name and Type dialog box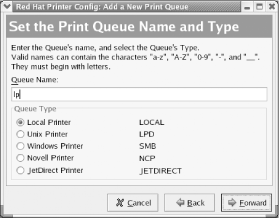 Every print queue has a name. The most commonly used name for the default print queue is lp. Type lp or another print queue name of your choice in the text box labeled Queue Name. Select the Local Printer radio button and click Forward. The Configure a Local Printer dialog box, as shown in Figure 9-4, appears. Figure 9-4. The Configure a Local Printer dialog box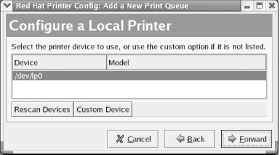 The dialog box shows the parallel ports associated with your system. Linux numbers parallel ports starting with zero, so the port designated /dev/lp0 corresponds to the device known by Microsoft Windows as LPT1. Select the parallel port to which your printer is attached and click Forward. The Select a Print Driver dialog box, as shown in Figure 9-5, appears. Select the make of your printer by clicking the triangle that appears at the left of its name. From the sublist that appears, select the model of your printer and choose a print driver, as shown in Figure 9-6. More than one driver may be available for your printer. Some drivers work better than others, so you'll eventually want to try each driver in order to locate the one that works best. For now, merely choose a driver arbitrarily from among those listed for your printer. Then click Forward. Figure 9-5. The Select a Print Driver dialog box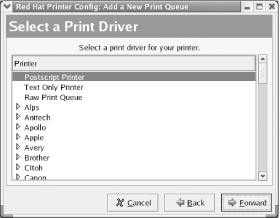 Figure 9-6. The Select a Print Driver dialog box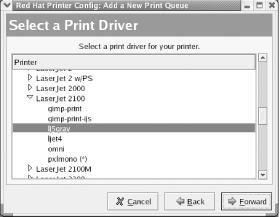 The Finish and Create the New Print Queue dialog box, as shown in Figure 9-7, appears. Check the information and use the Back button to correct any errors. When you're satisfied with your specifications, click Apply. Figure 9-7. The Finish and Create the New Print Queue dialog box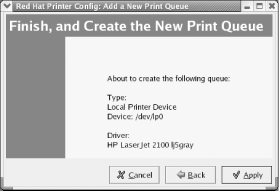 The printer configuration tool reappears with the new printer, as shown in Figure 9-8. To verify the configuration, click Test and choose ASCII Text Testpage. Doing so sends a sample page to the printer so that you can verify correct operation. A dialog box invites you to save your configuration changes; click Yes, or your new printer configuration will be lost. The system then restarts the printer system, known as the lpd daemon, and informs you of the result by presenting a dialog box. This process may take several seconds. Click OK to continue. Finally, a dialog box confirms that the sample page has been sent to the printer. Figure 9-8. The printer configuration tool If the sample page doesn't appear or appears incorrectly, select the printer and click Edit. Use the Edit Queue dialog box that appears, as shown in Figure 9-9, to select a different print driver or revise options associated with the current driver. Figure 9-9. The Edit Queue dialog box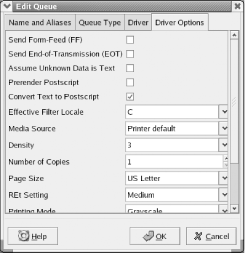 9.1.3 Changing the Root User PasswordYou can change the password
associated with the root user account by using
the Root Password tool. To do so, select System Settings
Figure 9-10. The Root Password tool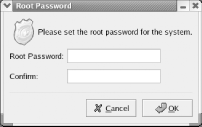
9.1.4 Configuring SoundIf your system includes a sound adapter supported by Red Hat Linux, you can use the Sound Card Configuration tool to configure your adapter. If you're unsure whether your system's sound adapter is supported, check the Red Hat Linux hardware compatibility database at http://hardware.redhat.com. Several popular cards are not fully compatible with Red Hat Linux, so it's best to check the database before wasting time trying to configure incompatible hardware. To configure your system's sound adapter, choose
System Settings Figure 9-11. The Sound Card Configuration tool The tool probes your system, seeking supported sound adapters. After a sound adapter has been identified, the tool displays the vendor and model of your sound card and the associated Linux kernel module name. If the tool was unable to find a sound adapter, it displays the text "No soundcards were detected." If your system's sound adapter was sucessfully probed, you can click the Play test sound button to test the adapter. If you don't hear the sound, check that your speakers are plugged in and, if necessary, powered on. Otherwise, you may spend time trying to reconfigure a sound adapter that's actually working fine. If the test sound works, but you don't hear sound at
other times, check the mixer levels by choosing Sound & Video
9.1.5 User and Group AdministrationThe Red Hat User Manager tool
lets you administer users and groups. To launch the tool, select
System Settings
Figure 9-12. The Red Hat User Manager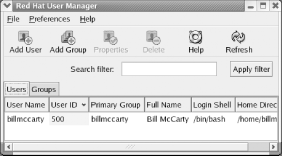 When many user accounts are configured, it may be inconvenient to scroll through the list. You can use the text box labeled Search Filter to display only user accounts having names matching a specified pattern. Type the pattern in the text box and click Apply filter. 9.1.5.1 Modifying a user accountTo modify a user account, click the desired account and click Properties. The User Properties dialog box, as shown in Figure 9-13, appears. Figure 9-13. The User Properties dialog box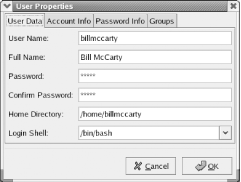 The User Data pane of the User Properties dialog box lets you view and change a variety of properties:
The Account Info pane, shown in Figure 9-14, lets you specify a date on which a user account becomes unusable. Alternatively, you can use the text box labeled User account is locked to immediately disable an account. Figure 9-14. The Account Info pane of the User Properties dialog box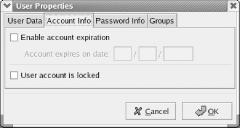 The Password Info pane, shown in Figure 9-15, lets you set password expiration options for the account. To do so, enable the checkbox labeled Enable password expiration. Then you can specify any of the following values:
Figure 9-15. The Password Info pane of the User Properties dialog box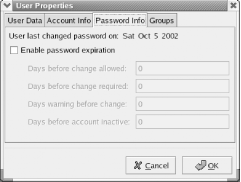 The Groups pane displays a series of checkboxes corresponding to user groups. To associate the user account with a group, check the box corresponding to the desired group. 9.1.5.2 Adding a new userTo create a new user account, click Add User in the Red Hat User Manager dialog box. This will launch the Create New User dialog box, shown in Figure 9-16. Figure 9-16. The Create New User dialog box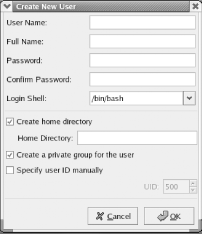
When you create a new user account, you can specify the following values:
When you've specified the desired values, click OK to create the user account. 9.1.5.3 Deleting a user accountTo delete a user account, click on the desired account and click Delete.
9.1.5.4 Configuring groupsYou may recall from Chapter 4 that Linux uses groups to define a set of related user accounts that can share access to a file or directory. You probably won't find it necessary to configure group definitions very often, particularly if you use your system as a desktop system rather than a server. To view the configured groups, launch the User Manager tool and click the Groups tab. The Groups pane, as shown in Figure 9-17, appears. Groups are shown in a scrollable list, similar to the way user accounts are shown. Figure 9-17. The Groups pane of the User Manager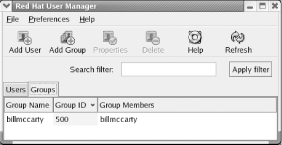 To create a new group, click the Add Group icon. The Create New Group dialog box, as shown in Figure 9-18, appears. The dialog box lets you specify the name of the new group. When you've specified the name of the new group, click OK to create the group. Figure 9-18. The Create New Group dialog box To modify a group, click on the name of the group. The Group Properties dialog box, shown in Figure 9-19, appears. The Group Data pane of the dialog box lets you revise the name of the group. The Group Users pane contains a scrollable list of users; you can associate a user account with a group by enabling the checkbox adjacent to the username or dissociate a user account from a group by disabling the checkbox adjacent to the username. When you've completed your changes, click OK to make them effective. Figure 9-19. The Group Properties dialog box To delete a group, select the group in the Groups pane and click the Delete icon.
9.1.6 Switching DesktopsDuring
the installation procedure, GNOME is automatically configured as the
default desktop. You can choose KDE as the default by using the desktop
switcher.To do so, select Extras Figure 9-20. The Desktop Switcher dialog box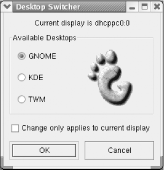 In addition to GNOME and KDE, the Desktop Switcher lets you specify TWM (tiny window manager), a sparsely functional but highly efficient desktop. The checkbox labeled "Change only applies to current display" lets you restrict your choice of desktop to the current desktop, as indicated in the top line of the dialog box. This facility is useful if your system has been configured to allow remote users to log in via X. To specify a desktop, click the desired radio button and click OK. A dialog box appears, informing you that you must restart X for the selected desktop to appear. To restart X, simply log out and then log in. |
