10.2 Configuring an Internet ConnectionThe Red Hat Linux Network Administration Tool simplifies configuration of your system to access the Internet via a telephone dialup, ISDN, DSL, Ethernet, or wireless connection. The Network Administration Tool requires you to follow a three-step process:
The following subsections explain how to perform these steps.
10.2.1 Setting Up Hardware DevicesIn the past, most computer users connected to the Internet via a POTS (plain old telephone service) dial-up modem. However, today, many means of connecting to the Internet are available. For example, many home computer users have high-speed connections using ISDN or DSL. Corporate computer users often connect to the Internet via a their local area network, using an Ethernet adapter. And wireless network adapters are becoming quite popular. To set up a hardware device using the Network Administration Tool,
login as root and choose System Settings Figure 10-1. The Network Administration Tool The Network Administration Tool has four tabs:
To begin setting up an Internet connection, click the Add button of the Device tab. A dialog box appears, inviting you to choose the type of your device, as shown in Figure 10-2. Choose the appropriate device type and click Forward. Then, follow the steps in the following subsection appropriate to the type of your device.
Figure 10-2. The Add new Device Type dialog box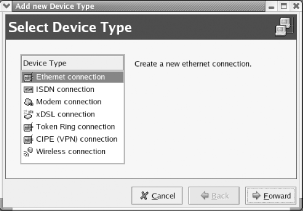 10.2.1.1 Setting up a dialup modemWhen you specify a Modem as the device type, the Network Administration Tool probes for your modem. This process may take several seconds. Once the Network Administration Tool locates the modem, it displays the Select Modem dialog box, shown in Figure 10-3, which lets you specify modem characteristics. Generally, the defaults are acceptable. However, check the documentation for your modem to be sure. If your phone line does not support touch tone dialing, de-select the Use touch tone dialing checkbox. Then, click Forward to continue. Figure 10-3. The Select Modem dialog box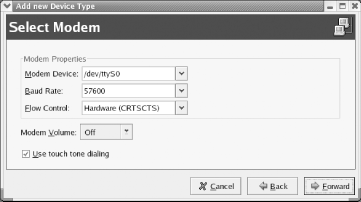 The Select Provider dialog box appears, as shown in Figure 10-4. If your country and provider are listed, select them. Otherwise, Specify the phone number, name, login name, and password associated with your account. Then click Forward to continue. Figure 10-4. The Select Provider dialog box The main Tool screen reappears. However, this time the screen includes a line identifying your modem as a ppp (Point-to-Point Protocol) device, as shown in Figure 10-5. Click Apply to save your changes. Figure 10-5. The Network Administration Tool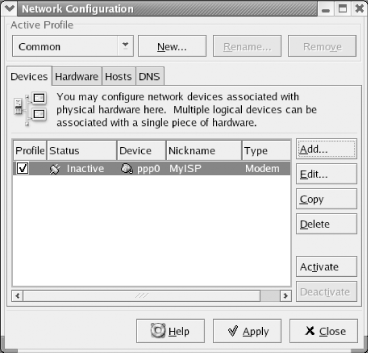
10.2.1.2 Setting up an ISDN modemWhen you specify an ISDN modem as the device type, the Network Administration Tool presents a list of supported ISDN modems, as shown in Figure 10-6. Specify the device characteristics and choose the D Channel Protocol used by your ISDN provider. Click Forward to continue. Figure 10-6. The Select ISDN Adapter dialog box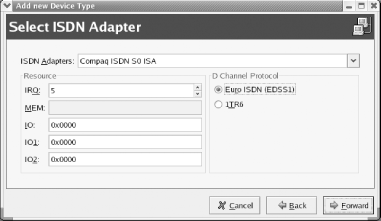 The Select Provider dialog box appears, shown earlier in Figure 10-4. If your country and provider are listed, select them. Otherwise, specify the phone number, name, login name, and password associated with your account. Then, click Forward to continue. The main Tool screen reappears. However, this time the screen includes a line identifying your ISDN modem as an ippp (ISDN Point-to-Point protocol) device. Click Apply to save your changes. 10.2.1.3 Setting up an xDSL modemSeveral varieties of DSL are in use, including IDSL, ADSL, and SDSL. The xDSL device type supports each variety. When you specify DSL modem, the Network Administration Tool presents the Configure DSL connection dialog box, as shown in Figure 10-7. Specify the Ethernet device associated with your DSL link and the login name and password associated with your DSL account. Click Forward to continue. The main Tool screen reappears. However, this time the screen includes a line identifying your DSL modem as a ppp (Point-to-Point Protocol) device. Click Apply to save your changes. Figure 10-7. The Configure DSL connection dialog box' 10.2.1.4 Setting up an Ethernet adapterWhen you select Ethernet adapter as the device type, the Network Administration Tool probes your system for supported Ethernet adapters and displays a list of the adapters it finds, as shown in Figure 10-8. Select the adapter you want to configure and click Forward. Figure 10-8. The Select Ethernet Device dialog box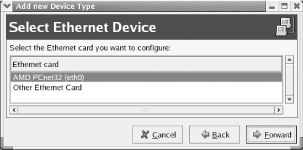 The Configure Network Settings dialog box appears, as shown in Figure 10-9. If your ISP provides a DHCP server that supplies your system with its network configuration, enable the Automatically obtain IP address settings with radiobutton and choose DHCP from the drop-down list. Also, enable the Automatically obtain DNS information from provider checkbox. If your provider uses BOOTP, which is now unusual, choose BOOTP from the drop-down list. Figure 10-9. The Configure Network Settings dialog box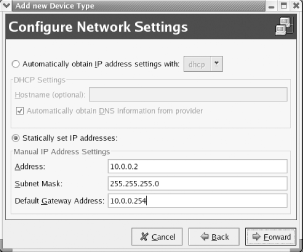 If your provider requires you to manually specify your system's network configuration, enable the Statically set IP address radiobutton. Then, specify the IP address, subnet mask, and default gateway address as directed by your network administrator. Click Forward to continue. The main Tool screen reappears. However, this time the screen includes a line identifying your Ethernet adapter as an eth device. Click Apply to save your changes. 10.2.1.5 Setting up a wireless adapterWhen you select Wireless adapter as the device type, the Network Administration Tool probes your system for supported wireless adapters and displays a list of the adapters it finds, as shown in Figure 10-10. Select the appropriate adapter and click Forward. Figure 10-10. The Select Wireless Device dialog box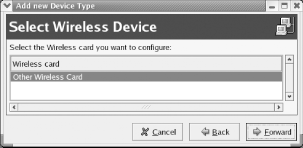 If the adapter is not specifically identified, choose Other Wireless Card and click Forward. The Select Ethernet Adapter dialog box appears, as shown in Figure 10-11. Choose the appropriate adapter and specify its characteristics. Click Forward to continue. Figure 10-11. The Select Ethernet Adapter dialog box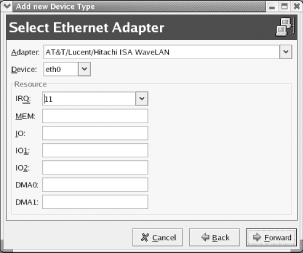 The Configure Wireless Connection dialog box appears, as shown in Figure 10-12. Specify the mode (Managed or Ad Hoc) in which your wireless access point operates or specify Auto to configure the adapter to use whatever mode the access point uses. Figure 10-12. The Configure Wireless Connection dialog box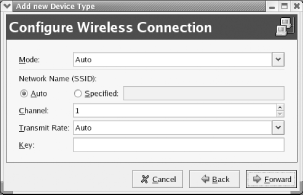
Specify the SSID (Service Set Identifier) of your network or specify Auto if you want to connect to any available network. Then, specify the channel, transmit rate, and key (if any) associated with your network. Click Forward to continue. The main Tool screen reappears. However, this time the screen includes a line identifying your Ethernet adapter as an eth device. Click Apply to save your changes.
10.2.2 Specifying DNS Settings and HostnamesThe DNS tab of the Network Configuration Tool, shown in Figure 10-13, lets you configure DNS. However, if your ISP provides DNS information via DHCP, you don't need to do so. Figure 10-13. The DNS tab of the Network Configuration Tool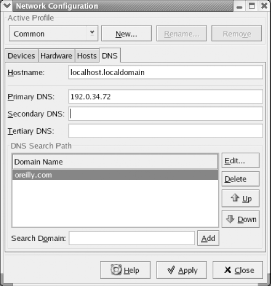 Internet hosts are generally known by both an IP address and hostname. DNS translates hostnames to IP addresses and IP addresses to hostnames. Translating a hostname to an IP address is called hostname lookup or address resolution. Translating an IP address to a hostname is called reverse lookup. DNS is important, but not essential. For instance, without DNS, you'd have to type IP addresses rather than hostnames when browsing the Web. Doing so would be inconvenient, but workable. However, you wouldn't be able to simply click hyperlinks specified using hostnames. Instead, you'd have to somehow figure out and type the proper IP address. Using the tab, you can specify the hostname of your system, and the IP addresses of primary, secondary, and tertiary DNS servers. You can also specify one or more domain names that are automatically added to hostnames when performing hostname lookups. For example, if you frequently access hosts in the example.com domain, you can include example.com on the search path. Then, you can refer to the host www.example.com as simply www. 10.2.3 Activating the DeviceThe Network Administration Tool activates some network devices, such as Ethernet adapters, automatically. Other network devices, such as dial-up modems, must be manually activated and deactivated. To activate a device, select its name in the Devices tab of the Network Administration Tool and click Activate. If the device is a dial-up modem, it will attempt to connect to your ISP. Once a connection is established, you should be able to access the Internet. Try to ping an Internet host by issuing a command such as ping www.redhat.com in a terminal window. You should see replies from the host: PING www.redhat.com (66.187.232.56) from 10.0.0.2 : 56(84) bytes of data. 64 bytes from redhat.com (66.187.232.56): icmp_seq=0 ttl=239 time=94.383 msec 64 bytes from redhat.com (66.187.232.56): icmp_seq=1 ttl=239 time=92.060 msec 64 bytes from redhat.com (66.187.232.56): icmp_seq=2 ttl=239 time=91.961 msec --- www.redhat.com ping statistics --- 3 packets transmitted, 3 packets received, 0% packet loss round-trip min/avg/max/mdev = 91.961/92.801/94.383/1.146 ms Terminate the ping command by typing Ctrl-C. If the command doesn't work, perhaps your connection isn't working. Or perhaps your ISP's DHCP server failed to properly provide DNS information. Try pinging the IP address of a host you know to be available. For example, issue a command such as: $ ping -n 66.187.232.56 If pinging the IP address works, simply use the DNS tab to revise your DNS configuration and you're set. Otherwise, you may have some difficulty getting the connection to work. Use the ifconfig and route commands to view your network configuration. If you can figure out the problem, again you're set. If not, you may be able to obtain help from your ISP or from participants in an Internet newsgroup, such as linux.redhat or linux.redhat.misc. To terminate a connection, deactivate the associated device by clicking Deactivate on the Devices tab. |

 Network
from the GNOME or KDE menu. The Network Administration Tool appears,
as shown in
Network
from the GNOME or KDE menu. The Network Administration Tool appears,
as shown in