Show Contents Previous Page Next Page Chapter 2 - A First Module / "Hello World" with the C API It can be a pain to relink and reinstall the server executable every time
you make a change to a custom module. As of Version 1.3, Apache offers a way
to build dynamically loadable modules. You build the module as a shared object,
place it somewhere handy, add a LoadModule directive to Dynamic loading is available on most systems, including Linux, FreeBSD, Solaris,
BSDI, AIX, and IRIX systems. To configure your server for dynamic loading, recompile
it with the % ./configure --enable-module=so --enable-module=other_module ...
Now you must run a full make to rebuild the You now have an % ./configure --activate-module=src/modules/site/mod_hello.c \
--enable-shared=hello
When the --enable-shared argument is present, this implies that
Now you'll need to run make to create the file % cp src/modules/site/mod_hello.so ~www/libexec/ Open LoadModule hello_module libexec/mod_hello.so The LoadModule directive, available only when A second, and possibly easier way to build a module as a DSO is to use the
% ~www/bin/apxs -c -i -a mod_hello.c
 gcc -DLINUX=2 -DHAS_BOOL -DUSE_HSREGEX -I/usr/local/apache/include
 -c mod_hello.c -o mod_hello.so mod_hello.o
 cp mod_hello.so /usr/local/apache/libexec/mod_hello.so
 chmod 644 /usr/local/apache/libexec/mod_hello.so
 [activating module 'hello' in /usr/local/apache/conf/httpd.conf]
The main advantage of Regardless of whether you built [Tue Mar 24 07:49:56 1998] [debug] mod_so.c(234): loaded module hello_module You should now be able to fetch http://your.site/hey/there, and see the familiar page produced by this example script. Show Contents Go to Top Previous Page Next PageIf your C module consists of more than a single source file, or if it requires linking with shared libraries, see Appendix C, Building Multifile C API Modules. Building C Modules in the Windows Environment Show Contents Go to Top Previous Page Next Page As of this writing, Apache does not provide any special support tools for
building third-party modules in the Win32 environment. We'll show you how to
build an Apache module DLL (Dynamic Link Library) using Microsoft Visual C++.
The naming convention for module source files is the same in Win32 systems as
it is in Unix, but the DLL library names generally replace the mod_
prefix with ApacheModule. In our example, we will build an To ensure that this procedure works, you'll have to compile everything on a Windows NT system (Windows 95/98 doesn't work, although you can run the resulting binaries on 95/98). You may also have to build Apache and Perl from source. The binary distributions are not guaranteed to interoperate correctly with modules you build yourself. Here is the blow-by-blow procedure:
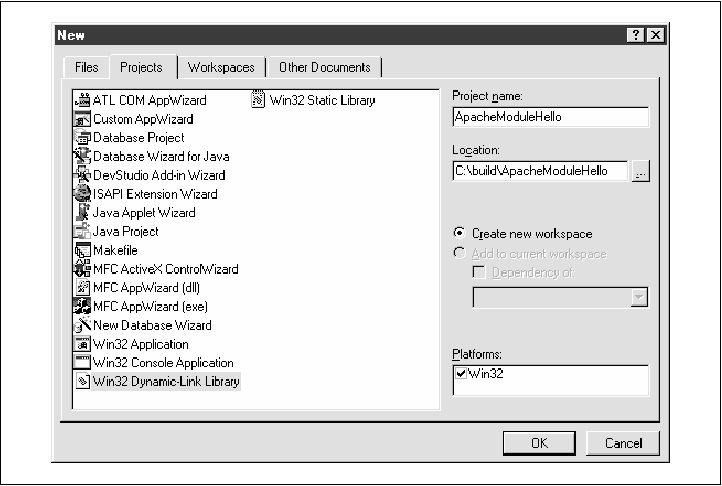
Select the File New menu to bring up the Projects window. Select "Win32 Dynamic-Link
Library" and enter "ApacheModuleHello" as the project name and Figure 2-2. Select "Win32 Dynamic-Link Library" to create a new Apache module project.
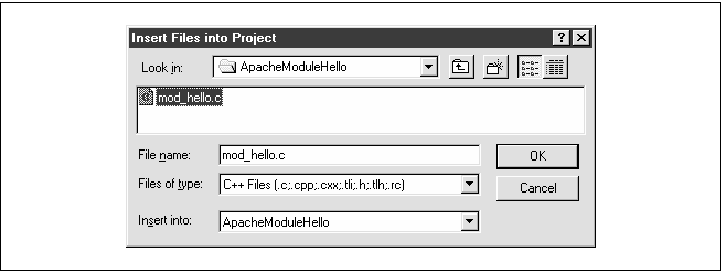
From the Project menu, select Add To Project Files. Add Figure 2-3. Add the module source files to the Visual C++ project.
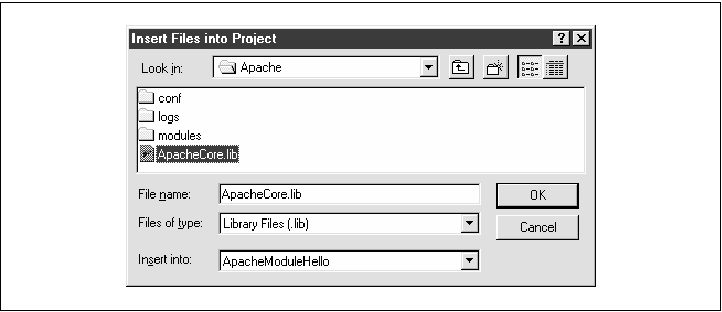
Repeat the previous step, adding the Apache core library, Figure 2-4. Add the Apache runtime library
to the build.
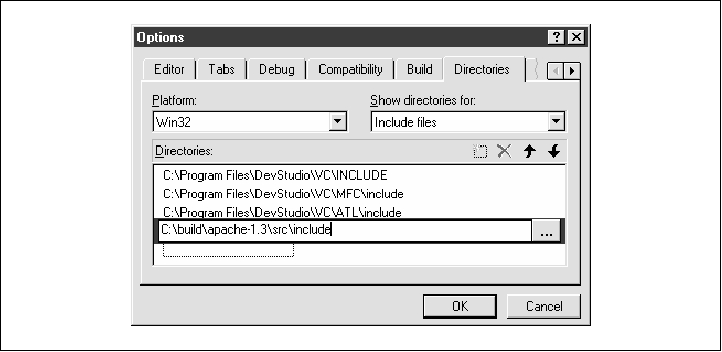
From the Tools Options menu, select Directories. In the dialog box, choose
Include files and add the path to the Apache include directory. This is located
underneath the Apache source tree, in the directory Figure 2-5. The Apache include path must be
added to the project directories.
From the Build Set Active Configuration menu, select Win32 Release. This will enable o ptimizations and turn off debugging code (Figure 2-6). Figure2-6. Set the Active Configuration.
From the Build menu, select Build ApacheModuleHello.dll. The compiler will fire up and, if all goes well, create the DLL library. If you get any error messages during this process, go back and fix the problems.
Copy
Add the following lines to LoadModule hello_module modules/ApacheModuleHello.dll <Location /hi/there> SetHandler hello-handler </Location> Fire up your favorite browser and request the URI http://your.site/hi/there.
With luck, Footnotes 7 Note that if HostNameLookups is configured to be Off, the ap_get_remote_host() function will return the IP address of the client. See Chapter 8, Customizing the Apache Configuration Process, and Chapter 9, Perl API Reference Guide, for more details on the ap_get_remote_host() function. Show Contents Go to Top Previous Page Next PageCopyright © 1999 by O'Reilly & Associates, Inc. |


