
20.6. Minimizing JPEG File Size
As for all files intended for Web delivery, it is important to optimize JPEGs to make them as small as possible. Because JPEGs are always 24-bit by nature, reducing bit-depth is not an option. For the most part, all you have to play with is the quality setting, but it is possible to prepare an image prior to compression. There are a number of specialized tools available for making JPEGs as small as they can be while letting you make decisions about image quality.
20.6.1. Aggressive Compression Ratios
The most direct way of optimizing a JPEG is to adjust its Quality setting. If your image has a lot of continuous tone or gradient colors, you can be pretty aggressive with the compression level and not worry too much about loss of quality in the resulting JPEG. Even at some of the lowest quality settings, the image quality is still suitable for viewing on web pages. Of course, this depends on the individual image. A low quality setting (below 40) usually results in a blocky or blotchy effect in areas of flat color, which may be unacceptable to you.
Each tool provides sliders for controlling quality/compression ratios, although they use different numbering systems. Fireworks uses a percentage value from 1 to 100%. Paint Shop Pro uses a scale from 1 to 100, but it works as the inverse of the standard scale: lower numbers correspond to higher image quality and less compression.
Photoshop uses a scale of 0 to 12 when you select JPEG from the "Save As" dialog box. When you "Save for Web" in Photoshop/ImageReady, the quality rating is on a scale from 0 to 100. It should be noted that Photoshop is much less aggressive with its numbering; 0 on the Photoshop scale corresponds to about 30 on the standard scale.
The easiest way to get the balance of compression and image quality just right is to use a tool that offers a preview of the image (and its file size) with your settings. Photoshop 5.5+/ImageReady, Fireworks, and the third party JPEG plug-ins offer previews. If your image editor does not have a preview function, you may need to do some testing to find the compression level that works best (save the file, then preview it in a browser). Be sure to save a copy of the original image so you can do a fresh JPEG compression with each test.
20.6.2. "Optimized" JPEGs
Standard JPEGs use a precalculated, general purpose compression table (called the Huffman table) for compressing an image. Some tools offer the ability to create an "optimized" compression table that is customized for the particular image. This results in better color fidelity and slightly smaller file sizes. This format is supported on current browsers, but some (mostly older) browsers may have trouble displaying optimized JPEGs.
The optimization option is presented differently in each tool:
- Photoshop 5.5 and higher (and ImageReady)
-
Check the "Optimized" checkbox in the Optimize palette.
- Photoshop (4.0 and 5.0)
-
Select the "Baseline (Optimized)" option in the JPEG dialog box.
- Pro-JPEG (BoxTop Software)
-
Check the "Optimize Huffman Codes" checkbox in the Pro-JPEG dialog box.
- HVS JPEG (Digital Frontiers)
-
In addition to optimizing Huffman Codes, HVS JPEG utilizes a different (and unique) method of optimization that, according to Digital Frontiers, uses a proprietary algorithm to base compression rates on a spatial frequency analysis of the image.
These optimization controls are grouped under the "Q-Table" options in the dialog box. "General" uses the standard compression table. "Generate Optimized Q-Table" creates a customized table for the image.
In addition to these, HVS JPEG provides two predefined tables for optimizing certain image types. "Portraits" is best used on images with smooth tones. "Textured" is for images where it is important to preserve detail and texture.
20.6.3. Softening the Image for Better Compression
JPEG compression does an admirable job of condensing photographic images without requiring much extra attention. However, if you are serious about making your JPEGs as compact as possible, you may want to maximize JPEG compression's strengths by feeding it the kind of image it likes -- an image with subtle gradations, fewer details, and no hard edges. By applying a slight blur to all or part of the image, you allow the compression scheme to do its work more efficiently.
If you are using one of the newer web graphics tools, you will find a setting with the optimization options that softens the image. In Photoshop 5.5 and higher, the tool is called "Blur"; in Fireworks, it's "Smoothing." If you apply a soft blur, the JPEG compression works better, resulting in a smaller file. If you don't have these tools, you can soften the whole image by applying a slight blur to the image with the "Gaussian Blur" filter (or similar). Compare the file sizes of the original image (left) and the slightly blurred image (center) in Figure 20-2.
A more sophisticated approach is to apply aggressive blurs to areas of the image that are not important and leave areas of detail alone. For instance, if you are working with a portrait, you could apply a blur to the background while maintaining detail in the face, as shown in the example on the right in Figure 20-2.
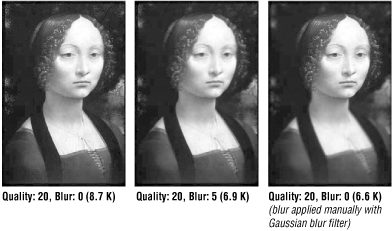
Figure 20-2. Blurring all or part of an image results in smaller file sizes
20.6.4. Using the HVS JPEG Plug-in
HVS JPEG has some unique features for pushing JPEG compression while maintaining image quality. The Edge-Preserving Detail Filter (in the upper-left corner of the dialog box shown in Figure 20-3) smooths out texture detail while working to maintain the edges. This results in higher compression with better overall image quality and without edge artifacts.
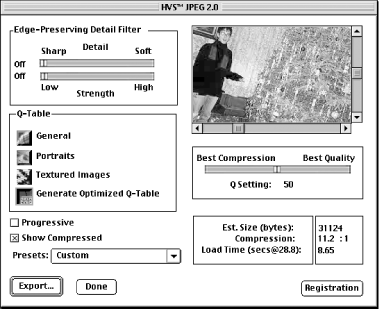
Figure 20-3. HVS JPEG dialog box
If you have an image that has a lot of detail, position the Detail slider towards the left. If your image is soft, you can slide the Detail slider to the right for a more aggressive application of the prefilter. Note that if either of the edge-preserving sliders is positioned all the way to the left, no prefilter will be applied.
Once you've set the Detail slider to match the general quality of the image, you can experiment with various amounts of blur using the Strength slider. This is not a scientific process -- it's a matter of finding the point at which you are comfortable with the image quality while minimizing the file size.
Always apply the prefilters first (that's why they're called "pre" filters), because the optimization tables and compression ratios will be based on these settings. After applying the filters and optimization, you may be able to reduce the compression Q-setting a bit without noticeable change in image quality.
20.6.5. Optimize to File Size in Photoshop 5.5+
If you know ahead of time the size you'd like your JPEG to be, try using the "Optimize to File Size" feature in Photoshop 5.5 and higher. Optimize to File Size (accessible via the "Save for Web" dialog box) allows you to achieve your target file size automatically without trying out lots of different optimization settings. Photoshop handles it all for you! The Optimize to File Size function is also discussed in Chapter 19, "GIF Format" (see Figure 19-10).
20.6.6. Weighted Optimization (Photoshop 6/ImageReady 3)
Photoshop 6 and ImageReady 3 offer a "weighted optimization" function that lets you smoothly vary the optimization settings across an image using an alpha channel (also called a mask). This allows you to let Photoshop know for which areas of the image quality should be preserved, and where quality may be sacrificed in order to achieve a smaller file size.
To save a JPEG with weighted optimization in Photoshop 6, first select the portion of the image that you want to retain the highest quality. Save the selection (using the Select menu) and give it a name. This creates the alpha channel that will be referenced when optimizing the image.
From the "Save for Web" dialog box, select the channel button to the right of the Quality text box (see Figure 20-4). In the Modify Quality Setting dialog that appears, select your named channel from the pop-up menu. Use the sliders to set the minimum (applied to black areas of the mask) and maximum (applied to white areas of the mask) quality levels. The results of your settings can be seen in the Optimized Preview.

Figure 20-4. Weighted optimization for JPEGs using Photoshop 6
In ImageReady, you can create a new channel based on a selected image area on the fly when you click on the Channel button.
 |  |  |
| 20.5. Creating JPEGs |  | 21. PNG Format |

Copyright © 2002 O'Reilly & Associates. All rights reserved.