
 |  |
Chapter 6. Creating and Installing Packages
Contents:
Just because you can build all your applications from source doesn't mean that you should. Linux users are spoiled by the wealth of applications that they can download as Red Hat or Debian packages. FreeBSD users have the best of both worlds (packaged software and building from source) through the vast number of applications in /usr/ports. Mac OS X users can tap into this wealth of applications through the Fink and GNU-Darwin projects.
However, if you go through the trouble of building applications from source, you might want to package the resulting binaries for distribution so others can install the package, you can reinstall it at a later time without needing to rebuild it from source, or you can install it on multiple machines. Mac OS X is quite rich in the number of options available for packaging.
This chapter covers the Fink and GNU-Darwin distributions, as well as the packaging tools that come with Mac OS X's Developer Tools, and shows you how to package your application for distribution.
6.1. Fink
Christoph Pfisterer[7] started the Fink project in December 2000. A number of other people continued the project after Pfisterer left it in 2002.
[7]Pfisterer named the project Fink, the German word for finch, while thinking about Charles Darwin's study of finches on the Galapagos Islands.
Fink is essentially a port of the Debian Advanced Package Tool (APT), with some frontends and its own centralized collection site, which stores packaged binaries, source code, and patches needed to build software on Mac OS X. The Fink package manager allows you to install a package, choosing whether to install it from source or a binary package. Consistent with Debian, binary package files are in the dpkg format with a .deb extension and are managed with the ported Debian tools dpkg and apt-get.
Fink also provides new tools that create a .deb package from source. A database of installed software is maintained that identifies packages by the combination of name, version, and revision. Moreover, Fink understands dependencies, uses CVS to propagate software updates, supports uninstallation, and makes it easy to see available packages and installed packages. Fink can be used to install XFree86, as well as several hundred other popular Unix packages. If you already have a copy of XFree86 installed, Fink recognizes and supports it.
TIP: Although Fink does not manage Mac OS X packages, it does require Mac OS X Developer Tools.
Fink installs itself and all of its packages, with the exception of XFree86, in a directory named /sw, thus completely separating it from the main system directory /usr. A more traditional Unix practice is to place locally installed software in /usr/local. Installing software in /sw takes the usual practice one step further and is regarded as a safer policy. If problems occur with Fink-installed packages, you can then delete the entire /sw directory tree without affecting your system.
You can install Fink from binary or source. Both methods of installation are simple. The binary installation involves the following steps:
-
Download the binary installer disk image (a .dmg file) from http://fink.sourceforge.net/download.
-
In the Finder, double-click the .dmg file to mount the disk image.
-
Open the mounted disk image and double-click the Fink Installer .pkg package inside.
-
Follow the instructions on the screen.
To install Fink from source, perform the following steps.
-
Download the source tarball from http://fink.sourceforge.net/download/srcdist.php to a temporary directory using the command line. For example:
cd /tmp
curl -O http://prdownloads.sourceforge.net/fink/fink-0.4.0a-full.tar.gz
WARNING: Do not use StuffIt to unpack the tarball, as it will corrupt some files; you should unpack the tarball from the command line. Also, check the Fink site for the latest release.
-
Issue the command gnutar -xzf fink-0.4.0a-full.tar.gz. This creates a directory with the same name as the archive, e.g., fink-0.4.0a-full/.
-
Change into that directory and run the bootstrap script:
cd fink-0.4.0a-full
./bootstrap.sh
-
Follow the instructions on the screen.
To begin using Fink, you need to set up your PATH and some environment variables. Fink provides shell scripts to help with this. If you are using tcsh or csh, you can execute this command before using Fink applications (or add it to your .cshrc or .tcshrc file, depending on which one you have):
source /sw/bin/init.csh
If you are using sh, zsh, ksh, or bash, you can run this command (or add it to your .profile or .bash_profile file):
. /sw/bin/init.sh
Use the following command to perform additional post-install configuration (you will be prompted for your password):
fink scanpackages
Fink can later be updated by entering the commands:
fink selfupdate
fink update-all
The first command updates Fink itself, including the list and descriptions of available packages, while the second command updates any installed packages. Once Fink has been installed, you can see what packages are available by entering the command fink list.
You can download and install binaries via dselect (shown in Figure 6-1), a console-based frontend to dpkg. To use dselect, you need to have superuser (or administrator) privileges, so you'll need to run sudo dselect in the Terminal. Once dselect has started, you can use the following options to maintain, install, and uninstall packages:
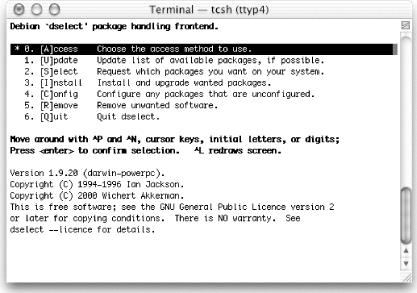
Figure 6-1. The dselect program's main menu
- [A]ccess
- Chooses the access method to use. Configures the network access method to use.
- [U]pdate
- Downloads the list of available packages from the Fink site. This option is equivalent to running apt-get update. Table 6-1 lists the apt-get and dpkg command-line options.
Table 6-1. Some apt-get and dpkg commands
|
Command |
Description |
|---|---|
|
apt-get update |
Updates list of available packages. Do this first. |
|
apt-get install foo |
Downloads and installs package foo. |
|
apt-get remove foo |
Deletes package foo. |
|
dpkg --list |
Lists all installed packages. |
|
dpkg --listfiles foo |
Lists all the files from package foo. |
|
dpkg --install foo |
Installs package foo. |
|
dpkg --remove foo |
Deletes package foo. Leaves configuration files. |
|
dpkg --purge foo |
Deletes foo and configuration files. |
|
dpkg -S /path/to/file |
Tells you which package owns a file. |
TIP: You must run [U]pdate at least once after installing Fink.
- [S]elect
- Requests the packages you want on your system. Displays the actual package listing, which is used to select and deselect the packages you want on your system.
- [I]nstall
- Installs, upgrades, and configures selected packages. Also removes deselected packages.
- [C]onfig
- Configures any packages that are unconfigured. Not actually needed, since [I]nstall does this after you've installed a package.
- [R]emove
- Removes unwanted software. Not actually needed, since [I]nstall will do this.
- [Q]uit
- Quits deselect.
The fink command is used from the command line to maintain, install, and uninstall packages. Table 6-2 lists some examples of its usage.
Table 6-2. Various fink commands
|
Command |
Description |
|---|---|
|
fink selfupdate |
Updates Fink along with package list. Do this first. |
|
fink update-all |
Updates all installed packages. |
|
fink install foo |
Downloads source, then builds and installs Debian package foo. |
|
fink reinstall foo |
Reinstalls foo using dpkg. |
|
fink describe foo |
Describes package foo. |
|
fink list |
Lists available packages. "i" is placed next to installed packages. |
|
fink build foo |
Downloads and builds Debian package foo. No installation is performed. |
|
fink rebuild foo |
Downloads and rebuilds Debian package foo. Installation is performed. |
|
fink --remove foo |
Deletes package foo, ignoring dependencies. Use apt-get remove instead. |
Using Fink, you can mix binary and source installations. That is, you can install some packages from their precompiled .deb files and others from source. If you do this, you will need to first use apt-get to update the available binaries and subsequently use fink selfupdate, followed by fink update-all, to update packages installed from source.
|  | |
| 5.7. Interesting and Important Libraries |  | 6.2. Creating Fink Packages |

Copyright © 2003 O'Reilly & Associates. All rights reserved.