|
|
CVS is client/server software that runs on Unix and Linux platforms. When you install CVS on a Unix/Linux server, you automatically get both server and client software. To access CVS across the network from any Unix/Linux machine, simply install CVS on the machine in question. The server and client software are one and the same.
CVS is available from http://www.cvsgui.org. It is also available as an installation package from many GNU/Linux distributions, including Debian, Red Hat, and SuSE.
If you prefer GUI clients, I recommend a visit to http://www.wincvs.org. There you'll find gCVS, WinCVS, and MacCVS, which are GUI clients for Unix and GNU/Linux, Windows, and Macintosh (pre-OS X), respectively.
|
A Windows-compatible CVS server is available at http://www.cvsnt.org. This server is not identical with the Unix server, but the differences are clearly listed in the FAQ and an installation guide is available on the web site.
If you plan to use the Secure Shell (SSH) protocol to establish secure connections between CVS clients and CVS servers, you'll need to install compatible versions of SSH on your client and server machines. For clients, you may need to find a version of SSH that can be used from the command line. See Section 2.4 for more information on this topic.
The OpenSSH web site (http://www.openssh.com) is a good starting point for information on SSH and SSH clients. You may also want to read SSH, The Secure Shell: The Definitive Guide (O'Reilly) by Daniel J. Barrett, Ph.D. and Richard Silverman. For more than you ever wanted to know, check the SSH FAQ at http://www.employees.org/~satch/ssh/faq/. The Google list of SSH documentation is at http://directory.google.com/Top/Computers/Security/Products_and_Tools/Cryptography/SSH/Documentation/.
Most Unix and Linux systems have an SSH client installed as part of the standard set of programs. Mac OS X also has an SSH client preinstalled. If it is not installed automatically, an SSH client is usually available in your distribution as an optional program.
The web site for MacCVS has a useful article on SSH for Macintosh users at http://www.heilancoo.net/MacCVSClient/MacCVSClientDoc/ssh.html. The instructions are useful regardless of which Macintosh CVS client you use.
To find an SSH client for Windows, I usually start from OpenSSH's web site on Windows and Macintosh clients (http://www.openssh.com/windows.html).
If you are running Unix or Linux, you may already have CVS installed. If it's installed and in your path, typing cvs at the command line produces the results shown in Example 2-1.
$ cvs
Usage: cvs [cvs-options] command [command-options-and-arguments]
 where cvs-options are -q, -n, etc.
  (specify --help-options for a list of options)
 where command is add, admin, etc.
  (specify --help-commands for a list of commands
   or --help-synonyms for a list of command synonyms)
 where command-options-and-arguments depend on the specific command
  (specify -H followed by a command name for command-specific help)
 Specify --help to receive this message

The Concurrent Versions System (CVS) is a tool for version control.
For CVS updates and additional information, see
  the CVS home page at http://www.cvshome.org/ or
  Pascal Molli's CVS site at http://www.loria.fr/~molli/cvs-index.html
If you already have CVS installed, you can skip this section and jump ahead to Section 2.2.
To install CVS on Unix, you typically download the source code and compile it on your system. This approach works with Linux too, but many Linux distributions also provide you with the option of installing precompiled CVS binaries. You'll find CVS installation instructions for various Linux distributions following the next section on installing from source.
Download the compressed .tar file from http://www.cvshome.org. Decompress and unarchive the file. If you intend to keep the source after you compile it, unzip the compressed .tar file into /usr/src/cvs. Otherwise, you can decompress and unarchive it into /tmp. Next, cd into the cvs directory, read the INSTALL and README files, and run the commands there. I recommend that novice users disable automake and autoconf.
|
Example 2-2 shows a sample installation from source. In this example, I decompress and unarchive the .tar file into /tmp and change directory into the top level of the resulting source tree. I then disable automake and autoconf using the noautomake script provided with CVS, as described in the INSTALL file. The next steps described in INSTALL for CVS 1.11.5 are to run the configure script provided and then, if that exits successfully, run make, switch to the root user, and run make install.
/tmp$ ls
cvs-1.11.5.tar.gz
/tmp$ gunzip cvs-1.11.5.tar.gz
/tmp$ tar -xpf cvs-1.11.5.tar
/tmp$ cd cvs-1.11.5
/tmp/cvs-1.11.5$ ./noautomake.sh --noautoconf
/tmp/cvs-1.11.5$ ./configure
creating cache ./config.cache
checking for a BSD compatible install... /usr/bin/install -c
.
.
.
creating config.h
config.status: executing depfiles commands
/tmp/cvs-1.11.5$ make
make  all-recursive
make[1]: Entering directory `/tmp/cvs-1.11.5'
.
.
.
make[2]: Leaving directory `/tmp/cvs-1.11.5'
make[1]: Leaving directory `/tmp/cvs-1.11.5'
/tmp/cvs-1.11.5$ su root
Password:
/tmp/cvs-1.11.5$ make install
Making install in lib
make[1]: Entering directory `/tmp/cvs-1.11.5/lib'
.
.
.
make[2]: Leaving directory `/tmp/cvs-1.11.5'
make[1]: Leaving directory `/tmp/cvs-1.11.5'
/tmp/cvs-1.11.5$
apt is the package manager used in Debian Linux and distributions based on Debian. Ensure that your apt source list is set up, and run apt-get update before installing CVS. The CVS package is called cvs, so the installation command is:
apt-get install cvs
Example 2-3 shows a sample apt installation, omitting most of the results of the apt-get update command.
$ apt-get update
.
.
.
Reading Package Lists... Done
Building Dependency Tree... Done
$ apt-get install cvs
Reading Package Lists... Done
Building Dependency Tree... Done
The following NEW packages will be installed:
  cvs
0 packages upgraded, 1 newly installed, 0 to remove and 10  not upgraded.
Need to get 0B/1085kB of archives. After unpacking 2626kB will be used.
Reading changelogs... Done
Preconfiguring packages ...
Selecting previously deselected package cvs.
(Reading database ... 39545 files and directories currently installed.)
Unpacking cvs (from .../cvs_1.11.1p1debian-8_i386.deb) ...
Setting up cvs (1.11.1p1debian-8) ...
rpm is the package manager used by Red Hat Linux. CVS is on the second CD-ROM of the Red Hat 7.3 distribution. These instructions assume that the CD is inserted and mounted or the package is available to the package manager some other way.
If you are using rpm from the command line, check your CD for the name of the CVS package. It will be in the format cvs-version.rpm. To install CVS, use the command:
rpm -Uh cvs-version.rpm
If the command is successful, there will be no output. If you prefer progress bars, add -v (for verbose) to the arguments. Example 2-4 shows a command-line installation in verbose mode.
$ rpm -Uvh cvs-1.11.1p1-7.i386.rpm
Preparing...            ############################### [100%]
1:cvs                   ############################### [100%]
If you are running Gnome, you will probably use GnoRPM:
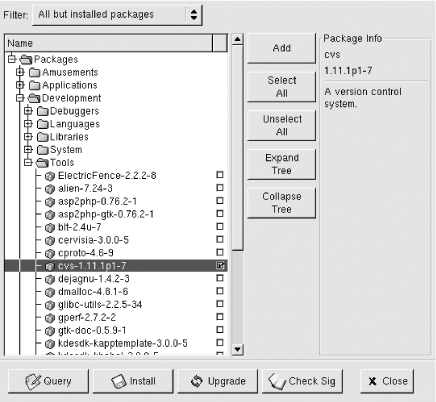
Select Install. This opens a new window and loads the packages from the CD-ROM.
Open the Packages folder, then the Development and Tools subfolders.
Select the cvs-version package (currently cvs-1.11.1p1-7).
Click on Install.
Figure 2-1 shows a GnoRPM example.
If you are running KDE, you will probably use KPackage:
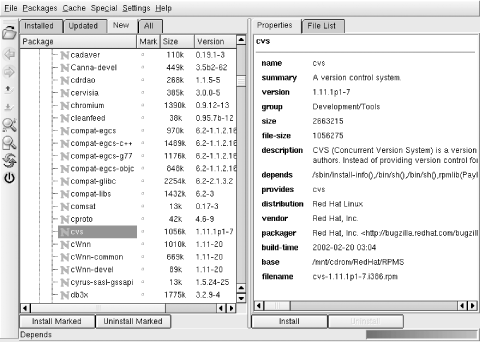
Select the New tab. The packages should load from the CD-ROM.
Find and select the cvs package.
Click on Install. A new window opens; click on Install in that window to confirm the installation.
Figure 2-2 shows a KPackage example.
yast is the package manager used in SuSE Linux. CVS is on the second CD-ROM of SuSE 7.3, but in later versions of SuSE it may be on a different CD-ROM or in a different group than in the following list. Put the CD-ROM in the drive; then run the YaST2 control center:
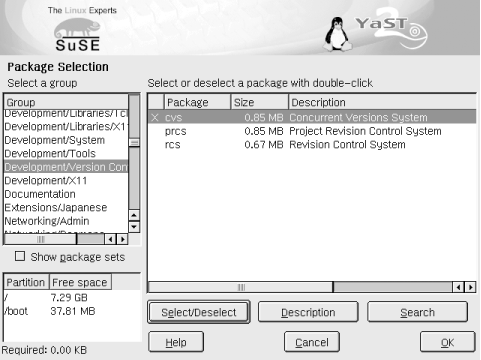
Select Software and open Install/Remove software.
Select the group Development/Version Control.
Select cvs and click OK.
If the CD-ROM is not in the drive and mounted, YaST2 will ask for it.
Figure 2-3 shows an example of a YaST2 installation.
|
|
| Top |
