Chapter 36. CList Widget
Inheritance Hierarchy
The CList widget has replaced the List widget (which is still available).
The CList widget is a multi-column list widget that is capable of handling literally thousands of rows of information. Each column can optionally have a title, which itself is optionally active, allowing us to bind a function to its selection.
Creating a CList is quite straightforward, once you have learned about widgets in general. It provides the almost standard two ways: the hard way, and the easy way. But before we create it, there is one thing we should figure out beforehand: how many columns should it have?
Not all columns have to be visible and can be used to store data
that is related to a certain cell in the list.
$clist = new Gtk::CList( $columns );
$clist = new_with_titles Gtk::CList( @titles );
The first form is very straightforward, the second might require
some explanation. Each column can have a title associated with
it, and this title can be a label or a button that reacts when
we click on it. If we use the second form, we provide a list of
title texts, and the number of elements in the list becomes the
number of columns in the CList. Of course we can always use the
first form, and manually add titles later.
Note: The CList widget does not have its own scrollbars and should be placed within a ScrolledWindow widget if your require this functionality. This is a change from the GTK 1.0 implementation.
There are several attributes that can be used to alter the
behaviour of a CList. First there is:
$clist->set_selection_mode( $mode );
which, as the name implies, sets the selection mode of the
CList. The argument specifies the cell selection mode (they are
defined in Gtk's C header fill gtkenums.h). At the time of this
writing, the following modes are available to us:
-
'single' - The selection is either empty or contains a single selected item.
-
'browse' - The selection is empty if the list contains no widgets or insensitive ones only, otherwise it contains one list item.
-
'multiple' - The selection is empty if no list items are selected or a list of selected items. This is currently the default for the CList widget.
-
'extended' - Any number of elements may be selected. Click-drag selects a range of elements. The Ctrl key may be used to enlarge the selection, and Shift key to select between the focus and the child pointed to.
We can also define what the border of the CList widget should
look like. It is done through:
$clist->set_shadow_type( $border );
'none'
The possible values for
$border are:
'in'
'out'
'etched_in'
'etched_out'
When you create a CList widget, you will also get a set of title
buttons automatically. They live in the top of the CList window,
and can act either as normal buttons that respond to being
pressed, or they can be passive, in which case they are nothing
more than a title. There are four different calls that aid us in
setting the status of the title buttons.
$clist->column_title_active( $column );
$clist->column_title_passive( $column );
$clist->column_titles_active();
$clist->column_titles_passive();
An active title is one which acts as a normal button, a passive
one is just a label. The first two calls above will
activate/deactivate the title button above the specific column,
while the last two calls activate/deactivate all title buttons in
the supplied clist widget.
But of course there are those cases when we don't want them at
all, and so they can be hidden and shown at will using the
following two calls.
$clist->column_titles_show();
$clist->column_titles_hide();
For titles to be really useful we need a mechanism to set and
change them, and this is done using
$clist->set_column_title( $column, $title );
$clist->set_column_widget( $column, $widget );
Note that only the title of one column can be set at a time, so
if all the titles are known from the beginning, then I really
suggest using
new_with_titles Gtk::CList()
(as described above) to set them. It saves you coding time, and
makes your program smaller. There are some cases where getting
the job done the manual way is better, and that's when not all
titles will be text. CList provides us with title buttons that
can in fact incorporate whole widgets, for example a
pixmap
.
It's all done through
which should require no special explanation.
It is possible to change the justification for a column, and it is
done through
$clist->set_column_justification( $column, $justification );
where the
$justification
can take the following values:
-
'left' - The text in the column will begin from the left edge.
-
'right' - The text in the column will begin from the right edge.
-
'center' - The text is placed in the center of the column.
-
'fill' - The text will use up all available space in the column. It is normally done by inserting extra blank spaces between words (or between individual letters if it's a single word). Much in the same way as any ordinary WYSIWYG text editor.
The next function is a very important one, and should be
standard in the setup of all CList widgets. When the list is
created, the width of the various columns are chosen to match
their titles, and since this is seldom the right width we have
to set it using:
$clist->set_column_width( $column, $width );
$clist->set_row_height( $height );
Note that the width is given in pixels and not letters. The same
goes for the height of the cells in the columns, but as the
default value is the height of the current font this isn't as
critical to the application. Still, it is done through:
Again, note that the height is given in pixels.
We can also move the list around without user interaction,
however, it does require that we know what we are looking
for. Or in other words, we need the row and column of the item
we want to scroll to.
$clist->moveto( $row, $column, $row_align, $col_align );
$row_align
is pretty important to understand. It's a value between 0.0 and
1.0, where 0.0 means that we should scroll the list so the row
appears at the top, while if the value of row_align is 1.0, the
row will appear at the bottom instead. All other values between
0.0 and 1.0 are also valid and will place the row between the
top and the bottom. The last argument,
$col_align
works in the same way, though 0.0 marks left and 1.0 marks right
instead.
Depending on the application's needs, we don't have to scroll to
an item that is already visible to us. So how do we know if it is
visible? As usual, there is a function to find that out as well.
$clist->row_is_visible( $row );
'none'
The return value is is one of the following:
Note that it will only tell us if a row is visible. Currently
there is no way to determine this for a column. We can get
partial information though, because if the return is
'partial',
then some of it is hidden, but we don't know if it is the row
that is being cut by the lower edge of the listbox, or if the
row has columns that are outside.
'partial'
'full'
We can also change both the foreground and background colors of
a particular row. This is useful for marking the row selected by
the user, and the two functions that is used to do it are
$clist->set_foreground( $row, $color );
$clist->set_background( $row, $color );
The colors must have been previously allocated.
We can add rows in three ways. They can be prepended or appended
to the list using:
$clist->prepend( @text );
$clist->append( @text );
$clist->insert( $row, @text );
The return value of these two functions indicate the index of
the row that was just added. We can insert a row at a given
place using:
In these calls we have to provide a list of the texts we want to put in the columns. The number of texts should equal the number of columns in the list. If the list of text argument is empty, then there will be no text in the columns of the row. This is useful, for example, if we want to add pixmaps instead (something that has to be done manually).
Also remember that the numbering of both rows and columns start at 0.
To remove an individual row we use:
$clist->remove( $row );
There is also a call that removes all rows in the list. This is
a lot faster than calling gtk_clist_remove once for each row,
which is the only alternative. To do this we use:
$clist->clear();
There are also two convenience functions that should be used
when a lot of changes have to be made to the list. This is to
prevent the list flickering while being repeatedly updated,
which may be highly annoying to the user. So instead it is a
good idea to freeze the list, do the updates to it, and finally
thaw it which causes the list to be updated on the screen.
$clist->freeze();
$clist->thaw();
A cell can contain a
pixmap
,
text or both. To set them the following functions are used.
$clist->set_text( $row, $column, $text );
$clist->set_pixmap( $row, $column, $pixmap, $mask );
$clist->set_pixtext( $row, $column, $text, $spacing, $pixmap, $mask );
It's quite straightforward. All the calls have the row and
column of the cell, followed by the data to be set. The
$spacing
argument in
set_pixtext()
is the number of pixels between the pixmap and the beginning of
the text. In all cases the data is copied into the widget.
To read back the data, we instead use:
$text = $clist->get_text( $row, $column );
( $pixmap, $mask ) = $clist->get_pixmap( $row, $column );
( $text, $spacing, $pixmap, $mask ) = $clist->get_pixtext( $row, $column );
The returned values are all references to the data stored within
the widget, so the referenced data should not be modified.
There is one more call that is related to what's inside a cell in
the clist, and that's:
$clist->get_cell_type( $row, $column );
'empty'
which returns the type of data in a cell. The return value is one
of:
'text'
'pixmap'
'pixtext'
'widget'
There is also a function that will let us set the indentation,
both vertical and horizontal, of a cell. The indentation value
is given in pixels, and can be both positive and negative.
$clist->set_shift( $row, $column, $vertical, $horizontal );
There are also functions available that let us force the selection
or unselection of a row. These are
$clist->select_row( $row, $column );
$clist->unselect_row( $row, $column );
And also a function that will take x and y coordinates (for
example, from the mousepointer), and map that onto the list,
returning the corresponding row and column.
( $row, $column ) = $clist->get_selection_info( $x, $y );
When we detect something of interest (it might be movement of
the pointer, or a click somewhere in the list) we can read the
pointer coordinates and find out where in the list the pointer
is. Cumbersome? Luckily, there is a simpler way...
As with all other widgets, there are a few signals that can be used. The CList widget is derived from the Container widget, and so has all the same signals, but also adds the following:
-
'select_row' - This signal will send the following information, in order: the CList, the row, the column, and the event.
-
'unselect_row' - When the user unselects a row, this signal is activated. It sends the same information as the 'select_row' signal.
-
'click_column' - Sends a CList and a column.
So if we want to connect a callback to
'select_row',
the callback function would be declared like this:
sub select_row_callback
{
my ( $widget, $row, $column, $event, @data ) = @_;
}
The callback is connected as usual with:
$clist->signal_connect( "select_row", \&select_row_callback, @data );
36.1. A CList Example
#!/usr/bin/perl -w

use
Gtk
;
use
strict
;

set_locale Gtk;
init Gtk;


my
 $false = 0;

my
 $true = 1;


my
 $window;

my
 $vbox;

my
 $hbox;

my
 $scrolled_window;

my
 $clist;

my
 $button_add;

my
 $button_clear;

my
 $button_hide_show;


my
 $titles_visible = $true;

my
 @titles = ( "Ingredients", "Amount" );


# Create the window
$window = new Gtk::Window( "toplevel" );
$window->set_usize( 300, 150 );
$window->set_title( "CList Example" );
$window->signal_connect( "destroy",
sub
 { Gtk->
exit
( 0 ); } );

$vbox = new Gtk::VBox( $false, 5 );
$window->add( $vbox );
$vbox->border_width( 5 );
$vbox->show();

# Create a scrolled window to pack the CList widget into
$scrolled_window = new Gtk::ScrolledWindow( undef, undef );
$vbox->pack_start( $scrolled_window, $true, $true, 0 );
$scrolled_window->set_policy( 'automatic', 'always' );
$scrolled_window->show();

# Create the CList. For this example we use 2 columns
$clist = new_with_titles Gtk::CList( @titles );

# When a selection is made, we want to know about it. The callback
# used is selection_made, and its code can be found further down
$clist->signal_connect( "select_row", \&selection_made );

# It isn't necessary to shadow the border, but it looks nice :)
$clist->set_shadow_type( 'out' );

# What however is important, is that we set the column widths as
# they will never be right otherwise. Note that the columns are
# numbered from 0 and up (to 1 in this case).
$clist->set_column_width( 0, 150 );

# Add the CList widget to the vertical box and show it.
$scrolled_window->add( $clist );
$clist->show();

# Create the buttons and add them to the window.
$hbox = new Gtk::HBox( $false, 0 );
$vbox->pack_start( $hbox, $false, $true, 0 );
$hbox->show();

$button_add = new Gtk::Button( "Add List" );
$button_clear = new Gtk::Button( "Clear List" );
$button_hide_show = new Gtk::Button( "Hide/Show Titles" );

$hbox->pack_start( $button_add, $true, $true, 0 );
$hbox->pack_start( $button_clear, $true, $true, 0 );
$hbox->pack_start( $button_hide_show, $true, $true, 0 );

# Connect our callbacks to the three buttons
$button_add->signal_connect( "clicked", \&button_add_clicked, $clist );
$button_clear->signal_connect( "clicked",
sub
 { $clist->clear(); } );
$button_hide_show->signal_connect( "clicked", \&button_hide_show_clicked, $clist );

$button_add->show();
$button_clear->show();
$button_hide_show->show();

$window->show();
main Gtk;

exit
( 0 );


### Subroutines


# User clicked the "Add List" button.


sub

button_add_clicked

{

my
 ( $widget, $clist ) = @_;

   # Something silly to add to the list. 4 rows of 2 columns each.

my
 @drink = ( [ Milk    => "3 Oz" ],
		 [ Water   => "6 l"  ],
		 [ Carrots => "2"    ],
		 [ Snakes  => "55"   ] );

    # Here we do the actual adding of the text. It's done once for each row.

for

my
 $i ( 0..3 )
    {
       $clist->append( @{$drink[ $i ]} );
    }

   # For those who may not have understood the above, here is a brief
   # explanation.  @drink is a list of references to anonymouse lists
   # (references are scalars holding a memory address, similar to
   # pointers).  This is used because Perl doesn't directly support
   # two-dimensional arrays.  Because of this, $drink[$i] is not a
   # list, but a reference to one, so we must dereference it by
   # enclosing it like this: @{ reference } ( we use @ because it is a
   # reference to a list.  For further information on references, see
   # the perlref(1) man page, or chapter 4 of _Programming Perl_.


return
;
}


# The user clicked the "Hide/Show titles" button.


sub

button_hide_show_clicked

{

my
 ( $widget, $clist ) = @_;


if
 ( $titles_visible )
   {
      # Hide the titles and set the flag to 1
      $clist->column_titles_hide();
      $titles_visible++;
   }

else

   {
      # Show the titles and reset flag to 0
      $clist->column_titles_show();
      $titles_visible--;
   }
}


# If we come here, then the user has selected a row in the list.


sub

selection_made

{

my
 ( $clist, $row, $column, $event, @data ) = @_;


my
 $text;

   # Get the text that is stored in the selected row and column
   # which was clicked in. We will receive it as a pointer in the
   # argument text.
   $text = $clist->get_text( $row, $column );

   # Just prints some information about the selected row

print
( "You selected row $row.  More specifically, you clicked in\n" );

print
( "column $column, and the text in this cell is:\n" );

print
( "    $text\n\n" );


return
;
}


# END EXAMPLE PROGRAM
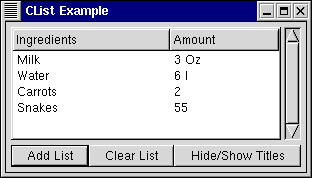
CList Example Screenshot