Jump to content United States-English
HP.com Home Products and Services Support and Drivers Solutions How to Buy
» Contact HP
More options
HP.com home
Managing Serviceguard Fifteenth Edition > Chapter 5 Building an HA Cluster Configuration

Configuring the Cluster

» 

Technical documentation

Complete book in PDF
» Feedback
Content starts here

 » Table of Contents

 » Index

This section describes how to define the basic cluster configuration. This must be done on a system that is not part of a Serviceguard cluster (that is, on which Serviceguard is installed but not configured).

NOTE: You can use Serviceguard Manager to configure a cluster: open the System Management Homepage (SMH) and choose Tools-> Serviceguard Manager. See “Using Serviceguard Manager” for more information.

To use Serviceguard commands to configure the cluster, follow directions in the remainder of this section.

Use the cmquerycl command to specify a set of nodes to be included in the cluster and to generate a template for the cluster configuration file.

IMPORTANT: See the entry for NODE_NAME under “Cluster Configuration Parameters ” for important information about restrictions on the node name.

Here is an example of the command (enter it all one line):

cmquerycl -v -C $SGCONF/clust1.config -n ftsys9 -n ftsys10 

This creates a template file, by default /etc/cmcluster/clust1.config. In this output file, keywords are separated from definitions by white space. Comments are permitted, and must be preceded by a pound sign (#) in the far left column.

NOTE: HP strongly recommends that you modify the file so as to send heartbeat over all possible networks.

The cmquerycl(1m) manpage further explains the parameters that appear in the template file. Many are also described in the “Planning” chapter. Modify your /etc/cmcluster/clust1.config file as needed.

cmquerycl Options

Speeding up the Process

In a larger or more complex cluster with many nodes, networks or disks, the cmquerycl command may take several minutes to complete. To speed up the configuration process, you can direct the command to return selected information only by using the -k and -w options:

-k eliminates some disk probing, and does not return information about potential cluster lock volume groups and lock physical volumes.

-w local lets you specify local network probing, in which LAN connectivity is verified between interfaces within each node only. This is the default when you use cmquerycl with the -C option.

(Do not use -w local if you need to discover nodes and subnets for a cross-subnet configuration; see “Full Network Probing” below.)

-w none skips network querying. If you have recently checked the networks, this option will save time.

Full Network Probing

-w full lets you specify full network probing, in which actual connectivity is verified among all LAN interfaces on all nodes in the cluster, whether or not they are all on the same subnet.

NOTE: This option must be used to discover actual or potential nodes and subnets in a cross-subnet configuration. See “Obtaining Cross-Subnet Information”.

Specifying a Lock Disk

A cluster lock disk, lock LUN, or quorum server, is required for two-node clusters. The lock must be accessible to all nodes and must be powered separately from the nodes. See “Cluster Lock” in Chapter 3 for additional information.

To create a lock disk, enter the lock disk information following the cluster name. The lock disk must be in an LVM volume group that is accessible to all the nodes in the cluster.

The default FIRST_CLUSTER_LOCK_VG and FIRST_CLUSTER_LOCK_PV supplied in the ASCII template created with cmquerycl are the volume group and physical volume name of a disk connected to all cluster nodes; if there is more than one, the disk is chosen on the basis of minimum failover time calculations. You should ensure that this disk meets your power wiring requirements. If necessary, choose a disk powered by a circuit which powers fewer than half the nodes in the cluster.

To display the failover times of disks, use the cmquerycl command, specifying all the nodes in the cluster. The output of the command lists the disks connected to each node together with the re-formation time associated with each.

Do not include the node’s entire domain name; for example, specify ftsys9, not ftsys9.cup.hp.com:


cmquerycl -v -n ftsys9 -n ftsys10

cmquerycl will not print out the re-formation time for a volume group that currently belongs to a cluster. If you want cmquerycl to print the re-formation time for a volume group, run vgchange -c n <vg name> to clear the cluster ID from the volume group. After you are done, do not forget to run vgchange -c y vgname to re-write the cluster ID back to the volume group; for example:

vgchange -c y /dev/vglock

NOTE: You should not configure a second lock volume group or physical volume unless your configuration specifically requires it. See the discussion “Dual Cluster Lock” in the section “Cluster Lock” in Chapter 3.

If your configuration requires you to configure a second cluster lock, enter the following parameters in the cluster configuration file:

SECOND_CLUSTER_LOCK_VG /dev/volume-group
SECOND_CLUSTER_LOCK_PV /dev/dsk/block-special-file

where the /dev/volume-group is the name of the second volume group and block-special-file is the physical volume name of a lock disk in the chosen volume group. These lines should be added for each node; for example:

SECOND_CLUSTER_LOCK_VG /dev/vglock
SECOND_CLUSTER_LOCK_PV /dev/dsk/c4t0d0

or (using agile addressing; see “About Device File Names (Device Special Files)”):

SECOND_CLUSTER_LOCK_VG /dev/vglock
SECOND_CLUSTER_LOCK_PV /dev/disk/disk100

See also “Choosing Cluster Lock Disks”.

Specifying a Lock LUN

A cluster lock disk, lock LUN, or quorum server, is required for two-node clusters. The lock must be accessible to all nodes and must be powered separately from the nodes. See “Cluster Lock” and “Setting Up a Lock LUN” for more information.

To specify a lock LUN in the cluster configuration file, enter the lock LUN information following each node name, for example:

NODE_NAME hasupt21 NETWORK_INTERFACE lan1 HEARTBEAT_IP 15.13.173.189 NETWORK_INTERFACE lan2 NETWORK_INTERFACE lan3 CLUSTER_LOCK_LUN /dev/dsk/c0t1d1

Specifying a Quorum Server

A cluster lock disk, lock LUN, or quorum server, is required for two-node clusters. To obtain a cluster configuration file that includes Quorum Server parameters, use the -q option of the cmquerycl command, specifying a Quorum Server host server, for example (all on one line):

cmquerycl -q <QS_Host> -n ftsys9 -n ftsys10 -C <ClusterName>.config

Enter the QS_HOST, QS_POLLING_INTERVAL and optionally a QS_TIMEOUT_EXTENSION.

To specify an alternate hostname or IP address by which the Quorum Server can be reached, use a command such as (all on one line):

cmquerycl -q <QS_Host> <QS_Addr> -n ftsys9 -n ftsys10 -C <ClusterName>.config

For detailed discussion of these parameters, see “Configuring Serviceguard to Use the Quorum Server” in the HP Serviceguard Quorum Server Version A.03.00 Release Notes, at http://www.docs.hp.com -> High Availability -> Quorum Server.

Obtaining Cross-Subnet Information

As of Serviceguard A.11.18 it is possible to configure multiple subnets, joined by a router, both for the cluster heartbeat and for data, with some nodes using one subnet and some another. See “Cross-Subnet Configurations” for rules and definitions.

You must use the -w full option to cmquerycl to discover the available subnets.

For example, assume that you are planning to configure four nodes, NodeA, NodeB, NodeC, and NodeD, into a cluster that uses the subnets 15.13.164.0, 15.13.172.0, 15.13.165.0, 15.13.182.0, 15.244.65.0, and 15.244.56.0.

The following command

cmquerycl -w full -n nodeA -n nodeB -n nodeB -n nodeC -n nodeD

will produce the output such as the following:

Node Names:    nodeA               nodeB               nodeC               nodeDBridged networks (full probing performed):1       lan3           (nodeA)        lan4           (nodeA)        lan3           (nodeB)        lan4           (nodeB)
 2       lan1           (nodeA)        lan1           (nodeB)
 3       lan2           (nodeA)        lan2           (nodeB)
 4       lan3           (nodeC)        lan4           (nodeC)        lan3           (nodeD)        lan4           (nodeD) 5       lan1           (nodeC)        lan1           (nodeD) 
6       lan2           (nodeC)        lan2           (nodeD) IP subnets: IPv4: 15.13.164.0         lan1      (nodeA)                    lan1      (nodeB) 
15.13.172.0         lan1     (nodeC)                    lan1     (nodeD) 
15.13.165.0         lan2      (nodeA)                    lan2      (nodeB) 
15.13.182.0         lan2      (nodeC)                    lan2      (nodeD) 
15.244.65.0         lan3      (nodeA)                    lan3      (nodeB) 
15.244.56.0         lan4      (nodeC)                    lan4      (nodeD) IPv6: 3ffe:1111::/64      lan3      (nodeA)                    lan3      (nodeB)        3ffe:2222::/64      lan3      (nodeC)                    lan3      (nodeD) Possible Heartbeat IPs: 15.13.164.0                       15.13.164.1         (nodeA)                                  15.13.164.2         (nodeB) 15.13.172.0                       15.13.172.158       (nodeC)                                  15.13.172.159       (nodeD) 15.13.165.0                       15.13.165.1         (nodeA)                                  15.13.165.2         (nodeB) 15.13.182.0                       15.13.182.158       (nodeC)                                  15.13.182.159       (nodeD)   Route connectivity(full probing performed): 1       15.13.164.0        15.13.172.0 2       15.13.165.0        15.13.182.0 3       15.244.65.0 4       15.244.56.0

In the Route connectivity section, the numbers on the left (1-4) identify which subnets are routed to each other (for example 15.13.164.0 and 15.13.172.0).

IMPORTANT: Note that in this example subnet 15.244.65.0, used by NodeA and NodeB, is not routed to 15.244.56.0, used by NodeC and NodeD.

But subnets 15.13.164.0 and 15.13.165.0, used by NodeA and NodeB, are routed respectively to subnets 15.13.172.0 and15.13.182.0, used by NodeC and NodeD. At least one such routing among all the nodes must exist for cmquerycl to succeed.

For information about configuring the heartbeat in a cross-subnet configuration, see the HEARTBEAT_IP parameter discussion under “Cluster Configuration Parameters” starting on “Cluster Configuration Parameters ”.

Identifying Heartbeat Subnets

The cluster configuration file includes entries for IP addresses on the heartbeat subnet. HP recommends that you use a dedicated heartbeat subnet, and configure heartbeat on other subnets as well, including the data subnet.

The heartbeat must be on an IPv4 subnet and must employ IPv4 addresses. An IPv6 heartbeat is not supported.

The heartbeat can comprise multiple subnets joined by a router. In this case at least two heartbeat paths must be configured for each cluster node. See also the discussion of HEARTBEAT_IP under “Cluster Configuration Parameters ” starting on “Cluster Configuration Parameters ”, and “Cross-Subnet Configurations”.

NOTE: If you are using CVM Version 3.5 disk groups, you can configure only a single heartbeat subnet, which should be a dedicated subnet. Each system on this subnet must have standby LANs configured, to ensure that there is a highly available heartbeat path.

Versions 4.1 and later allow multiple heartbeats, and require that you configure either multiple heartbeats or a single heartbeat with a standby.

Specifying Maximum Number of Configured Packages

This specifies the most packages that can be configured in the cluster.

The parameter value must be equal to or greater than the number of packages currently configured in the cluster. The count includes all types of packages: failover, multi-node, and system multi-node.

As of Serviceguard A.11.17, the default is 150, which is the maximum allowable number of packages in a cluster.

NOTE: Remember to tune HP-UX kernel parameters on each node to ensure that they are set high enough for the largest number of packages that will ever run concurrently on that node.

Modifying Cluster Timing Parameters

The cmquerycl command supplies default cluster timing parameters for HEARTBEAT_INTERVAL and NODE_TIMEOUT. Changing these parameters will directly affect the cluster’s reformation and failover times. It is useful to modify these parameters if the cluster is re-forming occasionally because of heavy system load or heavy network traffic; you can do this while the cluster is running.

The default value of 2 seconds for NODE_TIMEOUT leads to a best case failover time of 30 seconds. If NODE_TIMEOUT is changed to 10 seconds, which means that the cluster manager waits 5 times longer to timeout a node, the failover time is increased by 5, to approximately 150 seconds. NODE_TIMEOUT must be at least twice HEARTBEAT_INTERVAL. A good rule of thumb is to have at least two or three heartbeats within one NODE_TIMEOUT.

For more information about node timeouts, see “What Happens when a Node Times Out” and the HEARTBEAT_INTERVAL and NODE_TIMEOUT parameter discussions under “Cluster Configuration Parameters ” starting on “Cluster Configuration Parameters ”.

Optimization

Serviceguard Extension for Faster Failover (SGeFF) is a separately purchased product. If it is installed, the configuration file will display the parameter to enable it.

SGeFF reduces the time it takes Serviceguard to process a failover. It cannot, however, change the time it takes for packages and applications to gracefully shut down and restart.

SGeFF has requirements for cluster configuration, as outlined in the cluster configuration template file.

For more information, see the Serviceguard Extension for Faster Failover Release Notes posted on http://www.docs.hp.com -> High Availability.

See also Optimizing Failover Time in a Serviceguard Environment at http://www.docs.hp.com -> High Availability -> Serviceguard -> White Papers.

Controlling Access to the Cluster

Serviceguard access-control policies define cluster users’ administrative or monitoring capabilities.

A Note about Terminology

Although you will also sometimes see the term role-based access (RBA) in the output of Serviceguard commands, the preferred set of terms, always used in this manual, is as follows:

  • Access-control policies - the set of rules defining user access to the cluster.

  • Access roles - the set of roles that can be defined for cluster users (Monitor, Package Admin, Full Admin).

    • Access role - one of these roles (for example, Monitor).

How Access Roles Work

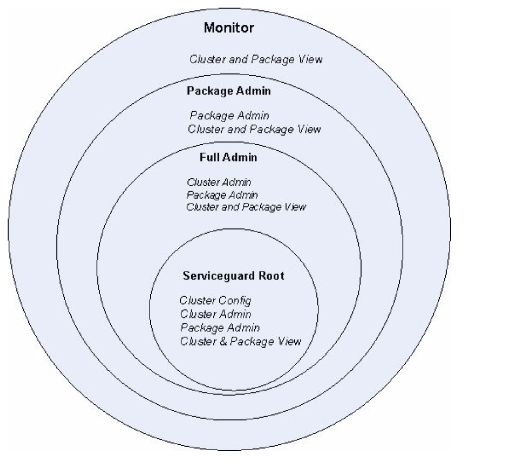
Serviceguard daemons grant access to Serviceguard commands by matching the command user’s hostname and username against the access control policies you define. Each user can execute only the commands allowed by his or her role.

The diagram that shows the access roles and their capabilities. The innermost circle is the most trusted; the outermost the least. Each role can perform its own functions and the functions in all of the circles outside it. For example Serviceguard Root can perform its own functions plus all the functions of Full Admin, Package Admin and Monitor; Full Admin can perform its own functions plus the functions of Package Admin and Monitor; and so on.

Figure 5-1 Access Roles

Access Roles

Levels of Access

Serviceguard recognizes two levels of access, root and non-root:

  • Root access: Full capabilities; only role allowed to configure the cluster.

    As Figure 5-1 “Access Roles” shows, users with root access have complete control over the configuration of the cluster and its packages. This is the only role allowed to use the cmcheckconf, cmapplyconf, cmdeleteconf, and cmmodnet -a commands.

    In order to exercise this Serviceguard role, you must log in as the HP-UX root user (superuser) on a node in the cluster you want to administer. Conversely, the HP-UX root user on any node in the cluster always has full Serviceguard root access privileges for that cluster; no additional Serviceguard configuration is needed to grant these privileges.

    IMPORTANT: Users on systems outside the cluster can gain Serviceguard root access privileges to configure the cluster only via a secure connection (rsh or ssh).
  • Non-root access: Other users can be assigned one of four roles:

    • Full Admin: Allowed to perform cluster administration, package administration, and cluster and package view operations.

      These users can administer the cluster, but cannot configure or create a cluster. Full Admin includes the privileges of the Package Admin role.

    • (all-packages) Package Admin: Allowed to perform package administration, and use cluster and package view commands.

      These users can run and halt any package in the cluster, and change its switching behavior, but cannot configure or create packages. Unlike single-package Package Admin, this role is defined in the cluster configuration file. Package Admin includes the cluster-wide privileges of the Monitor role.

    • (single-package) Package Admin: Allowed to perform package administration for a specified package, and use cluster and package view commands.

      These users can run and halt a specified package, and change its switching behavior, but cannot configure or create packages. This is the only access role defined in the package configuration file; the others are defined in the cluster configuration file. Single-package Package Admin also includes the cluster-wide privileges of the Monitor role.

    • Monitor: Allowed to perform cluster and package view operations.

      These users have read-only access to the cluster and its packages.

    IMPORTANT: A remote user (one who is not logged in to a node in the cluster, and is not connecting via rsh or ssh) can have only Monitor access to the cluster.

    (Full Admin and Package Admin can be configured for such a user, but this usage is deprecated and in a future release may cause cmapplyconf and cmcheckconf to fail. In Serviceguard A.11.18 configuring Full Admin or Package Admin for remote users gives them Monitor capabilities. See “Setting up Access-Control Policies” for more information.)

Setting up Access-Control Policies

The HP-UX root user on each cluster node is automatically granted the Serviceguard root access role on all nodes. (See “Configuring Root-Level Access” for more information.) Access-control policies define non-root roles for other cluster users.

NOTE: For more information and advice, see the white paper Securing Serviceguard at http://docs.hp.com -> High Availability -> Serviceguard -> White Papers.

Define access-control policies for a cluster in the cluster configuration file (see “Cluster Configuration Parameters ”), and for a specific package in the package configuration file (see user_name). You can define up to 200 access policies for each cluster. A root user can create or modify access control policies while the cluster is running.

NOTE: Once nodes are configured into a cluster, the access-control policies you set in the cluster and package configuration files govern cluster-wide security; changes to the “bootstrap” cmclnodelist file are ignored (see “Allowing Root Access to an Unconfigured Node”).

Access control policies are defined by three parameters in the configuration file:

  • Each USER_NAME can consist either of the literal ANY_USER, or a maximum of 8 login names from the /etc/passwd file on USER_HOST. The names must be separated by spaces or tabs, for example:

    # Policy 1:
    USER_NAME john fred patrick
    USER_HOST bit
    USER_ROLE PACKAGE_ADMIN

  • USER_HOST is the node where USER_NAME will issue Serviceguard commands.

    NOTE: The commands must be issued on USER_HOST but can take effect on other nodes; for example patrick can use bit’s command line to start a package on gryf.

    Choose one of these three values for USER_HOST:

    • ANY_SERVICEGUARD_NODE - any node on which Serviceguard is configured, and which is on a subnet with which nodes in this cluster can communicate (as reported by cmquerycl -w full).

      NOTE: If you set USER_HOST to ANY_SERVICEGUARD_NODE, set USER_ROLE to MONITOR; users connecting from outside the cluster cannot have any higher privileges (unless they are connecting via rsh or ssh; this is treated as a local connection).

      Depending on your network configuration, ANY_SERVICEGUARD_NODE can provide wide-ranging read-only access to the cluster.

    • CLUSTER_MEMBER_NODE - any node in the cluster

    • A specific node name - Use the hostname portion (the first of four parts) of a fully-qualified domain name that can be resolved by the name service you are using; it should also be in each node’s /etc/hosts. Do not use an IP addresses or the fully-qualified domain name. If there are multiple hostnames (aliases) for an IP address, one of those must match USER_HOST. See “Configuring Name Resolution” for more information.

  • USER_ROLE must be one of these three values:

    • MONITOR

    • FULL_ADMIN

    • PACKAGE_ADMIN

    MONITOR and FULL_ADMIN can be set only in the cluster configuration file and they apply to the entire cluster. PACKAGE_ADMIN can be set in the cluster configuration file or a package configuration file. If it is set in the cluster configuration file, PACKAGE_ADMIN applies to all configured packages; if it is set in a package configuration file, it applies to that package only. These roles are not exclusive; for example, you can configure more than one PACKAGE_ADMIN for the same package.

NOTE: You do not have to halt the cluster or package to configure or modify access control policies.

Here is an example of an access control policy:
USER_NAME john
USER_HOST bit
USER_ROLE PACKAGE_ADMIN

If this policy is defined in the cluster configuration file, it grants user john the PACKAGE_ADMIN role for any package on node bit. User john also has the MONITOR role for the entire cluster, because PACKAGE_ADMIN includes MONITOR.If the policy is defined in the package configuration file for PackageA, then user john on node bit has the PACKAGE_ADMIN role only for PackageA.

Plan the cluster’s roles and validate them as soon as possible. If your organization’s security policies allow it, you may find it easiest to create group logins. For example, you could create a MONITOR role for user operator1 from ANY_CLUSTER_NODE. Then you could give this login name and password to everyone who will need to monitor your clusters.

Role Conflicts

Do not configure different roles for the same user and host; Serviceguard treats this as a conflict and will fail with an error when applying the configuration. “Wildcards”, such as ANY_USER and ANY_SERVICEGUARD_NODE, are an exception: it is acceptable for ANY_USER and john to be given different roles.

IMPORTANT: Wildcards do not degrade higher-level roles that have been granted to individual members of the class specified by the wildcard. For example, you might set up the following policy to allow root users on remote systems access to the cluster:

USER_NAME root
USER_HOST ANY_SERVICEGUARD_NODE
USER_ROLE MONITOR

This does not reduce the access level of users who are logged in as root on nodes in this cluster; they will always have full Serviceguard root-access capabilities.

Consider what would happen if these entries were in the cluster configuration file:

# Policy 1:
USER_NAME john
USER_HOST bit
USER_ROLE PACKAGE_ADMIN

# Policy 2:
USER_NAME john
USER_HOST bit
USER_ROLE MONITOR

# Policy 3:
USER_NAME ANY_USER
USER_HOST ANY_SERVICEGUARD_NODE
USER_ROLE MONITOR

In the above example, the configuration would fail because user john is assigned two roles. (In any case, Policy 2 is unnecessary, because PACKAGE_ADMIN includes the role of MONITOR.)

Policy 3 does not conflict with any other policies, even though the wildcard ANY_USER includes the individual user john.

NOTE: Check spelling especially carefully when typing wildcards, such as ANY_USER and ANY_SERVICEGUARD_NODE. If they are misspelled, Serviceguard will assume they are specific users or nodes.

Package versus Cluster Roles

Package configuration will fail if there is any conflict in roles between the package configuration and the cluster configuration, so it is a good idea to have the cluster configuration file in front of you when you create roles for a package; use cmgetconf to get a listing of the cluster configuration file.

If a role is configured for a username/hostname in the cluster configuration file, do not specify a role for the same username/hostname in the package configuration file; and note that there is no point in assigning a package administration role to a user who is root on any node in the cluster; this user already has complete control over the administration of the cluster and its packages.

Adding Volume Groups

Add any LVM volume groups you have configured to the cluster configuration file, with a separate VOLUME_GROUP entry for each cluster-aware volume group that will be used in the cluster. These volume groups will be initialized with the cluster ID when the cmapplyconf command is used. In addition, you should add the appropriate volume group, logical volume and filesystem information to each package that activates a volume group; see vg on vg.

NOTE: If you are using CVM disk groups, they should be configured after cluster configuration is done, using the procedures described in “Creating the Storage Infrastructure and Filesystems with Veritas Cluster Volume Manager (CVM)”. Add CVM disk groups to the package configuration file; see cvm_dg on cvm_dg.

Verifying the Cluster Configuration

If you have edited a cluster configuration file using the command line, use the following command to verify the content of the file:

cmcheckconf -k -v -C /etc/cmcluster/clust1.config 

The following items are checked:

  • Network addresses and connections.

  • Cluster lock connectivity (if you are configuring a lock disk).

  • Validity of configuration parameters for the cluster and packages.

  • Uniqueness of names.

  • Existence and permission of scripts specified in the command line.

  • If all nodes specified are in the same heartbeat subnet.

  • If you specify the wrong configuration filename.

  • If all nodes can be accessed.

  • No more than one CLUSTER_NAME, HEARTBEAT_INTERVAL, and AUTO_START_TIMEOUT are specified.

  • The value for package run and halt script timeouts is less than 4294 seconds.

  • The value for NODE_TIMEOUT is at least twice the value of HEARTBEAT_INTERVAL.

  • The value for AUTO_START_TIMEOUT variables is >=0.

  • Heartbeat network minimum requirement is met. See the entry for HEARTBEAT_IP under “Cluster Configuration Parameters ” starting on “Cluster Configuration Parameters ”.

  • At least one NODE_NAME is specified.

  • Each node is connected to each heartbeat network.

  • All heartbeat networks are of the same type of LAN.

  • The network interface device files specified are valid LAN device files.

  • VOLUME_GROUP entries are not currently marked as cluster-aware.

  • (On systems that support CVM 3.5) there is only one heartbeat subnet configured if you are using CVM 3.5 disk storage.

If the cluster is online, the check also verifies that all the conditions for the specific change in configuration have been met.

NOTE: Using the -k option means that cmcheckconf only checks disk connectivity to the LVM disks that are identified in the ASCII file. Omitting the -k option (the default behavior) means that cmcheckconf tests the connectivity of all LVM disks on all nodes. Using -k can result in significantly faster operation of the command.

Distributing the Binary Configuration File

After specifying all cluster parameters, apply the configuration. This action distributes the binary configuration file to all the nodes in the cluster. HP recommends doing this separately before you configure packages (as described in the next chapter) so you can verify the cluster lock, heartbeat networks, and other cluster-level operations by using the cmviewcl command on the running cluster. Before distributing the configuration, ensure that your security files permit copying among the cluster nodes. See “Preparing Your Systems” at the beginning of this chapter.

Use the following steps to generate the binary configuration file and distribute the configuration to all nodes in the cluster:

  • Activate the cluster lock volume group so that the lock disk can be initialized:

    vgchange -a y /dev/vglock  
  • Generate the binary configuration file and distribute it:

    cmapplyconf -k -v -C /etc/cmcluster/clust1.config   

    or

    cmapplyconf -k -v -C /etc/cmcluster/clust1.ascii
    NOTE: Using the -k option means that cmapplyconf only checks disk connectivity to the LVM disks that are identified in the ASCII file. Omitting the -k option (the default behavior) means that cmapplyconf tests the connectivity of all LVM disks on all nodes. Using -k can result in significantly faster operation of the command.
  • Deactivate the cluster lock volume group.

    vgchange -a n /dev/vglock  

The cmapplyconf command creates a binary version of the cluster configuration file and distributes it to all nodes in the cluster. This action ensures that the contents of the file are consistent across all nodes. Note that the cmapplyconf command does not distribute the ASCII configuration file.

NOTE: The apply will not complete unless the cluster lock volume group is activated on exactly one node before applying. There is one exception to this rule: a cluster lock had been previously configured on the same physical volume and volume group.

After the configuration is applied, the cluster lock volume group must be deactivated.

Storing Volume Group and Cluster Lock Configuration Data

After configuring the cluster, create a backup copy of the LVM volume group configuration by using the vgcfgbackup command for each volume group you have created. If a disk in a volume group must be replaced, you can then restore the disk's metadata by using the vgcfgrestore command. The procedure is described under “Replacing Disks” in the “Troubleshooting” chapter.

Be sure to use vgcfgbackup for all volume groups, especially the cluster lock volume group.

NOTE: You must use the vgcfgbackup command to store a copy of the cluster lock disk's configuration data whether you created the volume group using the System Management Homepage (SMH), SAM, or HP-UX commands.

If the cluster lock disk ever needs to be replaced while the cluster is running, you must use the vgcfgrestore command to restore lock information to the replacement disk. Failure to do this might result in a failure of the entire cluster if all redundant copies of the lock disk have failed and if replacement mechanisms or LUNs have not had the lock configuration restored. (If the cluster lock disk is configured in a disk array, RAID protection provides a redundant copy of the cluster lock data. Mirrordisk/UX does not mirror cluster lock information.)

Creating a Storage Infrastructure with Veritas Cluster File System (CFS)

NOTE: Check the Serviceguard, SGeRAC, and SMS Compatibility and Feature Matrix and the latest Release Notes for your version of Serviceguard for up-to-date information about support for CFS (and CVM - Cluster Volume Manager) at http://www.docs.hp.com -> High Availability -> Serviceguard.

In addition to configuring the cluster, you create the appropriate logical volume infrastructure to provide access to data from different nodes. This is done with Logical Volume Manager (LVM), Veritas Volume Manager (VxVM), or Veritas Cluster Volume Manager (CVM). You can also use a mixture of volume types, depending on your needs. LVM and VxVM configuration are done before cluster configuration, and CVM configuration is done after cluster configuration.

This section has information about configuring a cluster that uses the Veritas cluster file system (CFS) with Veritas cluster volume manager (CVM) 4.1 and later. The next section (“Creating the Storage Infrastructure and Filesystems with Veritas Cluster Volume Manager (CVM)”) has information about configuring the Veritas Cluster Volume Manager (CVM) with other filesystems, not CFS. Both solutions use many of the same commands, but the processes are in a slightly different order. Another difference is that when you use CFS, Serviceguard creates packages to manage the disk groups and mount points so you do not activate CFS disk groups or CFS mount points in your application packages.

Refer to the Serviceguard man pages for more information about the commands cfscluster, cfsdgadm, cfsmntadm, cfsmount and cfsumount and cmgetpkgenv. Information is also in the documentation for HP Serviceguard Storage Management Suite posted at http:// docs.hp.com -> High Availability -> HP Serviceguard Storage Management Suite.

Preparing the Cluster and the System Multi-node Package

  1. First, be sure the cluster is running:

    cmviewcl

  2. If it is not, start it:

    cmruncl

  3. If you have not initialized your disk groups, or if you have an old install that needs to be re-initialized, use the vxinstall command to initialize VxVM/CVM disk groups. “Initializing the Veritas Volume Manager ”.

  4. The Veritas cluster volumes are managed by a Serviceguard-supplied system multi-node package which runs on all nodes at once, and cannot failover. In CVM 4.1 and later, which is required for the Cluster File System, Serviceguard supplies the SG-CFS-pkg template. (In CVM 3.5, Serviceguard supplies the VxVM-CVM-pkg template)

    The package for CVM 4.1 and later has the following responsibilities:

    • Maintain Veritas configuration files /etc/llttab, /etc/llthosts, /etc/gabtab

    • Launch required services: cmvxd, cmvxpingd, vxfsckd

    • Start/halt Veritas processes in the proper order: llt, gab, vxfen, odm, cvm, cfs

    NOTE: Do not edit system multi-node package configuration files, such as VxVM-CVM-pkg.conf and SG-CFS-pkg.conf. Create and modify configuration using the cfs admin commands listed in Appendix A.

    Activate the SG-CFS-pkg and start up CVM with the cfscluster command; this creates SG-CFS-pkg, and also starts it.

    This example, for the cluster file system, uses a timeout of 900 seconds; if your CFS cluster has many disk groups and/or disk LUNs visible to the cluster nodes, you may need to a longer timeout value. Use the -s option to start the CVM package in shared mode:

    cfscluster config -t 900 -s

  5. Verify the system multi-node package is running and CVM is up, using the cmviewcl or cfscluster command. Following is an example of using the cfscluster command. In the last line, you can see that CVM is up, and that the mount point is not yet configured:

    cfscluster status

    Node              :  ftsys9
    Cluster Manager   :  up
    CVM state         :  up (MASTER)
    MOUNT POINT   TYPE    SHARED VOLUME   DISK GROUP    STATUS

    Node              :  ftsys10
    Cluster Manager   :  up
    CVM state         :  up
    MOUNT POINT   TYPE    SHARED VOLUME   DISK GROUP    STATUS

NOTE: Because the CVM system multi-node package automatically starts up the Veritas processes, do not edit these files:
/etc/llthosts
/etc/llttab
/etc/gabtab

Creating the Disk Groups

Initialize the disk group from the master node.

  1. Find the master node using vxdctl or cfscluster status

  2. Initialize a new disk group, or import an existing disk group, in shared mode, using the vxdg command.

    • For a new disk group use the init option:
      vxdg -s init logdata c4t0d6

    • For an existing disk group, use the import option:
      vxdg -C -s import logdata

  3. Verify the disk group. The state should be enabled and shared: vxdg list

    NAME       STATE                     ID       
    logdata   enabled, shared, cds      11192287592.39.ftsys9

NOTE: If you want to create a cluster with CVM only - without CFS, stop here. Then, in your application package’s configuration file, add the dependency triplet, with DEPENDENCY_CONDITION set to SG-DG-pkg-id#=UP and DEPENDENCY_LOCATION set to SAME_NODE. For more information about these parameters, see “Package Parameter Explanations”.

Creating the Disk Group Cluster Packages

  1. Use the cfsdgadm command to create the package SG-CFS-DG-ID#, where ID# is an automatically incremented number, assigned by Serviceguard when it creates the package. In this example, the SG-CFS-DG-ID# package will be generated to control the disk group logdata, in shared write mode:
    cfsdgadm add logdata all=sw

  2. With Veritas CFS, you can verify the package creation with the cmviewcl command, or with the cfsdgadm display command. An example of cfsdgadm output is shown below:
    cfsdgadm display

    Node Name : ftsys9 (MASTER)
     DISK GROUP        ACTIVATION MODE
      logdata           off    (sw)

     Node Name :  ftsys10
      DISK GROUP       ACTIVATION MODE
       logdata          off    (sw)

  3. Activate the disk group and Start up the Package
    cfsdgadm activate logdata

  4. To verify, you can use cfsdgadm or cmviewcl This example shows the cfsdgadm output:
    cfsdgadm display -v logdata

    NODE NAME       ACTIVATION MODE
      ftsys9        sw (sw)
         MOUNT POINT        SHARED VOLUME     TYPE
      ftsys10       sw (sw)
          MOUNT POINT           SHARED VOLUME       TYPE

  5. To view the package name that is monitoring a disk group, use the cfsdgadm show_package command:
    cfsdgadm show_package logdata

    sg_cfs_dg-1

Creating Volumes

  1. Make log_files volume on the logdata disk group:
    vxassist -g logdata make log_files 1024m

  2. Use the vxprint command to verify:
    vxprint log_files

    disk group: logdata
    TY NAME      ASSOC      KSTATE     LENGTH    PLOFFS  STATE  TUTIL0   PUTIL0
    v  log_files    fsgen   ENABLED    1048576     -    ACTIVE   -       -
    pl log_files-01 fsgen   ENABLED    1048576     -    ACTIVE   -       -
    sd ct4t0d6-01   fsgen   ENABLED    1048576     -    ACTIVE   -       -

Creating a File System and Mount Point Package

CAUTION: Nested mounts are not supported: do not use a directory in a CFS file system as a mount point for a local file system or another cluster file system.

For other restrictions, see “Unsupported Features” in the “Technical Overview” section of the VERITAS Storage Foundation™ Cluster File System 4.1 HP Serviceguard Storage Management Suite Extracts at http://docs.hp.com -> High Availability -> HP Serviceguard Storage Management Suite.

  1. Create a filesystem:
    newfs -F vxfs /dev/vx/rdsk/logdata/log_files

    version 6 layout
    1-048576 sectors, 1048576 blocks of size 1024, log size 16384 blocks
    largefiles supported

  2. Create the cluster mount point:
    cfsmntadm add logdata log_files /tmp/logdata/log_files all=rw

    Package name “SG-CFS-MP-1” is generated to control the resource.

    You do not need to create the directory. The command creates one on each of the nodes, during the mount.

    CAUTION: Once you create the disk group and mount point packages, it is critical that you administer the cluster with the cfs commands, including cfsdgadm, cfsmntadm, cfsmount, and cfsumount. These non-cfs commands could cause conflicts with subsequent command operations on the file system or Serviceguard packages. Use of these other forms of mount will not create an appropriate multi-node package which means that the cluster packages are not aware of the file system changes.
    NOTE: The disk group and mount point multi-node packages do not monitor the health of the disk group and mount point. They check that the packages that depend on them have access to the disk groups and mount points. If the dependent application package loses access and cannot read and write to the disk, it will fail; however that will not cause the DG or MP multi-node package to fail.
  3. Verify with cmviewcl or cfsmntadm display. This example uses the cfsmntadm command:
    cfsmntadm display

    Cluster Configuration for Node: ftsys9
    MOUNT POINT             TYPE    SHARED VOLUME    DISK GROUP    STATUS
    /tmp/logdata/log_files  regular  log_files       logdata       NOT MOUNTED

    Cluster Configuration for Node: ftsys10
    MOUNT POINT             TYPE    SHARED VOLUME   DISK GROUP    STATUS
    /tmp/logdata/log_files  regular  log_files      logdata       NOT MOUNTED

  4. Mount the filesystem:
    cfsmount /tmp/logdata/log_files

    This starts up the multi-node package and mounts a cluster-wide filesystem.

  5. Verify that multi-node package is running and filesystem is mounted:
    cmviewcl

    CLUSTER   STATUS
    cfs_cluster   up
    NODE   STATUS   STATE
    ftsys9   up     running
    ftsys10  up     running

    MULTI_NODE_PACKAGES
    PACKAGE      STATUS     STATE     AUTO_RUN    SYSTEM
    SG-CFS-pkg   up         running    enabled     yes
    SG-CFS-DG-1  up         running    enabled     no
    SG-CFS-MP-1  up         running    enabled     no

    ftsys9/etc/cmcluster/cfs> bdf
    Filesystem                kbytes used avail  %used  Mounted on
    /dev/vx/dsk/logdata/log_files  10485 17338 966793   2%     tmp/logdata/log_files
    ftsys10/etc/cmcluster/cfs> bdf
    Filesystem                kbytes used avail  %used  Mounted on
    /dev/vx/dsk/logdata/log_files  10485 17338 966793   2%     tmp/logdata/log_files
  6. To view the package name that is monitoring a mount point, use the cfsmntadm show_package command:
    cfsmntadm show_package /tmp/logdata/log_files

    SG-CFS-MP-1

  7. After creating your mount point packages for the cluster file system, you can configure your application package to depend on the mount points. In the configuration file, specify the dependency triplet, setting dependency_condition to SG-mp-pkg-#=UP and dependency_location to SAME_NODE. For more information about these parameters, see “Package Parameter Explanations”.

    NOTE: Unlike LVM volume groups, CVM disk groups are not entered in the cluster configuration file; they are entered in the package configuration file only.

Creating Checkpoint and Snapshot Packages for CFS

The storage checkpoints and snapshots are two additional mount point package types. They can be associated with the cluster via the cfsmntadm(1m) command.

Mount Point Packages for Storage Checkpoints

The Veritas File System provides a unique storage checkpoint facility which quickly creates a persistent image of a filesystem at an exact point in time. Storage checkpoints significantly reduce I/O overhead by identifying and maintaining only the filesystem blocks that have changed since the last storage checkpoint or backup. This is done by a copy-on-write technique. Unlike a disk-based mirroring technology, which requires a separate storage space, this Veritas technology minimizes the use of disk space by creating a storage checkpoint within the same free space available to the filesystem.

For more information about the technique, see the Veritas File System Administrator’s Guide appropriate to your version of CFS, posted at http://docs.hp.com.

The following example illustrates how to create a storage checkpoint of the /cfs/mnt2 filesystem.

Start with a cluster-mounted file system.

  1. Create a checkpoint of /tmp/logdata/log_files named check2. It is recommended that the file system already be part of a mount point package that is mounted.

    cfsmntadm display

    Cluster Configuration for Node: ftsys9   MOUNT POINT              TYPE      SHARED VOLUME    DISK GROUP     STATUS
       /tmp/logdata/log_files   regular   log_files        logdata        MOUNTED

    Cluster Configuration for Node: ftsys10
       MOUNT POINT               TYPE     SHARED VOLUME    DISK GROUP     STATUS
       /tmp/logdata/log_files   regular   log_files        logdata        MOUNTED

    fsckptadm -n create check2 /tmp/logdata/log_files

  2. Associate it with the cluster and mount it.

    cfsmntadm add ckpt check2 /tmp/logdata/log_files \ /tmp/check_logfiles all=rw

    Package name "SG-CFS-CK-2" was generated to control the resource
    Mount point "/tmp/check_logfiles" was associated to the cluster

    cfsmount /tmp/check_logfiles

  3. Verify.
    cmviewcl

    CLUSTER      STATUS
    cfs-cluster up

       NODE         STATUS      STATE
       ftsys9       up          running
       ftsys10      up          running

    MULTI_NODE_PACKAGES

       PACKAGE STATUS STATE AUTO_RUN SYSTEM
       SG-CFS-pkg up running enabled yes
       SG-CFS-DG-1 up running enabled no
       SG-CFS-MP-1 up running enabled no
       SG-CFS-CK-1 up running disabled no

    /tmp/check_logfiles now contains a point in time view of /tmp/logdata/log_files, and it is persistent.

    bdf

    Filesystem          kbytes    used   avail %used Mounted on/dev/vg00/lvol3     544768  352240  180540   66% //dev/vg00/lvol1     307157   80196  196245   29% /stand/dev/vg00/lvol5    1101824  678124  398216   63% /var/dev/vg00/lvol7    2621440 1702848  861206   66% /usr/dev/vg00/lvol4       4096     707    3235   18% /tmp/dev/vg00/lvol6    2367488 1718101  608857   74% /opt/dev/vghome/varopt 4194304  258655 3689698    7% /var/opt/dev/vghome/home   2097152   17167 1949993    1% /home/tmp/logdata/log_files                    102400    1898   94228    2% /tmp/logdata/log_files/tmp/logdata/log_files:check2                    102400    1898   94228    2% /tmp/check_logfiles

Mount Point Packages for Snapshot Images

A snapshot is a frozen image of an active file system that does not change when the contents of target file system changes. On cluster file systems, snapshots can be created on any node in the cluster, and backup operations can be performed from that node. The snapshot of a cluster file system is accessible only on the node where it is created; the snapshot file system itself cannot be cluster mounted.

For details on creating snapshots on cluster file systems, see the Veritas Storage Foundation Cluster File System Installation and Administration Guide posted at http://docs.hp.com:.

The following example illustrates how to create a snapshot of the /tmp/logdata/log_files file system.

  1. Create local storage on which to place the snapshot.

    vxdg init dg1 c4t1d0
    vxassist -g dg1 make vol1 100m
    vxvol -g dg1 startall

  2. Associate it with the cluster.

    cfsmntadm add snapshot dev=/dev/vx/dsk/dg1/vol1 \ /tmp/logdata/log_files /local/snap1 ftsys9=ro

    Package name SG-CFS-SN-1 was generated to control the resource.
    Mount point /local/snap1 was associated to the cluster.

    cfsmount /local/snap1
    cmviewcl

    CLUSTER STATUS
    cfs-cluster up

       NODE STATUS STATE
       ftsys9       up           running
       ftsys10       up           running
    MULTI_NODE_PACKAGES

       PACKAGE STATUS STATE AUTO_RUN SYSTEM
       SG-CFS-pkg up running enabled yes
       SG-CFS-DG-1 up running enabled no
       SG-CFS-MP-1 up running enabled no
       SG-CFS-SN-1 up running disabled no

    The snapshot file system /local/snap1 is now mounted and provides a point in time view of /tmp/logdata/log_files.

    bdf

    Filesystem          kbytes    used   avail %used Mounted on
    /dev/vg00/lvol3 544768 352233 180547 66% /
    /dev/vg00/lvol1 307157 80196 196245 29% /stand
    /dev/vg00/lvol5 1101824 678426 397916 63% /var
    /dev/vg00/lvol7 2621440 1702848 861206 66% /usr
    /dev/vg00/lvol4 4096 707 3235 18% /tmp
    /dev/vg00/lvol6 2367488 1718101 608857 74% /opt
    /dev/vghome/varopt 4194304 258609 3689741 7% /var/opt
    /dev/vghome/home 2097152 17167 1949993 1% /home
    /dev/vx/dsk/logdata/log_files
                         102400 1765 94353 2% /tmp/logdata/log_files
    /dev/vx/dsk/dg1/vol1
                         102400 1765 94346 2% /local/snap1

Creating the Storage Infrastructure and Filesystems with Veritas Cluster Volume Manager (CVM)

NOTE: Check the Serviceguard, SGeRAC, and SMS Compatibility and Feature Matrix and the latest Release Notes for your version of Serviceguard for up-to-date information on support for CVM (and CFS - Cluster File System): http://www.docs.hp.com -> High Availability - > Serviceguard.

This section has information about configuring the Veritas Cluster Volume Manager without Veritas CFS (Cluster File System). The configuration may be needed to set up raw devices for Serviceguard Extension for RAC.

The previous section (“Creating a Storage Infrastructure with Veritas Cluster File System (CFS)”) has information about configuring a cluster with CFS.

Both solutions - with and without CFS - use many of the same commands, but the processes are in a slightly different order.

Before starting, make sure the directory in which VxVM commands are stored (/usr/lib/vxvm/bin) is in your path. Once you have created the root disk group with vxinstall, you can use VxVM commands or the Veritas Storage Administrator GUI, VEA, to carry out configuration tasks. Instructions for running vxinstall are in the Veritas Installation Guide for your version. For more information, refer to the Veritas Volume Manager Administrator’s Guide for your version.

Separate procedures are given below for:

  • Initializing the Volume Manager

  • Preparing the Cluster for Use with CVM

  • Creating Disk Groups for Shared Storage

  • Creating File Systems with CVM

For more information, including details about configuration of plexes (mirrors), multipathing, and RAID, refer to the HP-UX documentation for the Veritas Volume Manager. See the documents for HP Serviceguard Storage Management Suite posted at http://docs.hp.com.

Initializing the Veritas Volume Manager

If you are about to create disk groups for the first time, you need to initialize the Volume Manager.

Use the following command after installing VxVM/CVM on each node:

vxinstall

This displays a menu-driven program that steps you through the VxVM/CVM initialization sequence.

  • If you are using CVM 3.5, you must create a disk group known as rootdg that contains at least one disk. From the main menu, choose the “Custom” option, and specify the disk you wish to include in rootdg.

    IMPORTANT: The rootdg in version 3.5 of Veritas Volume Manager is not the same as the HP-UX root disk if an LVM volume group is used for the HP-UX root filesystem (/). Note also that rootdg cannot be used for shared storage. However, rootdg can be used for other local filesystems (e.g., /export/home), so it need not be wasted.

    Note that you should create a root disk group only once on each node.

  • CVM 4.1 and later do not require that you create the special Veritas rootdg disk.

Preparing the Cluster for Use with CVM

In order to use the Veritas Cluster Volume Manager (CVM), you need a cluster that is running with a Serviceguard-supplied CVM system multi-node package. This means that the cluster must already be configured and running before you create disk groups.

Configure system multi-node and multi-node packages using the command line, not Serviceguard Manager. Once configured, these cluster-wide packages’ properties have a special tab under Cluster Properties.

NOTE: Cluster configuration is described in the previous section, “Configuring the Cluster ”.

Check the heartbeat configuration. The CVM 3.5 heartbeat requirement is different from version 4.1 and later:

  • CVM 3.5 requires that you can configure only one heartbeat subnet.

  • CVM 4.1 and later versions require that the cluster have either multiple heartbeats or a single heartbeat with a standby.

Neither version can use Auto Port Aggregation, Infiniband, or VLAN interfaces as a heartbeat subnet.

The CVM cluster volumes are managed by a Serviceguard-supplied system multi-node package which runs on all nodes at once, and cannot fail over. For CVM 3.5, Serviceguard creates the VxVM-CVM-pkg. For CVM 4.1 and later, Serviceguard creates the SG-CFS-pkg.

The SG-CFS-pkg package has the following responsibilities:

  • Maintain Veritas configuration files /etc/llttab, /etc/llthosts, /etc/gabtab

  • Launch required services: cmvxd, cmvxpingd, vxfsckd

  • Start/halt Veritas process in the proper order: llt, gab, vxfen, odm, cvm, cfs

The following commands create the system multi-node package that communicates cluster information to CVM:

  • CVM 3.5:
    cmapplyconf -P /etc/cmcluster/cvm/VxVM-CVM-pkg.conf

  • CVM 4.1 and later: If you are not using Veritas Cluster File System, use the cmapplyconf command. (If you are using CFS, you will set up CVM as part of the CFS components.):

    cmapplyconf -P /etc/cmcluster/cfs/SG-CFS-pkg.conf

    Begin package verification ...
    Modify the package configuration ([y]/n)?  Y
    Completed the cluster update

You can confirm this using the cmviewcl command. This output shows results of the CVM 3.5 command above.

CLUSTER STATUS
example      up

NODE STATUS STATE
ftsys9       up running
ftsys10      up           running

MULTI_NODE_PACKAGES:

PACKAGE STATUS     STATE    AUTO_RUN   SYSTEM
VxVM-CVM-pkg  up        running  enabled     yes


NOTE: Do not edit system multi-node package configuration files, such as VxVM-CVM-pkg.conf and SG-CFS-pkg.conf. Create and modify configuration using the cfs admin commands listed in Appendix A.

Starting the Cluster and Identifying the Master Node

If it is not already running, start the cluster. This will automatically activate the special CVM package:

cmruncl

When CVM starts up, it selects a master node, and this is the node from which you must issue the disk group configuration commands. To determine the master node, issue the following command from each node in the cluster:

vxdctl -c mode

One node will identify itself as the master. Create disk groups from this node.

Initializing Disks for CVM

You need to initialize the physical disks that will be employed in CVM disk groups. If a physical disk has been previously used with LVM, you should use the pvremove command to delete the LVM header data from all the disks in the volume group (this is not necessary if you have not previously used the disk with LVM).

To initialize a disk for CVM, log on to the master node, then use the vxdiskadm program to initialize multiple disks, or use the vxdisksetup command to initialize one disk at a time, as in the following example:

/usr/lib/vxvm/bin/vxdisksetup -i c4t3d4

Creating Disk Groups

Use the following steps to create disk groups.

  1. Use the vxdg command to create disk groups. Use the -s option to specify shared mode, as in the following example:

    vxdg -s init logdata c0t3d2

  2. Verify the configuration with the following command:

    vxdg list

    NAME         STATE                  ID

    rootdg        enabled             971995699.1025.node1
    logdata       enabled,shared      972078742.1084.node2

  3. Activate the disk group, as follows, before creating volumes:

    vxdg -g logdata set activation=ew

Creating Volumes

Use the vxassist command to create volumes, as in the following example:

vxassist -g logdata make log_files 1024m

This command creates a 1024 MB volume named log_files in a disk group named logdata. The volume can be referenced with the block device file /dev/vx/dsk/logdata/log_files or the raw (character) device file /dev/vx/rdsk/logdata/log_files.

Verify the configuration with the following command:

vxdg list

If you are using CVM with CFS, use CFS commands to create file systems on the volumes you have created; see “Creating a Storage Infrastructure with Veritas Cluster File System (CFS)”.

Mirror Detachment Policies with CVM

The default CVM disk mirror detachment policy is global, which means that as soon as one node cannot see a specific mirror copy (plex), all nodes cannot see it as well. The alternate policy is local, which means that if one node cannot see a specific mirror copy, then CVM will deactivate access to the volume for that node only.

The global policy is recommended, because it ensures all nodes are accessing the same current data. If you use local, it can cause problems if one node cannot update one of the mirror copies and the data on that copy goes stale. If any of the other nodes read from that mirror copy, they will read stale data. This can be avoided with the global option, because all nodes will only use the current mirror copy, so they will all read consistent data.

This policy can be re-set on a disk group basis by using the vxedit command, as follows:

vxedit set diskdetpolicy=[global|local] <DiskGroupName>

NOTE: The specific commands for creating mirrored and multi-path storage using CVM are described in the HP-UX documentation for the Veritas Volume Manager, posted at http://docs.hp.com.

Adding Disk Groups to the Package Configuration

After creating units of storage with VxVM commands, you need to specify the CVM disk groups in each package configuration ASCII file. Use one DISK_GROUP parameter for each disk group the package will use. You also need to identify the CVM disk groups, filesystems, logical volumes, and mount options in the package control script. The package configuration process is described in detail in Chapter 6.

Using DSAU during Configuration

You can use DSAU to centralize and simplify configuration and monitoring tasks. See “What are the Distributed Systems Administration Utilities?”.

Printable version
Privacy statement Using this site means you accept its terms Feedback to webmaster
© Hewlett-Packard Development Company, L.P.