Jump to content United States-English
HP.com Home Products and Services Support and Drivers Solutions How to Buy
» Contact HP
More options
HP.com home
Software Distributor Administration Guide: HP-UX 11i v1, 11i v2, and 11i v3 > Chapter 6 Using Jobs and the Job Browser

Using the Job Browser

» 

Technical documentation

Complete book in PDF
» Feedback
Content starts here

 » Table of Contents

 » Glossary

 » Index

Figure 6-1 The SD Job Browser Window

The SD Job Browser Window

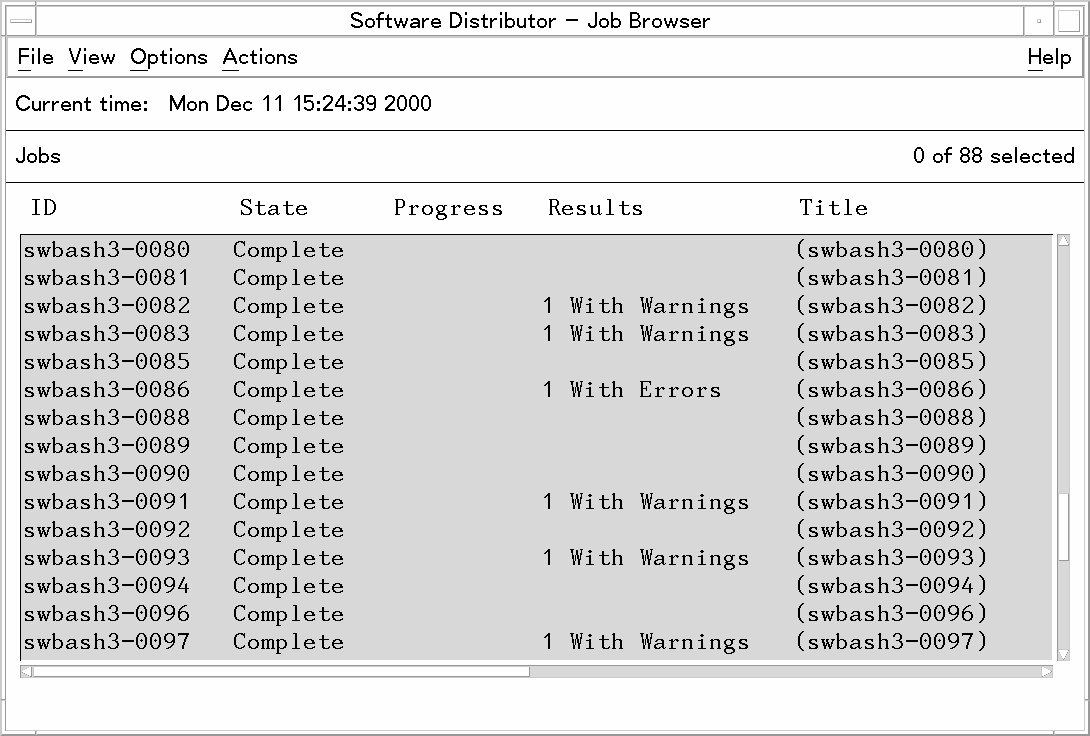
The window is divided into three parts:

  • Menu bar, which contains most of the standard SD-UX menus discussed in “Using the GUI and TUI Commands”. Menu items specific to the Job Browser are discussed later in this chapter.

  • Message area, which displays the current time.

  • Jobs List, which displays job icons (the default) representing each job. Under the icon is the job title. To select a job, click on the icon. See “Job Browser Icons”.

NOTE: Until a job is created, the Jobs List is empty.

Job Browser Icons

  • A clock indicates that the job is scheduled but hasn’t run yet.

  • A check mark indicates that a job has completed.

  • A ruler indicates that the job is active.

  • A red background indicates that the job contained errors.

  • A yellow background indicates that the job contained warnings.

Figure 6-2 Copy Icon

Copy Icon

This icon represents a copy job (depot to depot). A check mark indicates that the job has completed.

Figure 6-3 Active Install Job Icon

Active Install Job Icon

This icon represents an install job. The ruler on the side indicates that the job is active.

Figure 6-4 Scheduled Install Job Icon

Scheduled Install Job Icon

This icon represents an install job that is scheduled for a later time. The clock face indicates that it is a scheduled job.

Figure 6-5 Install Job with Warnings Icon

Install Job with Warnings Icon

This icon represents an install job that completed, but contained warnings. The background around the icon is yellow.

Figure 6-6 Install Job with Errors Icon

Install Job with Errors Icon

This icon represents an install job that completed, but contained errors. The background around the icon is red.

Figure 6-7 Scheduled Remove Installed Software Job Icon

Scheduled Remove Installed Software Job Icon

This icon represents a scheduled remove job on installed software.

Figure 6-8 Scheduled Remove Depot Software Job Icon

Scheduled Remove Depot Software Job Icon

This icon represents a scheduled remove job on software contained in a depot.

Figure 6-9 Verify Job Icon

Verify Job Icon

This icon represents a verify job (represented by a magnifying glass) that completed, but contained errors. The background around the icon is red.

The File Menu

The File menu has the following options:

Search

Performs text searches for job IDs or titles.

Print

Lets you print the jobs list.

Exit

Exits the Job Browser

Printing the Jobs List

This option prints the Jobs List to a specified printer or saves it to a file. (The Jobs List can only be printed if it is listed by properties—see “The View Menu ”.) If the Jobs List is displayed by name and icon (the default), this menu item is greyed-out and cannot be chosen. To print the Jobs List:

  1. Select ViewBy Properties.

  2. Choose FilePrint.... The Print Objects dialog is displayed.

  3. Supply any necessary information in the Print Objects dialog and select OK.

The View Menu

The View menu lets you change the way information is presented in the Job Browser. The standard choices on this menu (Columns..., Filter... , Sort... and Save View as Default) match those described in “Changing Software Views—The View Menu”. Note, however, that the Columns... choice is only valid for View→By Properties (discussed below).

Figure 6-10 Jobs Displayed by Properties

Jobs Displayed by Properties

Viewing By Name and Icon

  • Choosing ViewBy Name and Icon displays the jobs list in name and icon format.

  • This menu item and the View→By Properties menu choice operate as radio buttons. When one is chosen, the other is un-chosen.

Viewing By Properties

  • Choosing View→By Properties displays the jobs list by properties (job title, ID, type of operation, scheduled date, status, progress, results, and date of last update).

  • Any modifications made in the ViewColumns..., ViewFilter..., or ViewSort... menu selections affect how the property list is displayed.

  • This menu item and the By Name and Icon menu choice operate as radio buttons. When one is chosen, the other is un-chosen.

  • You can print the job list from this view by choosing FilePrint....

The Options Menu

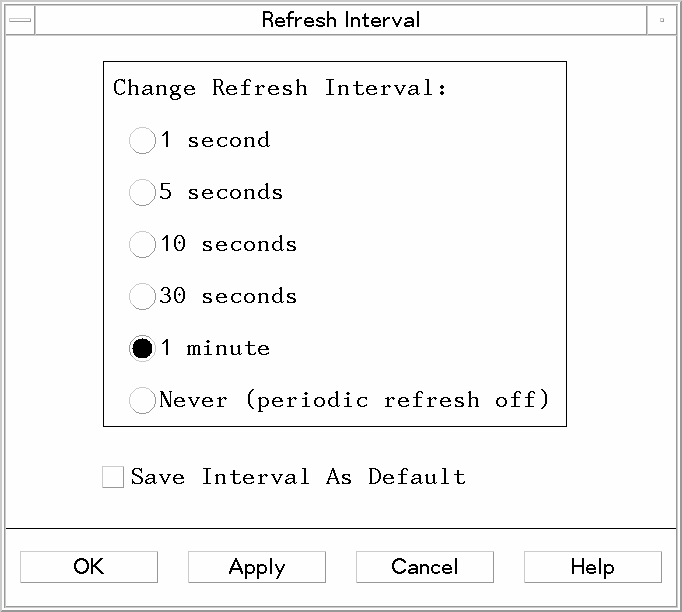
The Options menu allows you to control the optional behavior of the Job Browser.

Changing the Refresh Interval

By default, the Jobs List is refreshed every minute. You may want the list updated more frequently if you are monitoring a lot of jobs. Or, you can turn off the automatic refresh feature to improve performance.

To change how often the list is updated:

  1. Choose OptionsChange Refresh Interval.... The Refresh Interval dialog is displayed.

  2. Select a new refresh interval from the list.

Figure 6-11 Refresh Interval Dialog

Refresh Interval Dialog
  • Apply immediately applies the interval you have selected.

  • Save Interval as Default sets the selected refresh interval as the default for future sessions.

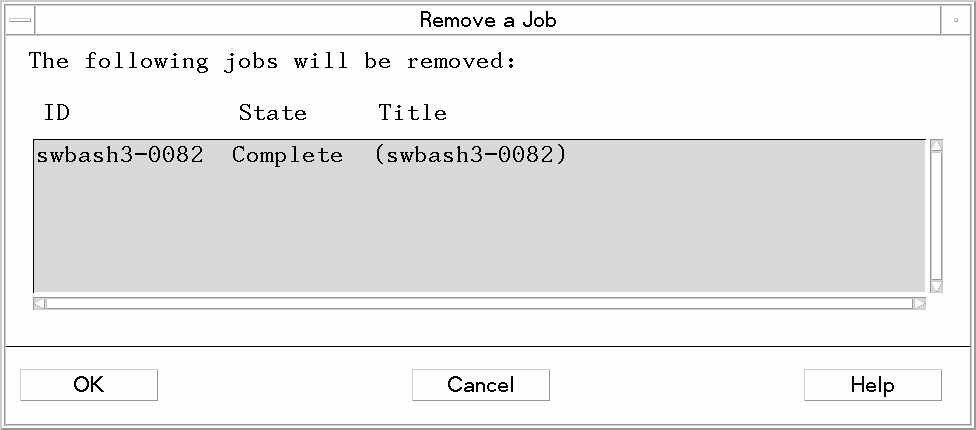
To change the refresh interval for the SD-UX daemon, see “Managing and Tuning Jobs with Command Options”.

Refreshing the Jobs List

To immediately update the Jobs List, choose OptionsRefresh List.

The Actions Menu

Items in the Actions menu let you perform job creation and management tasks. If you have selected a job, the actions available apply specifically to that job. If you do not have a job selected, the only action available is job creation.

Shortcuts

To display a pop-up menu of job-specific actions, right-click on a job icon, then left-click. This displays a pop-up Actions menu items. Choose an action by clicking with either mouse button.

Double clicking on a job displays the Job Results dialog (same as ActionsShow Job Results....)

Creating a Job

To create a job, choose ActionsCreate Job. This brings up a submenu with the following choices that start different sessions:

Table 6-2 Job Actions Options

Job Actions & Selections
Install Software...swinstall session.
Remove Installed Software...swremove session.
Copy Software to a Depot...swcopy session.
Remove Software from a Depot...swremove -d session.


Showing Job Results

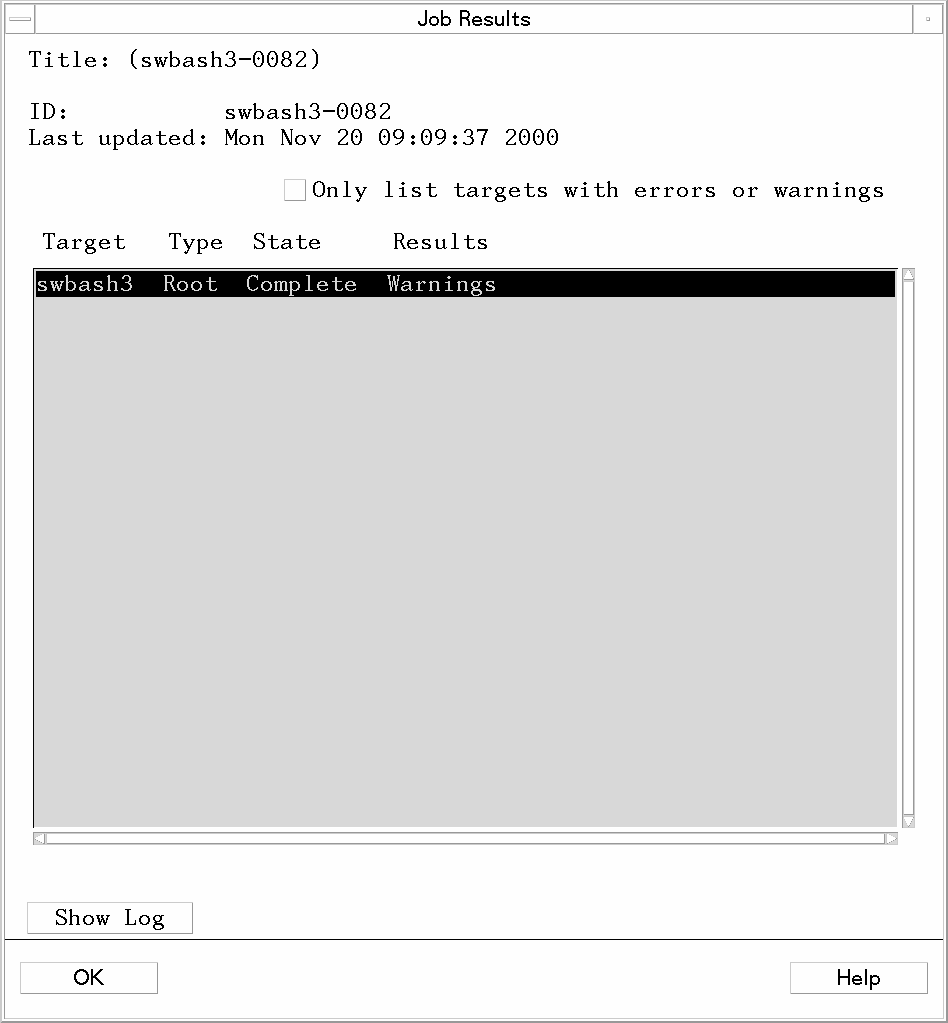
Selecting Actions→Show Job Results... displays the Job Results dialog, which lists results for the job selected. (You can also reach this dialog by double-clicking a Job Browser icon.)

  • The object list shows the list of targets for the job, their type, and job status.

  • TheShow only warnings or errors toggle button changes the information displayed to show all targets or to show only the list of targets with warnings or errors in the job.

  • Select the Show Log button or double-click on a target in the object list opens the log for that target.

  • Select OK to return to the Job Browser. (Closing the dialog does not stop the jobs displayed if they are active.)

Figure 6-12 Job Results Dialog

Job Results Dialog
NOTE: For performance reasons, a maximum of 250 targets are listed at once. If there are more then 250 targets for the job, Next and Previous buttons appear to let you view groups of 250 targets. Showing only warnings or errors can reduce the number of targets displayed.

Showing Job Descriptions

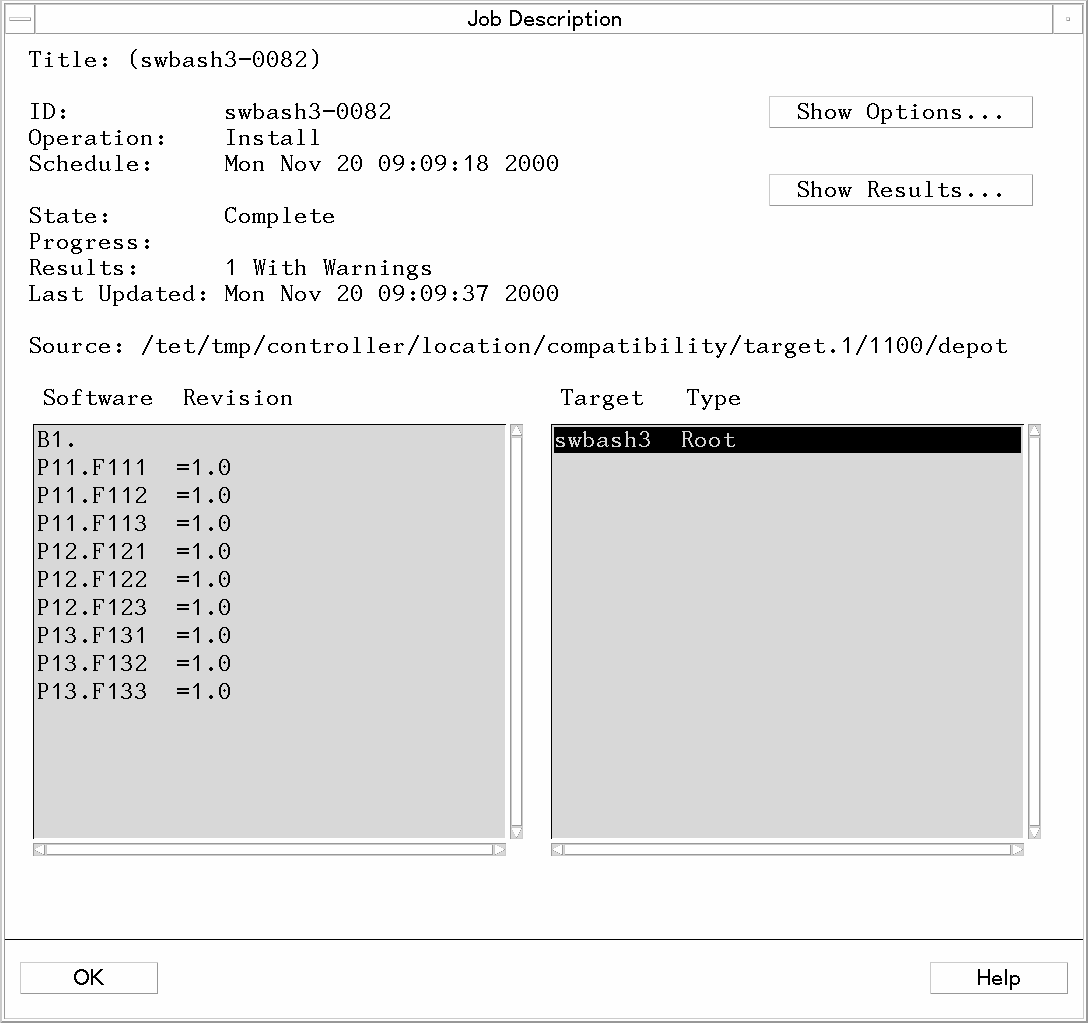
Selecting Actions→Show Job Description... opens the Job Description dialog, which contains all the information specified when the job was created, including:

  • All job attributes (ID, type of operation, scheduling, current state, results, when last updated, source)

  • Name and revision of the software

  • Targets involved and target type:

    • primary root

    • alternate root

    • depot

Figure 6-13 Show Job Description

Show Job Description
  • Selecting Show Options... displays the Job Options dialog. This lets you see the options used to create this job.

  • Selecting Show Results... displays the Job Results dialog, which shows the latest status information on the job.

  • Select OK in the Job Description dialog to return to the Job Browser. You can display the same information by double clicking on a job.

Showing Job Logs

Selecting Actions→Show Job Log... displays the Job Log dialog, which displays the controller (summary) log of a selected job. Buttons let you refresh or print the log file. Select OK to return to the Job Browser. (This menu item is greyed-out if the selected job is not active or completed.)

Copying Jobs

Copying a job consists of making the target and software selections available to a new session of swinstall, swcopy, or swremove. The new session is invoked automatically, using the same hosts, sources, software and target selections from the selected job. You can then re-use the same settings or make changes as needed.

This feature gives you the same advantages as using a session file in swinstall, swremove, or swcopy session. This can help you:

  • Distribute the same software to a new set of targets

  • Distribute new software to a previously defined set of targets

  • Change a job from preview to full execution

To copy a job:

  1. Select the desired job icon or listing in the job list.

  2. Choose ActionsCreate Job from Selected Job....

    The SD-UX program that matches the original job is automatically invoked. (For example, an installation job invokes swinstall.)

    • The Target Selection window displays the previously specified targets.

    • The Software Selection window displays the list of previously specified software.

  3. Execute the program with the copied settings, or change the settings before execution.

Removing a Job

The Actions→ Remove a Job... menu choice lets you remove the currently selected jobs from the Jobs List. (To select more than one job, hold down the CTRL key while selecting jobs in the Job Browser window.) The Remove a Job dialog displays, listing information about the selected jobs.

Figure 6-14 Remove a Job dialog

Remove a Job dialog
  • If you remove a scheduled job that has not yet run, the job is never run.

  • You cannot remove a job that is in progress.

Printable version
Privacy statement Using this site means you accept its terms Feedback to webmaster
© 1997, 2000-2003, 2006, 2007, 2008 Hewlett-Packard Development Company, L.P.