|
» |
|
|
|
| | | |  | NOTE: All of the procedures that follow require you
to be the root user on the system you are modifying. | | | | |
Adding a Disk to a Volume Group | |
For detailed information and instructions on adding a
disk, see Configuring HP-UX for Peripherals. What follows is a quick reference; we’ll be using HP SMH. Shut
down and power off the system. See “Shutting Down Systems”. Connect
the disk to the system and the power supply. Power
up the disk. Boot
the system. See “Booting Systems”. Access
the HP SMH Homepage: Select Tools, Disks and File Systems, Disks. The new disk to be added should be present in the
list of devices and display “unused” in the Use column.
The disk can be added to an existing volume group or added to a new
volume group. To add an unused disk to a
new volume group, click on the Volume Groups tab.
This will display existing volume groups. Click on the Create
VG... action on the right side of the page. Enter a name
for the new volume group. Click on Select Unused Disk(s)... This will display a list of unused disks available for assignment.
Select the desired disks. Click on Select. Configure
any desired options. Click on Create. To add the disk to an existing volume group, the
disk must be labeled as “unused”. Click on the Volume Groups tab. This will display the existing volume
groups. Select the target volume group from the displayed list. Click
on the Extend VG... action on the right side of the
page. Click on Select Unused Disk(s), select the desired disk and click on Select. Configure
the desired options and click on Extend. You can use HP SMH to configure the disk as LVM
disks, with or without disk mirroring if you so decide (see HP-UX System Administrator’s Guide: Logical Volume Management). If the driver for this disk is not already configured
into the kernel, you can use HP SMH to configure it. In this case,
a reboot might be required before you can use the disk. To export the volume group to other systems in
the workgroup, click on the Volume Groups tab and
select Export VG... from the list of actions on the
right side of the page. Select the desired option and click onExport. See HP-UX System Administrator’s
Guide: Logical Volume Management) for more information.
Adding a Logical Volume | |
For a detailed discussion of LVM (Logical
Volume Manager) see HP-UX System Administrator’s
Guide: Logical Volume Management. The following is a quick
reference using HP SMH. | | | | | NOTE: To configure a logical volume with disk striping,
you must have more than one physical volume in the volume group. The
option to stripe logical volumes is hidden in SMH if this is not true
(see “Setting Up Disk Striping” in the HP-UX
SystemAdministrator’s Guide: Logical Volume Management). | | | | |
Decide
how much disk space the logical volume will need. For example, you might want to add 200MB of swap, or
you might be adding a new project that you expect to grow to 500MB. Access
the HP SMH Homepage: Find
a volume group that has as much free space as you need. Select Tools, Disks and File
Systems, File Systems. Click on the Volume Groups tab. This will display a list of volume groups
and the free space for each. You might see, for example, that volume group vg01 has 600MB of free (unallocated) space. Identify
a volume group with sufficient free space for your new Logical Volume. Click
on the Logical Volumes tab. Select Create
LV... from the list of actions on the right side of the page. Select
the volume group you’ve identified to provide the space for
the Logical Volume. Enter a name, size and other configuration information
for the new Logical Volume. Click on Create. For
example, you might create a logical volume namedlvol7, occupying 500MB.
To share the new file system(s) with other systems
in the workgroup, go to Tools►Network Services Configuration►Network
File Systems page in the HP System Management Homepage, select
the Share/Unshare File Systems (Export FS) item and
use the following page to define which local file systems are shared
to which external systems. See HP-UX System Administrator’s
Guide: Logical Volume Management. As a result of all this, HP SMH creates a new
logical volume and mounts it on a new file system, for example, /dev/vg01/lvol7 mounted on /work/project5. Creating a File System | |
You can create a new file system from a Logical
Volume using HP SMH. Access
the HP SMH Homepage. Select Tools, Disks and File Systems, Logical Volumes. Click on the desired Add File System actions on the right side of the page, Add HFS... for example. Enter
a Mount Point and click Select Unused LV... A list
of available Logical Volumes will be displayed. Select
the desired Logical Volume. Click Select. You will
be returned to the Add File System page. Select
the desired File System attributes and Mount Options. Click Add file system.
Adding a Logical Volume with Mirroring | |
For detailed discussion of mirroring see HP-UX
System Administrator’s Guide: Logical Volume Management. The following example uses HP SMH. Decide
how many mirror copies you want. For the
purposes of this example, we’ll assume you want one mirror;
that is, you’ll be keeping two copies of the data online, the
original and a mirror copy. Decide
how much disk space the logical volume will need. For example, you might be adding a new project that
you expect to grow to 500MB. In this case you need a volume with at
least 1000MB of free space, 500MB for the original and 500MB for the
mirror copy. Access
the HP SMH Homepage. Select Tools, Disks and File Systems, Volume Group. Select a volume group that has as much free
space as you need. If you will be using strict mirroring (which HP recommends)
the volume group needs to contain a logical volume that has at least
500MB on each of two disks; strict mirroring ensures that the mirror
copy is on a separate disk from the original data. Look in the Free column; the numbers listed here represent the disk space in each
volume group that is not currently allocated to any logical volume. You might see, for example, that volume group vg01 has 1800 MB of unallocated space out of a total of
about 2500 MB, and you might also see in the Detailed view at the
bottom of the page thatvg01 is spread
across two disks. In this case it’s likely that each disk has
500 MB free. Click
on the Logical Volumes tab at the top of the page.
Select the Logical Volume to be mirrored and click on the Add Mirror(s)... action on the right side of the page. The Add Mirror(s) page is displayed. Enter
the number of mirrored data images desired (in this example one),
and desired options. You can place the mirrored Logical Volume on
a different physical drive by clicking on Select PV(s)... This will display available drives. Click Add. If
there is only one physical volume available you may need to change
the Allocation Policy setting for the Logical
Volume to Non-Strict. The setting can be changed
by selecting the Logical Volume to be mirrored from the list on the
Logical Volumes page and clicking on the Modify LV...action on the right side of the page. HP
SMH will create a logical volume that occupies 500 megabytes on each
Logical Volume (the original data and a mirror copy). The Mirrors
column of the Logical Volumes page should now show “1”
for the selected Logical Volume.
Extending a Logical Volume | |
For detailed discussion of
LVM (Logical Volume Manager) see HP-UX System Administrator’s
Guide: Logical Volume Management. The following example
uses HP SMH. Decide
how much more disk space the logical volume will need. For example, you might want to add 200 MB of swap, or
an existing project might need an additional 1000 MB. Make
sure no one has files open in any file system mounted to this logical
volume and that it is no one’s current working directory, for
example: fuser -cu /work/project5 | | | | | NOTE: If the file system is shared with other systems (exported),
use the fuser command to check on the systems it
is shared with to verify that no one is using it. Then unmount it
on those systems before unmounting it on the server. | | | | |
Unmount
the file system; for example: umount
/work/project5 Access
the HP SMH Homepage. Select Tools, Disks and File Systems, Logical Volumes. The Logical Volumes page will be displayed. Select
the logical volume you want to extend and click on the Extend
LV... action on the right side of the page. The Extend LV
page will be displayed. Check
to make sure that the Available Space in VG is sufficient for the desired increase. Enter the new total space
in the New Size field. Click on Extend. When the process is completed click on Back to
return to the Logical Volumes page. Note that the size of the selected
Logical Volume has been increased. Remount
the file system; for example: mount /dev/vg01/lvol5 /work/project5 If /work/project5 will continue to be used by NFS clients,
share it again on the server: (shareall -F nfs /work/project5) and remount it on the clients: mount -F nfs serversys: /work/project5
/work/localproject5
Extending a Logical Volume When You Can’t Use HP SMH | |
Before
you can extend a logical volume, you must unmount the file system
mounted to it. In the case of system directories, such as /var and /usr, you will need to be
in single-user mode to do this. In the example that follows, we’ll extend /usr, which means you aren’t able to use HP SMH,
because it resides in /usr/sbin. If you are trying to update the system to a new
HP-UX release, and have seen the following error message in swinstall: ERROR: The used disk space on filesystem "/usr" is estimated to
increase by 57977 Kbytes.
This operation will exceed the minimum free space
for this volume. You should free up at least 10854
Kbytes to avoid installing beyond this threshold of
available user disk space. |
In this example, you need to extend the /usr volume by 10 MB, which actually needs to be rounded
up to 12 MB. Log
in as root Find
out if any space is available: /sbin/vgdisplay You’ll see output something like this: - Volume groups -
VG Name /dev/vg00
VG Write Access read/write
VG Status available
Max LV 255
Cur LV 8
Open LV 8
Max PV 16
Cur PV 1
Act PV 1
Max PE per PV 2000
VGDA 2
PE Size (Mbytes) 4
Total PE 249
Alloc PE 170
Free PE 79
Total PVG 0 |
The Free PEentry
indicates the number of 4 MB extents available, in this case, 79 (316
MB) Change
to single-user state: /sbin/shutdown This will allow /usr to be
unmounted (see below). Check
to see where /usr is mounted (/dev/vg00/lvol7 by default): /sbin/mount You’ll see output such as:
/ on /dev/vg00/lvol1 defaults on Sat Jun 30 23:19:19 2007
/usr on /dev/vg00/lvol7 defaults on Wed Jun 27 23:19:28 2007 |
Extend
the logical volume: /sbin/lvextend -L new_size /dev/vg00/lvol7 For example, /sbin/lvextend -L 332 /dev/vg00/lvol7 increases the size of this volume to 332 MB. Unmount /usr: /sbin/umount
/usr This is required for the next step, since extendfs can only work on unmounted volumes. Extend
the file system size to the logical volume size; for example: /sbin/extendfs /dev/vg00/rlvol7 Remount /usr: /sbin/mount
/usr Reboot
the system: /sbin/reboot
-r
Reducing a Logical Volume | |
Here are several examples showing how to reduce the size
of logical volumes containing mounted file systems. The specific procedure
to do this varies depending on the type of file system you are working
with. | | | | | NOTE: Though the examples presented here are based
on manual commands, the HP System Management Homepage can do many
of the steps in this procedure for you. | | | | |
Example: Reducing the size of a logical volume containing a
VxFS file systemProcedure summary: Make sure no one is actively
using the file system during the procedure Backup the data (for safety) Use fsadm to reduce the size of the file system so that when you reduce the
size of the surrounding logical volume, none of the file system structures
or data are truncated Use lvreduce to reduce the size of the surrounding logical volume Verify and (only if necessary)
restore any lost data to the newly resized logical volume
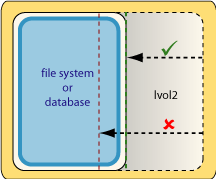
To reduce the size of the logical volume/dev/vg01/lvol2 containing a VxFS file system currently
mounted to the directory /work/project5 where
the new (smaller) size of the logical volume is to be 500MB: Make sure no one has files open in any file system on
the logical volume and that no one’s current working directory
is contained within the file system: | | | | | NOTE: If the file system is shared with other systems,
check on those other systems that no one is using it (fuser works on NFS-mounted file systems as well as local ones). Then unmount
it from the remote client systems before unmounting it from the server. | | | | |
Back up the data in the
file system: Using a utility
like tar or pax, backup the
data contained in the logical volume you are about to reduce. If your
logical volume contains a database, use a backup method appropriate
for that database. In this example, to back up /work/project5 to a tape device: cd /work/project5
pax -w -f /dev/rtape/tape4QIC150 .
|
Or, copy the contents of the file system to a
temporary location not within the logical volume you are attempting
to reduce: pax -rw /work/project5 /somewhere_else/project5
|
You can use a different backup utility or application
but, however you do it, protect your data in
case they are damaged by the logical volume reduction! Before shrinking the size of the logical volume (the container), ensure that the file system (the contents) will fit in the new smaller size. Use the fsadm command with
the -b option to reduce the size of a VxFS file system
so that it will fit inside the-smaller logical volume. As fsadm reduces the size of the file system, it moves any
data that reside in disk space being released so that all file system
data reside in the disk space that will remain part of the file system
after the reduction. This also ensures that you can safely reduce
the size of the surrounding logical volume without truncating important
file system structures. Though you should have made a backup of your data
in the previous step for safety, fsadm usually
eliminates the need to use that backup to restore lost data.[2] In this example: fsadm -b 512000 /work/project5 |
| | | | | NOTE: For VxFS file systems, the fsadm command uses DEV_BSIZE-byte sectors as the
units for the -b option. In this example (and probably
on your system)[3], DEV_BSIZE=1024. Therefore, -b 512000 represents 500MB in the above
command. | | | | |
Determine
the new size for the logical volume, based on the new (smaller) size
of the file system. If the logical volume
contains a file system (as in this example), the new size of the logical
volume should be at least as large as the file system that it will
contain. To determine the current size of a file system, use the bdf command. bdf will show you the size
of all mounted volumes (in kilobytes). The kbytes column of bdf's output shows the space currently
allocated to each file system. #bdf
Filesystem kbytes used avail %used Mounted on
/dev/vg00/lvol3 1048576 310784 732088 30% /
/dev/vg00/lvol1 1835008 150288 1671656 8% /stand
/dev/vg00/lvol8 4587520 603288 3956664 13% /var
/dev/vg00/lvol7 4423680 2976080 1436312 67% /usr
/dev/vg00/lvol4 524288 72672 448096 14% /tmp
/dev/vg00/lvol6 7274496 4211304 3039272 58% /opt
/dev/vg00/lvol5 114688 5792 108056 5% /home
/dev/vg01/lvol2 512499 49142 412107 11% /work/project5
# |
Unmount the file system. lvreduce will not reduce the size of a logical volume containing
a mounted file system. umount /work/project5 Reduce
the size of the logical volume: lvreduce -L 500 /dev/vg01/lvol2 This reduces the logical volume/dev/vg01/lvol2 to 500MB. Mount
the file system: mount
/dev/vg01/lvol2 /work/project5 This mounts the file system back to the directory
where it was previously mounted. | | | | | NOTE: If the reason you are reducing the size of the
logical volume is to use it for a different purpose, you might want
to mount it to a different directory. This is fine. | | | | |
Verify
that the data (if any) contained in the newly resized and remounted
file system has not been damaged. If necessary restore any damaged
data (or to be safe, the entire file system) from the backup you previously
made. For example: cd /somewhere_else
pax -rw . /work/project5 |
recovers the files from the alternate location somewhere_else, created using the second pax command in Step 2. If /work/project5 was previously, and will continue to be,
used by NFS clients, re-share it from the server: share -F nfs /work/project5 and remount it on the clients: mount -F nfs serversys:/work/project5
/work/localproject5
Example: Reducing the size of a logical volume containing an
HFS file systemHFS file systems cannot be manipulated while mounted
an online to the extent that VxFS file systems can. Therefore, the
procedure to reduce a logical volume that contains a mounted HFS file
system is a bit different than the previous example. If the file system mounted to /work/project5 is an HFS file system (and if the size of that file system needs
to be reduced to accommodate the pending reduction of its surrounding
logical volume) you need to remove the existing file system and make
a new (smaller) file system in its place: Procedure summary: Make sure no one is actively
using the file system during the procedure Backup the data (for later
restoration) Use lvreduce to reduce the size of the surrounding logical volume Use newfs to make a new HFS file system on the newly resized logical volume Mount the new file system Restore the data from
the backup you previously made
To reduce the size of the logical volume/dev/vg01/lvol2 containing an HFS file system that is
currently mounted to the directory /work/project5 where the new (smaller) size of the logical volume is to be 500MB: Make sure no one has files open in any file system on
the logical volume and that no one’s current working directory
is contained within the file system: | | | | | NOTE: If the file system is shared with other systems,
check on those other systems that no one is using it (fuser works on NFS-mounted file systems as well as local ones). Then unmount
it from the remote client systems before unmounting it from the server. | | | | |
Back up the data in the file system: Using a utility like tar or pax, backup the data contained in the logical
volume you are about to reduce. If your logical volume contains a
database, use a backup method appropriate for that database. In this
example, to back up /work/project5 to a tape
device: cd /work/project5
pax -w -f /dev/rtape/tape4QIC150 .
|
Or, copy the contents of the file system to a
temporary location not within the logical volume you are attempting
to reduce: pax -rw /work/project5 /somewhere_else/project5
|
| | | |  | IMPORTANT: However you do it, backup your data! You will need to restore the data from this
backup later in this procedure! | | | | |
Unlike
with VxFS file systems, you cannot use the -b option
to the fsadm command to reduce the size of an HFS
file system. Instead, unmount the HFS file system: Reduce
the size of the logical volume: lvreduce -L 500 /dev/vg01/lvol2 This reduces the logical volume/dev/vg01/lvol2 to 500MB. It also probably destroyed the integrity of the previously
existing file system by truncating a portion of its data and file
system structures. This is why you made the backup in Step 2. Use newfs to make a fresh file system structure on the newly reduced logical
volume: |
# newfs -F hfs /dev/vg01/rlvol2
mkfs (hfs): Warning - 208 sector(s) in the last cylinder are not allocated.
mkfs (hfs): /dev/vg01/rlvol2 - 524288 sectors in 1561 cylinders of 12 tracks, 28 secs
536.9Mb in 98 cyl groups (16 c/g, 5.51Mb/g, 832 i/g)
Super block backups (for fsck -b) at:
    16,   5424,  10832,  16240,  21648,  27056,  32464,  37872,  43280,  48688,
 54096,  59504,  64912,  70320,  75728,  81136,  86032,  91440,  96848, 102256,
107664, 113072, 118480, 123888, 129296, 134704, 140112, 145520, 150928, 156336,
161744, 167152, 172048, 177456, 182864, 188272, 193680, 199088, 204496, 209904,
215312, 220720, 226128, 231536, 236944, 242352, 247760, 253168, 258064, 263472,
268880, 274288, 279696, 285104, 290512, 295920, 301328, 306736, 312144, 317552,
322960, 328368, 333776, 339184, 344080, 349488, 354896, 360304, 365712, 371120,
376528, 381936, 387344, 392752, 398160, 403568, 408976, 414384, 419792, 425200,
430096, 435504, 440912, 446320, 451728, 457136, 462544, 467952, 473360, 478768,
484176, 489584, 494992, 500400, 505808, 511216, 516112, 521520
# |
|
Mount
the new (smaller) file system: mount /dev/vg01/lvol2 /work/project5 This mounts the file system back to the directory
where it was previously mounted. | | | | | NOTE: If the reason you are reducing the size of the
logical volume is to use it for a different purpose, you might want
to mount it to a different directory. This is fine. | | | | |
If
necessary restore the data from the backup you made in Step 2.. For example: cd /somewhere_else
pax -rw . /work/project5 |
recovers the files from the alternate location somewhere_else, created using the second pax command in Step 2. If /work/project5 was previously, and will continue to be,
used by NFS clients, reshare it from the server: share -F nfs /work/project5 and remount it on the clients: mount -F nfs serversys:/work/project5
/work/localproject5
Removing a Logical Volume | |
In this example we’ll assume you want to remove
a logical volume that is either unused or contains obsolete data.
The following example uses HP SMH. | | | |  | CAUTION: Removing a logical volume will destroy the contents
of any file system it contains. | | | | |
Access
the HP SMH Homepage. Select Tools, Disks and File Systems, Logical Volumes. The Logical Volumes page will be displayed. Select
the logical volume you want to remove and click on the Remove LV... action on the right side of the page. The Remove Logical Volume
page will be displayed. Click Remove.
You can now use this space to extend an existing
logical volume, or to build a new logical volume. Adding a Mirror for an Existing Logical Volume Using Non-strict
Mirroring | |
For detailed discussion of mirroring
see “Creating and Modifying Mirrored Logical Volumes”
in the HP-UX System Administrator’s Guide: Logical
Volume Management. The following example uses HP SMH. Decide
how many mirror copies you want. For the purposes of this example,
we’ll assume you want one mirror and the size of the logical
volume is 500MB. There will be two copies of the data, the original
and a mirror copy. Access
the HP SMH Homepage. Select Tools, Disks and File Systems, Volume Groups. A list of volume groups will be displayed. Select
the volume group containing the logical volume you wish to mirror.
This will display a list of the logical volumes making up the volume
group at the bottom of the page along with free space in the volume
group. Look in the Free column of the volume group that you selected. Make sure the volume
group has enough free space for the mirror. In this example, an additional
500 MB. If you want to use strict
mirroring (which HP recommends because it keeps the “mirror” data on a separate disk from the original data) refer
to the next example. Click
on the Logical Volumes tab at the top of the page.
This will display the logical volumes. Select
the logical volume you want to mirror. This will display the logical
volume actions. Click
on the Add Mirror(s)... action on the right side
of the page. The Add Mirror(s) page is displayed. Enter
the number of mirrored data images desired (in this example one),
and desired options. Since you are using non-strict mirroring you
can let the HP SMH select the location for the mirror data. You can
place the mirrored Logical Volume on a different physical drive by
clicking on Select PV(s)... This will display available
drives. Click Add. If
there is only one physical volume available you may need to change
the Allocation Policy setting for the logical
volume to Non-Strict. The setting can be changed
by selecting the logical volume to be mirrored from the list on the Logical Volumes page and clicking on the Modify
LV...action on the right side of the page. HP SMH will create a logical volume that occupies 500
megabytes on each logical volume (the original data and a mirror copy).
The Mirrors column of the Logical Volumes page should now show “1” for the selected logical
volume.
Adding a Mirror to an Existing Logical Volume Using Strict
Mirroring | |
For detailed discussion of mirroring
and allocation policies see “Creating and Modifying Mirrored
Logical Volumes” in the HP-UX System Administrator’s
Guide: Logical Volume Management. The following example
uses HP SMH. HP recommends that you use strict mirroring because it keeps the “mirror” data on a separate disk from the original data. This free space
must be on a disk or disks not currently used by the file system you
want to mirror. If you enable the “enforce strict mirroring
“ feature, a mirror copy will not be created unless this condition
can be met. Mirroring allocation policy can be set during
the logical volume creation process or by modifying the allocation
setting of an existing logical volume. Decide
how many mirror copies you want. For the purposes of this example,
we’ll assume you want one mirror and the size of the volume
is 500MB. There will be two copies of the data, the original and a
mirror copy. Access
the HP SMH Homepage. Select Tools, Disks and File Systems, Logical Volumes. A list of logical volumes will be displayed. Select
the logical volume you want to mirror. This will display detailed
information about the selected logical volume at the bottom of the
page. Make sure the Properties tab of the Detailed View display is selected. Check to see that the Allocation State is set to the desired strict selection. Enter
the number of mirrored data images desired (in this example one),
and desired options. Since you are using strict mirroring you can
let the HP SMH select the location for the mirror data. You can place
the mirrored Logical Volume on a different physical drive by clicking
on Select PV(s)... This will display available drives. Click Add. If
you need to change the allocation setting, click on the Modify
LV ... action on the right side of the page, and select the
desired allocation policy. If
the allocation setting is correct, click on the Add Mirror(s)
... action on the right side of the page. This will display
the Add Mirror(s) page. Enter
the number of mirrors desired (in this example, one) and select whether
you want HP SMH to make the physical volume allocation or you want
to manually select the physical volume. If you want to select the
physical volume, click on the Select PV(s) button
to view available devices and make a manual selection. After making
a selection the Add Mirror(s) page is again displayed. Click
on the Add button. If all of the conditions specified
(additional disks, free memory, etc.) can be met, the new mirror will
be created. If not, the process will terminate with an error message.
Removing a Mirror from a Logical Volume | |
For detailed discussion of mirroring see HP-UX System Administrator’s Guide: Logical Volume Management. The following is a quick reference; we’ll be using HP SMH. Access
the HP SMH Homepage. Select Tools, Disks and File Systems, Logical Volumes. This will display a list of the logical
volumes. Select
the logical volume for which you want to remove one or more mirror
data images and click on the Remove Mirror(s)... action
on the right side of the page. This will display the Remove
Mirror(s) page. Enter
the new desired number of mirror images. If there is only one mirror
image, enter “ 0”. If there are
more than one mirror images and you are not deleting all of them you
can either select the ones to remove or have HP SMH select the images
to remove. Click Remove. If
the removal process is not successful, an error message will be displayed.
If the procedure was successful click on Done to return to the Logical Volumes page. Check to see that the count in the Mirrors column has been updated for the logical volume.
Replacing a Mirrored Disk in a Logical Volume | |
The following method uses pvchange to temporarily disable links to a disk. For an alternate approach
to replacing a mirror see HP-UX System Administrator’s
Guide: Logical Volume Management. Before
replacing the disk, minimize any potential loss of data due to its
removal; confirm that any mirrored logical volumes using the disk
are mirrored onto a separate disk and that those mirror copies are
current. You can find the list of logical volumes using the disk using pvdisplay: pvdisplay
-v /dev/dsk/cntndn For each of those logical volumes, you can use lvdisplay to check which logical extents are mapped onto
the disk, and if there’s a current copy of that data on another
disk: lvdisplay -v /dev/vol_group/lvoln | grep /dev/dsk/cntndn Back
up the volume group configuration: vgcfgbackup /dev/vol_group If
any of the logical volumes on the disk have a timeout assigned that
isn’t the default (zero), temporarily disable the timeout.
For each logical volume: lvchange
-t 0 /dev/vol_group/lvoln Temporarily
disable all paths to the disk: pvchange -a N /dev/dsk/cntndn Once the command completes, proceed to the next
step. Physically
disconnect the bad disk and connect the replacement. If
you are replacing a mirror of the boot disk, set up the boot area
on the disk. If
this is an HP Integrity Server, partition the disk using the idisk command, as described in HP-UX System
Administrator’s Guide: Logical Volume Management. You do not need to run insf or pvcreate, since you are replacing an existing physical volume. Use
the mkboot command to set up the boot area: mkboot /dev/rdsk/cntndn On HP Integrity Servers, use the -e and -l options to the mkboot command to copy EFI utilities to the EFI partition: mkboot -e -l /dev/rdsk/cntndn Update
the root volume group information: lvlnboot -R /dev/vg00
Restore
LVM configuration information to the added disk: vgcfgrestore -n /dev/vol_group /dev/rdsk/cntndn Reattach
each link to the physical volume using pvchange: pvchange -a y /dev/dsk/cntndn or reattach all the detached links in the volume
group using vgchange: vgchange -a y /dev/vol_group Once any links to the physical volume are reattached,
LVM will synchronize the data on the disk with other mirror copies
of the data. There is no need to manually synchronize the mirrors
using vgsync. If
any of the logical volumes on the disk had a non-default timeout assigned,
restore the previous timeout: lvchange -t value /dev/vol_group/lvoln
| | | | | NOTE: You can use the same procedure to replace a disk
that contains unmirrored logical volumes. However,
by removing the disk, you will permanently lose any unmirrored data
on that disk. Therefore, before starting this procedure, confirm that
you have a backup of any unmirrored logical volume, then halt any
applications using it, and unmount any file system mounted on it.
After replacing the disk and activating the volume group, do not use
those unmirrored logical volumes until you have recovered them from
backup. | | | | |
Moving a Directory to a Logical Volume on Another System | |
In this example we’ll
move a 500MB directory, /projects, from a system
(named wsb2600) that is using “whole-disk” access, to a new logical volume, /work/project6, on a file server. We will assume that the wsb2600 is sharing the directory with all the other systems. The system’s name is wsb2600; the file server is fp_server. Do this step on the original server, that is, the system you plan to move the directory from, wsb2600 in this example. Make sure that /work/project6 exists
and is empty on all the systems. That is, use: mkdir /work/project6 Find out how much space /projects takes up on wsb2600: du -s /projects/
887740 (about 430 MB) |
du reports the size of a directory
in 512-byte blocks; dividing by 2048 gives the size in megabytes. Do this step on the new server, that
is, the system you plan to move the directory to, fp_server in this example. Find a volume
group on fp_server with at least as much
space as /projects currently occupies on wsb2600. The HP SMH Volume Groups menu shows the free space for each volume group in megabytes; the pvdisplay command provides the same information in terms
of physical extents; multiply Free PE by four to get free space in megabytes. Do this step on the new server, that
is, the system you plan to move the directory to, fp_server in this example. After selecting
a volume group with sufficient space, create a new logical volume
in it. You can do this on the command line - for example, lvcreate -L 500 /dev/vg02 or you can use HP SMH. Choose the Now and On Boot boxes for when to mount
- choosing On Boot automatically
creates an entry in /etc/fstab. Do this step on each NFS client in the workgroup. Edit /etc/fstab (or /etc/checklist) to remove the NFS import of /projects from wsb2600 and replace it with an NFS import from fp_server (you must be superuser on each system). Find the line in /etc/fstab that looks something like this:
wsb2600:/projects /projects nfs rw,intr 0 0 |
and change it to something like this:
fp_server:/work/project6 /work/project6 nfs rw,intr 0 0 |
Do this step on each NFS client in the workgroup. Now all users must stop working in /projects and close all files under /projects. Do this step on each NFS client in the workgroup. When everyone is out of /projects, unmount /projects on each system; as superuser: umount /projects If the umount fails on any
system, run fuser -cu to see if anyone on that
system still has files open, or is working in a directory, under /projects: You can also force an unmount using umount
-f path. This will unmount file
systems even if they are in use. | | | | | NOTE: fuserwill not be aware of files
opened in other directories within an editor. | | | | |
Do this step on the original server, that is the system where the directory that is to be moved currently
resides, in this example, wsb2600. Back up /projects. For example, to back up /projects to the system default tape device: cd /projects tar cv . | | | | | NOTE: In this example, we are changing the file system’s
name, as well as moving it, so tar cv /projects is not the right way to back it up; specify
an absolute path name only if you want tar to recover
the data to that path name. | | | | |
Do this step on the new server, that
is, the system you are moving the directory to,fp_server in this example. Recover the
files onto fp_server; for example, cd /work/project6 tar xv This copies the entire contents of the tape in
the system default tape drive to /work/project6. Do this step on the new server, that
is, the system you are moving the directory to,fp_server in this example. Export the
directory; for example, by editing/etc/dfs/dfstab to include an entry for the file system. The entries are of the
form: share [-F fstype] {-o options] [-d
“text”] pathname For the file system in this example the entry
would be: share -F NFS -o anon=65534 -d “work directory” /work/project6 |
and running the shareall command
to force the system to reread /etc/dfs/dfstab: shareall -F nfs You can also use HP SMH to perform this task;
see HP-UX System Administrator’s Guide: Configuration
Management. | | | | | NOTE: If this system is not already sharing file systems,
you may need to configure it as an NFS server; check that /etc/rc.config.d/nfsconf has NFS_SERVER=1, or use HP SMH to verify that NFS SERVER is
enabled; see HP-UX System Administrator’s Guide:
Configuration Management. | | | | |
Do this step on each NFS client in the workgroup. Mount the imported file system:
Once everyone has verified that their files are
intact in their new location (/work/project6 in
this example), you can remove /projects from wsb2600, freeing the space for other uses. |