| United States-English |
|
|
|
HP-UX System Administrator's Guide: Logical Volume Management: HP-UX 11i Version 3 > Chapter 2 Configuring LVMSetting Up Different Types of Logical Volumes |
|
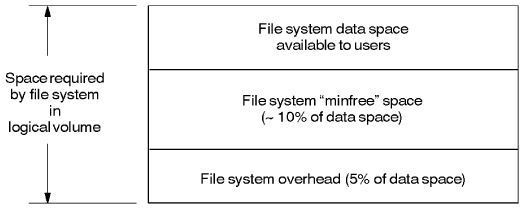
This section contains information on setting up special logical volumes. You can optimize raw I/O performance by planning your logical volumes specifically for raw data storage. To create a raw data logical volume (such as for a database), consider how large the logical volume must be and how such a logical volume is distributed over your disks. Typically, you specify the size of a logical volume in megabytes. However, a logical volume must be a multiple of the extent size used in the volume group. For example, if a database partition requires 2002 MB and the logical extent size is 4 MB, LVM creates a logical volume that is 2004 MB (or 501 logical extents). If you plan to use logical volumes heavily for raw data storage (such as for setting up database partitions), consider how the logical volumes are distributed over your disks. By default, LVM assigns disk space for a logical volume from one physical volume, uses the space on this physical volume entirely, then assigns space from each successive physical volume in the same manner. LVM uses the physical volumes in the order in which they appear in /etc/lvmtab and /etc/lvmtab_p, which means that data of a logical volume might not be evenly distributed over all the physical volumes within your volume group. As a result, when I/O access to the logical volumes occurs, one or more disks within the volume group might be heavily used, while the others might be lightly used, or not used at all. This arrangement does not provide optimum I/O performance. As a better alternative, you can set up your logical volume on specific disks in an interleaved manner, thus balancing the I/O access and optimizing performance (see “Extending a Logical Volume”). Because there are no HP-UX commands that identify that the contents of a logical volume are being used for raw data, create recognizable names for he logical volumes you create for raw data. In this way, you can recognize the contents of such a logical volume. File systems reside in a logical volume just as they do within disk partitions or nonpartitioned disks. Two types of file systems can be used in a logical volume: Hierarchical File Systems (HFS) and Journaled File Systems (JFS) (VxFS). Choosing the Initial Size of File System Logical VolumesWhen determining the required space for a file system, consider the three major components shown in Figure 2-1. To estimate how big to make a logical volume that will contain your file system, follow these steps:
For example, if a group of users will require 60 MB space for file system data, the following estimate allows for expected growth. Add 6 MB for the minfree space. Then add 3 MB for file system overhead for a total estimate of 69 MB required by the file system, and for the logical volume that contains the file system. If you are creating the logical volume in a volume group that has an extent size of 4 MB, round 69 to 72 to make it divisible by 4 MB. Although these estimates are not precise, they suffice for planning a file system size. Create your file system large enough to be useful for some time before increasing its size. Resizing File System Logical VolumesIf your users have outgrown the space originally allocated for the file system, you can increase its size by first enlarging the logical volume it resides in using the lvextend command, then using the extendfs command to enlarge the file system contained in the logical volume. Decreasing the size of a file system can be difficult. Based on the type of file system, you might not be able to decrease its size. However, you can create a new smaller file system to take its place. For more information on resizing file system logical volumes, see “Administering File System Logical Volumes”. Use the following guidelines when configuring file system logical volumes:
This section explains what to consider when using logical volumes as swap devices. For information on managing your system swap space, including determining how much and what type of swap space the system needs, see HP-UX System Administrator's Guide: Configuration Management. When configured as swap, logical volumes are treated as device swap space. Device swap space occupies a logical volume or partition, which is typically reserved expressly for swapping purposes. This space can also be configured as a dump area (See “Dump Logical Volume Guidelines”). Use the following guidelines when configuring swap logical volumes:
This section explains what to consider when using logical volumes as dump devices. A dump area is disk space used to write an image of the core memory after a system crash. The analysis of a core dump can be useful in troubleshooting and restoring the system to working order. By default, the primary swap device also serves as a dump area when no dump area is specifically designated. Although you are not required to retain primary swap as your dump area, doing so conserves disk space. You can configure a different or multiple dump devices on your system. To do this, create a logical volume as a dump device. This device can also be used for swap. For information on adding, removing, or modifying dump devices, and configuring the dump algorithms, see the HP-UX System Administrator's Guide: Configuration Management. |
||||||||||||||||||||||||||||||||||||||||||||||||||||||||||||||||||||||||||||||||||
|
|||||||||||||||